

Photo by Matt Kochar on Unsplash
本文同时发表在HACKERNOON
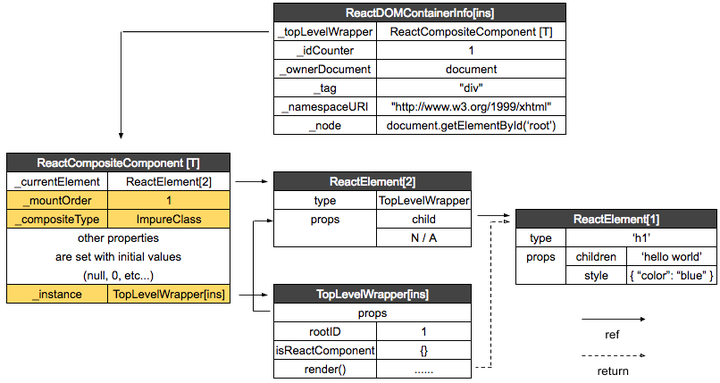
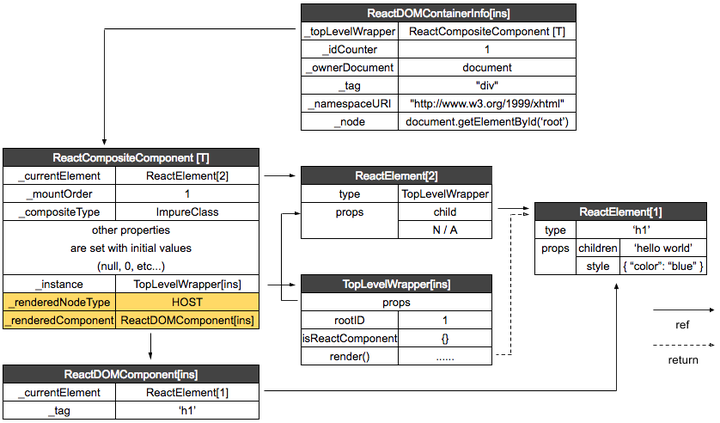
上次我们走完了平台无关的逻辑流程(表层)。简单来说,这个过程把ReactElement[1]封装进ReactCompositeComponent[T] 里面,然后再用它来派生出ReactDOMComponent[ins].
本篇我会继续讨论ReactDOMComponent[ins]是如何被用于创造一个可直接被渲染的HTML DOM,然后完成JSX-to-UI的闭环。
Files used in this article:
renderers/dom/shared/ReactDOMComponent.js: 创造 h1DOM element
renderers/dom/client/utils/DOMLazyTree.js: 将 h1 加入到 DOM 树中
renderers/dom/client/ReactMount.js: 上面两个操作会回到的交叉点
ReactDOMComponent.mountComponent()— 用document.createElement() 创造 DOM element
调到HTML DOM APIs了,说明到底了
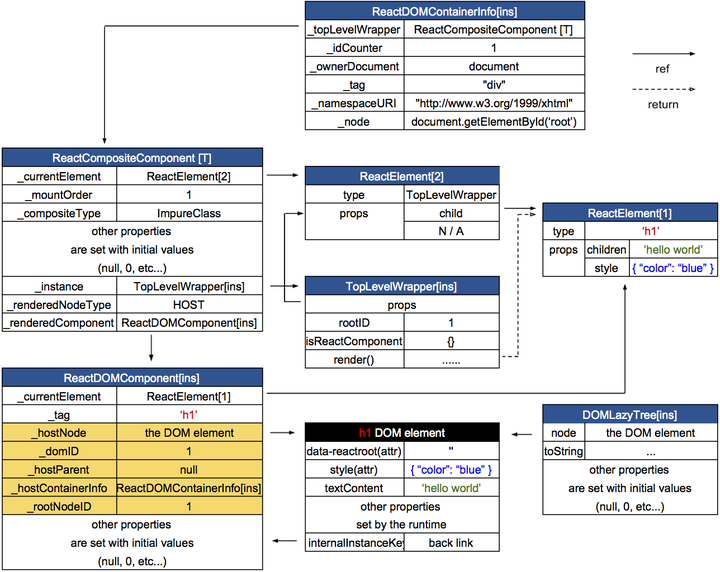
目标数据结构:
调用栈:
|=ReactMount.render(nextElement, container, callback)     ___
|=ReactMount._renderSubtreeIntoContainer()                 |
  |-ReactMount._renderNewRootComponent()                   |
    |-instantiateReactComponent()                          |
    |~batchedMountComponentIntoNode()                  upper half
      |~mountComponentIntoNode()                (platform agnostic)
        |-ReactReconciler.mountComponent()                 |
          |-ReactCompositeComponent.mountComponent()       |
          |-ReactCompositeComponent.performInitialMount()  |
            |-instantiateReactComponent()                 _|_
            /* we are here*/                               |
            |-ReactDOMComponent.mountComponent(        lower half
                transaction,                    (HTML DOM specific)
                hostParent,                                |
                hostContainerInfo,                         |
                context, (same)                            |
              )                                            |
ReactDOMComponent.mountComponent()比较长。所以我给数据结构图做了下染了色,这样各字段的来源能比较一目了然。接下来我们看一下实现细节:
mountComponent: function (
  transaction,       // scr: -----> not of interest
  hostParent,        // scr: -----> null
  hostContainerInfo, // scr: -----> ReactDOMContainerInfo[ins]
  context            // scr: -----> not of interest
) {
// scr: --------------------------------------------------------> 1)
  this._rootNodeID = globalIdCounter++;
  this._domID = hostContainerInfo._idCounter++;
  this._hostParent = hostParent;
  this._hostContainerInfo = hostContainerInfo;
 var props = this._currentElement.props;
 switch (this._tag) { // scr: ---> no condition is met here
...
  }
... // scr: -----> sanity check
// We create tags in the namespace of their parent container, except HTML
// tags get no namespace.
  var namespaceURI;
  var parentTag;
 if (hostParent != null) { // scr: -----> it is null
...
  } else if (hostContainerInfo._tag) {
    namespaceURI = hostContainerInfo._namespaceURI; // scr: -------> "http://www.w3.org/1999/xhtml"
    parentTag = hostContainerInfo._tag;        // scr: ------> "div"
  }
  if (namespaceURI == null ||
      namespaceURI === DOMNamespaces.svg &&
      parentTag === 'foreignobject'
  ) { // scr: -----> no
...
  }
 if (namespaceURI === DOMNamespaces.html) {
    if (this._tag === 'svg') {               // scr: -----> no
...
    } else if (this._tag === 'math') {       // scr: -----> no
...
    }
  }
 this._namespaceURI = namespaceURI;  // scr: ---------------------> "http://www.w3.org/1999/xhtml"
... // scr: ------> DEV code
 var mountImage;
 if (transaction.useCreateElement) { // scr: ---------------------> transaction related logic, we assume it is true
    var ownerDocument = hostContainerInfo._ownerDocument;
    var el;
   if (namespaceURI === DOMNamespaces.html) {
      if (this._tag === 'script') {         // scr: -----> no
...
      } else if (props.is) {                // scr: -----> no
...
      } else {
        // Separate else branch instead of using `props.is || undefined` above becuase of a Firefox bug.
        // See discussion in https://github.com/facebook/react/pull/6896
        // and discussion in https://bugzilla.mozilla.org/show_bug.cgi?id=1276240
// scr: --------------------------------------------------------> 2)
        // scr: ---------> HTML DOM API
        el = ownerDocument.createElement(this._currentElement.type);
      }
    } else { // scr: ------> no
...
    }
// scr: --------------------------------------------------------> 3)
    ReactDOMComponentTree.precacheNode(this, el); // scr: --------> doubly link (._hostNode & .internalInstanceKey)
    this._flags |= Flags.hasCachedChildNodes; // scr: ------------>
bit wise its flags
// scr: --------------------------------------------------------> 4)
    if (!this._hostParent) { // scr: ------> it is the root element
      DOMPropertyOperations.setAttributeForRoot(el); // scr: -----> data-reactroot
    }
// scr: --------------------------------------------------------> 5)
    this._updateDOMProperties( //*6
      null,
      props,
      transaction
    ); // scr: --------------------------> style:{ “color”: “blue” }
// scr: --------------------------------------------------------> 6)
    var lazyTree = DOMLazyTree(el); // scr: ------> DOMLazyTree[ins]
// scr: --------------------------------------------------------> 7)
    this._createInitialChildren( //*7
      transaction,
      props,
      context,
      lazyTree
    ); // scr: --------------------------> textContent:‘hello world’

    mountImage = lazyTree;
  } else { // if (transaction.useCreateElement)
...
  }
 switch (this._tag) { // scr: ---> no condition is met here
...
  }
 return mountImage;
}

ReactDOMComponent@renderers/dom/shared/ReactDOMComponent.js
1)它给ReactDOMComponent[ins]的成员变量和一些局部变量直接用参数做了初始化。接下来的一堆if都跳过了。
2)HTML DOM API document.createElement()创建了h1 DOM element。
3)ReactDOMComponentTree.precacheNode()这个函数对ReactDOMComponent[ins]和h1 DOM element通过ReactDOMComponent[ins]._hostNode,element.internalInstanceKey这两个字段建立了双向链接。
4)_hostParent是null,这代表一个根组件(内部)。所以用DOMPropertyOperations.setAttributeForRoot()给data-reactroot附一个空字符串“”在外部的DOM节点也标记一下(根节点)。
5)_updateDOMProperties也比较复杂。现在我们只用知道这个函数从ReactDOMComponent[ins]._currentElement.props取得{ “color”: “blue” }然后设置给style属性。我们以后会在讨论“基于setState()的组件更新”回到这个函数,那时请文内搜索
*6
6)实例化DOMLazyTree[ins]。
7)_createInitialChildren是另一个复杂的函数。现在我们只用知道这个函数从ReactDOMComponent[ins]._currentElement.children中取得‘hello world’,然后设置给 DOM 的textContent。 我们会在讨论复合组件渲染时回到这个函数。文内搜索
*7
然后DOMLazyTree[ins]被一直返回到上文提到的交叉路口-mountComponentIntoNode()。
mountImageIntoNode() —把 DOM 加入到容器节点
我先拷贝下调用栈。
|=ReactMount.render(nextElement, container, callback)     ___
|=ReactMount._renderSubtreeIntoContainer()                 |
  |-ReactMount._renderNewRootComponent()                   |
    |-instantiateReactComponent()                          |
    |~batchedMountComponentIntoNode()                  upper half
      |~mountComponentIntoNode(                  (platform agnostic)
          wrapperInstance, // scr: -> not of interest now  |
          container,   // scr: --> document.getElementById(‘root’)
          transaction, // scr: --> not of interest         |
          shouldReuseMarkup, // scr: -------> null         |
          context,           // scr: -------> not of interest
        )                                                  |
        |-ReactReconciler.mountComponent()                 |
          |-ReactCompositeComponent.mountComponent()       |
          |-ReactCompositeComponent.performInitialMount()  |
            |-instantiateReactComponent()                 _|_
            |-ReactDOMComponent.mountComponent()           |
       /* we are here */                               lower half
        |-_mountImageIntoNode()                  (HTML DOM specific)
            markup,    // scr: --> DOMLazyTree[ins]        |
            container, // scr: --> document.getElementById(‘root’)
            wrapperInstance, // scr:----> same             |
            shouldReuseMarkup, // scr:--> same             |
            transaction, // scr: -------> same             |
          )                                               _|_
然后是实现:
_mountImageIntoNode: function (
  markup,
  container,
  instance,
  shouldReuseMarkup,
  transaction)
{
  if (shouldReuseMarkup) { // scr: -------> no
…
  }
  if (transaction.useCreateElement) {//scr:>again, assume it is true
    while (container.lastChild) {    // scr: -------> null
…
    }
// scr: -------------------------> the only effective line this time
    DOMLazyTree.insertTreeBefore(container, markup, null);
  } else {
…
  }
… // scr: DEV code
}

ReactMount@renderers/dom/client/ReactMount.js
尽管这个函数看起来很复杂,现在只有一行有效代码,insertTreeBefore调用。
var insertTreeBefore = createMicrosoftUnsafeLocalFunction(function (
  parentNode,   // scr: -----> document.getElementById(‘root’)
  tree,         // scr: -----> DOMLazyTree[ins]
  referenceNode // scr: -----> null
) {
  if (tree.node.nodeType === DOCUMENT_FRAGMENT_NODE_TYPE ||
      tree.node.nodeType === ELEMENT_NODE_TYPE &&
      tree.node.nodeName.toLowerCase() === 'object' &&
      (tree.node.namespaceURI == null ||
       tree.node.namespaceURI === DOMNamespaces.html)) { // scr:->no
...
  } else {
    parentNode.insertBefore(tree.node, referenceNode);
    insertTreeChildren(tree); // scr: -> returned directly in Chrome
  }
});

DOMLazyTree@renderers/dom/client/utils/DOMLazyTree.js
这个函数也只有一行有效代码:
parentNode.insertBefore(tree.node, referenceNode);
我们知道这是另一个HTML DOM API,用来将DOMLazyTree[ins].node(h1 DOM element)
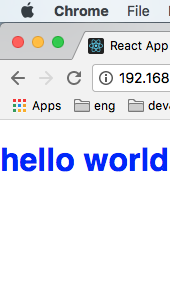
插入到#root节点,完全符合我们对最初的JSX的预期:
…
ReactDOM.render(
  <h1 style={{“color”:”blue”}}>hello world</h1>,
  document.getElementById(‘root’)
);
…
阶段性总结

写在最后
这个连载集中讨论了一个非常简单的操作--“h1组件加载”,用来打通整个渲染的关键路径,可以说和React的代码结构大致混了个脸熟。后面的文章会通过不同的应用场景,对这条关键路径进行二维展开,希望能对React代码有一个更全面,更深入的理解。
我尽量在这篇文章中模拟了调试代码的“经历”,但我仍然建议读者用Chrome亲手调试完整版代码。
React 16 用了新架构,fiber reconciler。等不及的话可以去先行探索。Happy hacking!
其他类似(不太全)的资源:
源码解析类
从头开始做React类
engineering.hexacta.com/didact-lear…
今天先写到这。如果您觉得这篇不错,可以点赞或关注这个专栏。
感谢阅读!👋
Originally published at
Understanding The React Source Code - Initial Rendering (Simple Component) IIIholmeshe.me