

简书迁移
发现有新版本了,所以就上去下载来看看,顺手更新了下,看官可以移步一下
#直接使用
直接使用Reveal的话,需要导入framework到工程内,并且需要设置工程Other Linker Flags,这样子对于其他不需要使用reveal的队友来说,同步代码的时候就会出现问题,甚至在提交前还需要谨记去掉reveal的相关设置才可以
- 1.打开Reveal 下载 [30天试用期,需要付费] 2.打开Xcode项目 3.Reveal——(菜单栏)Help——Show Reveal Library in Finder 4.Xcode——导入Reveal.framework至当前项目中 5.Xcode 中 工程设置building setting中,在Other Linker Flags项增加-ObjC -framework Reveal 6.运行当前项目后,打开Reveal,在左上角选择关联项目即可
#无侵入使用(推荐)
(该方法介绍处于唐巧《iOS开发进阶》书内,仅此作为分享)
##用模拟器调试 1.打开命令控制台,创建文件 .lldbinit
vim ~/.lldbinit
2.编辑 .lldbinit (swift 和objc 中使用的命令是不一样的)
如果是新版本的Reveal,里面lib会换成framework, 下面的读取位置 换成 libReveal.dylib 换成 RevealServer.framework/RevealServer
command alias swift_reveal_load_sim expr dlopen("/Applications/Reveal.app/Contents/SharedSupport/iOS-Libraries/libReveal.dylib", 2)
command alias swift_reveal_load_dev expr dlopen(NSBundle.mainBundle().pathForResource("libReveal", ofType: "dylib")!, 2)
command alias swift_reveal_start expr NSNotificationCenter.defaultCenter().postNotificationName("IBARevealRequestStart", object: nil)
command alias swift_reveal_stop expr NSNotificationCenter.defaultCenter().postNotificationName("IBARevealRequestStop", object: nil)
command alias objc_reveal_load_sim expr (void*)dlopen("/Applications/Reveal.app/Contents/SharedSupport/iOS-Libraries/libReveal.dylib", 0x2);
command alias objc_reveal_load_dev expr (void*)dlopen([(NSString*)[(NSBundle*)[NSBundle mainBundle] pathForResource:@"libReveal" ofType:@"dylib"] cStringUsingEncoding:0x4], 0x2);
command alias objc_reveal_start expr (void)[(NSNotificationCenter*)[NSNotificationCenter defaultCenter] postNotificationName:@"IBARevealRequestStart" object:nil];
command alias objc_reveal_stop expr (void)[(NSNotificationCenter*)[NSNotificationCenter defaultCenter] postNotificationName:@"IBARevealRequestStop" object:nil];
- 该步骤其实是为 lldb 设置了 4 个别名,为了后续方便操作,这 4 个别名意义如下:
- swift_reveal_load_sim/objc_reveal_load_sim 为模拟器加载 reveal 调试用的动态链接库
- swift_reveal_load_dev/objc_reveal_load_dev 为真机加载 reveal 调试用的动态链接库
- swift_reveal_start/objc_reveal_start 启动 reveal 调试功能
- swift_reveal_stop/objc_reveal_stop 结束 reveal 调试功能
3.打开工程
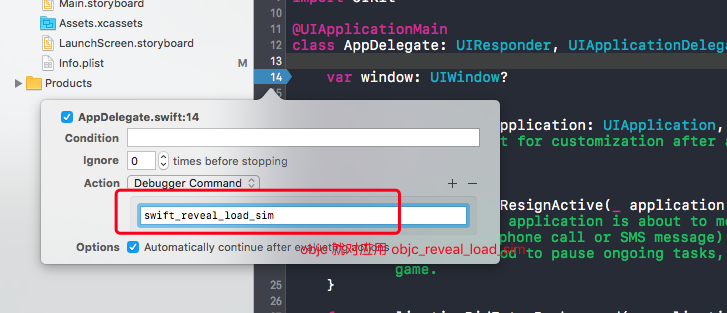
接下来,我们在 AppDelegate 类的 application: didFinishLaunchingWithOptions: 方法中, 做如下三步操作(如下图所示):
- 1). 点击该方法左边的行号区域,增加一个断点,之后右击该断点,选择“Edit Breakpoint”。 2). 点击“Action”项边右的“Add Action”, 然后输入“ swift_reveal_load_sim” 或者 “objc_reveal_load_sim”。 3). 勾选上“Options”上的”Automatically continue a er evaluating”选项。
4.打开Reveal使用
##真机调试
要用 Reveal 连接真机调试,我们需要先把 Reveal 的动态链接库上传到真机上。由于 iOS 设备有沙盒存在,所以我们只能将 Reveal 的动态链接库添加到工程中。
1.点击 Reveal 菜单栏的“Help”->“Show Reveal Library in Finder”选项(如下图所示),可以在“Finder”中显示出 Reveal 的动态链接库:libReveal.dylib
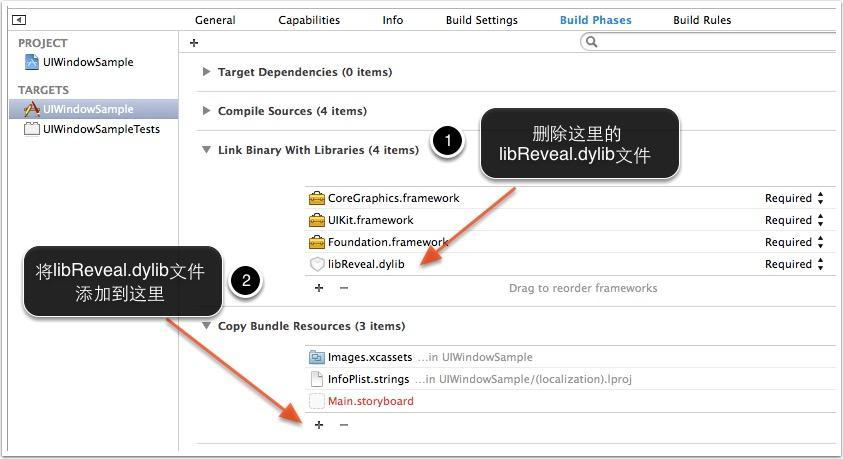
2.将 libReveal.dylib 文件拖动到目标 Xcode 工程中,Xcode 默认情况下错误地将 libRe- veal.dylib 设置到了“Link Binary With Libraries”下,我们需要进行一下调整,将其中的“Link Binary With Libraries”删除,然后将其添加到“Copy Bundle Resources”下面。
3.之后用 Reveal 连接真机的方式和连接模拟器的方式类似,我们只需要把上一节提到的断点 Action 的内容从 reveal_load_sim 改成 reveal_load_dev 即可。
#用Reveal调试其他应用界面 条件:
- 需要一台越狱的设备
方法:
iOS 设备的目 录/Library/MobileSubstrate/DynamicLibraries 下存放着所有在系统启动时就需要加载的 动态链接库,所以我们只需要将 Reveal 的动态链接库上传到该目录即可。
- 在安装 OpenSSH 之后,用 scp 来上传该文件。具体步骤如下:
- 将libReveal.dylib上传到/Library/MobileSubstrate/DynamicLibraries
- 如果 libReveal.dylib 没有执行权限,用 [chmod +x libReveal.dylib] 命令,给其增加执行权限
- 执行killallSpringBoard重启桌面。
