简介
Snackbar是design包下的一个特色控件,Android5.0新增。
Snackbars provide lightweight feedback about an operation. They show a brief message at the bottom of the screen on mobile and lower left on larger devices. Snackbars appear above all other elements on screen and only one can be displayed at a time.
根据Android API介绍:Snackbars 是提供有关操作的轻量级反馈。它在移动设备的屏幕底部显示简短的信息,并在较大的设备上显示左下角。 Snackbars显示在屏幕上的所有其他元素上方,并且一次只能显示一个。
使用
SnackbarActivity:
public class SnackbarActivity extends AppCompatActivity {

    @Override
    protected void onCreate(Bundle savedInstanceState) {
        super.onCreate(savedInstanceState);
        setContentView(R.layout.activity_snackbar);
        Toolbar toolbar = (Toolbar) findViewById(R.id.toolbar);
        setSupportActionBar(toolbar);


        FloatingActionButton fab = (FloatingActionButton) findViewById(R.id.fab);
        fab.setOnClickListener(new View.OnClickListener() {
            @Override
            public void onClick(View view) {
                Snackbar snb = Snackbar.make(view, "this is my message", Snackbar.LENGTH_SHORT);
                snb.setAction("button", new View.OnClickListener() {
                    @Override
                    public void onClick(View view) {
                        Toast.makeText(SnackbarActivity.this, "toast", Toast.LENGTH_SHORT).show();
                    }
                });
                snb.setActionTextColor(0xffffffff);
                snb.show();

                //不使用action事件
//                Snackbar.make(view, "this is my message", Snackbar.LENGTH_SHORT).show();

            }
        });
    }

}
使用Snackbar.make函数构建实例,直接然后调用show函数即可,这是最简单的用法,如果想要喝Snackbar有交互的,需要调用setAction方法,为button设置点击事件。
Snackbar为开发者提供很多方法:
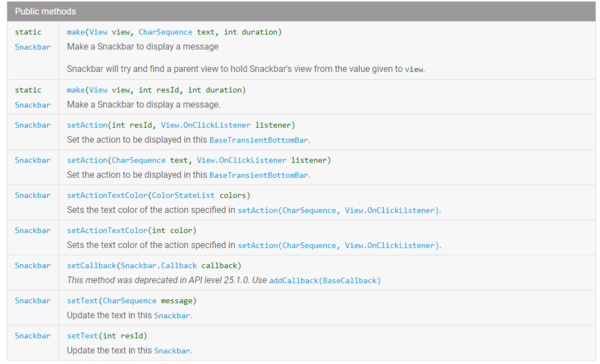
如:
setActionTextColor:设置button文本颜色 setText:设置提示文本
源码解析
首先看make函数
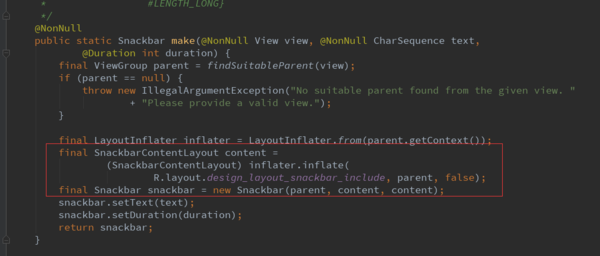
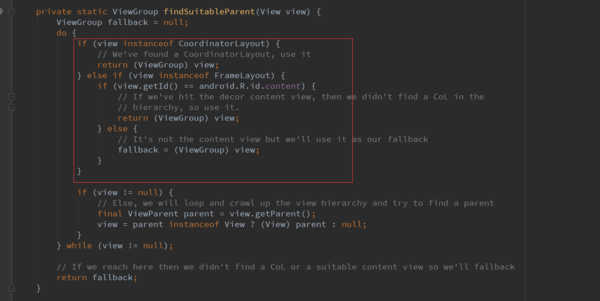
先调用findSuitableParent(view)方法:该方法就是一直寻找根View,首先优先判断View是不是CoordinatorLayout类型的,如果是就直接返回。否则,最终会找到的是顶层的View,如果setContentView进来的是一个FrameLayout,则返回contentView
否则就会是顶层的decorView。
然后初始化布局SnackbarContentLayout和Snackbar,并且把布局传入Snackbar里,同时设置显示的文本和时间。
SnackbarContentLayout布局:
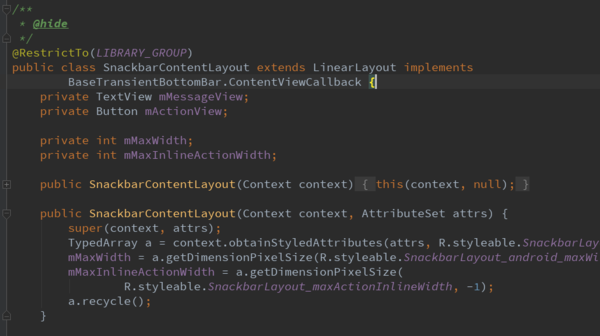
SnackbarContentLayout是继承LinearLayout的自定义布局,并且实现了动画的接口ContentViewCallback。SnackbarContentLayout控件只有两个子控件,也就是在Snackbar显示出来的TextView和Button。
SnackbarContentLayout实现的动画:
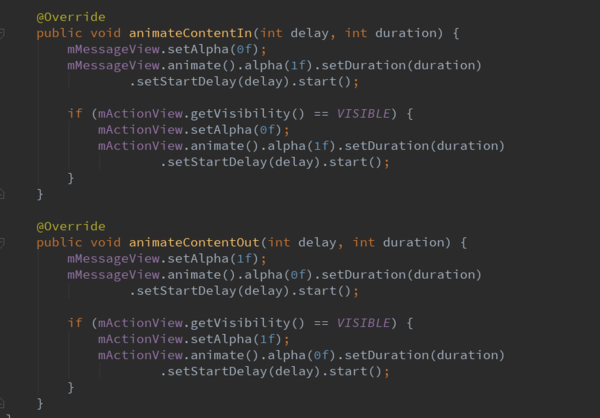
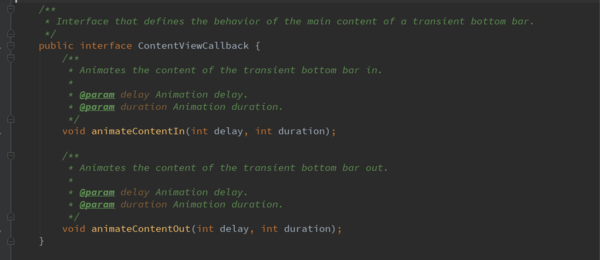
BaseTransientBottomBar.ContentViewCallback接口
从以上的SnackbarContentLayout控件知道,该控件就是show显示出来的布局,并且该控件实现了ContentViewCallback的接口,该接口就是控件显示和隐藏的时的动画接口。
下面我们看会make方法: make方法中new了一个Snackbar对象,而且是使用final修饰符。
final Snackbar snackbar = new Snackbar(parent, content, content);
一个final变量,如果是基本数据类型的变量,则其数值一旦在初始化之后便不能更改;如果是引用类型的变量,则在对其初始化之后便不能再让其指向另一个对象。
确保snackbar只有一个对象。
接下来看下new Snackbar所做的事情:Snackbar是继承BaseTransientBottomBar这个抽象类的,最后会调用BaseTransientBottomBar的构造方法。
BaseTransientBottomBar的构造方法:
 protected BaseTransientBottomBar(@NonNull ViewGroup parent, @NonNull View content,
            @NonNull ContentViewCallback contentViewCallback) {
        if (parent == null) {
            throw new IllegalArgumentException("Transient bottom bar must have non-null parent");
        }
        if (content == null) {
            throw new IllegalArgumentException("Transient bottom bar must have non-null content");
        }
        if (contentViewCallback == null) {
            throw new IllegalArgumentException("Transient bottom bar must have non-null callback");
        }

        mTargetParent = parent;
        mContentViewCallback = contentViewCallback;
        mContext = parent.getContext();

        ThemeUtils.checkAppCompatTheme(mContext);

        LayoutInflater inflater = LayoutInflater.from(mContext);
        // Note that for backwards compatibility reasons we inflate a layout that is defined
        // in the extending Snackbar class. This is to prevent breakage of apps that have custom
        // coordinator layout behaviors that depend on that layout.
        mView = (SnackbarBaseLayout) inflater.inflate(
                R.layout.design_layout_snackbar, mTargetParent, false);
        mView.addView(content);

        ViewCompat.setAccessibilityLiveRegion(mView,
                ViewCompat.ACCESSIBILITY_LIVE_REGION_POLITE);
        ViewCompat.setImportantForAccessibility(mView,
                ViewCompat.IMPORTANT_FOR_ACCESSIBILITY_YES);

        // Make sure that we fit system windows and have a listener to apply any insets
        ViewCompat.setFitsSystemWindows(mView, true);
        ViewCompat.setOnApplyWindowInsetsListener(mView,
                new android.support.v4.view.OnApplyWindowInsetsListener() {
                    @Override
                    public WindowInsetsCompat onApplyWindowInsets(View v,
                            WindowInsetsCompat insets) {
                        // Copy over the bottom inset as padding so that we're displayed
                        // above the navigation bar
                        v.setPadding(v.getPaddingLeft(), v.getPaddingTop(),
                                v.getPaddingRight(), insets.getSystemWindowInsetBottom());
                        return insets;
                    }
                });

        mAccessibilityManager = (AccessibilityManager)
                mContext.getSystemService(Context.ACCESSIBILITY_SERVICE);
    }
该构造方法主要做的事情:记录在make方法中通过findSuitableParent(view)找到的根View也就是parent,以及记录内容布局mContnet和回调mContentViewCallback。还把content添加到mView中,用mView包装content。最后获取AccessibilityManager服务,关于AccessibilityManager服务的可以参考这篇文章《你真的理解AccessibilityService吗》。
整个Snackbar初始化完成之后,接下来我们看下setAction方法的实现。
setAction的实现
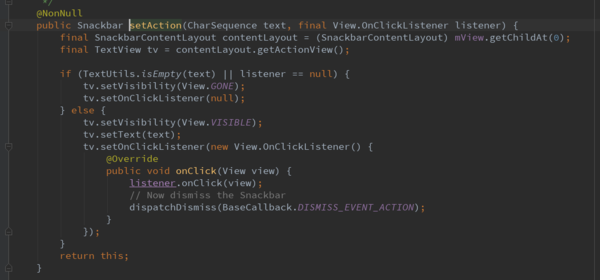
改方法实现比较简单,上面我们介绍过SnackbarContentLayout控件,该控件里面就是包含一个TextView和一个Button,这里直接给Button点击事件,然后回调传入的listener的onClick方法。最后调用dispatchDismiss()方法,该方法就是dismiss掉Snackbar。这样就达到点击button的时候和用户交互,接着就隐藏了Snackbar。
dispatchDismiss方法
上面我们说过该方法主要是dismiss掉Snackbar,下面我们看看是不是这样子的呢。

调用了SnackbarManager的dismiss方法。
dismiss
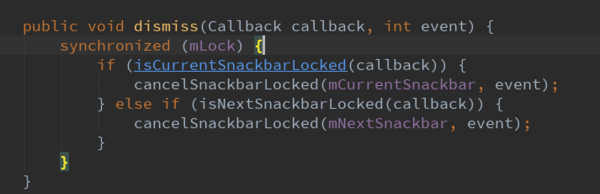
这里判断是否是当前正在执行的callback和下一个callback。最终调用cancelSnackbarLocked方法。
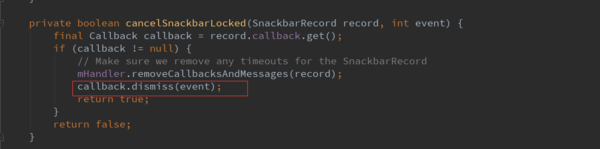
最后还是调用了callba的dismiss方法,而这个callback就是在SnackbarManager的dismiss方法中传入的mManagerCallback。我们看看mManagerCallback是如何实现的。
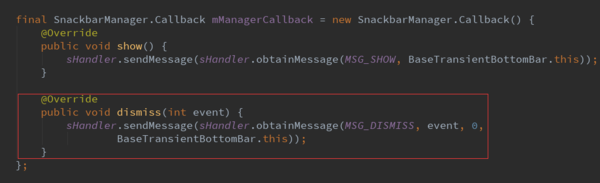
显然这就是在主线程中显示和隐藏Snackbar。
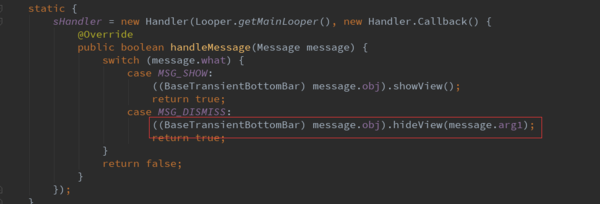
调用了hideView
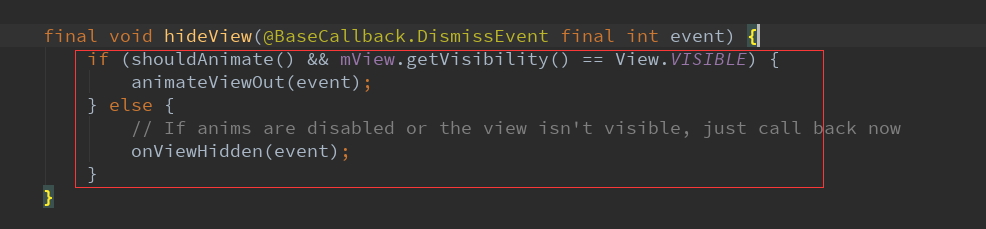
如果mView显示中的话需要调用animateViewOut动画来隐藏,否则直接调用onViewHidden来hide即可。
其实animateViewOut动画结束后还是调用了onViewHidden方法。
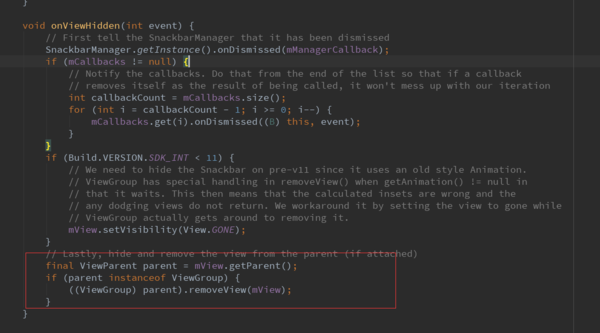
最后调用了removeView,将mView移除了。完成了整个将View隐藏。
show()
Snackbar是如何显示的呢,我们看下show()方法。

调用了SnackbarManager的show方法。
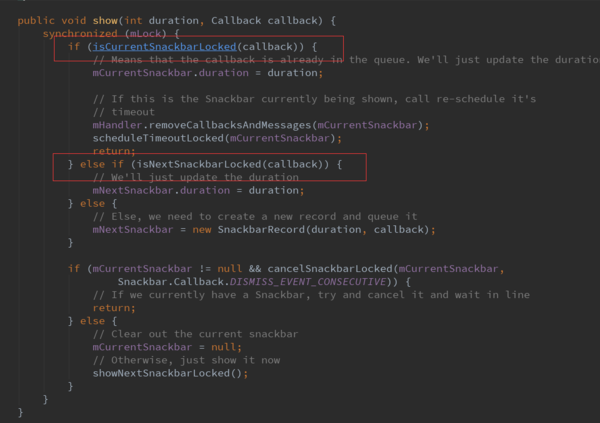
这里逐一判断传入的callback是否是当前正在执行,是否是下一个callback。这里我们看下showNextSnackbarLocked()方法。

和dismiss一样,都是调用了传入的callback,这里调用了传入的callback的show方法。这个callback也就是mManagerCallback。我们看下sHandler的showView。
final void showView() {
if (mView.getParent() == null) {
final ViewGroup.LayoutParams lp = mView.getLayoutParams();
if (lp instanceof CoordinatorLayout.LayoutParams) {
// If our LayoutParams are from a CoordinatorLayout, we'll setup our Behavior
final CoordinatorLayout.LayoutParams clp = (CoordinatorLayout.LayoutParams) lp;
final Behavior behavior = new Behavior();
behavior.setStartAlphaSwipeDistance(0.1f);
behavior.setEndAlphaSwipeDistance(0.6f);
behavior.setSwipeDirection(SwipeDismissBehavior.SWIPE_DIRECTION_START_TO_END);
behavior.setListener(new SwipeDismissBehavior.OnDismissListener() {
@Override
public void onDismiss(View view) {
view.setVisibility(View.GONE);
dispatchDismiss(BaseCallback.DISMISS_EVENT_SWIPE);
}
@Override
public void onDragStateChanged(int state) {
switch (state) {
case SwipeDismissBehavior.STATE_DRAGGING:
case SwipeDismissBehavior.STATE_SETTLING:
// If the view is being dragged or settling, pause the timeout
SnackbarManager.getInstance().pauseTimeout(mManagerCallback);
break;
case SwipeDismissBehavior.STATE_IDLE:
// If the view has been released and is idle, restore the timeout
SnackbarManager.getInstance()
.restoreTimeoutIfPaused(mManagerCallback);
break;
}
}
});
clp.setBehavior(behavior);
// Also set the inset edge so that views can dodge the bar correctly
clp.insetEdge = Gravity.BOTTOM;
}
mTargetParent.addView(mView);
}
mView.setOnAttachStateChangeListener(
new BaseTransientBottomBar.OnAttachStateChangeListener() {
@Override
public void onViewAttachedToWindow(View v) {}
@Override
public void onViewDetachedFromWindow(View v) {
if (isShownOrQueued()) {
// If we haven't already been dismissed then this event is coming from a
// non-user initiated action. Hence we need to make sure that we callback
// and keep our state up to date. We need to post the call since
// removeView() will call through to onDetachedFromWindow and thus overflow.
sHandler.post(new Runnable() {
@Override
public void run() {
onViewHidden(BaseCallback.DISMISS_EVENT_MANUAL);
}
});
}
}
});
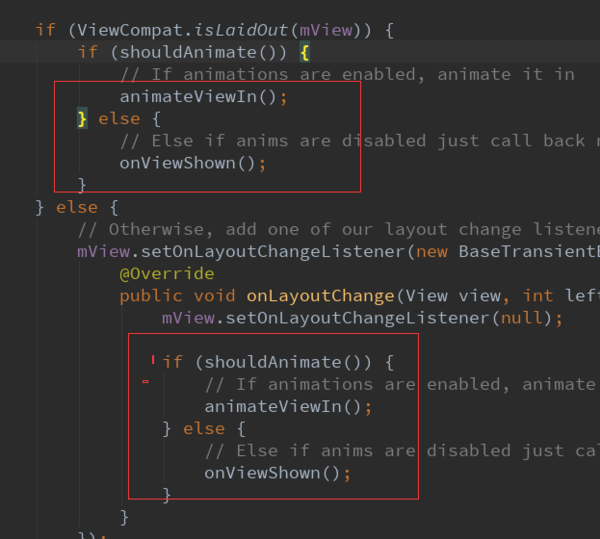
if (ViewCompat.isLaidOut(mView)) {
if (shouldAnimate()) {
// If animations are enabled, animate it in
animateViewIn();
} else {
// Else if anims are disabled just call back now
onViewShown();
}
} else {
// Otherwise, add one of our layout change listeners and show it in when laid out
mView.setOnLayoutChangeListener(new BaseTransientBottomBar.OnLayoutChangeListener() {
@Override
public void onLayoutChange(View view, int left, int top, int right, int bottom) {
mView.setOnLayoutChangeListener(null);
if (shouldAnimate()) {
// If animations are enabled, animate it in
animateViewIn();
} else {
// Else if anims are disabled just call back now
onViewShown();
}
}
});
}
}
先判断是否是CoordinatorLayout,然后初始化Behavior,这里对CoordinatorLayout和Behavior不做过多的介绍,接着调用的是mTargetParent.addView。
最后调用显示的动画,这样完成了显示流程。
Snackbar高级使用
public class SnackbarActivity extends AppCompatActivity {

    @Override
    protected void onCreate(Bundle savedInstanceState) {
        super.onCreate(savedInstanceState);
        setContentView(R.layout.activity_snackbar);
        Toolbar toolbar = (Toolbar) findViewById(R.id.toolbar);
        setSupportActionBar(toolbar);


        FloatingActionButton fab = (FloatingActionButton) findViewById(R.id.fab);
        fab.setOnClickListener(new View.OnClickListener() {
            @Override
            public void onClick(View view) {
                Snackbar snb = Snackbar.make(view, "this is my message", Snackbar.LENGTH_SHORT);
                snb.setAction("button", new View.OnClickListener() {
                    @Override
                    public void onClick(View view) {
                        Toast.makeText(SnackbarActivity.this, "toast", Toast.LENGTH_SHORT).show();
                    }
                });
                snb.setActionTextColor(0xffffffff);
                snb.show();

                setSnackbarBgColor(snb, 0xffff0000, 0xff02f78e);

                addView(SnackbarActivity.this, snb, R.layout.header_layout, 0);

                //不使用action事件
//                Snackbar.make(view, "this is my message", Snackbar.LENGTH_SHORT).show();

            }
        });
    }


    /**
     * 添加背景和文字颜色
     *
     * @param snb
     * @param textColor
     * @param bgColor
     */
    public void setSnackbarBgColor(Snackbar snb, int textColor, int bgColor) {
        //获取Snackbar的view
        View view = snb.getView();
        if (view != null) {
            //修改view的背景色
            view.setBackgroundColor(bgColor);
            //获取Snackbar的message控件,修改字体颜色
            ((TextView) view.findViewById(R.id.snackbar_text)).setTextColor(textColor);
        }
    }


    /**
     * 添加View
     * @param context
     * @param snb
     * @param layoutId
     * @param index
     */
    public void addView(Context context, Snackbar snb, int layoutId, int index) {

        View snbView = snb.getView();

        Snackbar.SnackbarLayout snbLayout = (Snackbar.SnackbarLayout) snbView;

        SnackbarContentLayout layout = (SnackbarContentLayout) snbLayout.getChildAt(0);

        View mAddView = LayoutInflater.from(context).inflate(layoutId, null);

        LinearLayout.LayoutParams fp = new LinearLayout.LayoutParams(LinearLayout.LayoutParams.WRAP_CONTENT, LinearLayout.LayoutParams.WRAP_CONTENT);

        fp.gravity = Gravity.CENTER_VERTICAL;

        layout.addView(mAddView, index, fp);

    }

}
通过前面的源码分析,我们知道其布局是SnackbarContentLayout(包含一个TextView和一个Button),我们可以添加背景颜色和文字颜色,还可以添加View。
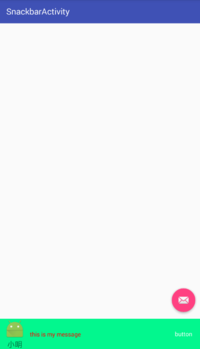
运行效果: