

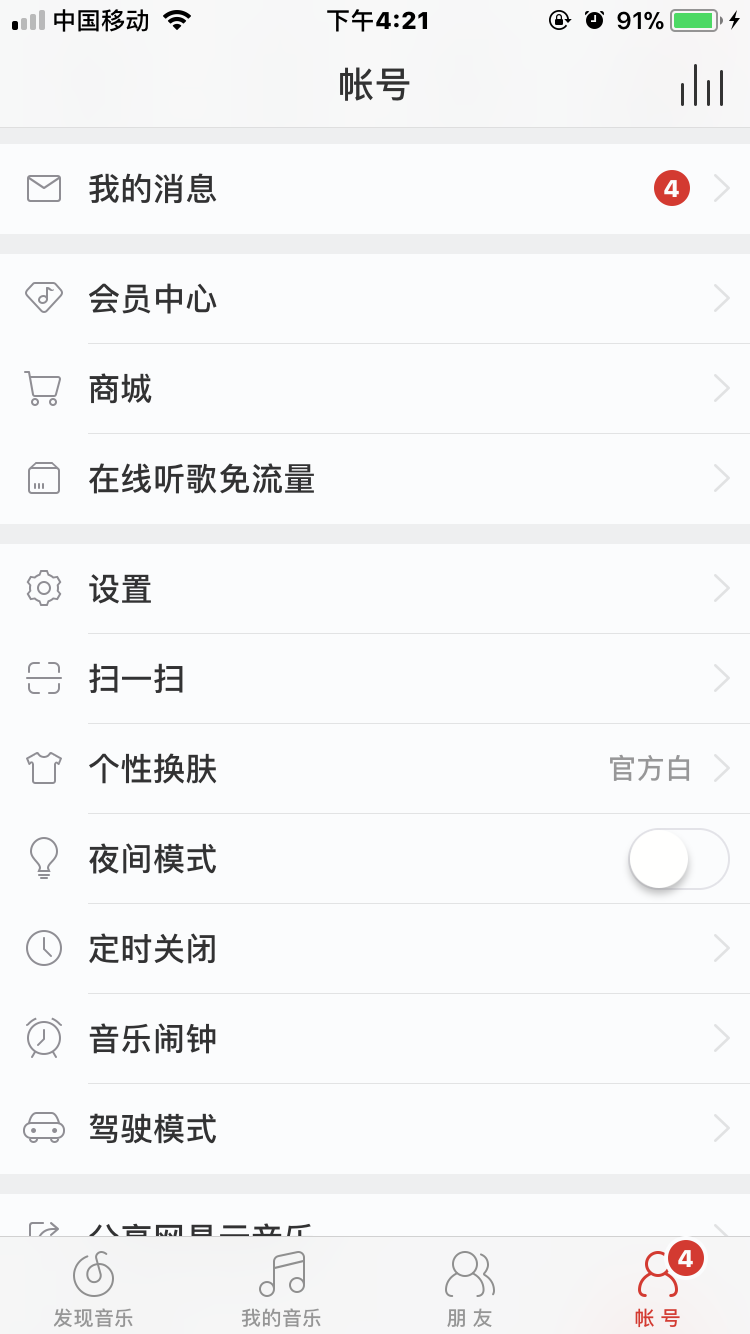
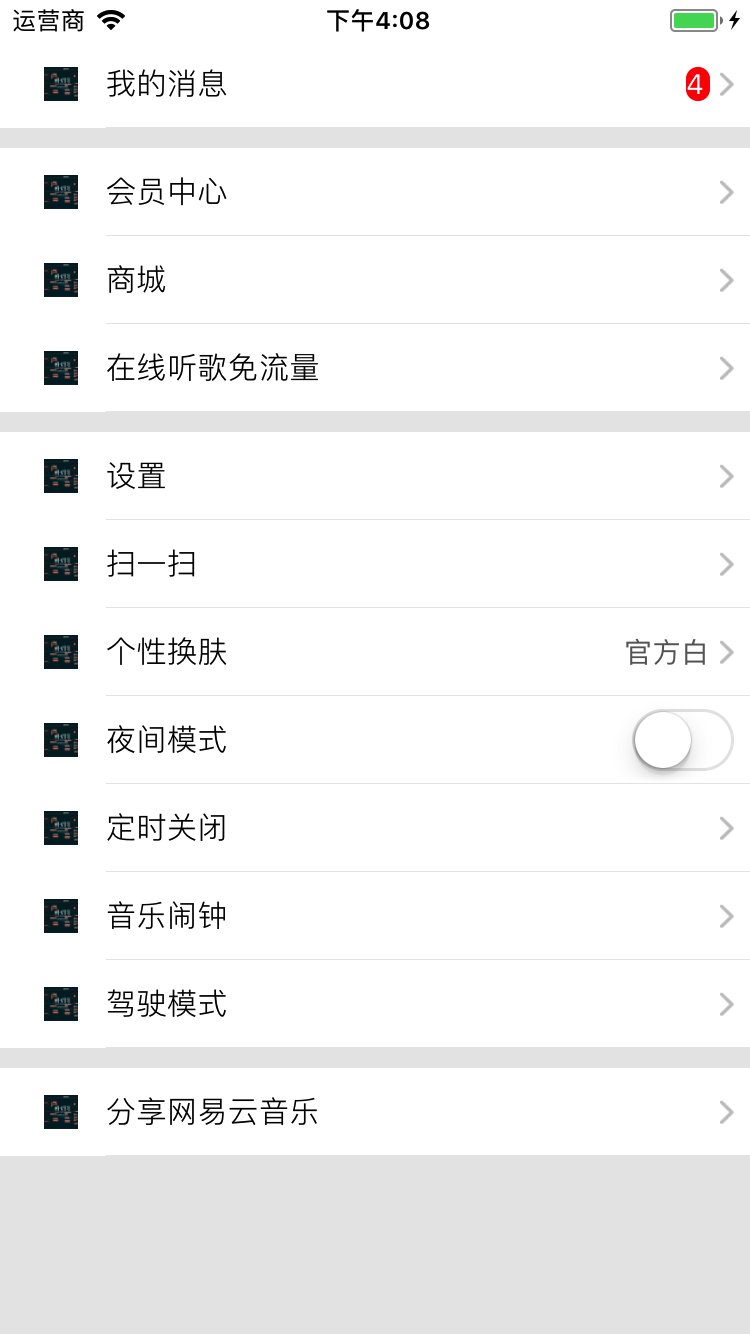
在使用react-native 做一些通用的设置界面的时候,以网易云音乐界面为例子:
这篇文章主要是分享一下面向对象的思想来搭建这个通用的列表界面。 首先我封装了一个组件,供外部的使用,首先我看一下组件类的结构
- Common文件夹
- CommonGroupList文件夹
- CommonGroupItem.js
- CommonListItem.js
- CommonSwitchItem.js
- CommonTextItem.js
- CommonRowCell.js
- CommonList.js
- CommonListHeader.js
- src文件夹
- screen.js
- TextTools.js
- imgs文件夹
- 图片资源
- CommonGroupList文件夹
如何使用
1.添加数据源
constructor(props) {
      super(props);
      // 初始状态
      var Groups = [];
      //第一组
      this._setGroupItem0(Groups);
      //第二组
      this._setGroupItem1(Groups);
      //第三组
      this._setGroupItem2(Groups);
      //第四组
      this._setGroupItem3(Groups);

      this.state = {
        dataSource: Groups,
      }
    }

  _setGroupItem0(Groups){
    var item0 = new CommonListHeader.CommonListItem('test','我的消息','4');
    item0.customItemTipStyle = {fontSize:14,color:'white',width:12,borderRadius:6,backgroundColor:'red',overflow:'hidden'};
    var group0 = new CommonListHeader.CommonGroupItem([item0],10);
    Groups.push(group0);

  }
  _setGroupItem1(Groups){
    var item0 = new CommonListHeader.CommonListItem('test','会员中心');
    var item1 = new CommonListHeader.CommonListItem('test','商城');
    var item2 = new CommonListHeader.CommonListItem('test','在线听歌免流量');
    var group1 = new CommonListHeader.CommonGroupItem([item0,item1,item2],10);
    Groups.push(group1);
  }
  _setGroupItem2(Groups){
    var item0 = new CommonListHeader.CommonListItem('test','设置');
    var item1 = new CommonListHeader.CommonListItem('test','扫一扫');
    var item2 = new CommonListHeader.CommonListItem('test','个性换肤','官方白');
    var item3 = new CommonListHeader.CommonSwitchItem('test','夜间模式');
    var item4 = new CommonListHeader.CommonListItem('test','定时关闭');
    var item5 = new CommonListHeader.CommonListItem('test','音乐闹钟');
    var item6 = new CommonListHeader.CommonListItem('test','驾驶模式');

    var group2 = new CommonListHeader.CommonGroupItem([item0,item1,item2,item3,item4,item5,item6],10);
    Groups.push(group2);
  }

  _setGroupItem3(Groups){
    var item0 = new CommonListHeader.CommonListItem('test','分享网易云音乐');

    var group3 = new CommonListHeader.CommonGroupItem([item0],10);
    Groups.push(group3);
  }
2.渲染
render() {
    return (
        <CommonListHeader.CommonList
            commonSectionListStyle={{marginTop: 20,backgroundColor:'#e8e8e8'}}
            dataSource={this.state.dataSource}
            switchTintColor={'red'}
            didSelectedItem={(value)=>{
                   // alert(value)
                }}
            tipTitleStyle={{fontSize:14,color:'#666666'}}
            CommonRowCellStyle={{height:44}}
            // SectionHeader={this._sectionHeader()}
        />
    );
  }
这样我们就可以动态的改变数据源,相应的界面也会随之而变,以上搭建的界面如下
下面我们说一下这个封装这个组件的思想:
首先针对每一行数据,我们可以通过创建一个类当做一个模型
CommonListItem 行模型
function CommonListItem(image,title,tipTitle,showArrow) {
    this.image = image;
    this.title = title;
    this.tipTitle = tipTitle;

    //是否显示箭头
    this.hiddenArrow = showArrow;
    //item点击
    this.itemClick = null;
    //路由Screen
    this.routeScreen = null;
    //自定义样式
    this.customItemTipStyle = {};
}

module.exports = CommonListItem;
上述是一个包含图片,标题,尾部标题和默认的显示箭头的对象,相当一个item,注释的几个属性是扩展属性
CommonGroupItem 组模型
function CommonGroupItem(rowData,sectionHeight) {
    this.rowData = rowData;
    this.sectionHeight = sectionHeight;
}

module.exports = CommonGroupItem;
一个组模型需要多个行模型,并且包含该行的行高
那么通过创建一个个行模型,将行模型添加到组中的过程,我们数据源就构建完成了,接下来就是渲染sectionList的过程了,分两部分 一、渲染renderItem 二、渲染renderSectionHeader 这里需要注意的是对数据源的处理,通过外界创建的数据源我们需要进行对它处理以后才能使用,主要思路是遍历获取每一条数据,按照sectionList数据源格式进行赋值,过程如下:
        var GroupsData = [];
        var sourceData = this.props.dataSource;
        sourceData.forEach((groupItem,index) => {
            console.log(groupItem.sectionHeight)
            GroupsData.push({
                sectionHight:groupItem.sectionHeight,
                data:groupItem.rowData,
                sectionId:index
            })
        });
_renderItem
 _renderItem({item}){
        return(
           <CommonRowCell
               rowData={item}
               {...this.props}
           />
        )
    }
_renderSectionHeader
_renderSectionHeader({section}){

        if (section.sectionId == 0){
            return(
                this.props.SectionHeader
            )
        }else {
            return (
                <View style={{height:section.sectionHight}}>
                </View>
            )
        }
    }
具体过程就省略了,大家可以看相应源码。
相应的github 地址
在使用中有不明白的,可以加我qq群309105048讨论。
