

创建
NSThread
detachNewThreadSelector:toTarget:withObject:- 创建
NSThread并调用start方法
这两个方法都会创建独立的线程。独立线程指的是该线程存在且完成任务后,将会由被自动回收。
POSIX
#include <assert.h>
#include <pthread.h>

void* PosixThreadMainRoutine(void* data) {
  // Do some work here
  return NULL;
}

void LaunchThread() {
  // Create the thread using POSIX routines.
  pthread_attr_t attr;
  pthread_t posixThreadID;
  int returnVal;

  returnVal = pthread_attr_init(&attr);
  assert(!returnVal);
  returnVal = pthread_attr_setdetachstate(&attr, PTHREAD_CREATE_DETACHED);
  assert(!returnVal);

  int threadError = pthread_create(&posixTHreadID, &attr, &PosixThreadMainRoutine, NULL);

  returnVal = pthread_attr_destory(&attr);
  assert(!returnVal);
  if (threadError != 0) {
    // Report an error
  }
}
使用NSObject生成线程
performSelectorInBackground:withObject:会创建线程并且将制定的方法作为该线程的入口(entry point).
在Cocoa Application使用POSIX
保护Cocoa Framework
为了避免在线程中的锁会降低该线程的性能,Cocoa在利用NSThread类来创建第一个线程之前,并不会创建POSIX相关的线程!!所以如果你单单使用POSIX线程的话,Cocoa并不会知悉有该线程的存在。要避免这种情况的话,首先应该使用NSThread来生成一个线程并且让其马上退出即可,这个线程并不会执行什么任务,只是让app知道自己需要进入到多线程任务而已。
POSIX和Cocoa的锁的混合
Cocoa中的线程锁是POSIX中互斥锁和条件锁等的封装。
配置
线程的本地存储
每个线程中都存有一个键值对用于线程中访问其他有用的信息。但是Cocoa和POSIX中存储的方式并不相同。在Cocoa中使用的是threadDictionary方法来获取NSMutableDictionary类型的对象。在POSIX中使用的pthread_setspecific和pthread_getspecific方法来设置和获取相关的值。
Run Loop
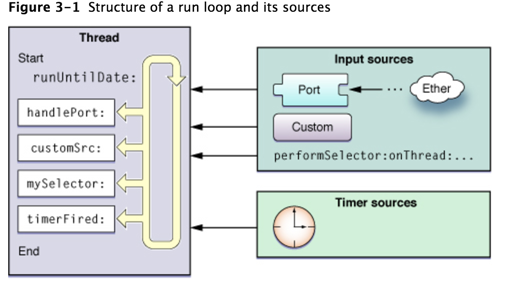
Run Loop是线程的入口,用于对事件进行处理的循环,可以接收两种类型的时间源。Input sources传入的是异步的事件,比方说其他线程或者其他app的信息。Timer sources传入的是同步事件,比方说计划好的或者重复发生的事件。
下面展示了run loop的结构和事件源。Input sources传入了异步事件给对应的处理器并触发了runUnitlDate:方法来退出run loop。Timer sources传入同步事件但是并不会引起run loop的退出。
为了处理input sources的事件,run loops会生成包含其处理信息的通知,可以通过注册为run-loop的观察者来接收这些通知并且使用它们来处理额外的工作。这些工作可以通过Core Foundation来完成。
Input Sources
Input Sources分为两种类型:Port-Based Sources和Custom Input Sources
Port-Based Sources
Cocoa和Core Foundation提供了创建port-based input sources相关的方法和对象。比方说在Cocoa中,并不需要创建input sources,仅需要创建port对象并且使用NSPort的方法将该对象添加到run loop中就可以了。port对象会管理input source的创建和配置。而在Core Foundation中,则必须手动创建所有的port及其run loop source,通过port相关的类型(CFMachPortRef, CFMessagePortRef或者CFSocketRef)的方法来创建相关的对象。
Custom Input Sources
要创建Custom input sources的话,则必须使用CFRunLoopSourceRef中的方法。除了定义事件的处理方法以外,还需要定义事件的传递机制。
Cocoa Perform Selector Sources
Cocoa还定义了一种custom input source来允许你在任何线程中执行某个方法。与port-based source类似,它也是顺序执行指定的方法。不同点在于这种类型的source会在执行完毕以后自动移除。
这种类型的方法都是NSObject的实例方法,诸如perfromSelectorOnMainThread:withObject:waitUntilDone:等。
Timer Sources
Timer sources会在未来某个设定好的时间同步性地传递事件。但是需要注意的是,timer并不是一个实时的机制,取决于你运行你的run loop.如果run loop并没有运行的话,timer则也不会被触发。
另外,我们只能通过配置timer来一次性或者重复生成某个事件。
Run Loop Observers
使用CFRunLoopObserverRef来创建run loop观察者的实例。通过这个实例,我们可以关注以下事件:
- run loop的入口
- 处理timer的时间点
- 处理input source的时间点
- run loop休眠的时间
- 唤醒之后,处理时间之前的时间点
- run loop的出口
Run Loop的事件顺序
- 通知观察者run loop已经开始
- 通知观察者timer准备开始计时
- 通知观察者非port-based的input sources准备开始执行
- 执行所有非non-port-based的input sources
- 如果port-based的input source已经准备完毕并且等待执行的话,则马上处理该事件,转到步骤9
- 通知观察者线程准备休眠
- 线程开始进入休眠,除非出现以下事件:
- port-based input source事件进入
- timer计时
- run loop超时
- run loop被唤醒
- 通知观察者线程将要被唤醒
- 处理等待处理的事件
- 如果用户定义的timer开始计时,处理timer事件并重启loop,回到步骤2
- 如果input source开始执行,则传递该事件
- 如果run loop还未到时间就被唤醒的话,重启loop回到步骤2
- 通知观察者已经退出run loop
何时使用Run Loop?
只有在以下的几种情况下你才需要start run loop:
- 使用ports 或者custom input sources来跟其他线程进行交互
- 在线程上使用timer
- 使用诸如
performSelector...等方法 - 执行周期性任务期间保证线程的运行
使用Run Loop对象
每个线程都有一个与自己相关的run loop对象。在Cocoa中,该对象为NSRunLoop的实例,对于更底层的框架的话,则是指向CFRunLoopRef的指针
创建Run Loop对象
在Cocoa中,使用NSRunLoop的类方法currentRunLoop来获取当前线程的run loop对象或者是使用CFRunLoopGetCurrent方法。
虽然它们不是对象桥接的类型,但是你可以使用NSRunLoop的getCFRunLoop来获取CFRunLoopRef类型的对象。
Run Loop的配置
在次级线程中运行run loop之前必须保证最少有一个input source或者timer在里面,否则的话,run loop一运行就会退出。
除了添加source之外,我们还可以添加观察者。要添加观察者对象的话,必须使用Core Foundation对象。通过CFRunLoopObserverRef创建观察者,并通过CFRunLoopAddObserver方法将其添加到run loop中去。
- (void)threadMain {
  NSRunLoop *myRunLoop = [NSRunLoop currentRunLoop];

  CFRunLoopObserverContext context = {0, self, NULL, NULL, NULL};
  CFRunLoopObserverRef observer = CFRunLoopObserverCreate(kCFAllocatorDefault, kCFRunLoopAllActivities, YES, 0, &myRunLoopObserver, &context);

  if (observer) {
    CFRunLoopRef cfLoop = [myRunLoop getCFRunLoop];
    CFRunLoopAddObserver(cfLoop, observer, kCFRunLoopDefaultMode);
  }

  NSInteger loopCount = 10;
  do {
    [myRunLoop runUntilDate:[NSDate dateWithTimeIntervalSinceNow:1]];
    loopCount--;
  } while(loopCount);
}
Start the Run Loop
只有在次级线程上,才可能需要启动run loop这个操作(主线程并不需要!)
- (void)skeletonThreadMain {
  BOOL done = NO;

  do {
    SInt32 result = CFRunLoopRunInMode(kCFRunLoopDefaultMode, 10, YES);
    if ((result == kCFRunLoopStopped) || (result == kCFRunLoopRunFinished)) {
      done = YES;
    }
  } while (!done);
}
run loop是可以递归运行的~
配置Run Loop Sources
定义Custom Input Source
定义Input Source
@interface RunLoopSource: NSObject {
  CFRunLoopSourceRef runLoopSource;
  NSMutableArray *commands;
}

- (id)init;
- (void)addToCurrentRunLoop;
- (void)invalidate;

// Handler method
- (void)sourceField;

// Client interface for registering commands to process
- (void)addCommand:(NSInteger)command withData:(id)data;
- (void)fireAllCommandsOnRunLoop:(CFRunLoopRef)runloop;
@end

// These are the CFRunLoopSourceRef callback functions
void RunLoopSourceScheduleRoutine(void *info, CFRunLoopRef r1, CFStringRef mode);
void RunLoopSourcePerformRoutine(void *info);
void RunLoopSourceCancelRoutine(void *info, CFRunLoopRef r1, CFStringRef mode);

// RunLoopContext is a container object used during registration of the input source.
@interface RunLoopContext: NSObject {
  CFRunLoopRef runLoop;
  RunLoopSource *source;
}

@property (readonly) CFRunLoopRef runLoop;
@property (readonly) RunLoopSource *source;

- (id)initWithSource:(RunLoopSource *)src andLoop:(CFRunLoopRef)loop;
@end
调度一个run loop source
void RunLoopSourceScheduleRoutine(void *info, CFRunLoopRef r1, CFStringRef mode) {
  RunLoopSource *obj = (RunLoopSource*)info;
  AppDelegate *del = [AppDelegate sharedAppDelegate];
  RunLoopContext *theContext = [[RunLoopContext alloc] initWithSource:obj andLoop:rl];
  [del performSelectorOnMainThread:@selector(registerSource:) withObject:theContext waitUntilDone:NO];
}
执行
void RunLoopSourcePerformRoutine(void *info) {
  RunLoopSource *obj = (RunLoopSource *)info;
  [obj sourceFired];
}
取消input source
void RunLoopSourceCancelRoutine(void *info, CFRunLoopRef r1, CFStringRef mode) {
  RunLoopSource *obj = (RunLoopSource *)info;
  AppDelegate *del = [AppDelegate sharedAppDelegate];
  RunLoopContext *theContext = [[RunLoopContext alloc] initWithSource: obj andLoop:r1];

  [del performSelectorOnMainThread:@selector(removeSource:) withObject:theContext waitUntilDone:YES];
}
将input source添加到Run Loop
- (id)init {
  CFRunLoopSourceContext context = {0, self, NULL, NULL, NULL, NULL, NULL, &RunLoopSourceScheduleRoutine, RunLoopSourceCancelRoutine, RunLoopSourcePerformRoutine};
  runLoopSource = CFRunLoopSourceCreate(NULL, 0, &context);
  commands = [[NSMutableArray alloc] init];

  return self;
}

- (void)addToCurrentRunLoop {
  CFRunLoopRef runLoop = CFRunLoopGetCurrent();
  CFRunLoopAddSource(runLoop, runLoopSource, kCFRunLoopDefaultMode);
}
与clients的input source进行协调
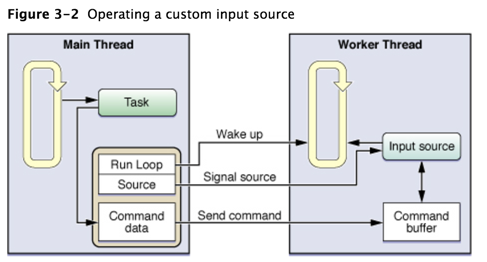
次级线程的input source的client就只有一个,即主线程。如果想要input source变得更加有用的话,那就需要从另一个线程中操控并且标志它,关键点就在于将input source相关的线程进行休眠,在需要处理事件时唤醒。这就要求有另外的线程知悉input source的状态并且能够与其进行交互。
通知client的方法之一是在input source首次被添加到run loop中的时候发出注册的命令。下面的代码展示了利用application delegate来注册和移除一个input source
- (void)registerSource:(RunLoopContext *)sourceInfo {
  [sourcesToPing addObject:sourceInfo];
}

- (void)removeSource:(RunLoopContext *)sourceInfo {
  id objToRemove = nil;
  for (RunLoopContext *context in sourcesToPing) {
    if ([context isEqual:sourceInfo]) {
      objToRemove = context;
      break;
    }
  }

  if (objToRemove) [sourceToPing removeObject:objToRemove];
}
标记Input Source
在传递数据给input source之后,client必须标记source并且唤醒其run loop。
- (void)fireCommandsOnRunLoop:(CFRunLoopRef)runloop {
  CFRunLoopSourcesSignal(runLoopSource);
  CFRunLoopWakeUp(runloop);
}
配置Timer Sources
要创建一个timer source的话,仅需要创建一个timer对象并添加到run loop当中。在Cocoa中,使用NSTimer来创建timer对象,在CF中使用CFRunLoopTimerRef。通过下面的两个方法可知,使用NSTimer会方便点:
scheduledTimerWithTimeInterval:target:selector:userInfo:repeats:scheduledTimerWithTimeInterval:invocation:repeats:
这两个方法会创建timer并将它添加到默认类型(NSDefaulRunLoopMode)的run loop的当前线程中。也可以通过NSRunLoop的addTimer:forMode:方法来将timer添加到run loop中。
Port-Based Input Source的配置
Cocoa和Core Foundation都提供了在线程和进程之间用于交互的port-based 对象。
NSMachPort
使用NSMachPort的话,在主要线程的run loop中创建该对象并添加。在运行次级线程的时候,将同个NSMachPort对象传入线程的入口中。
主线程的实现代码
- (void)launchThread {
  NSPort *myPort = [NSMachPort port];
  if (myPort) {
    // This class handles incoming port message.
    [myPort setDelegate: self];

    // Install the port as an input source on the current run loop.
    [[NSRunLoop currentRunLoop] addPort:myPort forMode:NSDefaultRunLoopMode];

    // Detach the thread. Let the worker release the port
    [NSThread detachNewThreadsSelector:@selector(LaunchThreadWithPort:) toTarget:[MyWorkerClass class] withObject:myPort];
  }
}
除了在主线程中创建和添加对象之外,还需要处理端口传递过来的消息
#define kCheckinMessage 100
// Handle response from the worker thread
- (void)handlePortMessage:(NSPortMessage *)portMessage {
  unsigned int message = [portMessage msgid];
  NSPort *distantPort = nil;
  if (message == kCheckinMessage) {
    // Get the worker thread's communications port
    distantPort = [portMessage sendPort];

    // Retain and save the worker port for later use
    [self storeDistantPort:distantPort];
  } else {
    // Handle other message.
  }
}
次级线程的实现代码
加载次级线程
+ (void)LaunchThreadWithPort:(id)inData {
  NSAutoreleasePool *pool = [[NSAutoreleasePool alloc] init];

  // Set up the connection between this thread and the main thread
  NSPort *distantPort = (NSPort *)inData;
  MyWorkerClass *workerObj = [[self alloc] init];
  [workerObj sendCheckinMessage:distantPort];
  [distantPort release];

  do {
    [[NSRunLoop currentRunLoop] runMode:NSDefaultRunLoopMode beforeDate:[NSDate distantFuture]];
  } while (![workerObj shouldExit]);

  [workerObj release];
  [pool release];
}
使用Mach ports来发送check-in消息
- (void)sendCheckinMessage:(NSPort *)outPort {
  // Retain and save the remote port for future use.
  [self setRemotePort:outPort];

  // Create and configure the worker thread port
  NSPort *myPort = [NSMachPort port];
  [myPort setDelegate: self];
  [[NSRunLoop currentRunLoop] addPort:myPort forMode:NSDefaultRunLoopMode];

  //  Create the check-in message.
  NSPortMessage *messageObj = [[NSPortMessage alloc] initWithSendPort:outPort receivePort:myPort components:nil];

  if (messageObj) {
    // Finish configuring the message and send it immediately
    [messageObj setMsgId:kCheckinMessage];
    [messageObj sendBeforeDate:[NSDate date]];
  }
}
NSMessagePort
在线程中使用port对象的话,需要给port对象取个名,然后再将这个名字告知给其他线程即可。
NSPort *localPort = [[NSMessagePort alloc] init];

// Configure the object and add it to the current run loop.
[localPort setDelegate:self];
[[NSRunLoop currentRunLoop] addPort:localPort forMode:NSDefaultRunLoopMode];

// Register the port using a specific name. The name must be unique.
NSString *localPortName = [NSString stringWithFormat:@"MyPortName"];
[[NSMessagePortNameServer sharedInstance] registerPort:localPort name:localPortName];
锁
POSIX互斥锁
pthread_mutex_t mutex;
void MyInitFunction() {
  pthread_mutex_init(&mutex, NULL);
}

void MyLockingFunction() {
  pthread_mutex_lock(&mutex);
  // Do work.
  pthread_mutex_unlock(&mutex);
}
NSLock
BOOL moreToDo = YES;
NSLock *theLock = [[NSLock alloc] init];
...
while (moreToDo) {
  /* Do another increment of calculation */
  /* until there's no more to do */
  if ([theLock tryLock]) { // tryLock方法会尝试获取某个锁,且失败的时候不会去阻塞线程
    /*Update display used by all threads. */
    [theLock unlock];
  }
}
@synchronized
在OC中,@synchronized默认是创建互斥锁。
- (void)myMethod:(id)anObj {
  @synchronized(anObj) {
    // Everything between the braces is protected by the @synchronized directive.
  }
}
传递给@synchronized的参数可以将其当做一个唯一的标识符来看待。举个例子说,如果你有两个线程在运行,给每个线程传递不同的对象(标识符)的话,则每个线程都会获取到自己的互斥锁而不会影响彼此。
@synchronized除了创建互斥锁以外,还隐式地增加了错误处理机制。该机制会自动释放互斥锁。
Cocoa的其他锁
NSRecursiveLock
NSRecursiveLock定义了在同一线程中可以多次使用且不会引起死锁问题的锁。递归锁会记录其成功次数,在解锁时就需要解锁相同的次数。只有加锁和解锁次数完全一致时才能将此锁释放。
NSRecursiveLock *theLock = [[NSRecursiveLock alloc] init];

void MyRecursiveFunction(int value) {
  [theLock lock];
  if (value != 0) {
    --value;
    MyRecursiveFunction(value);
  }
  [theLock unlock];
}

MyRecursiveFunction(5);
NSConditionLock
NSConditionLock定义了含有条件的互斥锁。
id condLock = [[NSConditionLock alloc] initWithCondition:NO_DATA];

while(true) {
  [condLock lock];
  /* Add data to the queue */
  [condLock unlockWithCondition:HAS_DATA];
}
NSDistributedLock
NSDistributedLock是一种用于文件系统的的互斥锁。跟其他锁不同的是,NSDistributedLock并不需要遵守NSLocking协议,也没有lock方法,取而代之的是tryLock方法
因为这种类型的锁是用在文件系统上面的,所以只有在你显示释放的时候才会完全释放。
