

一、项目结构
Vue & Angular
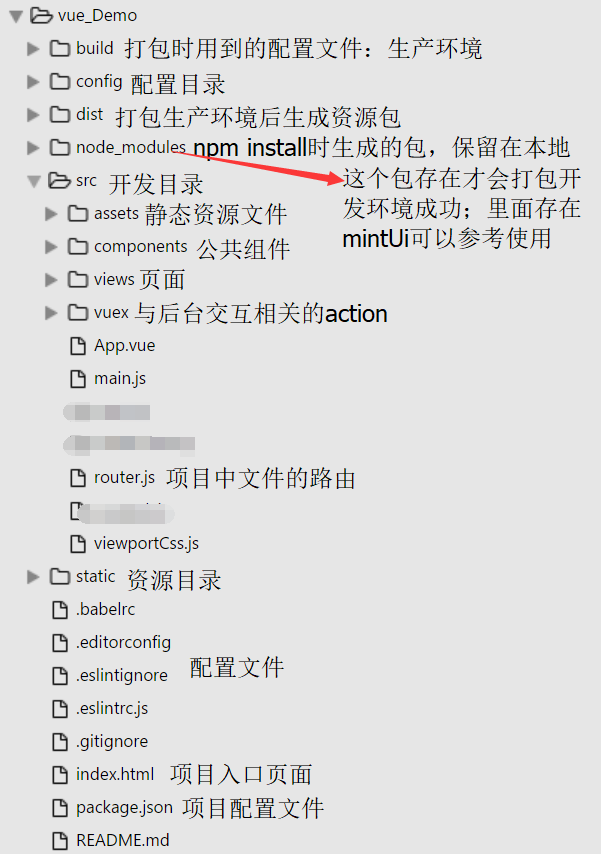
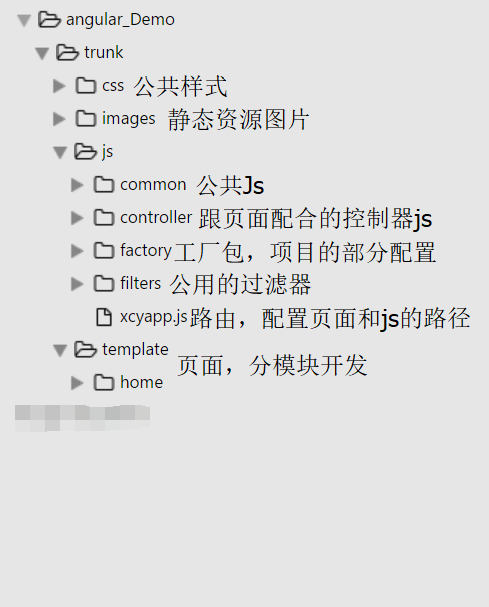
因为我目前是做微信公众号开发和维护的,所以angular的目录结构可能不够完整,仅供参考。
tips:vue项目用的是node.js包管理器打包项目的。angular项目是用nginx环境运行。
二、语法
1.v-if,v-show & ng-if,ng-show
v-if:条件判断,不满足条件的话则不会生成DOM;
v-show:判断是否显示,不管条件满不满足都会生成DOM中,不满足时样式会被设置为display:none;
ng-if:根据表达式的值在DOM中生成或移除元素,注意:DOM被移除时,同它关联的作用域也会被销毁。
    当它重新加入DOM中时,会通过原型继承从它的父作用域生成一个新的作用域。
    也就是说ng-if会新建作用域,而ng-show和ng-hide则不会;
ng-show:通过表达式的值判断是否显示,值为false时会被隐藏,通过display控制;
2.v-bind,v-model & ng-bind,ng-model
v-bind:绑定属性和数据,缩写是:  ;
v-model:绑定数据,使用在表单控件上实现数据的双向绑定;
ng-bind:view的单向绑定,相当于{{object.xxx}},是用于展示数据的;
ng-model:view的双向绑定;
3.v-for & ng-repeat
v-for:循环数组和对象,有两个参数key,index;其中数组是没有key值的,对象是可以得到key值
    例如:
    <ul> <!--循环对象-->
        <li v-for="(item,index,key) in Obj">
            <div>key:{{key}}</div>
            <div>index:{{index}}</div>
        </li>
    </ul>
    <ul> <!--循环数组-->
        <li v-for="(temp,index) in Arr">
            <div @click="showDiv(temp,index)">{{temp.name}}</div>
        </li>
    </ul>
    tips:循环时,不能使用this绑定组件,只能在函数中传入Index或其他特征值进行判断选中的div
ng-repeat:循环输出指定次数的html元素,$index是循环时自带的索引
    例如:
    <ul>
        <li ng-repeat="data in Arr track by $index">
            <div>data.name</div>
            <div ng-show="data.id==$index">data.age</div>
        </li>
    </ul>
三、组件
- vue:公共组件放在components中,是否显示通过父组件传参控制,调用时是在页面中引用此组件,以此为标签显示
<template> <div class="mainConent"> <popList v-show = 'showListFlag' :data = 'tableData' :sureFun = 'sureFun'></popList> </div> </template> <script> import popList from './../components/popList' export default { data () { return { showListFlag:false //控制列表是否显示 } }, components:{poplist},//引用组件 methods:{ sureFun(){//传入的确定方法,显示组件 this.showListFlag = true; } } } </script>- angular: 使用自定义指令实现模块化开发
- 设置项restrict:EACM,每个字母表示一种使用自定义指令的方式。
restrict:E:标签使用
restrict:A:属性使用
restrict:C:类名使用
restrict:M,需同步设replace:true:注释使用
<!--在对应的Js中或者公共的js中定义一个registerDirective-->
"use strict";
define(['xcyapp', 'angular'], function(xcyapp, angular) {
    xcyapp.registerDirective('datalist',["$timeout",function($timeout){
        return {
            restrict:'E',//值可以根据需求换成EACM
            replace:true,
            scope:{
                data:'='//指令中要传入的数据
            },
            template:'<ul>'+
                        '<li>自定义指令</li>'+
                      '</ul>',
            link:function(scope,element,attrs){

            }
        }
    }]);
});
<!--页面上-->
<datalist data="data"></datalist>
四、跳转
- Vue:
- 使用<router-view></router-view>用来通过路由渲染的组件,当路径更改时router-view的内容也会更改
- tag表示跳转后成为的标签,to为跳转的链接和参数。
router-link映射路由,适合只需要跳转页面不需要验证方法的情况
tips:编译后router-link会被渲染为a标签,to变为href <router-link tag = 'p':to="{name:'index',params:{code:1}}"></router-link>- 编程式导航:
<button @click="changePage"></button>methods:{ changePage(){ this.$router.push({path:'/home/index'});//对象模式 //this.$router.push({path:'/home/index',params:{code:1}}); } }- 最后提醒一下router-link跳转方式可能会让整行列表点击,如果列表中有展开按钮或者查看按钮可以使用@click.stop阻止时间冒泡实现在router-link中的button也可以点击。
- Angular:
$location.path("/home/index");$state.go('home.index');window.location="/index#/home/index";var url=$state.href('home.index',{code:1});window.open(url,'_self');
最后:
就这么多啦,最近才用了angular,所以懂的还不是很多。。
