

同样的工作还需要再来一次
在第二篇章的开始,首先要做的事就是忘记上一章写过的代码,但一定要记得 string -> tokens -> ast 这么一个流程,对于实际的项目中,这个流程会比理论上复杂很多,但整体总会遵循这么一个规则,然后正式开始~
首先脚本运行 npx create-react-app my-app
反正就叫 my-app 就好了,主要还是用这个项目进行测试,顺便附带官方文档
继续脚本运行
 cd my-app
 npm run eject
好了,一个测试用 react 项目就创建完成了,是不是非常简单呢~
一个小 tip,一般情况下,如果需要做 eject 之后相关的测试的话,非常建议先用 git commit 一下 eject 之后的代码,至于有什么用途嘛(手动斜眼
做完上面的事情之后,就可以得到了这么一个文件结构的目录
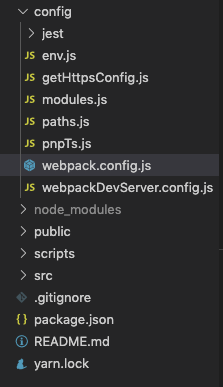
大多数情况下只需要关心 webpack.config.js 这样一个文件,当然 react 中的这个文件和之前精简版的内容复杂度是完全不一样的,其它的文件基本上也都是在为 webpack.config.js 服务,所以,接下来需要新建 loader/remix-loader.js 并且写入
module.exports = function(source) {
    console.log('source:', source)
    return source;
};
一个和之前一模一样的不做任何内容的 loader,虽然这个 loader 好像和其它对项目重名了,但我感觉目前应该无所谓吧,贴合项目本身但命名感觉会更好一点~
那么问题来了,这个 loader,要如果被正确的引用呢?如果是第一次 eject 代码或者做相关调试的话,对于这个 webpack.config.js 代码应该是一脸迷茫吧大概 orz
不过在忽略一些这次不需要关注的配置之后,大概应该可以找到和精简版类似的数据结构,类似于
{
    ...
    module: {
        ...
        rules: [ ... ],
        ...
    },
    ...
}
虽然多了一些看起来没什么用的代码(大雾),但总归是可以找到 rules 这样一个节点,在忽略了其它配置之后,可以对 webpack.config.js 做这样一个改造
diff --git a/config/webpack.config.js b/config/webpack.config.js
index c058190..66c8513 100644
--- a/config/webpack.config.js
+++ b/config/webpack.config.js
@@ -362,35 +362,38 @@ module.exports = function(webpackEnv) {
             // Process application JS with Babel.
             // The preset includes JSX, Flow, TypeScript, and some ESnext features.
             {
-              test: /\.(js|mjs|jsx|ts|tsx)$/,
+              test: /\.(js|mjs|jsx|ts|tsx|rex)$/,
               include: paths.appSrc,
-              loader: require.resolve('babel-loader'),
-              options: {
-                customize: require.resolve(
-                  'babel-preset-react-app/webpack-overrides'
-                ),
-
-                plugins: [
-                  [
-                    require.resolve('babel-plugin-named-asset-import'),
-                    {
-                      loaderMap: {
-                        svg: {
-                          ReactComponent:
-                            '@svgr/webpack?-svgo,+titleProp,+ref![path]',
+              use: [{
+                loader: require.resolve('babel-loader'),
+                options: {
+                  customize: require.resolve(
+                    'babel-preset-react-app/webpack-overrides'
+                  ),
+                  plugins: [
+                    [
+                      require.resolve('babel-plugin-named-asset-import'),
+                      {
+                        loaderMap: {
+                          svg: {
+                            ReactComponent:
+                              '@svgr/webpack?-svgo,+titleProp,+ref![path]',
+                          },
                         },
                       },
-                    },
+                    ],
                   ],
-                ],
-                // This is a feature of `babel-loader` for webpack (not Babel itself).
-                // It enables caching results in ./node_modules/.cache/babel-loader/
-                // directory for faster rebuilds.
-                cacheDirectory: true,
-                // See #6846 for context on why cacheCompression is disabled
-                cacheCompression: false,
-                compact: isEnvProduction,
-              },
+                  // This is a feature of `babel-loader` for webpack (not Babel itself).
+                  // It enables caching results in ./node_modules/.cache/babel-loader/
+                  // directory for faster rebuilds.
+                  cacheDirectory: true,
+                  // See #6846 for context on why cacheCompression is disabled
+                  cacheCompression: false,
+                  compact: isEnvProduction,
+                },
+              }, {
+                loader: './loader/remix-loader'
+              }],
             },
             // Process any JS outside of the app with Babel.
             // Unlike the application JS, we only compile the standard ES features.
diff 文件看起来有些复杂的原因是因为出现了缩进相关的改动,实际上的改动只有那么一丢丢啊喂
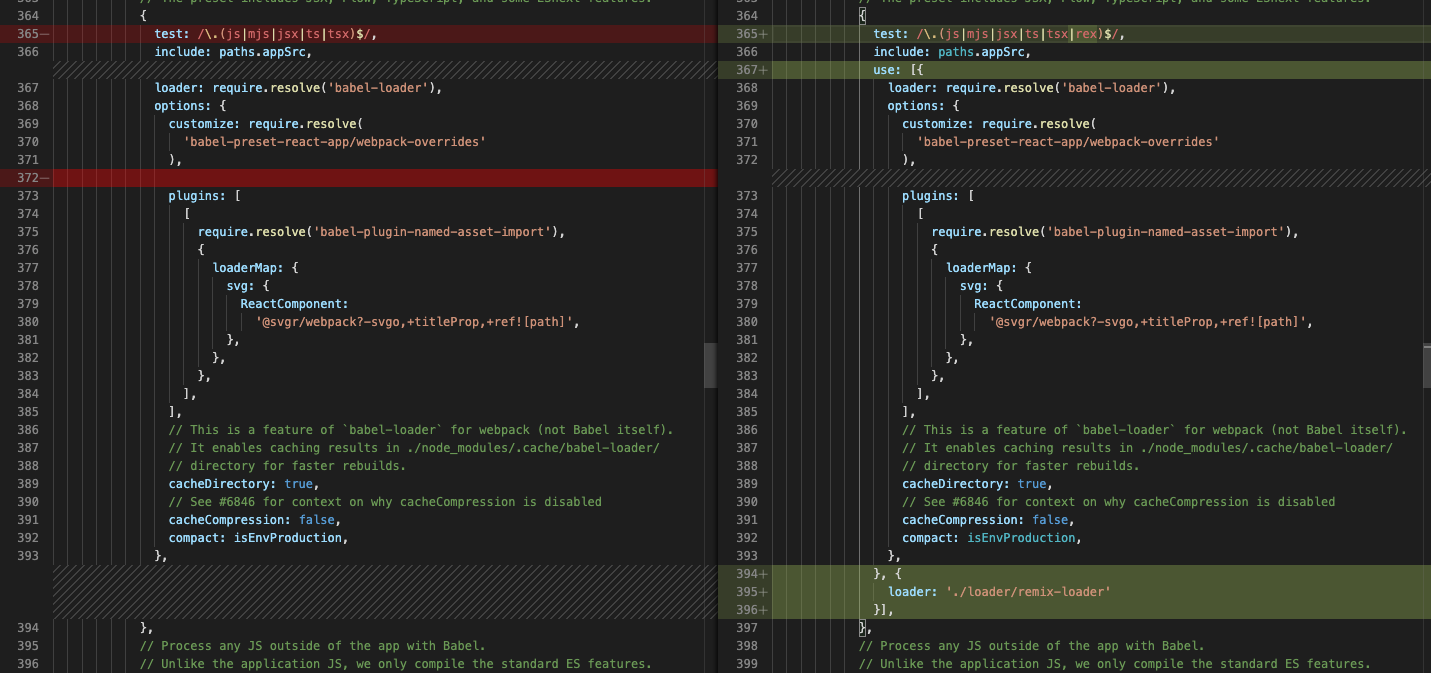
使用 ide 的 diff 果然看起来舒服多了,顺便这里就是之前提到的为什么 eject 之后建议 commit 一下的原因 orz(方便 diff
注意事项要来了哈
1.webpack 的 loader 加载机制是从下到上加载的,即下面 loader 的处理结果丢给上一个 loader
2.webpack 的 loader 加载机制是从下到上加载的 ...
3. ... 从下到上加载的 ...
从下到上的加载机制有那么一丢丢反直觉,想我这种有时候懒得翻文档的人就踩坑了 orz
另外,loader 的引入暂时就先这么写吧,因为懒~
至少目前来看,我们又恢复了上一期视频,呸,上一篇文章的状态,可以专注去实现一个 string -> ... -> js string 这样一个 loader 了噢耶
那么再来定这么一个小目标~
好吧,因为上一个实验性质的 loader 只是非常简单的用正则匹配关键字然后生成 js 代码,没有任何价值的产物。而这次的 loader,可能稍稍会有那么一丢丢的价值。
首先必须要明确一下,因为在 source 阶段,loader 可以拿到所有的源码的字符串,所以要确定哪些代码是在 loader 时期被解决的,哪些代码是在其它时候被解决的,这个非常非常重要。
原则上,loader 应该只做 string -> js string 这样一个转换的过程,但是目前为止,手头上但工具只有 loader, 所以只能先混杂在一起简单处理了
这次要处理但 .rex 文件,大概长这么个样子,看起来比之前复杂了不少呢(手动斜眼
import React from 'react'

@[COMPONENT]

const props = @{RexProps}
const [count, setCount] = React.useState(0)

const onAddCount = () => {
    setCount(x => x + 1)
}

@[RENDER] |> count === 2

<div className="name">render by condition</div>
<div>count: {count}</div>
<div onClick={onAddCount}>add count</div>

@[RENDER]

<div className="name">
    render
    <span> {props.name || 'none' }</span>
</div>
<div>count: {count}</div>
<div onClick={onAddCount}>add count</div>


@[STYLE]

.name {
    color: red;

}
.name span {
    color: ${count === 4 ? 'yellow' : 'blue' }
}
如果不出意外的话,编译之后的 js string 的期望大概是下面的结果(简略版
export default function(__REX_PROPS__) {
    const props = __REX_PROPS__
    ... // component code

    const __REX_STYLES__ = ` ... ` // style code

    if (count === 2) {
        return (
            <React.Fragment>
            ... // condition render code
            <style jsx>{__REX_STYLES__}</style>
            </React.Fragment>
        )
    }
    return (
        <React.Fragment>
        ... // render code
        <style jsx>{__REX_STYLES__}</style>
        </React.Fragment>
    )
}
和最开始的大目标相比,这里为了方便实现,做了一些简单的修改
- 使用
@{RexProps}特殊标示获得props - 魔改管道操作符
|>的定义,暂时只作为 render 的判断条件使用 - css 使用
styled-jsx的方案
好啦,这次的目标就是,可以让这部分代码顺利执行~
如何实现一个正经一点的 loader
作为一个正经的 loader,肯定需要正经的去解析相关的自定义语法了。感觉上和之前一样,还是 string -> ... -> js string 这样一个流程,只不过需要解析的字符串会复杂很多,所以,这个时候就需要去到什么地方 copy 一个算法来实现需求,能在巨人的肩膀上就不要自己慢慢爬了(笑
分享一个可以 copy 的算法:github.com/starkwang/t…
有兴趣的可以学习一下,没兴趣的可以像我一样直接 copy(手动斜眼
const initialToken = {
    type: 'source',
    value: '',
    args: {},
    pipes: [],
}

function clone(obj) {
    return JSON.parse(JSON.stringify(obj));
}

function getTokens(input) {
    const tokens = []
    let cur = 0
    let token = clone(initialToken)
    while(cur < input.length) {
        let char = input[cur]
        // 解析 @[module(key='value')]
        if (char === '@' && input[cur + 1] === '[') {
            let str = ''
            char = input[++cur] // 当前 char: '['
            while(char !== ']' && cur < input.length) {
                char = input[++cur]
                if (char === '\'') {
                    // 归一化引号,便于格式化
                    char = '"'
                }
                str += char
            }
            // str 归一化为小写, 去掉结尾的 ']'
            str = str.toLocaleLowerCase().slice(0, -1)
            // 设置上一个 module 的 token, 并且重置数据
            tokens.push(token)
            token = clone(initialToken)

            // str: MODULE(agrs='value')
            const m = str.split(/\(|\)/).map(x => x.trim()).filter(Boolean)
            token.type = m[0]

            // 判断是否存在 args
            if (m[1]) {
                const s = m[1].split(/\,|=/).map(x => x.trim()).filter(Boolean)
                for (let i = 0; i < s.length; i += 2) {
                    const key = s[i];
                    const value = JSON.parse(s[i + 1])
                    token.args[key] = value
                }
            }
            cur++ // 跳过结尾的 ']'
            continue
        }
        // 解析 |> 操作符
        if (char === '|' && input[cur + 1] === '>') {
            let str = ''
            cur += 2
            char = input[cur] // 当前 char: '>' + 1
            // 跳过空白字符
            while(char.match(/\s/) && cur < input.length) {
                char = input[++cur]
            }
            let deep = 0
            // 匹配管道操作符
            // 因为这里只匹配表达式,所以匹配做了简单修改 \s -> \n
            while((deep || !char.match(/\n/)) && cur < input.length) {
                str += char
                // 判断括号是否匹配完成
                if (char.match(/\(|\[|\{/)) {
                    deep++
                }
                if (char.match(/\)|\]|\}/)) {
                    deep--
                }
                char = input[++cur]
            }
            token.pipes.push(str)
            continue
        }
        token.value += char
        cur++
    }
    tokens.push(token)
    return tokens
}

const REX_PROPS = '__REX_PROPS__'
const REX_STYLES = '__REX_STYLES__'

function parseTokens(tokens) {
    let component = ''
    let renders = ''
    let source = ''
    let styles = ''
    for (const token of tokens) {
        if (token.type === 'source') {
            // 设置 source code
            source += token.value
        }
        if (token.type === 'component') {
            // 设置 component code, 并且替换 @{RexProps}
            component = token.value.replace('@{RexProps}', REX_PROPS)
        }
        if (token.type === 'render') {
            // 设置 render code
            let render = `return (
                <React.Fragment>
                    ${token.value}
                    <style jsx>{\`${REX_STYLES}\`}</style>
                </React.Fragment>
            )`
            if (token.pipes.length) {
                // 临时使用 pipes[0] 作为是否 render 的条件
                const condition = token.pipes[0]
                render = `if (${condition}) {${render}}`
            }
            render = `\n${render}\n`
            renders += render
        }
        if (token.type === 'style') {
            // 设置 styles code
            styles += token.value
        }
    }
    // 全局替换 __REX_STYLES__ 占位符
    renders = renders.replace(/__REX_STYLES__/g, styles)
    const func = `export default function (${REX_PROPS}) {
        ${component}
        ${renders}
    }`

    source += func
    return source
}

module.exports = function(source) {
    // 只处理 rex 后缀的文件
    if (!this.resourcePath.endsWith('.rex')) {
        return source
    }
    const tokens = getTokens(source)
    const parsedSource = parseTokens(tokens)
    return parsedSource
};
虽然还不是最正经的 loader,但和之前但那个相比,这个已经好了很多了,然后,我讨厌算法,这种代码没有什么可以分析解读的 = =
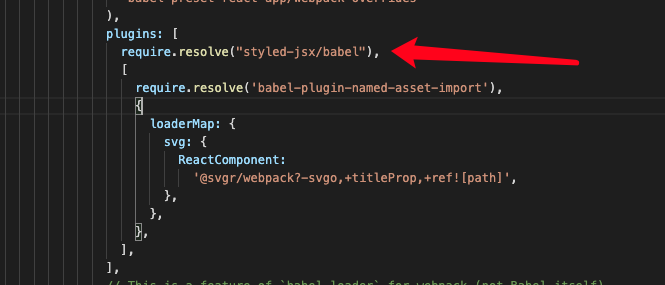
哦对了,为了支持 styled-jsx,所以需要先运行脚本 yarn add styled-jsx,然后去更改 webpack babel 的配置,就像这样
这里遇到了某个不符合期望的地方,就是 styled-jsx 的使用方案并没有完全符合预期,虽然可能提供了符合预期的方案,但使用 styled-jsx 并不是最终期望的结果,不然这个项目的乐趣就少了一大半
不要问我哪里不符合期望,编译结果和期望结果对比一下就知道了 orz
这个测试用项目就不放出源码了,因为改动太少了
出去 loader 之后完整的 diff 如下
diff --git a/config/webpack.config.js b/config/webpack.config.js
index c058190..95a5990 100644
--- a/config/webpack.config.js
+++ b/config/webpack.config.js
@@ -362,35 +362,39 @@ module.exports = function(webpackEnv) {
             // Process application JS with Babel.
             // The preset includes JSX, Flow, TypeScript, and some ESnext features.
             {
-              test: /\.(js|mjs|jsx|ts|tsx)$/,
+              test: /\.(js|mjs|jsx|ts|tsx|rex)$/,
               include: paths.appSrc,
-              loader: require.resolve('babel-loader'),
-              options: {
-                customize: require.resolve(
-                  'babel-preset-react-app/webpack-overrides'
-                ),
-
-                plugins: [
-                  [
-                    require.resolve('babel-plugin-named-asset-import'),
-                    {
-                      loaderMap: {
-                        svg: {
-                          ReactComponent:
-                            '@svgr/webpack?-svgo,+titleProp,+ref![path]',
+              use: [{
+                loader: require.resolve('babel-loader'),
+                options: {
+                  customize: require.resolve(
+                    'babel-preset-react-app/webpack-overrides'
+                  ),
+                  plugins: [
+                    require.resolve("styled-jsx/babel"),
+                    [
+                      require.resolve('babel-plugin-named-asset-import'),
+                      {
+                        loaderMap: {
+                          svg: {
+                            ReactComponent:
+                              '@svgr/webpack?-svgo,+titleProp,+ref![path]',
+                          },
                         },
                       },
-                    },
+                    ],
                   ],
-                ],
-                // This is a feature of `babel-loader` for webpack (not Babel itself).
-                // It enables caching results in ./node_modules/.cache/babel-loader/
-                // directory for faster rebuilds.
-                cacheDirectory: true,
-                // See #6846 for context on why cacheCompression is disabled
-                cacheCompression: false,
-                compact: isEnvProduction,
-              },
+                  // This is a feature of `babel-loader` for webpack (not Babel itself).
+                  // It enables caching results in ./node_modules/.cache/babel-loader/
+                  // directory for faster rebuilds.
+                  cacheDirectory: true,
+                  // See #6846 for context on why cacheCompression is disabled
+                  cacheCompression: false,
+                  compact: isEnvProduction,
+                },
+              }, {
+                loader: './loader/remix-loader'
+              }],
             },
             // Process any JS outside of the app with Babel.
             // Unlike the application JS, we only compile the standard ES features.

diff --git a/package.json b/package.json
index a6b1dca..428455e 100644
--- a/package.json
+++ b/package.json
@@ -53,6 +53,7 @@
     "sass-loader": "8.0.2",
     "semver": "6.3.0",
     "style-loader": "0.23.1",
+    "styled-jsx": "^3.3.0",
     "terser-webpack-plugin": "2.3.5",
     "ts-pnp": "1.1.6",
     "url-loader": "2.3.0",
diff --git a/src/App.js b/src/App.js
index ce9cbd2..ab8ef09 100644
--- a/src/App.js
+++ b/src/App.js
@@ -1,10 +1,12 @@
 import React from 'react';
 import logo from './logo.svg';
 import './App.css';
+import Test from './test.rex'

 function App() {
   return (
     <div className="App">
+      <Test name="test name" />
       <header className="App-header">
         <img src={logo} className="App-logo" alt="logo" />
         <p>
diff --git a/src/test.rex b/src/test.rex
new file mode 100644
index 0000000..9269556
--- /dev/null
+++ b/src/test.rex
@@ -0,0 +1,36 @@
+import React from 'react'
+
+@[COMPONENT]
+
+const props = @{RexProps}
+const [count, setCount] = React.useState(0)
+
+const onAddCount = () => {
+    setCount(x => x + 1)
+}
+
+@[RENDER] |> count === 2
+
+<div className="name">render by condition</div>
+<div>count: {count}</div>
+<div onClick={onAddCount}>add count</div>
+
+@[RENDER]
+
+<div className="name">
+    render
+    <span> {props.name || 'none' }</span>
+</div>
+<div>count: {count}</div>
+<div onClick={onAddCount}>add count</div>
+
+
+@[STYLE]
+
+.name {
+    color: red;
+
+}
+.name span {
+    color: ${count === 4 ? 'yellow' : 'blue' }
+}
\ No newline at end of file
如果要求不高的话,这种代码稍微改改优化一下,基本上可以达到可以用的程度了,但这种没有经过测试和验证的代码并没有什么真正意义上的价值 = =
这里可以列举一下这种方案的一些问题,所以如果还有之后的 part 的话应该就是要解决下面这些问题(手动斜眼
1. 不能买足日常开发的需求(实际上这个是很容易解决的
2. 直接对源码操作太过危险(只用 loader 的情况下只能先用这种方案 orz
3. 果然还是想自己动手撸一个 css-in-js 方案
如果继续开发的这个组件的话,css 方案应该会继续使用 styled-jsx 虽然是我第一次使用这个库,但肯定比我自己手撸的要好用,对,我需要更多的调研~
好啦,可以试着走一次发布了~
从不知道哪里的项目中 copy 一些发布用文件,然后直接 npm publish,这个过程是需要登陆的,具体 npm 发布流程请各位大佬自行百度 orz
项目地址在这里~ github.com/frontend-ki…
实际上就是把之前写的代码 copy 了进去
然后就可以按照正常使用 webpack loader 的方式去使用了,但是呢!通过正常的方式很难去修改 node_modules 里面的 webpack.config.js,所以这么为了应对这么常见的功能,已经有大佬写了一些库来帮助我们,反正随便选一个就行,这里就使用常用的 react-app-rewired(第一次用这个,之前一直在用 carco,反正差不多的样子 orz
然后脚本执行
npx create-react-app my-app
cd my-app
yarn add styled-jsx react-app-rewired remix-loader@0.0.2
不要问我为什么锁了版本,不要问我为什么版本是 0.0.2,问就是不知道 orz(因为翻车了一次
之后按照 react-app-rewired 在根目录创建 config-overrides.js,写入内容
const includeRegexp = /\.(js|mjs|jsx|ts|tsx)$/

module.exports = function(config, env) {
    for (const rule of config.module.rules) {
        if (rule.oneOf) {
            for (const r of rule.oneOf) {
                if (String(r.test) === String(includeRegexp)) {
                    const l = {
                        loader: r.loader,
                        options: r.options,
                    }
                    l.options.plugins.push(require.resolve("styled-jsx/babel"),)
                    delete r.loader
                    delete r.options
                    r.test = /\.(js|mjs|jsx|ts|tsx|rex)$/
                    r.use = [l, {
                        loader: require.resolve('remix-loader')
                    }]
                }
            }
        }
    }
    return config;
}
对,就是把之前直接修改 config 的方式换成了修改 json 节点的方式,直觉告诉我这种修改的时效性应该是十分有限的(万一官方更新了 webpack.config.js 的节点结构,这个肯定就不能用了 orz
配置就只有这么多,剩下就可以当作是一个正常的项目来使用 .rex 文件了
最后附上大量的 diff 文件,基本上除了 config-overrides.js 都是重复内容
diff --git a/config-overrides.js b/config-overrides.js
new file mode 100644
index 0000000..83beca5
--- /dev/null
+++ b/config-overrides.js
@@ -0,0 +1,24 @@
+const includeRegexp = /\.(js|mjs|jsx|ts|tsx)$/
+
+module.exports = function(config, env) {
+    for (const rule of config.module.rules) {
+        if (rule.oneOf) {
+            for (const r of rule.oneOf) {
+                if (String(r.test) === String(includeRegexp)) {
+                    const l = {
+                        loader: r.loader,
+                        options: r.options,
+                    }
+                    l.options.plugins.push(require.resolve("styled-jsx/babel"),)
+                    delete r.loader
+                    delete r.options
+                    r.test = /\.(js|mjs|jsx|ts|tsx|rex)$/
+                    r.use = [l, {
+                        loader: require.resolve('remix-loader')
+                    }]
+                }
+            }
+        }
+    }
+    return config;
+}
\ No newline at end of file
diff --git a/package.json b/package.json
index 76f4685..067b251 100644
--- a/package.json
+++ b/package.json
@@ -7,13 +7,16 @@
     "@testing-library/react": "^9.3.2",
     "@testing-library/user-event": "^7.1.2",
     "react": "^16.13.1",
+    "react-app-rewired": "^2.1.6",
     "react-dom": "^16.13.1",
-    "react-scripts": "3.4.1"
+    "react-scripts": "3.4.1",
+    "remix-loader": "0.0.2",
+    "styled-jsx": "^3.3.0"
   },
   "scripts": {
-    "start": "react-scripts start",
-    "build": "react-scripts build",
-    "test": "react-scripts test",
+    "start": "react-app-rewired start",
+    "build": "react-app-rewired build",
+    "test": "react-app-rewired test",
     "eject": "react-scripts eject"
   },
   "eslintConfig": {
diff --git a/src/App.js b/src/App.js
index ce9cbd2..b46b699 100644
--- a/src/App.js
+++ b/src/App.js
@@ -1,10 +1,12 @@
 import React from 'react';
 import logo from './logo.svg';
 import './App.css';
+import Temp from './temp.rex'

 function App() {
   return (
     <div className="App">
+      <Temp name="test name" />
       <header className="App-header">
         <img src={logo} className="App-logo" alt="logo" />
         <p>
diff --git a/src/temp.rex b/src/temp.rex
new file mode 100644
index 0000000..9269556
--- /dev/null
+++ b/src/temp.rex
@@ -0,0 +1,36 @@
+import React from 'react'
+
+@[COMPONENT]
+
+const props = @{RexProps}
+const [count, setCount] = React.useState(0)
+
+const onAddCount = () => {
+    setCount(x => x + 1)
+}
+
+@[RENDER] |> count === 2
+
+<div className="name">render by condition</div>
+<div>count: {count}</div>
+<div onClick={onAddCount}>add count</div>
+
+@[RENDER]
+
+<div className="name">
+    render
+    <span> {props.name || 'none' }</span>
+</div>
+<div>count: {count}</div>
+<div onClick={onAddCount}>add count</div>
+
+
+@[STYLE]
+
+.name {
+    color: red;
+
+}
+.name span {
+    color: ${count === 4 ? 'yellow' : 'blue' }
+}
\ No newline at end of file
虽然 loader 这里留了很多坑,但总归可用一种毕竟正常的方式来使用了,留下的坑会在下一篇章解决,如果还有的话(手动斜眼
再次完结撒花~
