

1. 入口
本文的编译入口为 gradle 插件. 一般情况下, kotlin的gradle 工程一般都会引入这样一句话 apply plugin: 'kotlin'
开发过 gradle plugin 的同学都知道 pluginId 是定义在resource的xxx.properties里, 这里引用下Gradle官网的资料
Example 41.7. Wiring for a custom plugin
src/main/resources/META-INF/gradle-plugins/org.samples.greeting.properties
implementation-class=org.gradle.GreetingPlugin
以此推断必定有一个叫 kotlin.properties 的文件 , 然后很快找到了它 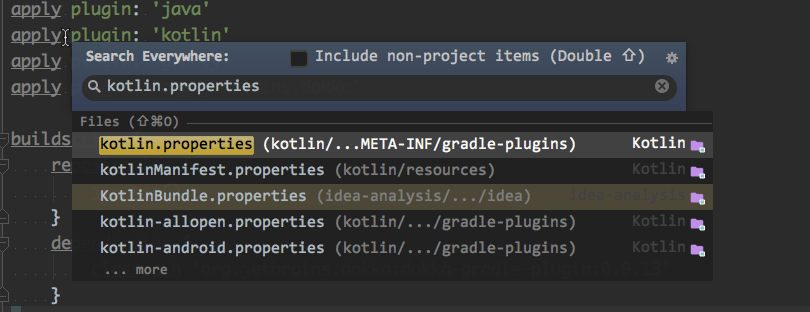
implementation-class=org.jetbrains.kotlin.gradle.plugin.KotlinPluginWrapper
所以 kotlin 的插件入口类是 KotlinPluginWrapper
接着我们就会发现 javacompile 和 kotlincompile 之间的关系
internal fun configureJavaTask(kotlinTask: KotlinCompile, javaTask: AbstractCompile, logger: Logger) {
    skip...
    // Make Gradle check if the javaTask is up-to-date based on the Kotlin classes
    javaTask.inputs.dir(kotlinTask.destinationDir)
    // Also, use kapt1 annotations file for up-to-date check since annotation processing is done with javac
    kotlinTask.kaptOptions.annotationsFile?.let { javaTask.inputs.file(it) }

    javaTask.dependsOn(kotlinTask)
    skip...
}
javaTask.dependsOn(kotlinTask), 这句话的意思就是在编译 java 之前, 先执行 kotlin 的编译
接下来我们继续跟踪KotlinCompile Task
Gradle Task的入口函数都会有个@TaskAction annotation , 根据这个特性, 我们很快就能找到编译的主入口runJvmCompiler
很快就可以追踪到真正编译 kotlin 的入口, CompileServiceImpl类的compile函数
override fun compile(
            sessionId: Int,
            compilerArguments: Array<out String>,
            compilationOptions: CompilationOptions,
            servicesFacade: CompilerServicesFacadeBase,
            compilationResults: CompilationResults?
    ): CompileService.CallResult<Int> = ifAlive {
        ...skip...
        @Suppress("UNCHECKED_CAST")
        val compiler = when (targetPlatform) {
            CompileService.TargetPlatform.JVM -> K2JVMCompiler()
            CompileService.TargetPlatform.JS -> K2JSCompiler()
            CompileService.TargetPlatform.METADATA -> K2MetadataCompiler()
        } as CLICompiler<CommonCompilerArguments>
        ...skip...
        doCompile(sessionId, daemonReporter, tracer = null) { _, _ ->
          compiler.exec(messageCollector, Services.EMPTY, k2PlatformArgs)
        }
    }
接着我们就到 kotlin -> JVM 的入口了
    public static void doGenerateFiles(
            @NotNull Collection<KtFile> files,
            @NotNull GenerationState state,
            @NotNull CompilationErrorHandler errorHandler
    )
需要注意的是, 这个函数其中一个必要入参是 KtFile的集合. 有过intellij Idea Plugin开发经验的人应该知道这个是Inellij Idea 里对应语言文件的 psiFile , Java文件对应的也有PsiJavaFile
关于PSI File的具体了解,可以看这里www.jetbrains.org/intellij/sd…
2. 编译
由于 kotlin 自定义的一些语法糖比较丰富, 所以这里将编译部分分开来讲.
2.1 Property
kotlin 定义属性有以下几种
class Address {
    val Country = "China"
    var street: kotlin.String = "name"
    lateinit var city: kotlin.String
    var state: kotlin.String? = null
        get() = ""
    var zip: Int? = null
        set(value) {
            field = value
        }
    val address: kotlin.String by kotlin.lazy { "$Country $city $street $state $zip" }

    var address1: kotlin.String by kotlin.properties.Delegates.observable(address) { _, old, new ->
        kotlin.io.println("oldValue = $old And newValue = $new")
    }
}
在下面的内容之前, 有个概念大家需要知道.
Backing Fields
Classes in Kotlin cannot have fields. However, sometimes it is necessary to have a backing field when using customaccessors. For these purposes, Kotlin provides an automatic backing field which can be accessed using the fieldidentifier:
大致意思是说, 在Kotlin 里没有fields的概念, 当用户需要自定义 getter 或者 setter 时, 在自定义 accesser 里可以通过backing field来修改当前property的值, 例如上述var zip 如果没有field = value这句话,
zip就永远无法被修改.
我们先看下Property的编译函数
    private void gen(
            @Nullable KtProperty declaration,
            @NotNull PropertyDescriptor descriptor,
            @Nullable KtPropertyAccessor getter,
            @Nullable KtPropertyAccessor setter
    ) {
        ...skip...
        genBackingFieldAndAnnotations(declaration, descriptor, false);

        if (isAccessorNeeded(declaration, descriptor, getter)) {
            generateGetter(declaration, descriptor, getter);
        }
        if (isAccessorNeeded(declaration, descriptor, setter)) {
            generateSetter(declaration, descriptor, setter);
        }
    }
一个Property 的转化成JVM可以分为三个步骤
- genBackingField
- genAnnotations
- genGetter && genSetter
那我们一个一个的看
2.1.1 genBackingField
入口函数
    private boolean generateBackingField(
            @NotNull KtNamedDeclaration p,
            @NotNull PropertyDescriptor descriptor,
            @NotNull Annotations backingFieldAnnotations,
            @NotNull Annotations delegateAnnotations
    ) {
       ...skip...
        if (p instanceof KtProperty && ((KtProperty) p).hasDelegate()) {
            generatePropertyDelegateAccess((KtProperty) p, descriptor, delegateAnnotations);
        }
        else if (Boolean.TRUE.equals(bindingContext.get(BindingContext.BACKING_FIELD_REQUIRED, descriptor))) {
            generateBackingFieldAccess(p, descriptor, backingFieldAnnotations);
        }
        ...skip...
        return true;
    }
从代码中可以看到, Property 的BackingField 的编译分为两个分支
- Delegate. 2. 非 Delegate 的变量
Delegated Properties
The most common kind of properties simply reads from (and maybe writes to) a backing field. On the other hand, withcustom getters and setters one can implement any behaviour of a property. Somewhere in between, there are certaincommon patterns of how a property may work. A few examples: lazy values, reading from a map by a given key, accessing adatabase, notifying listener on access, etc.
在上述的例子中, address 和 address1 是属于 Delegate.
非 Delegate 的Property最终都以下面这种方式生成java的 bytecode
FieldVisitor fv = builder.newField(
                JvmDeclarationOriginKt.OtherOrigin(element, propertyDescriptor), modifiers, name, type.getDescriptor(),
                isDelegate ? null : typeMapper.mapFieldSignature(kotlinType, propertyDescriptor), defaultValue
        );
    @Override
    @NotNull
    public FieldVisitor newField(
            @NotNull JvmDeclarationOrigin origin,
            int access,
            @NotNull String name,
            @NotNull String desc,
            @Nullable String signature,
            @Nullable Object value
    ) {
        FieldVisitor visitor = getVisitor().visitField(access, name, desc, signature, value);
        if (visitor == null) {
            return EMPTY_FIELD_VISITOR;
        }
        return visitor;
    }
到这里, kotlin 的编译方式大家应该就知道了 KtFile —> Asm —>ByteCode
Asm 官网地址asm.ow2.org/index.html
我们接着讲 Delegate Property 的 gen 过程. 以address1为例
    var address1: kotlin.String by kotlin.properties.Delegates.observable(address) { _, old, new ->
        kotlin.io.println("oldValue = $old And newValue = $new")
    }
observable的代码如下
    /**
     * Returns a property delegate for a read/write property that calls a specified callback function when changed.
     * @param initialValue the initial value of the property.
     * @param onChange the callback which is called after the change of the property is made. The value of the property
     *  has already been changed when this callback is invoked.
     */
    public inline fun <T> observable(initialValue: T, crossinline onChange: (property: KProperty<*>, oldValue: T, newValue: T) -> Unit):
        ReadWriteProperty<Any?, T> = object : ObservableProperty<T>(initialValue) {
            override fun afterChange(property: KProperty<*>, oldValue: T, newValue: T) = onChange(property, oldValue, newValue)
        }
address1是具有Delegate 属性的, 所以走的是generatePropertyDelegateAccess分支. 那么我们 debug 一下看看
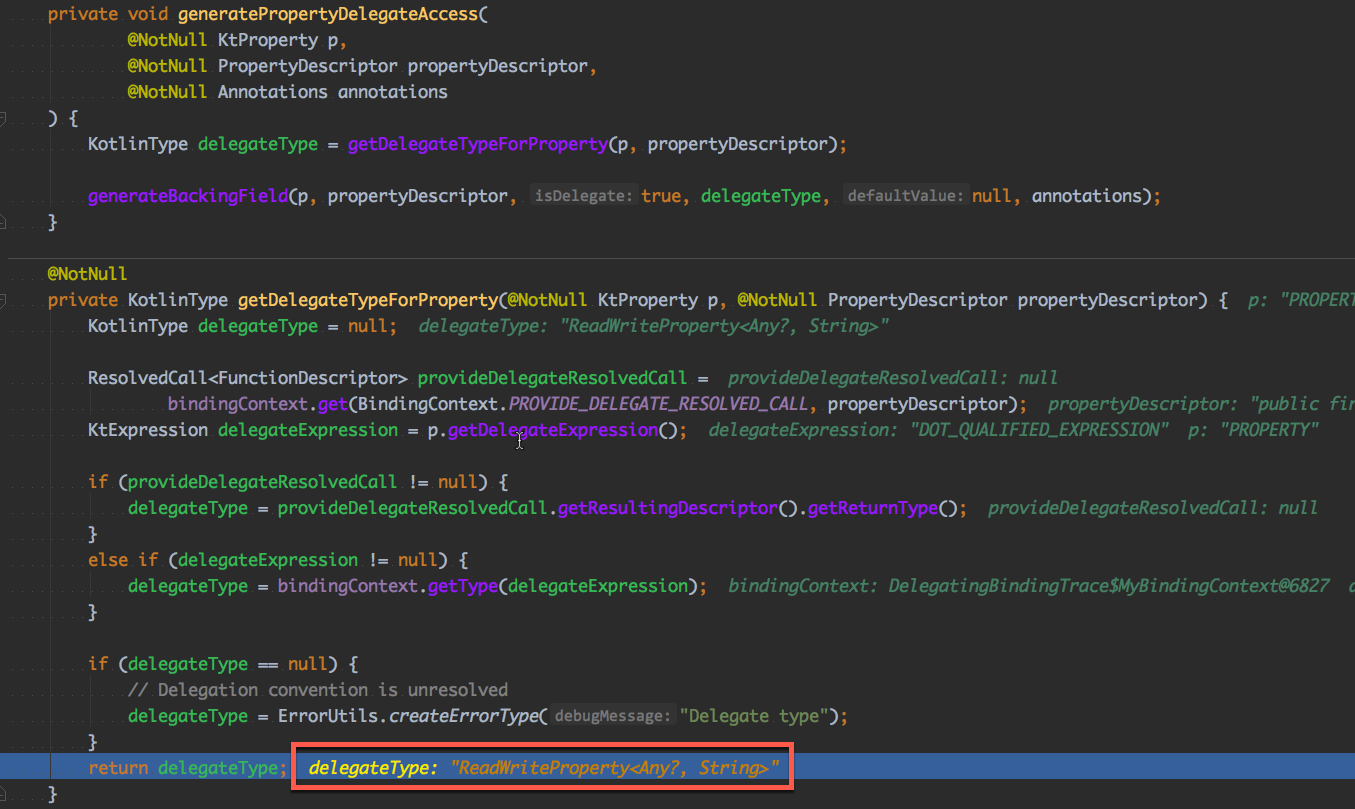

从上两张图可以看到. 在最终生成bytecode 中, address1 变成了address1$delegate, 而且类型也变成了ReadWriteProperty. 但address1的getter与 setter 还是getAddress1,setAddress1.
所以Delegate大致的工作原理是这样的
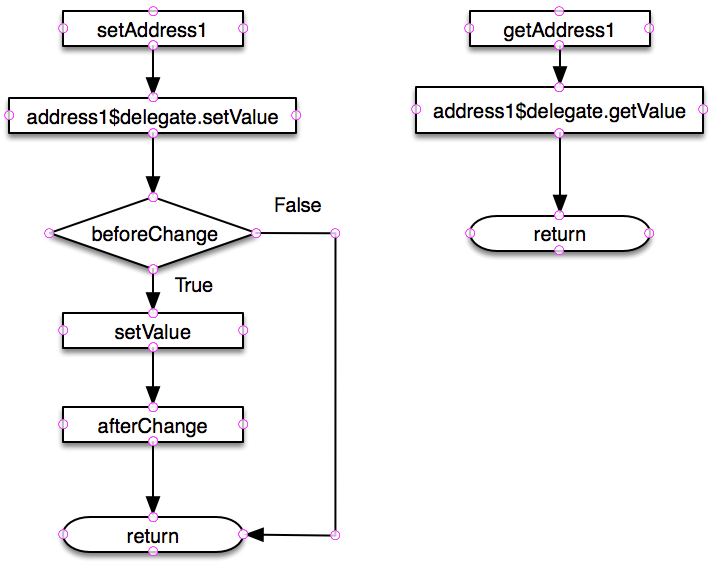
Lazy 也是 Delegate 中的一种, 只不过它只能修饰val 属性, 不存在 setter方法. 所以可以理解 lazy 的 val Property 是一个懒加载的常量. 如图所示, Lazy属性 在语法层面上是无法设置 setter, 和 getter的

2.1.2 genAnnotations
在 java 里, 主要是添加@ NotNull 以及@ Nullable annotation
2.1.3 getter And setter
先看 setter
    private void generateSetter(@Nullable KtNamedDeclaration p, @NotNull PropertyDescriptor descriptor, @Nullable KtPropertyAccessor setter) {
        if (!descriptor.isVar()) return;
        generateAccessor(p, setter, descriptor.getSetter() != null
                                    ? descriptor.getSetter()
                                    : DescriptorFactory.createDefaultSetter(descriptor, Annotations.Companion.getEMPTY()));
    }
先会判断是否是var, 如果不是就直接返回, 所以val的属性不会生成 setter, 通过这种方式kotlin语言就达到了无法修改val 的 Property的目的.
接着在生成 setter 之前, 它会先判断开发者有否有自定义的 setter. 如果有就用之,没有就创建一个默认的
var zip: Int? = null
        set(value) {
            field = value
        }
这些方法最终也是通过asm来直接生成的. 这里有个细节, 针对非空的入参Property 都会在当前函数的字节码的最前方插入非空的判断函数(static 方法).
    private static void genParamAssertion(
            @NotNull InstructionAdapter v,
            @NotNull KotlinTypeMapper typeMapper,
            @NotNull FrameMap frameMap,
            @NotNull CallableDescriptor parameter,
            @NotNull String name
    ) {
        KotlinType type = parameter.getReturnType();
        if (type == null || isNullableType(type)) return;

        int index = frameMap.getIndex(parameter);
        Type asmType = typeMapper.mapType(type);
        if (asmType.getSort() == Type.OBJECT || asmType.getSort() == Type.ARRAY) {
            v.load(index, asmType);
            v.visitLdcInsn(name);
            v.invokestatic(IntrinsicMethods.INTRINSICS_CLASS_NAME, "checkParameterIsNotNull",
                           "(Ljava/lang/Object;Ljava/lang/String;)V", false);
        }
    }
    public static void checkParameterIsNotNull(Object value, String paramName) {
        if (value == null) {
            throwParameterIsNullException(paramName);
        }
    }
这就是 kotlin 能够避免空指针的原因. 它帮你做了该做的非空判断.
2.2 data class
kotlin data class, 例如 data class User(val name: String, val age: Int)
简简单单的一行代码同等同于java差不多50行吧.. 那么它是怎么做到的呢.
下面这段代码是一个类基本的构造步骤, 从代码字面意思就能看出每个函数所干的事情. 而且结构很整洁..
    public void generate() {
        generateDeclaration();
        boolean shouldGenerateSyntheticParts =
                !(element instanceof KtClassOrObject) ||
                state.getGenerateDeclaredClassFilter().shouldGenerateClassMembers((KtClassOrObject) element);
        if (shouldGenerateSyntheticParts) {
            generateSyntheticPartsBeforeBody();
        }
        generateBody();
        if (shouldGenerateSyntheticParts) {
            generateSyntheticPartsAfterBody();
        }
        if (state.getClassBuilderMode().generateMetadata) {
            generateKotlinMetadataAnnotation();
        }
        done();
    }
那些自动生成的方法的入口函数是generateSyntheticPartsAfterBody, 进入这个函数你就会发现Data Class生成了哪些方法. 不出意外你也会了解到Enmu Class为什么会有 values和valueof方法..
    fun generate() {
        generateComponentFunctionsForDataClasses()

        generateCopyFunctionForDataClasses(primaryConstructorParameters)

        val properties = dataProperties
        if (properties.isNotEmpty()) {
            generateDataClassToStringIfNeeded(properties)
            generateDataClassHashCodeIfNeeded(properties)
            generateDataClassEqualsIfNeeded(properties)
        }
    }
上面这段代码就是 Data class 收尾阶段生成ComponentX, toString等方法的地方.
所以, 它之所以这么便捷, 是因为编译器帮你写了剩下的行代码..
2.3 Extension Functions
fun String.SayHello() {
    println("Hello From $this")
}
debug 看下这个函数是如何生成的.
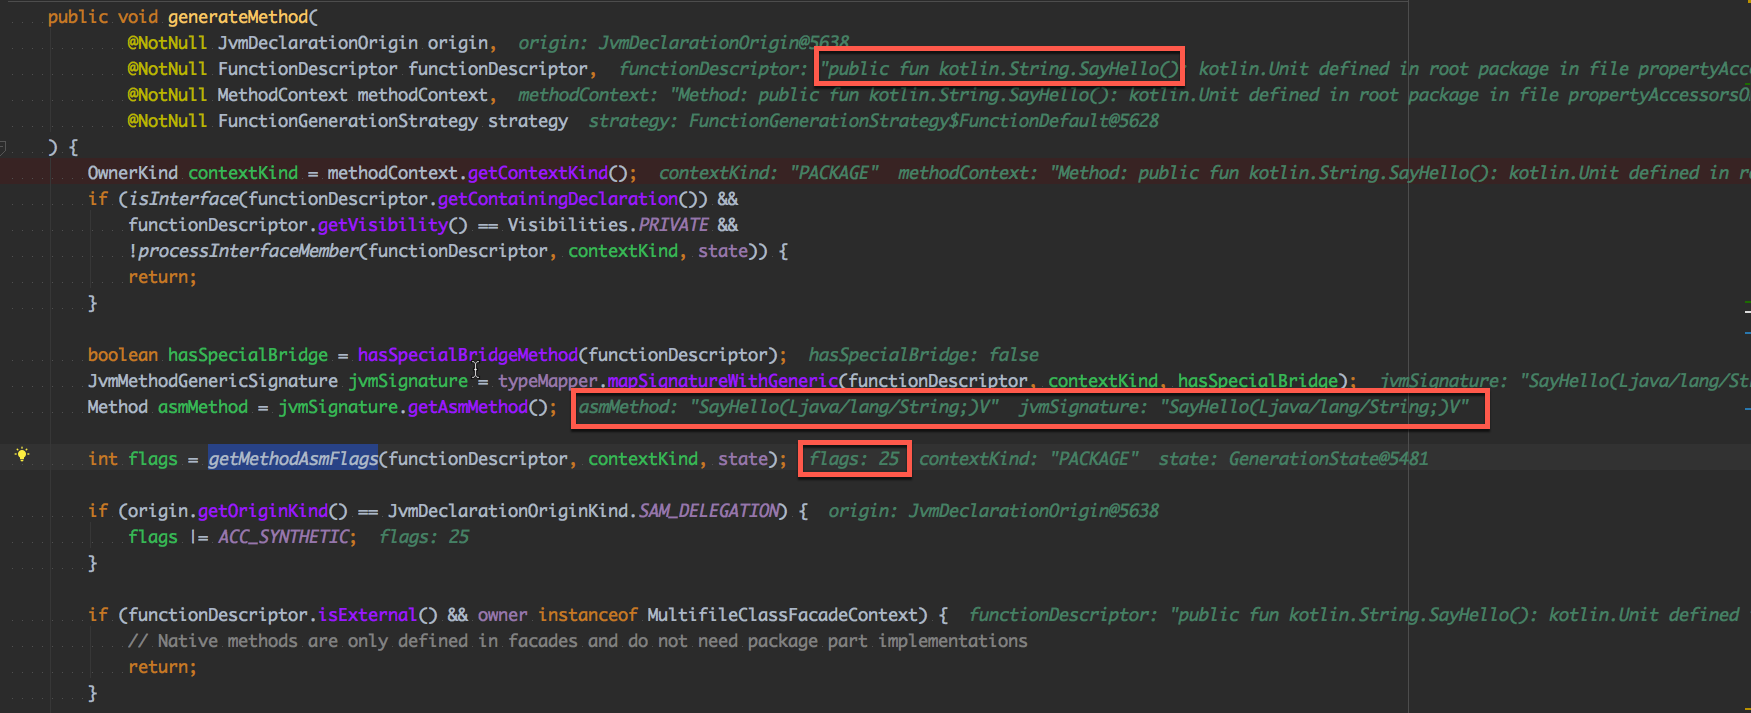
可以看到
- Function 的字节码
asmMethod是SayHello(Ljava/lang/String;)V - Flag 是25, 25对应的是
ACC_PUBLICACC_FINALACC_STATIC
那么这个函数对应的 java方法应该是这样
   public static final void SayHello(@NotNull String $receiver) {
      Intrinsics.checkParameterIsNotNull($receiver, "$receiver");
      String var1 = "Hello From " + $receiver;
      System.out.println(var1);
   }
所以XXX.fun() 之类的定义, 在转换成字节码之后, 都是一个 public static final 的方法, 而且第一个参数是XXX类型
2.4 Higher-Order Functions and Lambdas
例如这个例子
fun <T> lock(lock: Lock?, body: () -> T): T {
    lock?.lock()
    try {
        return body()
    } finally {
        lock?.unlock()
    }
}
lock 方法接收两个参数,1. Lock, 2 () -> T 的方法.
在 kotlin 里, 如果一个函数最后一个参数是一个 Function, 那么就可以写成 Lambda 的方式.
所以我们可以这样调用 lock
fun callLock() {
    lock(null) {
        println("")
    }
}
body: () -> T 最终转换成字节码对应的东西是一个Function0的对象.
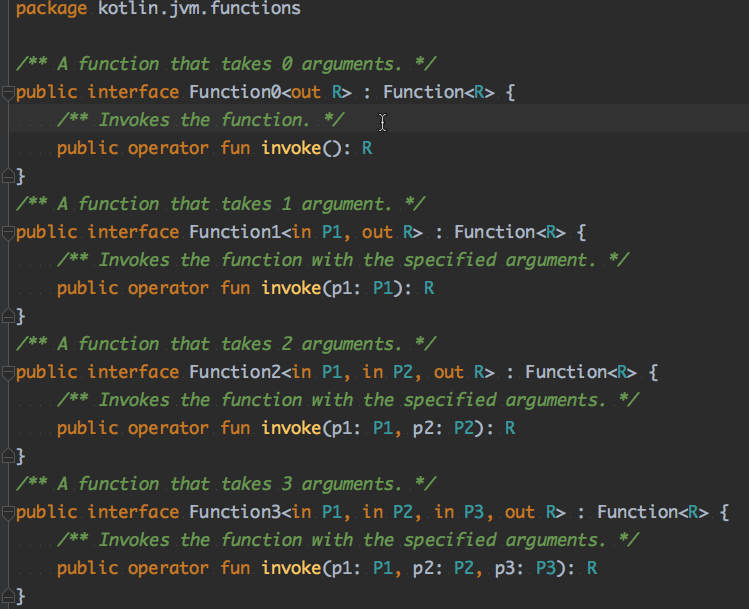
如图所示, body 接收几个对象, 对应的就是 FunctionX. 目前 kotlin 最多支持22个参数的入参函数
所以上述函数这么用也是合法的
fun callLock1() {
    lock(null, object : Function0<Unit> {
        override fun invoke(): Unit {
            println("")
        }
    })
}
暂时就介绍这几个常用特性的编译吧.
Read the Fucking Source Code
