

这是一篇我在学习RuntimePermission过程中的总结,详细的剖析了,RuntimePermission的权限适配和源码分析。
如果有说得不对的地方,希望大家指出,共同提高。
为什么需要动态权限
动态权限的加入,更加完善和保护了用户的隐私,当涉及到一些危险权限的时候,需要用户确认才能授权,比如说,拨打电话的权限,就有可能产生资费,如果让一个app能过随意调用此权限,显然是不合理的,因此在Android6.0(API级别23)以后,加入了动态权限的功能,让用户决定是否调用该权限。
在运行时,请求权限
从 Android 6.0(API 级别 23)开始,用户开始在应用运行时向其授予权限,而不是在应用安装时授予。此方法可以简化应用安装过程,因为用户在安装或更新应用时不需要授予权限。它还让用户可以对应用的功能进行更多控制;例如,用户可以选择为相机应用提供相机访问权限,而不提供设备位置的访问权限。用户可以随时进入应用的“Settings”屏幕调用权限。权限分为正常权限和危险权限。下面给出了Google的说明,可详细看。因此不贴出了。
有一点需要指出的是,Android有上百的权限,不可能每个用到的危险权限都要申请,这是不合理的,所以设置了组的概念。
- 如果应用请求其清单中列出的危险权限,而应用目前在权限组中没有任何权限,则系统会向用户显示一个对话框,描述应用要访问的权限组。对话框不描述该组内的具体权限。例如,如果应用请求
READ_CONTACTS权限,系统对话框只说明该应用需要访问设备的联系信息。如果用户批准,系统将向应用授予其请求的权限。 - 如果应用请求其清单中列出的危险权限,而应用在同一权限组中已有另一项危险权限,则系统会立即授予该权限,而无需与用户进行任何交互。例如,如果某应用已经请求并且被授予了
READ_CONTACTS权限,然后它又请求WRITE_CONTACTS,系统将立即授予该权限。
关于权限调用需要注意的是一下几点:
- 如果设备运行的是 Android 5.1 或更低版本,或者应用的目标 SDK 为 22 或更低:如果您在清单中列出了危险权限,则用户必须在安装应用时授予此权限;如果他们不授予此权限,系统根本不会安装应用。
- 如果设备运行的是 Android 6.0 或更高版本,或者应用的目标 SDK 为 23 或更高:应用必须在清单中列出权限,并且它必须在运行时请求其需要的每项危险权限。用户可以授予或拒绝每项权限,且即使用户拒绝权限请求,应用仍可以继续运行有限的功能。
注:从 Android 6.0(API 级别 23)开始,用户可以随时从任意应用调用权限,即使应用面向较低的 API 级别也可以调用。无论您的应用面向哪个 API 级别,您都应对应用进行测试,以验证它在缺少需要的权限时行为是否正常。
所以只需要考虑App高版本的权限适配即可,低版本的兼容性良好。
动态获取权限效果图
相信你已经大体有个权限的概念了,那么就先上个效果图吧。

我使用的最新的android8.0的模拟器,解释一下,我先申请的是android.permission.CALL_PHONE的权限,如果用户拒绝,则调用了shouldShowRequestPermissionRationale方法,就是应该询问一下到底什么原因,给出一个解释说明。如果用户点击确定按钮,那么重新跳出授权的界面,授权就可以打电话,实现我们的目的了。
向mainfest.xml中声明权限
我使用CALL_Phone这个权限作为讲解
<manifest xmlns:android="http://schemas.android.com/apk/res/android"
        package="site.yanhui.runtimepermissiontest">
    <uses-permission android:name="android.permission.CALL_PHONE"/>

    <application ...>
        ...
    </application>
</manifest>
activity_main.xml界面
我们不需要很花哨的功能,因此放一个button就够了
<Button
        android:layout_width="match_parent"
        android:layout_height="wrap_content"
        android:id="@+id/make_call"
        android:text="MakeCall"/>
设计一个打电话的方法
private void call() {
       Intent intent = new Intent(Intent.ACTION_CALL);//打电话
       //因为是调用的危险权限,所以要调用checkSelfPermission()判断是否获得权限
       //没有获得权限的话,直接return,  startActivity(intent)不会执行
       //快捷键 ctrl+alt +t
       intent.setData(Uri.parse("tel:10086")); //拨打10086
       if (ActivityCompat.checkSelfPermission(this, Manifest.permission.CALL_PHONE) != PackageManager.PERMISSION_GRANTED) {
           // TODO: Consider calling
           //    ActivityCompat#requestPermissions
           // here to request the missing permissions, and then overriding
           //   public void onRequestPermissionsResult(int requestCode, String[] permissions,
           //                                          int[] grantResults)
           // to handle the case where the user grants the permission. See the documentation
           // for ActivityCompat#requestPermissions for more details.
           return;
       }
       startActivity(intent);
   }
我们单独设计一个打电话的方法,你肯定会纳闷到7到16行代码是什么情况,整体的意思就是如果说CALL_PHONE权限没有授予的话,直接返回return,那么就不会调用到startActivity这个方法。这是处于对与安全性的考虑。
checkSelfPermission() 和shouldShowRequestPermissionRationale()方法
接下来就发车了,坐稳。
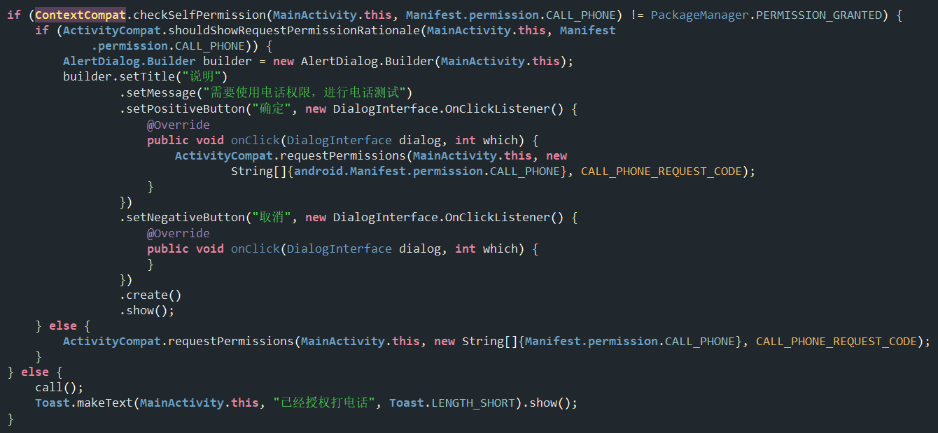
看此段代码ContextCompat.checkSelfPermission()方法,看名字就知道了,是检查自身有没有call_phone打电话的权限,里面传入两个个参数
- MainActivity.this 上下文的引用
- Manifest.permission.CALL_PHONE 需要判断是否有权限的权限
执行条件:ContextCompat.checkSelfPermission(MainActivity.this, Manifest.permission.CALL_PHONE) != PackageManager.PERMISSION_GRANTED
最后返回值是一个int数,与PackageManager.PERMISSION_GRANTED的int数字做比较,相等话就说明已经授权,那么直接执行
else {
   call();
   Toast.makeText(MainActivity.this, "已经授权打电话", Toast.LENGTH_SHORT).show();
}不相等的话,进入第二个if语句执行ActivityCompat.shouldShowRequestPermissionRationale()方法,先解释一下这个方法的含义,就是告诉用户,为什么需要这个权限,这个方法的设计还是很人性化的。废话不多说了,传入两个参数:
- MainActivity.this 上下文,运行环境。
- Manifest.permission.CALL_PHONE 需要请求的权限
返回值如果是得到了一个boolean 类型的正数。那么也就是说,我们开发者希望告诉用户请求次权限的理由是什么。因此我们使用了一个AlertDialog.Builder来实现对用户的友好提醒
AlertDialog.Builder builder = new AlertDialog.Builder(MainActivity.this);
                       builder.setTitle("说明")
                               .setMessage("需要使用电话权限,进行电话测试")
                               .setPositiveButton("确定", new DialogInterface.OnClickListener() {
                                   @Override
                                   public void onClick(DialogInterface dialog, int which) {
                                       ActivityCompat.requestPermissions(MainActivity.this, new
                                               String[]{android.Manifest.permission.CALL_PHONE}, CALL_PHONE_REQUEST_CODE);
                                   }
                               })
                               .setNegativeButton("取消", new DialogInterface.OnClickListener() {
                                   @Override
                                   public void onClick(DialogInterface dialog, int which) {
                                   }
                               })
                               .create()
                               .show();
值得一提的是,我们设置的setPositiveButton里面,设置了onclick方法,里面执行了一条语句:
ActivityCompat.requestPermissions(MainActivity.this, new String[{android.Manifest.permission.CALL_PHONE},此行代码就是用来申请权限的,当然敏锐的你一定注意到了,ActivityCompat.shouldShowRequestPermissionRationale()方法if语句中,当条件不满足的时候,我们在else里面,直接调用了此语句。用来申请权限。
requestPermissions方法
顾名思义,这是申请权限的方法,里面要求传入三个参数
- Mainactivity.this 上下文
- String[]{android.Manifest.permission.CALL_PHONE} 存有带申请的权限
- CALL_PHONE_REQUEST_CODE 状态回执码,这个数字是我自己封装的int值,我设置成了一个常量值。
onRequestPermissionsResult方法
是这样子的,当requestPermissions()方法执行完毕,授权了以后,会回调一个onRequestPermissionsResult()方法如下图所示:
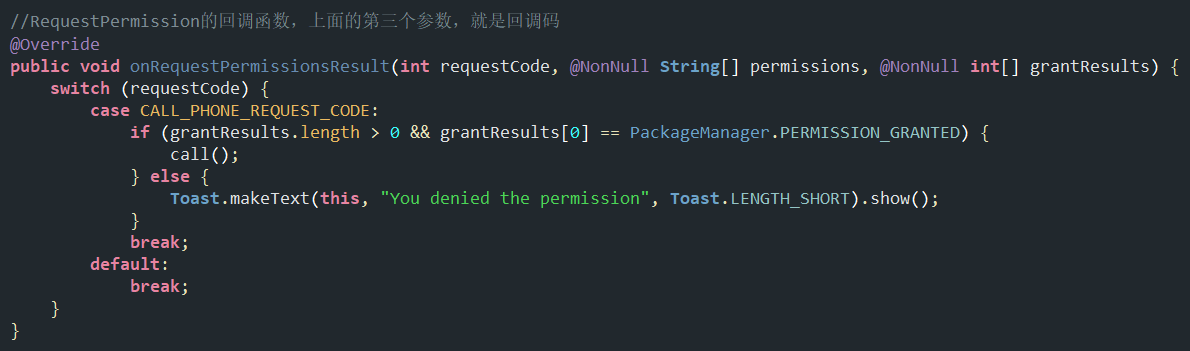
我们对requestCode进行swith语句判断。当case等于我们的回执码(自己定义的唯一值)的时候,进入到下面的if语句,如果封装好权限的int[] grantResults数组的长度大于0并且grantResults[0]==PackageManager.PERMISSION_GRANTED,我们就执行call方法,因为已经授权,否则制作一个土司,告诉用户,你拒绝了权限。
在这里值得注意的是,不管你是拒绝还是授予权限,requestCode的值都会传递给onRequestPermissionsResult()方法,也就是说只要执行了requestPermissions()方法,onRequestPermissionsResult()就一定会回调回去,区别就在于,你是否重写,做出判断。这一点,我们后面的源码解析就会进一步说明。
到目前为止,相信你应该有能力应付6.0以上的动态权限处理了。
谈一谈代码执行顺序
不管前面说得方法说得再好,也要能够理解代码,最终在app里面的执行顺序,才是最重要的,比如说,当你点击button的时候,跳出来的请求权限的框是哪行代码的实现的呢?我们先要分析清楚这个问题。
首先,这是一个危险权限,那么它的checkSelfPermission()的返回值就肯定不为0,所以进入到了第二个,肯定也不是一个正数,如果是正数的话,就先执行的shouldShowRequestPermissionRationale()方法,所以checkSelfPermission()的返回值必然是一个非0的负数,所以走到了shouldShowRequestPermissionRationale()方法if语句的else里面去了,我们看到的是requestPermissions()方法,所以跳出了一个系统申请权限的对话框,当你点击确定的时候,两个动作在执行checkSelfPermission()的返回值置为0(权限已授权),requestCode会回传到他的回调函数,onRequestPermissionsResult方法里面,所以当我们匹配上,requestCode和权限的时候,我们的call方法就可以得到调用,目的就达成了。
当然当你点击拒绝的时候,我相信在底层的操作当中,它就会把shouldShowRequestPermissionRationale()方法的返回值,设置成了正数非0,所以当用户再次点击button的时候,会直接跳出解释理由的第二个对话款,也就是我们自己设置的AlertDialog.Builder。只有你再次点击确定的时候,checkSelfPermission()的返回值就直接设置为0,下次执行的时候,就直接是走到了checkselfPermission方法的if语句的else里面去了,call方法直接得到执行。目标达成。
我再解释一下,为什么这个值设置成为了0就代表权限已经授权了呢,这是因为PackageManager.PERMISSION_GRANTED的默认int就是一个0;
/**
    * Permission check result: this is returned by {@link #checkPermission}
    * if the permission has been granted to the given package.
    */
   public static final int PERMISSION_GRANTED = 0;
   /**
    * Permission check result: this is returned by {@link #checkPermission}
    * if the permission has not been granted to the given package.
    */
   public static final int PERMISSION_DENIED = -1;
下面我们分析一下源码,看看能有什么结果。
分析checkSelfPermission()源码
按住Ctrl+checkSelfPermission打开源码
/**
     * Determine whether <em>you</em> have been granted a particular permission.
     *
     * @param permission The name of the permission being checked.
     *
     * @return {@link android.content.pm.PackageManager#PERMISSION_GRANTED} if you have the
     * permission, or {@link android.content.pm.PackageManager#PERMISSION_DENIED} if not.
     *
     * @see android.content.pm.PackageManager#checkPermission(String, String)
     */
    public static int checkSelfPermission(@NonNull Context context, @NonNull String permission) {
        if (permission == null) {
            throw new IllegalArgumentException("permission is null");
        }
        return context.checkPermission(permission, android.os.Process.myPid(), Process.myUid());
    }
checkSelfPermission的源码告诉我们,如果我们传递的permission为空,则抛出非法参数异常。继续看return的方法,这里我们注意到了,context的checkPermission方法中,有process,这就表示,这些操作都是底层在帮我们完成,不管了,进去看了再说。
按住Ctrl+checkSelfPermission打开源码
/**
     * Gatekeeper Service.
     * @hide
     */
    public static final String GATEKEEPER_SERVICE = "android.service.gatekeeper.IGateKeeperService";
    /**
     * Determine whether the given permission is allowed for a particular
     * process and user ID running in the system.
     *
     * @param permission The name of the permission being checked.
     * @param pid The process ID being checked against.  Must be > 0.
     * @param uid The user ID being checked against.  A uid of 0 is the root
     * user, which will pass every permission check.
     *
     * @return {@link PackageManager#PERMISSION_GRANTED} if the given
     * pid/uid is allowed that permission, or
     * {@link PackageManager#PERMISSION_DENIED} if it is not.
     *
     * @see PackageManager#checkPermission(String, String)
     * @see #checkCallingPermission
     */
    @CheckResult(suggest="#enforcePermission(String,int,int,String)")
    @PackageManager.PermissionResult
    public abstract int checkPermission(@NonNull String permission, int pid, int uid);
    /** @hide */
    @PackageManager.PermissionResult
    public abstract int checkPermission(@NonNull String permission, int pid, int uid,
            IBinder callerToken);
根据这个源码,我们可以得出, checkPermission最终的返回值是一个int数并且在相关源码最上方,看到了一个@hide标记,说明这个是系统级别的api,处于安全的考虑,并没有放出来给开发者,而是隐藏起来了。
退回去,按住Crtrl+PackageManager.PERMISSION_GRANTED我们发现,这也是一个封装好的int值并且值是0,那么也就是说, checkPermission()方法返回的值必然不是等于0的,如果等于0的话,就应该相当于是授权了。比如说在6.0之前的版本里面,在安装的时候就会提示出需要的权限,如果我的推测没有错的话,当用户选择确认安装,就相当于是默认在编译的时候,把, checkPermission()方法设置为了0,所以不需要动态获取权限就可以直接调用一些危险权限的方法。
分析requestPermissions()源码
ctrl+requestPermissions()进入到源码里面
/**
 * Requests permissions to be granted to this application. These permissions
 * must be requested in your manifest, they should not be granted to your app,
 * and they should have protection level {@link android.content.pm.PermissionInfo
 * #PROTECTION_DANGEROUS dangerous}, regardless whether they are declared by
 * the platform or a third-party app.
 * <p>
 * Normal permissions {@link android.content.pm.PermissionInfo#PROTECTION_NORMAL}
 * are granted at install time if requested in the manifest. Signature permissions
 * {@link android.content.pm.PermissionInfo#PROTECTION_SIGNATURE} are granted at
 * install time if requested in the manifest and the signature of your app matches
 * the signature of the app declaring the permissions.
 * </p>
 * <p>
 * If your app does not have the requested permissions the user will be presented
 * with UI for accepting them. After the user has accepted or rejected the
 * requested permissions you will receive a callback reporting whether the
 * permissions were granted or not. Your activity has to implement {@link
 * android.support.v4.app.ActivityCompat.OnRequestPermissionsResultCallback}
 * and the results of permission requests will be delivered to its {@link
 * android.support.v4.app.ActivityCompat.OnRequestPermissionsResultCallback#onRequestPermissionsResult(
 * int, String[], int[])} method.
 * </p>
 * <p>
 * Note that requesting a permission does not guarantee it will be granted and
 * your app should be able to run without having this permission.
 * </p>
 * <p>
 * This method may start an activity allowing the user to choose which permissions
 * to grant and which to reject. Hence, you should be prepared that your activity
 * may be paused and resumed. Further, granting some permissions may require
 * a restart of you application. In such a case, the system will recreate the
 * activity stack before delivering the result to your
 * {@link OnRequestPermissionsResultCallback#onRequestPermissionsResult(int, String[], int[])}.
 * </p>
 * <p>
 * When checking whether you have a permission you should use {@link
 * #checkSelfPermission(android.content.Context, String)}.
 * </p>
 * <p>
 * Calling this API for permissions already granted to your app would show UI
 * to the user to decided whether the app can still hold these permissions. This
 * can be useful if the way your app uses the data guarded by the permissions
 * changes significantly.
 * </p>
 * <p>
 * You cannot request a permission if your activity sets {@link
 * android.R.attr#noHistory noHistory} to <code>true</code> in the manifest
 * because in this case the activity would not receive result callbacks including
 * {@link OnRequestPermissionsResultCallback#onRequestPermissionsResult(int, String[], int[])}.
 * </p>
 * <p>
 * The <a href="http://developer.android.com/samples/RuntimePermissions/index.html">
 * RuntimePermissions</a> sample app demonstrates how to use this method to
 * request permissions at run time.
 * </p>
 *
 * @param activity The target activity.
 * @param permissions The requested permissions. Must me non-null and not empty.
 * @param requestCode Application specific request code to match with a result
 *    reported to {@link OnRequestPermissionsResultCallback#onRequestPermissionsResult(int, String[], int[])}.
 *    Should be >= 0.
 *
 * @see OnRequestPermissionsResultCallback#onRequestPermissionsResult(int, String[], int[])
 * @see #checkSelfPermission(android.content.Context, String)
 * @see #shouldShowRequestPermissionRationale(android.app.Activity, String)
 */
public static void requestPermissions(final @NonNull Activity activity,
        final @NonNull String[] permissions, final @IntRange(from = 0) int requestCode) {
    if (Build.VERSION.SDK_INT >= 23) {
        ActivityCompatApi23.requestPermissions(activity, permissions, requestCode);
    } else if (activity instanceof OnRequestPermissionsResultCallback) {
        Handler handler = new Handler(Looper.getMainLooper());
        handler.post(new Runnable() {
            @Override
            public void run() {
                final int[] grantResults = new int[permissions.length];
                PackageManager packageManager = activity.getPackageManager();
                String packageName = activity.getPackageName();
                final int permissionCount = permissions.length;
                for (int i = 0; i < permissionCount; i++) {
                    grantResults[i] = packageManager.checkPermission(
                            permissions[i], packageName);
                }
                ((OnRequestPermissionsResultCallback) activity).onRequestPermissionsResult(
                        requestCode, permissions, grantResults);
            }
        });
    }
}
然后我们看代码的时候,发现当版本大于等于23的时候,调用了ActivityCompatApi23.requestPermissions(),继续跟进
public static void requestPermissions(Activity activity, String[] permissions,
           int requestCode) {
       if (activity instanceof RequestPermissionsRequestCodeValidator) {
           ((RequestPermissionsRequestCodeValidator) activity)
                   .validateRequestPermissionsRequestCode(requestCode);
       }
       activity.requestPermissions(permissions, requestCode);
   }
你会发现,ActivityCompatApi23类中,封装了一些api23以上涉及的新功能,不扯淡了,仅需跟进
ctrl+requestPermissions
/**
* Requests permissions to be granted to this application. These permissions
* must be requested in your manifest, they should not be granted to your app,
* and they should have protection level {@link android.content.pm.PermissionInfo
* #PROTECTION_DANGEROUS dangerous}, regardless whether they are declared by
* the platform or a third-party app.
* <p>
* Normal permissions {@link android.content.pm.PermissionInfo#PROTECTION_NORMAL}
* are granted at install time if requested in the manifest. Signature permissions
* {@link android.content.pm.PermissionInfo#PROTECTION_SIGNATURE} are granted at
* install time if requested in the manifest and the signature of your app matches
* the signature of the app declaring the permissions.
* </p>
* <p>
* If your app does not have the requested permissions the user will be presented
* with UI for accepting them. After the user has accepted or rejected the
* requested permissions you will receive a callback on {@link
* #onRequestPermissionsResult(int, String[], int[])} reporting whether the
* permissions were granted or not.
* </p>
* <p>
* Note that requesting a permission does not guarantee it will be granted and
* your app should be able to run without having this permission.
* </p>
* <p>
* This method may start an activity allowing the user to choose which permissions
* to grant and which to reject. Hence, you should be prepared that your activity
* may be paused and resumed. Further, granting some permissions may require
* a restart of you application. In such a case, the system will recreate the
* activity stack before delivering the result to {@link
* #onRequestPermissionsResult(int, String[], int[])}.
* </p>
* <p>
* When checking whether you have a permission you should use {@link
* #checkSelfPermission(String)}.
* </p>
* <p>
* Calling this API for permissions already granted to your app would show UI
* to the user to decide whether the app can still hold these permissions. This
* can be useful if the way your app uses data guarded by the permissions
* changes significantly.
* </p>
* <p>
* You cannot request a permission if your activity sets {@link
* android.R.styleable#AndroidManifestActivity_noHistory noHistory} to
* <code>true</code> because in this case the activity would not receive
* result callbacks including {@link #onRequestPermissionsResult(int, String[], int[])}.
* </p>
* <p>
* The <a href="http://developer.android.com/samples/RuntimePermissions/index.html">
* RuntimePermissions</a> sample app demonstrates how to use this method to
* request permissions at run time.
* </p>
*
* @param permissions The requested permissions. Must me non-null and not empty.
* @param requestCode Application specific request code to match with a result
* reported to {@link #onRequestPermissionsResult(int, String[], int[])}.
* Should be >= 0.
*
* @see #onRequestPermissionsResult(int, String[], int[])
* @see #checkSelfPermission(String)
* @see #shouldShowRequestPermissionRationale(String)
*/
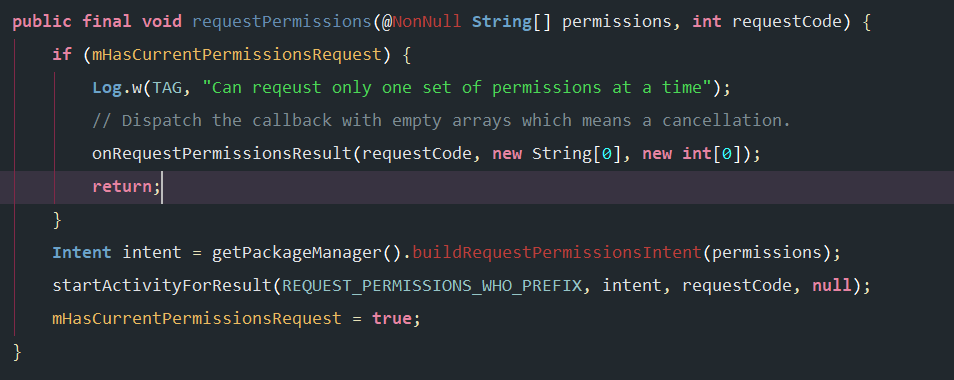
public final void requestPermissions(@NonNull String[] permissions, int requestCode) {
if (mHasCurrentPermissionsRequest) {
Log.w(TAG, "Can reqeust only one set of permissions at a time");
// Dispatch the callback with empty arrays which means a cancellation.
onRequestPermissionsResult(requestCode, new String[0], new int[0]);
return;
}
Intent intent = getPackageManager().buildRequestPermissionsIntent(permissions);
startActivityForResult(REQUEST_PERMISSIONS_WHO_PREFIX, intent, requestCode, null);
mHasCurrentPermissionsRequest = true;
}前面的效果图中,requestPermissions()最终一定是会调用一个类似于我们自己设计的AlertDialog的这么一个对话款,我们先看,留下的唯一的线索就是这个intent,因为到这里.buildRequestPermissionsIntent出现了红字如下图展示,
所以我们无法得知.buildRequestPermissionsIntent做了什么,但是我们仍然不死心,去跟进这个startActivityForResult方法。
/**
 * @hide
 */
@Override
public void startActivityForResult(
        String who, Intent intent, int requestCode, @Nullable Bundle options) {
    Uri referrer = onProvideReferrer();
    if (referrer != null) {
        intent.putExtra(Intent.EXTRA_REFERRER, referrer);
    }
    options = transferSpringboardActivityOptions(options);
    Instrumentation.ActivityResult ar =
        mInstrumentation.execStartActivity(
            this, mMainThread.getApplicationThread(), mToken, who,
            intent, requestCode, options);
    if (ar != null) {
        mMainThread.sendActivityResult(
            mToken, who, requestCode,
            ar.getResultCode(), ar.getResultData());
    }
    cancelInputsAndStartExitTransition(options);
}
最终我们得到了一个hide的方法,也就是说,设计源码的人,并不希望开发者调用这部分源码,所以给隐藏了,但是距离我们应该要找到的一个关于一个像dialog的东西,还是更近一步了,仔细看看上面的源码,我们发现了activity和Result词语,也就是说大胆的推测,虽然源码出于安全的角度被隐藏了,但是我们还是找到了端倪,正在在代码的执行顺序里面分析的一样,当点击申请权限的确定按钮时,我推测会把checkSelfPermission()的值置为0,则被视为是授予权限。到这,可以分析出,其实第一个弹出的对话款应该不是dialog,而是一个activity,不管用那种方式实现的。并且,有一个数据的传入,传出,这样才能实现设置数据嘛,也算不虚到此一游了。
返回startActivityForResult的上一层,我们惊喜的发现,有一行代码我们十分眼熟:
if (mHasCurrentPermissionsRequest) {
    Log.w(TAG, "Can reqeust only one set of permissions at a time");
    // Dispatch the callback with empty arrays which means a cancellation.
    onRequestPermissionsResult(requestCode, new String[0], new int[0]);//就是它
    return;
}
在startActivityForResult方法执行以后,把mHasCurrentPermissionsRequest 置为了true;那么if表达式为真,当然要执行下面的逻辑了,跟进跟进。
ctrl+ onRequestPermissionsResult
/**
 * Callback for the result from requesting permissions. This method
 * is invoked for every call on {@link #requestPermissions(String[], int)}.
 * <p>
 * <strong>Note:</strong> It is possible that the permissions request interaction
 * with the user is interrupted. In this case you will receive empty permissions
 * and results arrays which should be treated as a cancellation.
 * </p>
 *
 * @param requestCode The request code passed in {@link #requestPermissions(String[], int)}.
 * @param permissions The requested permissions. Never null.
 * @param grantResults The grant results for the corresponding permissions
 *     which is either {@link android.content.pm.PackageManager#PERMISSION_GRANTED}
 *     or {@link android.content.pm.PackageManager#PERMISSION_DENIED}. Never null.
 *
 * @see #requestPermissions(String[], int)
 */
public void onRequestPermissionsResult(int requestCode, @NonNull String[] permissions,
        @NonNull int[] grantResults) {
    /* callback - no nothing */
}
啊呀,我的小宝贝,原来你在这啊,所以前面我们提到的,不管了你是拒绝还是确定,onRequestPermissionsResult,只要重写了都会执行,就是这个道理,因为即便你不重写,其实默认也是存在的,只是人家静静的呆在那里do nothing(继承的基本概念)。重写了就有了!不虚此行了!
分析shouldShowRequestPermissionRationale()源码
回到我们自己MainActivity里面
ctrl+shouldShowRequestPermissionRationale
/**
 * Gets whether you should show UI with rationale for requesting a permission.
 * You should do this only if you do not have the permission and the context in
 * which the permission is requested does not clearly communicate to the user
 * what would be the benefit from granting this permission.
 * <p>
 * For example, if you write a camera app, requesting the camera permission
 * would be expected by the user and no rationale for why it is requested is
 * needed. If however, the app needs location for tagging photos then a non-tech
 * savvy user may wonder how location is related to taking photos. In this case
 * you may choose to show UI with rationale of requesting this permission.
 * </p>
 *
 * @param activity The target activity.
 * @param permission A permission your app wants to request.
 * @return Whether you can show permission rationale UI.
 *
 * @see #checkSelfPermission(android.content.Context, String)
 * @see #requestPermissions(android.app.Activity, String[], int)
 */
public static boolean shouldShowRequestPermissionRationale(@NonNull Activity activity,
        @NonNull String permission) {
    if (Build.VERSION.SDK_INT >= 23) {
        return ActivityCompatApi23.shouldShowRequestPermissionRationale(activity, permission);
    }
    return false;
}
如果版本大于等于23 return ActivityCompatApi23.shouldShowRequestPermissionRationale(activity, permission);
否则return false 因为在低版本中,就没有设置这个新功能,所以直接false跳过。
继续跟踪
public static boolean shouldShowRequestPermissionRationale(Activity activity,
        String permission) {
    return activity.shouldShowRequestPermissionRationale(permission);
}
这个静态方法,都是存放在ActivityCompatApi23类中,是版本大于等于23的新特性。继续更进
/**
     * Gets whether you should show UI with rationale for requesting a permission.
     * You should do this only if you do not have the permission and the context in
     * which the permission is requested does not clearly communicate to the user
     * what would be the benefit from granting this permission.
     * <p>
     * For example, if you write a camera app, requesting the camera permission
     * would be expected by the user and no rationale for why it is requested is
     * needed. If however, the app needs location for tagging photos then a non-tech
     * savvy user may wonder how location is related to taking photos. In this case
     * you may choose to show UI with rationale of requesting this permission.
     * </p>
     *
     * @param permission A permission your app wants to request.
     * @return Whether you can show permission rationale UI.
     *
     * @see #checkSelfPermission(String)
     * @see #requestPermissions(String[], int)
     * @see #onRequestPermissionsResult(int, String[], int[])
     */
    public boolean shouldShowRequestPermissionRationale(@NonNull String permission) {
        return getPackageManager().shouldShowRequestPermissionRationale(permission);
    }
shouldShowRequestPermissionRationale方法又红了,至少我们知道了通过这个方法,应该是得到了一布尔类型的返回值,而这个返回值与requestPermissions()方法的返回值密切相关,因为只有当用户拒绝了权限的时候,requestPermissions()会存在一个返回值(数据),这个数据决定了shouldShowRequestPermissionRationale的返回值为真,所以才会显示出我们所builder的AlertDalog。
源码为什么会报错
这是因为这些方法或者类是被 Android SDK 隐藏的,出于安全或者某些原因,这些 API 不能暴露给应用层的开发者,所以编译完成的 android.jar 包里会把这些 API 隐藏掉,而我们的 Android 项目是依赖 android.jar 的,查看源码的时候,IDE 会自动去 android.jar 找对应的 API,自然会找不到。当然,这些 API 在 ROM 中是实际存在的,有些开发者发现了一些可以修改系统行为的隐藏 API,在应用层通过反射的方式强行调用这些 API 执行系统功能,这种手段也是一种 HACK。
源码下载
纸上得来终觉浅,绝知此事要躬行。
如果有任何疑问欢迎和我讨论,觉得不错就顺手点个star吧。
也算是一种鼓励和鞭策。
参考文献
- 第一行代码 2th 郭霖
- Google开发文档
