需要注意的是,Angular4已经将动画模块分离了出来,所以当我们要使用的时候,首先要将该模块下载并注册进来。
使用npm下载安装:
npm install @angular/animations
// app/app.module.ts
import { BrowserAnimationsModule } from '@angular/platform-browser/animations';
@NgModule({
declarations: [...],
imports: [
BrowserAnimationsModule
],
providers: [],
bootstrap: [AppComponent]
})
- 在两个Class样式类之间切换,比如:
active和inactive之间的切换 - 移除或显示,比如指令
ngIf,ngFor
import { trigger, state, style, animate, transition } from '@angular/animations';
(1) 在两个Class样式类之间切换
下面我们先来创建一个基于两个样式类之间切换的动画。 当需要添加动画时,我们一般都是给
@Component()装饰器的animations属性(属性值是一个数组)添加动画:
// app/demo/demo-animation/demo-animation.component.ts
@Component(
...
animations: [
trigger('colorState', [
state('active', style({
background: 'red'
})),
state('inactive', style({
background: 'blue'
})),
transition('active => inactive', animate('500ms ease-in')),
transition('inactive => active', animate('500ms ease-out'))
])
])
export class DemoAnimationComponent implements OnInit {
isActive: boolean;
toActive() {
this.isActive = !this.isActive;
}
}
// app/demo/demo-animation/demo-animation.component.html
<button (click)="toActive()">按钮</button>
<div style="width: 50px;height: 50px;" [@colorState]="isActive ? 'active' : 'inactive'"></div>
@colorState属性的div的背景色从蓝色变为红色。 我们来分析一下上面的代码,首先我们给
animations属性添加了一个动画colorState,这样我们就可以使用@colorState属性给元素定义动画。 state()函数是用来定义动画状态的,这里是定义当元素拥有不同的样式类时,给元素添加不同的样式(style()函数里定义的样式)。
最后,使用
transition()函数来定义动画过渡的状态和过渡时间等。
注:`A => B`表示从A状态到B状态,还有另外一个双向`A <=> B`,表示A到B,B到A都是采取当前过渡。
注意:由
trigger()定义的动画名称,在使用时是当作属性来定义的,并且加上@。 (2) 移除或显示
对于移除和显示的动画,我们需要借助
*通配符状态和void无状态。 还是用例子来看看如何实现! // app/demo/demo-animation.html
@Component({
...
animations: [
trigger('moveInState', [
state('in', style({opacity: 1, transform: 'translate3d(0,0,0)'})),
transition('void => *', [
style({transform: 'translate3d(0, 100px, 0)', opacity: 0}),
animate(200)
]),
transition('* => void', [
animate(200, style({transform: 'translate3d(0, 100px, 0)', opacity: 0}))
])
])
]
})
export class DemoAnimationComponent implements OnInit {
isIn: boolean;
toIn() {
this.isIn = !this.isIn;
}
}
// app/demo/demo-animation.component.html
<button (click)="toIn()">按钮</button>
<div style="width: 50px;height: 50px;background: red" *ngIf="isIn" [@moveInState]></div>
void => *进场,* => void离场。 注意:
-
*通配符匹配任何动画;void表示元素没有被附加到视图中。 - 有两个别名:
:enter等价于void => *,:leave等价于* => void。
对于样式属性值,还有一个自动属性值:
*,一般用在对应高度或宽度等的属性。
// app/demo/demo-animation.component.ts
@Component({
...
animations: [
...
trigger('expandState', [
state('active', style({
height: '*'
})),
state('inactive', style({
height: 0
})),
transition('active <=> inactive', animate('300ms ease'))
])
]
})
export class DemoAnimationComponent implements OnInit {
isExpand: boolean;
expandClass: string;
ngOnInit() {
this.expandClass = this.isExpand ? 'active' : 'inactive';
}
open() {
this.isExpand = !this.isExpand;
this.expandClass = this.isExpand ? 'active' : 'inactive';
}
}
// app/demo/demo-animation.component.html
<button (click)="open()">按钮</button>
<div style="background: red;overflow: hidden;" [@expandState]="expandClass">
<div style="padding: 20px">我是自动属性</div>
</div>
expandState,当元素添加上样式类active时,高度展开为*,在这里可以看作是元素的offsetHeight;当元素添加上样式类inactive时,元素的高度折叠为0.
注意:
*会自动计算。 回调函数
类似原生JavaScript的
transitionStart和transitionEnd动画事件,Angular也为动画提供了两个动画事件。 @triggerName.start动画开始事件,@triggerName.done动画结束事件。 <div style="background: red;overflow: hidden;" [@expandState]="expandClass2" (@expandState.start)="transitionStart($event)" (@expandState.done)="transitionEnd($event)">
<div style="padding: 20px">我是自动属性</div>
</div>
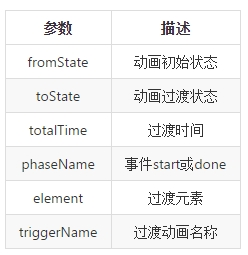
$event事件包含6个参数:

注:动画结束事件是
done而不是end。 《Angular4 开发实战》
如有任何问题或疑问,可以在下面的评论区留言!