

什么是 Headless Chrome
Headless Chrome 是 Chrome 浏览器的无界面形态,可以在不打开浏览器的前提下,使用所有 Chrome 支持的特性运行你的程序。相比于现代浏览器,Headless Chrome 更加方便测试 web 应用,获得网站的截图,做爬虫抓取信息等。相比于出道较早的 PhantomJS,SlimerJS 等,Headless Chrome 则更加贴近浏览器环境。
如何获取 Headless Chrome
目前,Mac 上 Chrome 59 beta 版本与 Linux 上的 Chrome 57+ 已经开始支持 headless 特性。Windows 上 Chrome 暂时不支持,可以使用 Chrome Canary 60 进行开发。
如何在终端中使用
在Mac上使用前,建议先绑定 Chrome 的别名
alias google-chrome="/Applications/Google\ Chrome.app/Contents/MacOS/Google\ Chrome"
Linux下无需绑定别名,从官网上下载最新版 Chrome 之后直接运行以下命令即可。然后,在终端中输入:
google-chrome --headless --disable-gpu --remote-debugging-port=9222 https://github.com
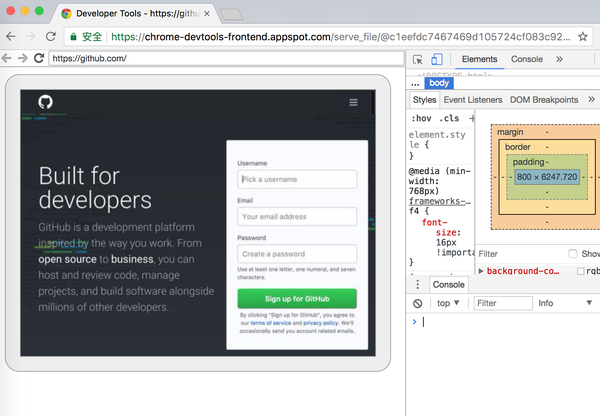
增加 --disable-gpu 主要是为了屏蔽现阶段可能触发的错误。此时,Headless Chrome已经成功运行了。打开浏览器,输入 http://localhost:9222,你会看到如下的界面:<img src="https://pic1.zhimg.com/v2-5642654f2fc3a784f04c90efbeca52ac_b.png" data-rawwidth="1682" data-rawheight="1166" class="origin_image zh-lightbox-thumb" width="1682" data-original="https://pic1.zhimg.com/v2-5642654f2fc3a784f04c90efbeca52ac_r.png">
在终端中,我们还可以做以下操作:
获取屏幕截图:
google-chrome --headless --disable-gpu --screenshot --window-size=1280,1696 https://github.com
获取页面为PDF:
google-chrome --headless --disable-gpu --print-to-pdf https://github.com
打印页面DOM:
google-chrome --headless --disable-gpu --dump-dom https://github.com/
远程控制
在上文中讲述的都使用终端命令启动 Headless Chrome,下文以获取截图为例,尝试如何在程序里控制 Headless Chrome。
安装依赖
npm install lighthouse chrome-remote-interface --save
const { ChromeLauncher } = require('lighthouse/lighthouse-cli/chrome-launcher')
const chrome = require('chrome-remote-interface')
const fs = require('fs')
const deviceMetrics = {
  width: 1200,
  height: 800,
  deviceScaleFactor: 0,
  mobile: false,
  fitWindow: false
}
const screenshotMetrics = {
  width: deviceMetrics.width,
  height: deviceMetrics.height
}
let protocol
let launcher

function launchChrome () {
  const launcher = new ChromeLauncher({
    port: 9222,
    autoSelectChrome: true,
    additionalFlags: ['--window-size=412,732', '--disable-gpu', '--headless']
  })
  return launcher.run().then(() => launcher)
}
function getScreenShot () {
  const { Page, Emulation } = protocol
  return Page.enable()
    .then(() => {
      Emulation.setDeviceMetricsOverride(deviceMetrics) // 配置浏览器尺寸
      Emulation.setVisibleSize(screenshotMetrics) // 配置截图尺寸
      Page.navigate({ url: 'https://github.com/' })
      return new Promise((resolve, reject) => {
        Page.loadEventFired(() => {
          resolve(Page.captureScreenshot({ format: 'jpeg', fromSurface: true }))
        })
      })
    })
    .then(image => {
      const buffer = new Buffer(image.data, 'base64')
      return new Promise((resolve, reject) => {
        fs.writeFile('output.jpeg', buffer, 'base64', err => {
          if (err) return reject(err)
          resolve()
        })
      })
    })
}
launchChrome()
  .then(Launcher => {
    launcher = Launcher
    return new Promise((resolve, reject) =>{
      chrome(Protocol => {
        protocol = Protocol
        resolve()
      }).on('error', err => { reject(err) })
    })
  })
  .then(getScreenShot)
  .then(() => {
    protocol.close()
    launcher.kill()
  })
  .catch(console.error)
这里使用 lighthouse 提供的 ChromeLauncher 模块来调用 Chrome,如果电脑上安装了Chrome Canary,lighthouse 默认会启动 Chrome Canary,可以将 autoSelectChrome 设置为false 然后自行选择使用什么版本。
通过 chrome-remote-interface 配合 Headless Chrome,我们还可以做更多事情。
使用 CSS 和 DOM 模块,可以获取和设置页面中的 DOM 节点内容和 CSS 样式。
function getStyle () {
  const { Page, CSS, DOM } = protocol
  return Promise.all([
      DOM.enable(),
      CSS.enable(),
      Page.enable()
    ])
    .then(() => {
      Page.navigate({ url: 'https://github.com/' })
      return new Promise((resolve, _) => {
        Page.loadEventFired(() => { resolve(DOM.getDocument()) })
      })
    })
    .then(res => res.root.nodeId)
    .then(nodeId => DOM.querySelector({ selector: '.btn-primary', nodeId }))
    .then(({ nodeId }) => CSS.getComputedStyleForNode({ nodeId }))
    .then(style => { console.log(style) })
}
使用 Runtime 模块,可以在页面运行时执行 JS 脚本。
function search () {
  const { Page, Runtime } = protocol
  return Promise.all([
      Page.enable()
    ])
    .then(() => {
      Page.navigate({ url: 'https://www.baidu.com/' })
      return new Promise((resolve, _) => {
        Page.loadEventFired(() => { resolve() })
      })
    })
    .then(() => {
      const code = [
        'var input = document.querySelector(\'.s_ipt\')',
        'var btn = document.querySelector(\'#su\')',
        'input.value=\'123\''
      ].join(';')
      return Runtime.evaluate({ expression: code })
    })
    .then(() => {
      return new Promise((resolve, _) => {
        setTimeout(() => {
          resolve(Page.captureScreenshot({ format: 'jpeg', fromSurface: true }))
        }, 3000)
      })
    })
    .then(image => {
      const buffer = new Buffer(image.data, 'base64')
      return new Promise((resolve, reject) => {
        fs.writeFile('output.jpeg', buffer, 'base64', err => {
          if (err) return reject(err)
          resolve()
        })
      })
    })
}
使用 Network 模块,可以读取并设置 UserAgent 和 Cookie 等信息。
function setUAandCookie () {
  const { Page, Network } = protocol
  return Promise.all([
      Network.enable(),
      Page.enable()
    ])
    .then(() => {
      const userAgent =
      Network.setUserAgentOverride({ userAgent: "Mozilla/5.0 (Macintosh; Intel Mac OS X 10_12_5) AppleWebKit/537.36 (KHTML, like Gecko) Chrome/59.0.3071.71 Safari/537.36" })
      Network.setCookie({
        url: 'https://github.com',
        name: 'test',
        value: '123',
        domain: '.github.com',
        path: '/',
        httpOnly: true
      })
      Page.navigate({ url: 'https://github.com/' })
      return new Promise((resolve, _) => {
        Page.loadEventFired(() => { resolve() })
      })
    })
    .then(() => {
      return Network.getCookies()
    })
    .then(console.log)
}
在 Karma 中使用 Headless Chrome 进行单元测试
相比于 PhantomJS 等,使用 Headless Chrome 做单元测试更加贴近浏览器开发环境。同时 PhantomJS 作者也已经功成身退,在 Chrome 发布 Headless 模式后,发布通知不再维护 PhantomJS 项目。
安装依赖
npm install jasmine-core karma karma-chrome-launcher karma-jasmine -D
// karma.conf.js
module.exports = function (config) {
  config.set({
    frameworks: ['jasmine'],
    files: ['./test.js'],
    browsers: ["Chrome_Beta_Headless"],
    customLaunchers: {
      Chrome_Beta_Headless: {
        base: 'Chrome',
        flags: [
          '--headless',
          '--disable-gpu',
          '--remote-debugging-port=9222'
        ]
      }
    },
    browserConsoleLogOptions: {
      level: 'log',
      terminal: true
    },
    reporters: ['progress'],
    autoWatch: false,
    singleRun: true
  })
}
// test.js
describe('test', function() {
  it('should be true', function() {
    console.log(window.navigator.userAgent)
    expect(true).toEqual(true);
  });
});
配置npm script
// package.json
...
scripts: {
  test: "karma start"
}
...
npm test
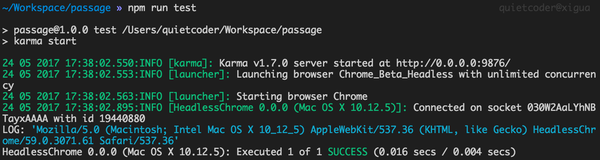
从返回结果中可以看出,测试已运行在 Headless Chrome 环境下。
小结
本文简单介绍了一下 Headless Chrome 在终端的用法,以及如何使用 Headless Chrome 获取截图、获取页面中的CSS和DOM、设置UA和Cookie、运行JS脚本、配合 Karma 进行单元测试。接下来,就等着你探索更多关于 Headless Chrome 的用法了...
参考:
developers.google.com/web/updates…How to install and use Headless Chrome on OSX
