

iOS10 中统一了本地推送和远程推送的 API,在 UserNotifications.framework 来统一处理与推送相关任务,并增加了图片、音频、视频,自定义通知 UI 等新特性。
回顾
推送的过程:app 向 apple 服务器申请注册通知,apple 服务器再向 APNs 服务器申请 token,APNs 将 token 发送给 app。app 保存这个 token 到个人服务器。在个人服务器根据 token 发送推送时,先将 payload 发送到 APNs,① 然后 APNs 根据 token 下发到对应的 app
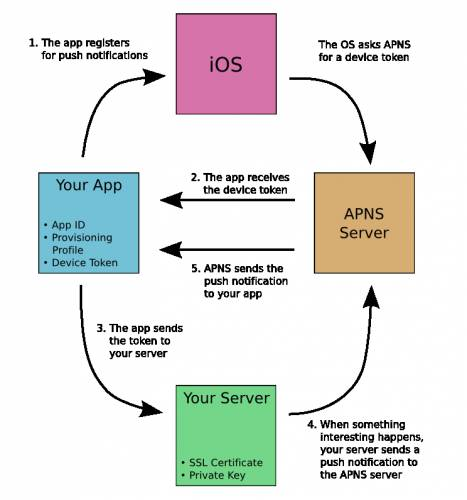
我的理解:① iOS10 中 Service Extension & Content Extension 是在这里处理完之后再转发出去。
{
  "aps" : {
    "alert" : {
      "title" : "message",
      "subtitle" : "brief message"  # new
      "body" : "Your message Here"
    },
    "sound" : "default",
    "badge" : 1
    "mutable-content":1		# new
  }
  "image": "https://onevcat.com/assets/images/background-cover.jpg"	# new
}
通知界面
页面变成如下图所示远角矩形,界面的元素有 Title、subTitle、body等,对于用户操作加了 3D Touch、Action。 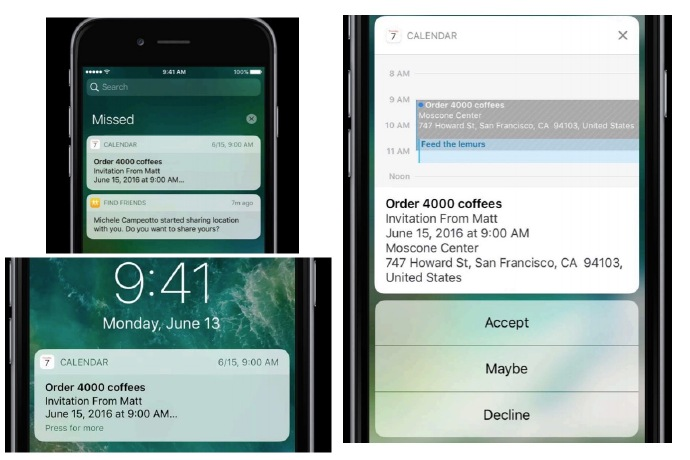
多媒体
iOS10 中通知不再仅仅是一行文字这么简单,在此版本加入了图片、音频、视频这样的多媒体。对于手机碎片化时间有了更好的诠释。当然对于多媒体的大小是有限制的,对于这些多媒体的加载时间大概在 30s 左右,远程下载的多媒体下载结束之后由系统来管理,当然也可以通过 UserNotificationCenter 来管理。
| 多媒体类型 | 限制大小 |
|---|---|
| 图片 | 10M |
| 音频 | 5M |
| 视频 | 50M |
1.创建 UNNotificationCategory 对象
let myCatrgory: UNNotificationCategory = {

      let commentAction = UNTextInputNotificationAction(
        identifier: myNotificationAction.comment.rawValue,
        title: "写评论",
        options: [.foreground],
        textInputButtonTitle: "发送",
        textInputPlaceholder: "写点什么吧")

      let zanAction = UNNotificationAction(
        identifier: myNotificationAction.zan.rawValue,
        title: "点赞",
        options: [.foreground])

      let cancelAction = UNNotificationAction(
        identifier: myNotificationAction.cancel.rawValue,
        title: "取消",
        options: [.destructive])

      return UNNotificationCategory(identifier: UserNotificationCategoryType.myNotificationCategory.rawValue, actions: [commentAction, zanAction, cancelAction], intentIdentifiers: [], options: [])
    }()

UNUserNotificationCenter.current().setNotificationCategories([inputCatrgory, myCatrgory])
以上代码也就是定义了一种 category 的 Action 的特征,定义的 Action 在 Appdelegate 中可以做出相应的处理。并注册到 UNUserNotificationCenter 中。此时可以通过通知发送的 payload 中的字段来控制显示哪个 category。
{
  "aps" : {
    "alert" : "Test message!",
    "sound" : "default",
    "category": "myCatrgory"
  }
}
以上的 payload 就是指定 myCatrgory 这个类型。到此一个简单的推送就完成了。
2.初始化 UNNotificationAttachment 对象
let attachment = UNNotificationAttachment(identifier: "identifier", url: url, options: nil)
- identifier:是对 attachment 的唯一标示
- url:attachment 资源的链接
- options:attachment 一些可选项
比如 .ThumbnailClippingRectKey 表示获取一个缩略图。
3.带多媒体的推送
if #available(iOS 10.0, *) {
      let content = UNMutableNotificationContent()
      content.title = "iOS10 推送测试"
      content.body = "附件"
      content.userInfo = ["icon":"1","mutable-content":1]
      content.categoryIdentifier = "InputSomething"

      let trigger = UNTimeIntervalNotificationTrigger(timeInterval: 3, repeats: false)

      let requestIdentifier = "imageLocal"
      if let imageURL = Bundle.main.url(forResource: "avatar@2x", withExtension: "png"), let attachment = try? UNNotificationAttachment(identifier: "imageAttachment", url: imageURL, options: nil) {

        content.attachments = [attachment]
      }

      let request = UNNotificationRequest(identifier: requestIdentifier, content: content, trigger: trigger)

      UNUserNotificationCenter.current().add(request, withCompletionHandler: { (error) in
        if (error != nil) {
          print("error: \(error.debugDescription)")
        }
      })
    }
以上代码涉及到 UNTimeIntervalNotificationTrigger 触发器,UNNotificationRequest 通知请求,UNMutableNotificationContent 通知内容。 其中 UNTimeIntervalNotificationTrigger 是 UNNotificationTrigger 抽象类的一个子类,UNNotificationTrigger 一共有3个子类:
- UNCalendarNotificationTrigger 按日期推送
- UNLocationNotificationTrigger 按地点推送
- UNTimeIntervalNotificationTrigger 按时间推送
UNMutableNotificationContent 它相当于payload 的一个对象但是比 payload 内容要丰富。值得注意的是 userInfo 属性,一个类似字典并且其中的内容完全是由开发者来自定义的,大大提高了使用的空间,此时推送可以做更多的事情。
UNNotificationRequest 将 trigger、content 包装一层发送给 UNUserNotificationCenter 来完成本地推送。
3.带多媒体的远程推送 此时就需要用到 UNNotificationServiceExtension 应用扩展,通过在 payload 中增加 mutable-content 字段来触发改扩展。
{
	"aps":{
		"alert":"IOS10 推送测试",
		"sound":"default",
		"badge":1,
		"mutable-content":1,
		"category":"InputSomething"
	},
	"image":"https://ws1.sinaimg.cn/mw690/934b5ef8gw1fapg2ssteej20oz0oz420.jpg"
}
当推送达到 app 时,会启动扩展并回调 didReceive 方法。在该方法里面可以对推送的 UNMutableNotificationContent 做出相应的修改。在 didReceive 回调方法中的 request 包含了推送的具体信息,可以通过其 userInfo 属性来解析出多媒体的 url,当然也可以去读取本地资源来显示。
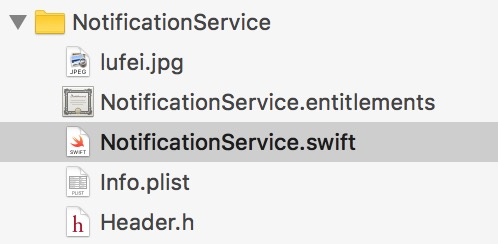
从本地读取资源:
let imageURL = Bundle.main.url(forResource: "lufei", withExtension: "jpg")
值得注意的是这里 Bundle 指的是扩展的沙盒,不是 app 的沙盒,所以资源的路径要正确。
读取远程的资源和本地资源相比多一步下载保存的操作:
private func downloadAndSave(url: URL, handler: @escaping (_ localURL: URL?) -> Void) {
    let task = URLSession.shared.dataTask(with: url, completionHandler: {
      data, res, error in

      var localURL: URL? = 下载完之后保存到本地并返回本地的 url

      handler(localURL)
    })

    task.resume()
  }
得到本地的 url 之后操作其实就一样了,都是通过 url 来生成一个 UNNotificationAttachment 对象。一切都操作完之后将这个 UNMutableNotificationContent 对象返还 contentHandler(bestAttemptContent)
自定义界面
iOS10 除了显示 Title、subTitle、body 之外,通过 3D Touch 来显示界面
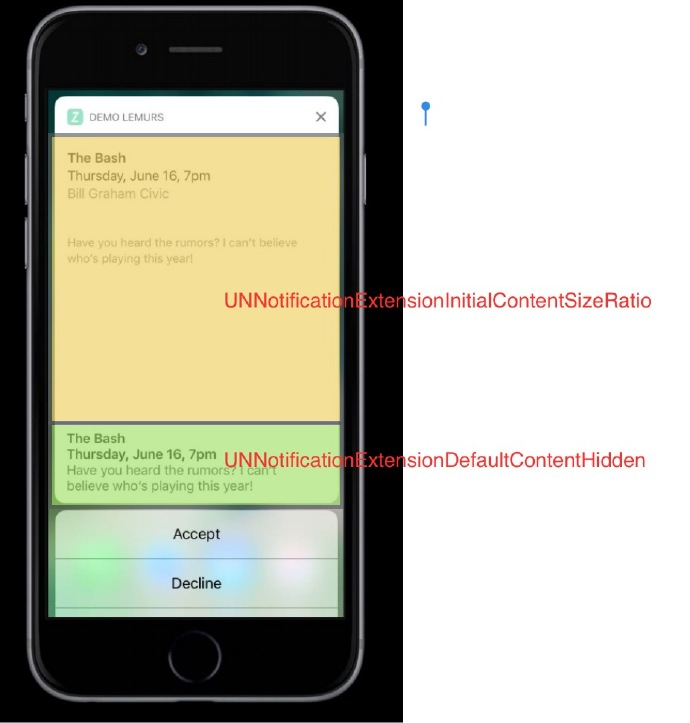
其中上面的黄色区域可以理解成一个 ViewController 操作,下面绿色部分就是 Title 之类的显示内容。这部分是可以隐藏的。在扩展的目录下的 info.plist 编辑一些界面相关的东西。
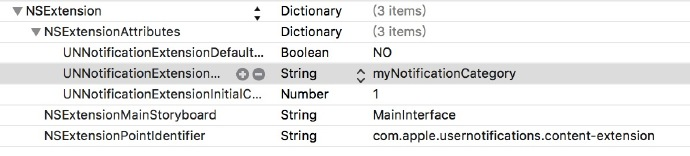
- UNNotificationExtensionCategory 触发 Extension 的 category 这里需要在注册才能有效的触发 字符串类型
- UNNotificationExtensionInitialContentSizeRatio 上图黄色区域的长宽比,float 类型
- UNNotificationExtensionDefaultContentHidden 默认内容是否隐藏,Bool 类型
总结
在 iOS10 中的这次推送的重构,方便了开发者对推送的集成。较高程度的自定义 UI 和多媒体增加了推送的趣味性。接下来赶快去集成吧~
参考
喵神的 blog
Apple 自家的文档 UserNotification
后记
写的不准确的地方,欢迎拍砖~
demo 地址
