对Activity的setContentView的使用,大家比较熟悉了,当然,对setContentView的原理估计也比较熟悉,网上有不少的文章,不过,还是写一篇这方面的东西,记录下,毕竟
很多东西,看别人的是一回事儿,自己写又是一回事儿,当作是对知识的温故,再学习吧!
Activity.Java
首先,在自己的activity中,调用setContentView(int resID)方法,如下:
- public void setContentView(@LayoutRes int layoutResID) {
- getWindow().setContentView(layoutResID);
- }

    public void setContentView(@LayoutRes int layoutResID) {
        getWindow().setContentView(layoutResID);
    }
可以看出,该方法先是获取Window的对象,然后调用该对象的setContentView方法
继续看,源码:
- private Window mWindow;
- bsp;public Window getWindow() {
- return mWindow;
- }
- final void attach(Context context, ActivityThread aThread,Instrumentation instr, IBinder token, int ident,...省略) {
- mWindow = new PhoneWindow(this);
- //省略部分代码
- }
    private Window mWindow;

   public Window getWindow() {
        return mWindow;
    }

    final void attach(Context context, ActivityThread aThread,Instrumentation instr, IBinder token, int ident,...省略) {
        mWindow = new PhoneWindow(this);
        //省略部分代码
    }
发现getWindow()方法,是mWindow,属于成员变量,在attach方法调用后mWindow初始化为PhoneWindow,是不是着急想知道PhoneWindow是何东东?
别急,在这有点疑问?attach方法在什么时候调用呢?告诉你,是在ActivityThread类中,有个performLaunchActivity方法,该方法调用activity.attach,然后mWindow初始化
当然,关于performLaunchActivity执行,暂时只需要知道,当我们调用startActivity的时候,系统会去加载一系列的类,调用一系列方法,其中就有performLaunchActivity,来
完成activity的启动工作
ok,知道了mWindow的初始化,让我们回到setContentView,来聊聊PhoneWindow这个类,PhoneWindow继承自Window,而Window是个抽象类
PhoneWindow.java
- public class PhoneWindow extends Window
public class PhoneWindow extends Window PhoneWindow对setContentView的重写,如下:
- @Override
- public void setContentView(int layoutResID) {
- if (mContentParent == null) {
- installDecor();
- }
- //...
- mLayoutInflater.inflate(layoutResID, mContentParent);
- //...
- }
    @Override
    public void setContentView(int layoutResID) {
        if (mContentParent == null) {
            installDecor();
        }
        //...
       mLayoutInflater.inflate(layoutResID, mContentParent);
        //...
}步骤1:installDecor(),
步骤2:将我们自己的xml布局资源ID,转换为view,并填充到mContentParent上,问题来了,mContentParent是什么呢?留个问题在这
先看步骤1,源码如下:
- private void installDecor() {
- if (mDecor == null) {
- mDecor = generateDecor();
- //...
- }
- if (mContentParent == null) {
- mContentParent = generateLayout(mDecor);
- //...
- }
    private void installDecor() {
        if (mDecor == null) {
            mDecor = generateDecor();
            //...
        }
        if (mContentParent == null) {
            mContentParent = generateLayout(mDecor);
            //...
        }
- private final class DecorView extends FrameLayout
private final class DecorView extends FrameLayout到这里,知道步骤1是执行了两步,了解到以下内容:
mDecor是个类变量,是DecorView,继承Framlayout,也就是一个ViewGroup,mDecor是generateDecor创建的
mContentParent是类变量,是一个ViewGroup,mContentParent是generateLayout进行创建的,mContentParent的创建依赖mDecor,
接下来,分别看generateDecor与generateLayout
generateDecor()方法:
- protected DecorView generateDecor() {
- return new DecorView(getContext(), -1);
- }
    protected DecorView generateDecor() {
        return new DecorView(getContext(), -1);
    }
该方法创建了DecorView实例,通过查看DecorView构造方法,发现只是初始化了一些类变量,没有其他操作
generateLayout()方法(关键之处):
PS:这里,由于源码比较冗杂,只是保留关键部分,简化代码如下
- protected ViewGroup generateLayout(DecorView decor){
- int layoutResource;
- //...
- layoutResource = R.layout.screen_simple;
- View in = mLayoutInflater.inflate(layoutResource, null);
- decor.addView(in, new ViewGroup.LayoutParams(MATCH_PARENT, MATCH_PARENT));
- //...
- ViewGroup contentParent = (ViewGroup)findViewById(ID_ANDROID_CONTENT);
- //...
- return contentParent;
- }
    protected ViewGroup generateLayout(DecorView decor){
        int layoutResource;
        //...
        layoutResource = R.layout.screen_simple;

        View in = mLayoutInflater.inflate(layoutResource, null);
        decor.addView(in, new ViewGroup.LayoutParams(MATCH_PARENT, MATCH_PARENT));
        //...
        ViewGroup contentParent = (ViewGroup)findViewById(ID_ANDROID_CONTENT);
        //...
        return contentParent;

}将in作为DecorView的子view进行添加,调用 findViewById,这里,很奇怪,为何能直接调用findViewById,原来是Window中定义了该方法,前面说过, PhoneWindow继承
Window,所以可直接调用父类方法。
Window类
- public View findViewById(@IdRes int id) {
- return getDecorView().findViewById(id);
- }
- public abstract View getDecorView();
    public View findViewById(@IdRes int id) {
        return getDecorView().findViewById(id);
    }

public abstract View getDecorView();那么,getDecorView()是怎么执行的呢?PhoneWindow对该抽象方法进行具体实现,返回上面generateDecor() 方法的mDecor
PhoneWindow类
- public final View getDecorView() {
- if (mDecor == null) {
- installDecor();
- }
- return mDecor;
- }
    public final View getDecorView() {
        if (mDecor == null) {
            installDecor();
        }
        return mDecor;
    }
到这里,大致清楚了,这句代码
ViewGroup contentParent = (ViewGroup)findViewById(ID_ANDROID_CONTENT);
饶来绕去,就是在mDecor中查找ID_ANDROID_CONTENT的对应的View ,然后是赋值给contentParent,在generateLayout方法中返回contentParent ,最终赋值给
mContentParent,换句话说,mContentParent是mDecor的子 view,而我们自己布局对应的view,是mContentParent的子 view
步骤2中
- mLayoutInflater.inflate(layoutResID, mContentParent);
- //等价于
- View ourContentView = mLayoutInflater.inflate(layoutResID, null);
- mContentParent.addView(ourContentView );
    mLayoutInflater.inflate(layoutResID, mContentParent);
    //等价于
    View ourContentView = mLayoutInflater.inflate(layoutResID, null);
mContentParent.addView(ourContentView );R.layout.screen_simple的xml源码:
- <LinearLayout xmlns:android="http://schemas.android.com/apk/res/android"
- android:layout_width="match_parent"
- android:layout_height="match_parent"
- android:fitsSystemWindows="true"
- android:orientation="vertical">
- <ViewStub android:id="@+id/action_mode_bar_stub"
- android:inflatedId="@+id/action_mode_bar"
- android:layout="@layout/action_mode_bar"
- android:layout_width="match_parent"
- android:layout_height="wrap_content"
- android:theme="?attr/actionBarTheme" />
- <FrameLayout
- android:id="@android:id/content"
- android:layout_width="match_parent"
- android:layout_height="match_parent"
- android:foregroundInsidePadding="false"
- android:foregroundGravity="fill_horizontal|top"
- android:foreground="?android:attr/windowContentOverlay" />
- </LinearLayout>
    <LinearLayout xmlns:android="http://schemas.android.com/apk/res/android"
       android:layout_width="match_parent"
       android:layout_height="match_parent"
       android:fitsSystemWindows="true"
       android:orientation="vertical">
      <ViewStub android:id="@+id/action_mode_bar_stub"
              android:inflatedId="@+id/action_mode_bar"
              android:layout="@layout/action_mode_bar"
              android:layout_width="match_parent"
              android:layout_height="wrap_content"
              android:theme="?attr/actionBarTheme" />
      <FrameLayout
         android:id="@android:id/content"
         android:layout_width="match_parent"
         android:layout_height="match_parent"
         android:foregroundInsidePadding="false"
         android:foregroundGravity="fill_horizontal|top"
         android:foreground="?android:attr/windowContentOverlay" />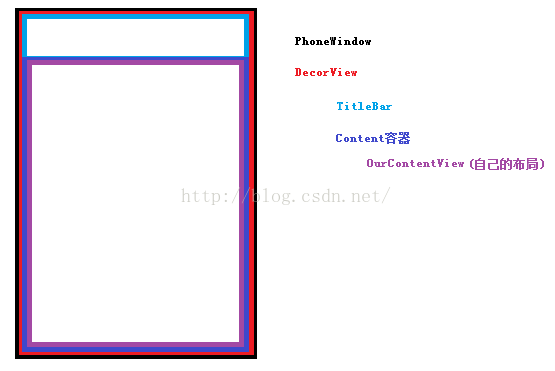
</LinearLayout>结论:DecorView是Window的最顶级的View,其下有两个子 View,一个标题栏bar,一个是容器content,
自己定义的布局对应view,是被addView在容器 content上
最后,附上一张图,直观感受下