

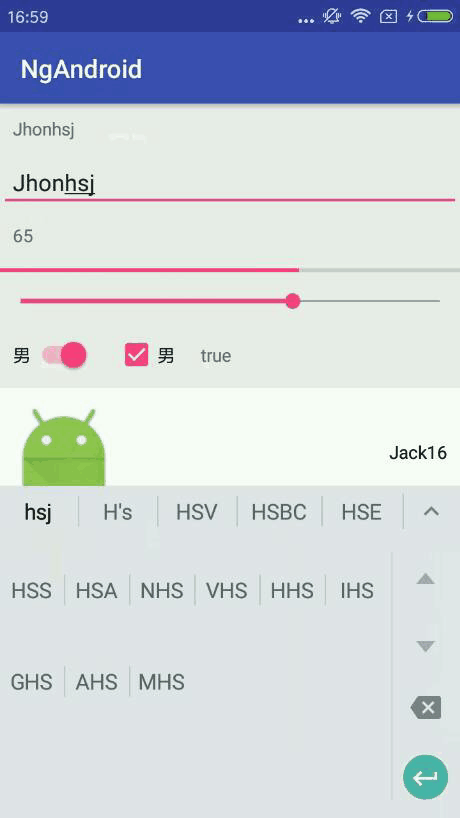
先上一张完成的效果图:
> GitHub地址:github.com/superyoyo/A…
完成这么多的UI操作,其实指需要很少的代码,现在附上全部关键代码。
首先是布局文件:activity_main.xml
<?xml version="1.0" encoding="utf-8"?>
xmlns:ng="http://schemas.android.com/apk/res-auto"
xmlns:tools="http://schemas.android.com/tools"
android:id="@+id/activity_main"
android:layout_width="match_parent"
android:layout_height="match_parent"
android:orientation="vertical">
<LinearLayout
    android:id="@+id/ll_container"
    android:layout_width="match_parent"
    android:layout_height="wrap_content"
    android:orientation="vertical">

    <TextView
        android:layout_width="wrap_content"
        android:layout_height="wrap_content"
        android:layout_margin="10dp"
        android:tag="ng:user:name"
        android:text="Hello World!" />

    <EditText
        android:layout_width="match_parent"
        android:layout_height="wrap_content"
        android:hint="userName"
        android:padding="10dp"
        android:tag="ng:user:name" />

    <TextView
        android:layout_width="wrap_content"
        android:layout_height="wrap_content"
        android:layout_margin="10dp"
        android:tag="ng:user:age" />

    <ProgressBar
        android:layout_width="match_parent"
        android:layout_height="wrap_content"
        style="@style/Base.Widget.AppCompat.ProgressBar.Horizontal"
        android:progress="10"
        android:tag="ng:user:age"/>

    <SeekBar
        android:layout_width="match_parent"
        android:layout_height="wrap_content"
        android:progress="0"
        android:tag="ng:user:age"/>

    <LinearLayout
        android:layout_width="wrap_content"
        android:layout_height="wrap_content"
        android:orientation="horizontal">

        <Switch
            android:layout_width="wrap_content"
            android:layout_height="match_parent"
            android:text="男"
            android:tag="ng:user:isMale"
            android:layout_margin="10dp"/>

        <CheckBox
            android:layout_width="wrap_content"
            android:layout_height="wrap_content"
            android:tag="ng:user:isMale"
            android:text="男"
            android:layout_margin="10dp" />

        <TextView
            android:layout_width="wrap_content"
            android:layout_height="wrap_content"
            android:layout_margin="10dp"
            android:tag="ng:user:isMale"
            android:text="Hello World!" />

    </LinearLayout>

    <LinearLayout
        android:id="@+id/rv_list"
        android:layout_width="match_parent"
        android:layout_height="wrap_content"
        android:orientation="vertical"
        android:tag="nglist:user:list">

        <com.autonavi.jacklee.ngandroid.angular.view.NgItemView
            android:layout_width="match_parent"
            android:layout_height="wrap_content"
            android:tag="ng:student"
            ng:ngRecyclerViewItemList="@layout/item_student" />

        <com.autonavi.jacklee.ngandroid.angular.view.NgItemView
            android:layout_width="match_parent"
            android:layout_height="wrap_content"
            android:tag="ng:title"
            ng:ngRecyclerViewItemList="@layout/item_tag" />

        <com.autonavi.jacklee.ngandroid.angular.view.NgItemView
            android:layout_width="match_parent"
            android:layout_height="wrap_content"
            android:tag="ng:content"
            ng:ngRecyclerViewItemList="@layout/item_content" />

    </LinearLayout>


</LinearLayout>
其中java代码部分如下:
public class MainActivity extends AppCompatActivity implements CommonAdapter.CommonAdapterInterface{
private NgGo ngGo;
private NgModel ngUser;
private List list;
private LinearLayout ll_container;
private Handler handler = new
Handler(){
@Override
public void handleMessage(Message msg) {
super.handleMessage(msg);
        if((int)ngUser.getValue("age") >= 100){
            ngUser.addParams("age", 0 );
        }else{
            ngUser.addParams("age", ((int)ngUser.getValue("age")) + 2 );
        }

        NgModel user = ((List<NgModel>)ngUser.getValue("list")).get(0);
        user.addParams("name", "Jack" + ((int)ngUser.getValue("age")));
    }
};

@Override
protected void onCreate(Bundle savedInstanceState) {
    super.onCreate(savedInstanceState);
    setContentView(R.layout.activity_main);
    ll_container = (LinearLayout) findViewById(R.id.ll_container);
    ngGo = new NgGo(ll_container);

    ngUser = new NgModel("user");

    ngGo.addNgModel(ngUser);

    ngGo.start();

}

@Override
protected void onResume() {
    super.onResume();
    initNgGo();
}

private void initNgGo(){

    ngUser.addParams("name", "Jhon");
    ngUser.addParams("sex", "nan");
    ngUser.addParams("age", 14);
    ngUser.addParams("isMale", false);

    list = new ArrayList<>();
    for(int i = 0; i<10; i++){
        if(i%3 == 0){
            NgModel ngUser = new NgModel("student");
            ngUser.addParams("name", "Jack" + i);
            list.add(ngUser);
        }else if(i%3 == 1){
            NgModel ngUser = new NgModel("title");
            ngUser.addParams("name", "title" + i);
            list.add(ngUser);
        }else{
            NgModel ngUser = new NgModel("content");
            ngUser.addParams("name", "Content" + i);
            list.add(ngUser);
        }
    }

    ngUser.addParams("list", list);

    Message msg = Message.obtain();
    handler.sendMessageDelayed(msg, 1000);

    CommonAdapter adapter = ngGo.getRecyclerAdapter(R.id.rv_list);
    adapter.setCommonAdapterInterface(this);
}


@Override
public void handleItem(int id, CommonAdapter.CommonHolder holder, final int position) {
    switch (id){
        case R.id.rv_list:
            if(list.get(position).getTag().equals("student")){
                holder.getView(R.id.iv_head).setOnClickListener(new View.OnClickListener() {
                    @Override
                    public void onClick(View v) {

                    }
                });
            }

            holder.getItemView().setOnClickListener(new View.OnClickListener() {
                @Override
                public void onClick(View v) {
                    Toast.makeText(getApplicationContext(), position + "_item", Toast.LENGTH_SHORT).show();
                }
            });
            break;
    }
}
}
以上就是所有代码,是不是感觉代码很少?哈哈哈
现在开始介绍AngularAndroid
一 需要记住的几个对象
- NgGo:这个是AngularAndroid渲染的具体执行者
- NgModel:这个是数据绑定中的绑定对象,只要它的属性值产生了变化,那么只要绑定在它身上的View就会做出相应的改变
- CommonAdapter:这个是RecyclerView的通用适配器
- NgItemView:这个是RecyclerView的Item,NgGo在监测到LinearLayout的tag中以nglist开头,会自动将LinearLayout转为RecyclerView,LinearLayout有多少个NgItemView,RecyclerView就有多少种item类型。
二 使用步骤
1.初始化NgGo对象 NgGo ngg = new NgGo(View parent);
parent这个view对象,类似与angularjs中的控制域,可能一个页面中有不同的逻辑部分,这个时候,需要多个逻辑对象,这样的话,每个逻辑操作对象都对应一个控制域。一般这样的情况比较少。
2.初始化NgModel对象 NgModel user = new NgModel("user");
其中“user”这个参数,对应xml中"ng:user:name"的user,也就是NgModel需要指定对象名字。
3.将NgModel添加到NgGo中,交给NgGo去控制 ngg.addNgModel(user);
4.NgGo开始渲染 ngg.start();
至此,数据绑定完成,现在尝试改变user的属性值:user.addParams("name", "Jhon");
然后运行程序,是不是发现只要xml中tag为"ng:user:name"的view都显示"Jhon"?
因为是双向绑定,所以,当view的文本发生改变时,对应的NgModel的相应属性也会发生变化。倘若Editext和TextView的tag都设置为"ng:user:name"时,会发现,TextView的值是跟着EditText的值动态改变的。
有人会问这有什么用?现在举例一个最简单的场景:
现在要做一个登录页面:
原始做法:
1.实例化帐号和密码两个EditText
3.点击登录时,判断EditText的输入值是否符合规定。
现在的做法:
1.点击登录时,判断user对象的帐号(account)和密码(password)是否符合规定
有木有发现,全程不用关注View对象,只需要关注具体的逻辑对象User,思维不用来回切
