


由于我们公司不是专门做直播的, 所以研究直播开发完全处于兴趣爱好,可能很多地方用处理的不是很周到, 所以, 希望大家多提提意见, 互相学习一下哈!
这里附上我写的第一篇直播开发的文章传送门
iOS-直播开发(开发从底层做起)
好啦, 废话不多说, 直奔主题! 本篇文章是针对直播开发中的第一部分, 音视频采集! 用的是iOS 原生的AVFoundation框架!
Demo传送门GitHub
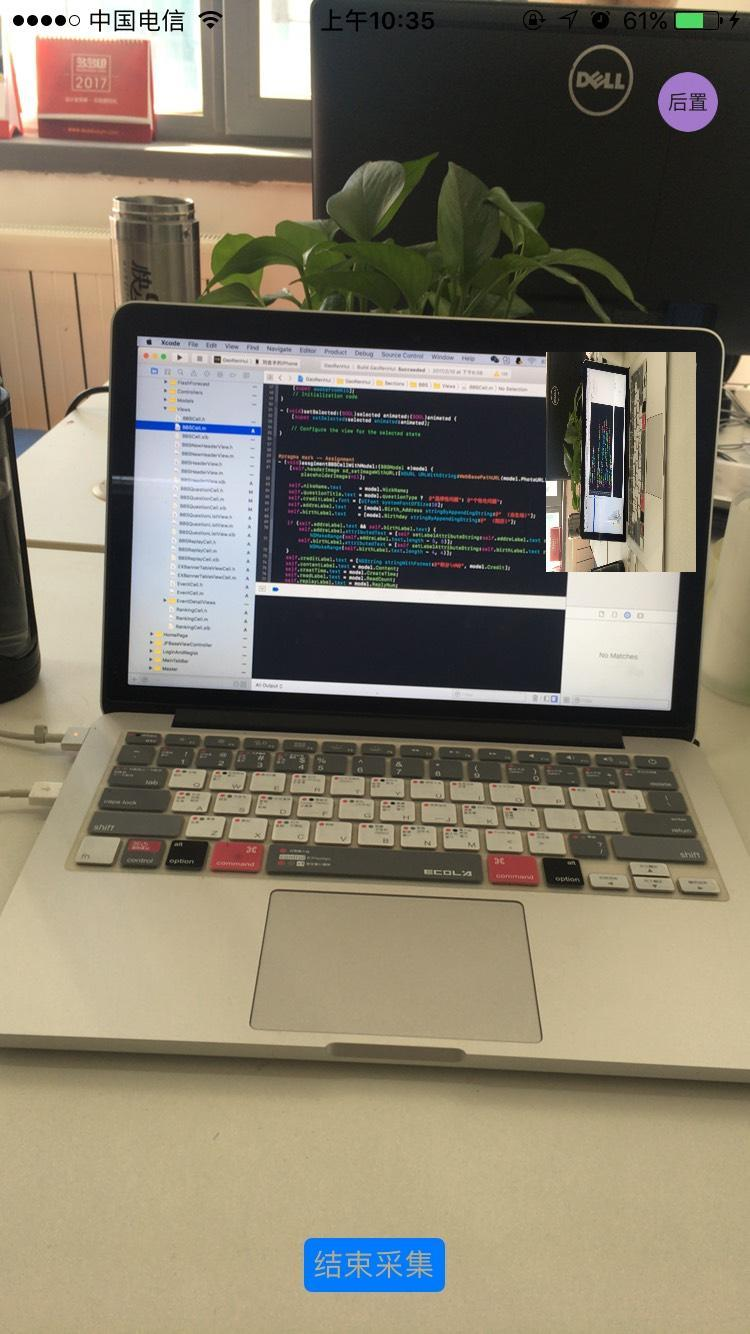
实现的效果图
1. 所使用的系统类
AVCaptureSession *session;    // 音视频管理对象
AVCaptureDevice *videoDevice; // 视频设备对象 (用来操作闪光灯, 聚焦, 摄像头切换等)
AVCaptureDevice *audioDevice; // 音频设备对象
AVCaptureDeviceInput *videoInput;         // 视频输入对象
AVCaptureDeviceInput *audioInput;         // 音频输入对象
AVCaptureVideoDataOutput *videoOutput;    // 视频输出对象
AVCaptureAudioDataOutput *audioOutput;    // 音频输出对象
AVCaptureVideoPreviewLayer *preViewLayer; // 用来展示视频的layer对象
2. 封装音视频采集类
为了方便后边的使用, 我们把音视频采集这个功能单独封装成一个类, 这里封装成 JFCaptureSession
JFCaptureSession.h
typedef NS_ENUM(NSUInteger, JFCaptureSessionPreset){
    /// 低分辨率
    JFCaptureSessionPreset368x640 = 0,
    /// 中分辨率
    JFCaptureSessionPreset540x960 = 1,
    /// 高分辨率
    JFCaptureSessionPreset720x1280 = 2
};
这个枚举是来初始化JFCaptureSession 该类对象的时候需要传的一个枚举值, 来制定视频采集的分辨率, 有三个枚举值
JFCaptureSessionPreset368x640  //该枚举值是分辨率最低的, 基本上所有的机型都支持该分辨率
JFCaptureSessionPreset720x1280 //而这个枚举值分辨率比较高, 可能有些机型不支持该分辨率, .m中的实现有判断, 如果不支持该分辨率, 则会降一级
.h中的另一个枚举 该枚举用来操控前后摄像头的
// 摄像头方向
typedef NS_ENUM(NSInteger, JFCaptureDevicePosition) {
    JFCaptureDevicePositionFront = 0,  // 前置摄像头
    JFCaptureDevicePositionBack        // 后置摄像头
};
然后就是JFCaptureSession 的代理 JFCaptureSessionDelegate, 用来回调采集的音视频帧数据 CMSampleBufferRef
/** 视频取样数据回调 */
- (void)videoCaptureOutputWithSampleBuffer:(CMSampleBufferRef)sampleBuffer;
/** 音频取样数据回调 */
- (void)audioCaptureOutputWithSampleBuffer:(CMSampleBufferRef)sampleBuffer;
JFCaptureSession 该类的初始化方法, 初始化的时候需要传一分辨率的枚举值, 来设置要采集视频的分辨率
- (instancetype)defaultJFCaptureSessionWithSessionPreset:(JFCaptureSessionPreset)sessionPreset;@property (nonatomic, strong) UIView *preView; // 用来展示视频图像 @property (nonatomic, assign) JFCaptureDevicePosition videoDevicePosition; // 先后摄像头切换 @property (nonatomic, assign) id <JFCaptureSessionDelegate> delegate; // 代理开始采集, 暂停采集
/**
 开始
 */
- (void)startRunning;
/**
 暂停
 */
- (void)stopRunning;
JFCaptureSession.m 集体实现音视频采集的方法
// 初始化方法
- (instancetype)defaultJFCaptureSessionWithSessionPreset:(JFCaptureSessionPreset)sessionPreset {
    if ([super init]) {
        self.sessionPreset = sessionPreset;
        // 初始化Session
        [self initAVCaptureSession];
    }
    return self;
}
- (void)initAVCaptureSession { // 初始化 self.session = [[AVCaptureSession alloc] init]; // 设置录像的分辨率 [self.session canSetSessionPreset:[self supportSessionPreset]]; /** 注意: 配置AVCaptureSession 的时候, 必须先开始配置, beginConfiguration, 配置完成, 必须提交配置 commitConfiguration, 否则配置无效 **/ // 开始配置 [self.session beginConfiguration]; // 设置视频 I/O 对象 并添加到session [self videoInputAndOutput]; // 设置音频 I/O 对象 并添加到session [self audioInputAndOutput]; // 提交配置 [self.session commitConfiguration]; }// 设置视频 I/O 对象 - (void)videoInputAndOutput { NSError *error; // 初始化视频设备对象 self.videoDevice = nil; // 创建摄像头类型数组 (前置, 和后置摄像头之分) NSArray *devices = [AVCaptureDevice devicesWithMediaType:AVMediaTypeVideo]; // 便利获取的所有支持的摄像头类型 for (AVCaptureDevice *devcie in devices) { // 默然先开启前置摄像头 if (devcie.position == AVCaptureDevicePositionFront) { self.videoDevice = devcie; } } // 视频输入 // 根据视频设备来初始化输入对象 self.videoInput = [[AVCaptureDeviceInput alloc] initWithDevice:self.videoDevice error:&error]; if (error) { NSLog(@"== 摄像头错误 =="); return; } // 将输入对象添加到管理者 AVCaptureSession 中 // 需要先判断是否能够添加输入对象 if ([self.session canAddInput:self.videoInput]) { // 可以添加, 才能添加 [self.session addInput:self.videoInput]; } // 视频输出对象 self.videoOutput = [[AVCaptureVideoDataOutput alloc] init]; // 是否允许卡顿时丢帧 self.videoOutput.alwaysDiscardsLateVideoFrames = NO; if ([self supportsFastTextureUpload]) { // 是否支持全频色彩编码 YUV 一种色彩编码方式, 即YCbCr, 现在视频一般采用该颜色空间, 可以分离亮度跟色彩, 在不影响清晰度的情况下来压缩视频 BOOL supportFullYUVRange = NO; // 获取输出对象所支持的像素格式 NSArray *supportedPixelFormats = self.videoOutput.availableVideoCVPixelFormatTypes; for (NSNumber *currentPixelFormat in supportedPixelFormats) { if ([currentPixelFormat integerValue] == kCVPixelFormatType_420YpCbCr8BiPlanarFullRange) { supportFullYUVRange = YES; } } // 根据是否支持全频色彩编码 YUV 来设置输出对象的视频像素压缩格式 if (supportFullYUVRange) { [self.videoOutput setVideoSettings:[NSDictionary dictionaryWithObject:[NSNumber numberWithInt:kCVPixelFormatType_420YpCbCr8BiPlanarFullRange] forKey:(id)kCVPixelBufferPixelFormatTypeKey]]; } else { [self.videoOutput setVideoSettings:[NSDictionary dictionaryWithObject:[NSNumber numberWithInt:kCVPixelFormatType_420YpCbCr8BiPlanarVideoRange] forKey:(id)kCVPixelBufferPixelFormatTypeKey]]; } } else { [self.videoOutput setVideoSettings:[NSDictionary dictionaryWithObject:[NSNumber numberWithInt:kCVPixelFormatType_32BGRA] forKey:(id)kCVPixelBufferPixelFormatTypeKey]]; } // 创建设置代理是所需要的线程队列 优先级设为高 dispatch_queue_t videoQueue = dispatch_get_global_queue(DISPATCH_QUEUE_PRIORITY_HIGH, 0); // 设置代理 [self.videoOutput setSampleBufferDelegate:self queue:videoQueue]; // 判断session 是否可添加视频输出对象 if ([self.session canAddOutput:self.videoOutput]) { [self.session addOutput:self.videoOutput]; // 链接视频 I/O 对象 [self connectionVideoInputVideoOutput]; } }// 设置音频I/O 对象 - (void)audioInputAndOutput { NSError *error; // 初始音频设备对象 self.audioDevice = [AVCaptureDevice defaultDeviceWithMediaType:AVMediaTypeAudio]; // 音频输入对象 self.audioInput = [[AVCaptureDeviceInput alloc] initWithDevice:self.audioDevice error:&error]; if (error) { NSLog(@"== 录音设备出错"); } // 判断session 是否可以添加 音频输入对象 if ([self.session canAddInput:self.audioInput]) { [self.session addInput:self.audioInput]; } // 音频输出对象 self.audioOutput = [[AVCaptureAudioDataOutput alloc] init]; // 判断是否可以添加音频输出对象 if ([self.session canAddOutput:self.audioOutput]) { [self.session addOutput:self.audioOutput]; } // 创建设置音频输出代理所需要的线程队列 dispatch_queue_t audioQueue = dispatch_get_global_queue(DISPATCH_QUEUE_PRIORITY_LOW, 0); [self.audioOutput setSampleBufferDelegate:self queue:audioQueue]; }// 链接 视频 I/O 对象 - (void)connectionVideoInputVideoOutput { // AVCaptureConnection是一个类,用来在AVCaptureInput和AVCaptureOutput之间建立连接。AVCaptureSession必须从AVCaptureConnection中获取实际数据。 AVCaptureConnection *connection = [self.videoOutput connectionWithMediaType:AVMediaTypeVideo]; // 设置视频的方向, 如果不设置的话, 视频默认是旋转 90°的 connection.videoOrientation = AVCaptureVideoOrientationPortrait; // 设置视频的稳定性, 先判断connection 连接对象是否支持 视频稳定 if ([connection isVideoStabilizationSupported]) { connection.preferredVideoStabilizationMode = AVCaptureVideoStabilizationModeAuto; } // 缩放裁剪系数, 设为最大 connection.videoScaleAndCropFactor = connection.videoMaxScaleAndCropFactor; }// 判断是否支持设置的分辨率, 如果不支持, 默认降一级, 还不支持, 设为默认 - (NSString *)supportSessionPreset { if (![self.session canSetSessionPreset:self.avPreset]) { self.sessionPreset = JFCaptureSessionPreset540x960; if (![self.session canSetSessionPreset:self.avPreset]) { self.sessionPreset = JFCaptureSessionPreset368x640; } } else { self.sessionPreset = JFCaptureSessionPreset368x640; } return self.avPreset; }#pragma mark - Setter - (void)setSessionPreset:(JFCaptureSessionPreset)sessionPreset { _sessionPreset = sessionPreset; } // 根据视频分辨率, 设置具体对应的类型 - (NSString *)avPreset { switch (self.sessionPreset) { case JFCaptureSessionPreset368x640: _avPreset = AVCaptureSessionPreset640x480; break; case JFCaptureSessionPreset540x960: _avPreset = AVCaptureSessionPresetiFrame960x540; break; case JFCaptureSessionPreset720x1280: _avPreset = AVCaptureSessionPreset1280x720; break; default: _avPreset = AVCaptureSessionPreset640x480; break; } return _avPreset; }// 摄像头切换 - (void)setVideoDevicePosition:(JFCaptureDevicePosition)videoDevicePosition { if (_videoDevicePosition != videoDevicePosition) { _videoDevicePosition = videoDevicePosition; if (_videoDevicePosition == JFCaptureDevicePositionFront) { self.videoDevice = [self deviceWithMediaType:AVMediaTypeVideo preferringPosition:AVCaptureDevicePositionFront]; } else { self.videoDevice = [self deviceWithMediaType:AVMediaTypeVideo preferringPosition:AVCaptureDevicePositionBack]; } [self changeDevicePropertySafety:^(AVCaptureDevice *captureDevice) { NSError *error; AVCaptureDeviceInput *newVideoInput = [[AVCaptureDeviceInput alloc] initWithDevice:_videoDevice error:&error]; if (newVideoInput != nil) { //必选先 remove 才能询问 canAdd [self.session removeInput:_videoInput]; if ([self.session canAddInput:newVideoInput]) { [self.session addInput:newVideoInput]; _videoInput = newVideoInput; }else{ [self.session addInput:_videoInput]; } } else if (error) { NSLog(@"切换前/后摄像头失败, error = %@", error); } }]; } } // 获取需要的设备对象 - (AVCaptureDevice *)deviceWithMediaType:(NSString *)mediaType preferringPosition:(AVCaptureDevicePosition)position { // 获取所有类型的摄像头设备 NSArray *devices = [AVCaptureDevice devicesWithMediaType:mediaType]; AVCaptureDevice *captureDevice = devices.firstObject; // 先初始化一个设备对象并赋初值 // 便利获取需要的设备 for (AVCaptureDevice *device in devices) { if (device.position == position) { captureDevice = device; break; } } return captureDevice; } #pragma mark 更改设备属性前一定要锁上 -(void)changeDevicePropertySafety:(void (^)(AVCaptureDevice *captureDevice))propertyChange{ //也可以直接用_videoDevice,但是下面这种更好 AVCaptureDevice *captureDevice= [_videoInput device]; NSError *error; //注意改变设备属性前一定要首先调用lockForConfiguration:调用完之后使用unlockForConfiguration方法解锁,意义是---进行修改期间,先锁定,防止多处同时修改 BOOL lockAcquired = [captureDevice lockForConfiguration:&error]; if (!lockAcquired) { NSLog(@"锁定设备过程error,错误信息:%@",error.localizedDescription); }else{ //调整设备前后要调用beginConfiguration/commitConfiguration [self.session beginConfiguration]; propertyChange(captureDevice); [captureDevice unlockForConfiguration]; [self.session commitConfiguration]; } }// 展示视频的试图 - (void)setPreView:(UIView *)preView { _preView = preView; if (_preView && !self.preViewLayer) { self.preViewLayer = [[AVCaptureVideoPreviewLayer alloc] initWithSession:self.session]; self.preViewLayer.frame = _preView.layer.bounds; // 设置layer展示视频的方向 self.preViewLayer.connection.videoOrientation = [self.videoOutput connectionWithMediaType:AVMediaTypeVideo].videoOrientation; self.preViewLayer.videoGravity = AVLayerVideoGravityResizeAspectFill; self.preViewLayer.position = CGPointMake(_preView.frame.size.width * 0.5, _preView.frame.size.height * 0.5); CALayer *layer = _preView.layer; layer.masksToBounds = YES; [layer addSublayer:self.preViewLayer]; } }开始和暂停音视频数据的方法实现
#pragma mark - Method
- (void)startRunning {
    [self.session startRunning];
}
- (void)stopRunning {
    if ([self.session isRunning]) {
        [self.session stopRunning];
    }
}
视频输出对象和音频输出对象的代理方法是同一个
#pragma mark - AVCaptureVideoDataAndAudioDataOutputSampleBufferDelegate
// 实现视频输出对象和音频输出对象的代理方法, 在该方法中获取音视频采集的数据, 或者叫做帧数据
- (void)captureOutput:(AVCaptureOutput *)captureOutput didOutputSampleBuffer:(CMSampleBufferRef)sampleBuffer fromConnection:(AVCaptureConnection *)connection {
    // 判断 captureOutput 多媒体输出对象的类型
    if (captureOutput == self.audioOutput) {    // 音频输出对象
        if (self.delegate && [self.delegate respondsToSelector:@selector(audioCaptureOutputWithSampleBuffer:)]) {
            [self.delegate audioCaptureOutputWithSampleBuffer:sampleBuffer];
        }
    } else {                                    // 视频输出对象
        if (self.delegate && [self.delegate respondsToSelector:@selector(videoCaptureOutputWithSampleBuffer:)]) {
            [self.delegate videoCaptureOutputWithSampleBuffer:sampleBuffer];
        }
    }
}
// 是否支持快速纹理更新 - (BOOL)supportsFastTextureUpload; { #if TARGET_IPHONE_SIMULATOR return NO; #else #pragma clang diagnostic push #pragma clang diagnostic ignored "-Wtautological-pointer-compare" return (CVOpenGLESTextureCacheCreate != NULL); #pragma clang diagnostic pop #endif } - (void)dealloc { [self stopRunning]; // 取消代理, 回到主线程 [self.videoOutput setSampleBufferDelegate:nil queue:dispatch_get_main_queue()]; [self.audioOutput setSampleBufferDelegate:nil queue:dispatch_get_main_queue()]; }
到此, 音视频采集的类已经封装完成!
3.JFCaptureSession的使用
用的时候需要先检验设备是否授权摄像头或麦克风的使用权限!
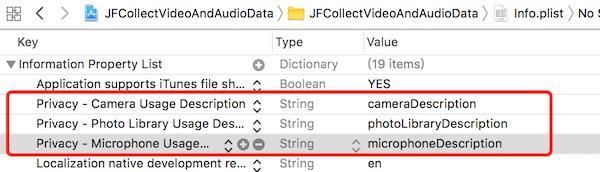
注意Xcode8.0以后, 使用麦克风, 摄像头, 相册等需要在info.plist文件中添加开启权限的Key 和 value
| key | value |
|---|---|
| Privacy - Camera Usage Description | cameraDescription |
| Privacy - Photo Library Usage Description | photoLibraryDescription |
| Privacy - Microphone Usage Description | microphoneDescription |
摄像头和麦克风的权限检验
// 检查是否授权摄像头的使用权限
- (void)checkVideoDeviceAuth {
    switch ([AVCaptureDevice authorizationStatusForMediaType:AVMediaTypeVideo]) {
        case AVAuthorizationStatusAuthorized:    // 已授权
            self.authRemember += 1;
            break;
        case AVAuthorizationStatusNotDetermined: // 未授权, 进行允许和拒绝授权
        {
            [AVCaptureDevice requestAccessForMediaType:AVMediaTypeVideo completionHandler:^(BOOL granted) {
                if (granted) {
                    NSLog(@"已开启摄像头权限");
                } else {
                    NSLog(@"拒绝授权");
                }
            }];
        }
            break;
        default:
            NSLog(@"用户尚未授权摄像头的使用权");
            break;
    }
}
// 检查是否授权麦克风的shiyongquan
- (void)checkAudioDeviceAuth {
    AVAuthorizationStatus status = [AVCaptureDevice authorizationStatusForMediaType:AVMediaTypeAudio];
    switch (status) {
        case AVAuthorizationStatusNotDetermined:{
            [AVCaptureDevice requestAccessForMediaType:AVMediaTypeAudio completionHandler:^(BOOL granted) {
                if (granted) {
                    self.authRemember += 1;
                } else {
                    NSLog(@"拒绝授权");
                }
            }];
        }
            break;
        case AVAuthorizationStatusAuthorized:
            NSLog(@"已开启麦克风权限");
            break;
        case AVAuthorizationStatusDenied:
        case AVAuthorizationStatusRestricted:
            break;
        default:
            break;
    }
}
本文中, 设置的是只有摄像头和麦克风同事已授权的时候才初始化的JFCaptureSession的实例对象
self.session = [[JFCaptureSession alloc] defaultJFCaptureSessionWithSessionPreset:JFCaptureSessionPreset540x960];
        _session.preView = self.view;
        _session.delegate = self;  // 记得实现代理方法, 不然获取不到采集的数据
[self.session startRunning];
/** 在需要暂停的时候 调用
[self.session stopRunning];
*/ 就可以啦
4.Demo下载地址
5.结尾
本文是用的AVFoundation 框架实现的音视频数据采集, 系统的原生框架进行视频采集, 如果进行美颜的话, 工作量和难度会增加很多很多, 不过如果需要进行美颜, 我们可以使用GPUImage 开源框架的美颜相机GPUImageVideoCamera来进行视频数据采集! 后边有时间我会专门写篇文章, 来跟大家谈论一下GPUImageVideoCamera 的视频数据采集等!
音视频的数据采集, 相对来说不是很难, AVFoundation 中的很多类我们都比较陌生, 很少使用到,
所以很感觉相对难一点! 这篇文章只是分享了一下我个人对AVFoundation框架中部分类的使用和见解,拿出来跟大家分享探讨一下, 希望能对大家有所帮助, 有不完善的地方, 希望大家能多提提, 我这边也学习改正一下!
由于工作比较忙, 可能后边的技术文正会更的比较慢, 见谅!
