Learn from React 官方文档
一、Rendering Elements
1. Rendering an Element into the DOM
<body>
<div id="root"></div>
<script type="text/babel">
const element = <h1>Hello World!</h1>;
ReactDOM.render(element,document.getElementById("root"));
</script>
</body>
2. Updating the Rendered Element
React elements 是不可改变的,一旦创建,就不可以改变它的子节点或者属性。
<body>
<div id="root"></div>
<script type="text/babel">
    function tick () {
        const element = (
            <div>
                <h1>Hello World!</h1>
                <h2>{ new Date().toLocaleTimeString() }</h2>
            </div>
        );
        ReactDOM.render(element,document.getElementById("root"));
    }
    setInterval(tick,1000);
</script>
</body>
上例每秒调用一次 tick() 函数,每次调用重新调用一次 ReactDOM.render() ,更新 React element 的内容。
React 只更新有必要更新的内容。 React DOM 把新的element和比较之前的element 比较,将不同的地方加以更新。例如打开浏览器控制台可以看到,在上例中只改变了 h2 的文本。
二、Components and Props
- 组件将 UI 分成独立的、可重用的小块。
- 组件和 JavaScript 函数相似。它们接受任意输入 (called "props"),返回描述所要显示的
React elements。 - 组件的返回必须是一个单独的
element而不可以是多个,所以可以用一个<div>将其他元素包裹起来 - 尽可能将一个组件分成多个更小的组件。
1. Functional and Class Components
-
way 1: Functional Components
function Welcome (props) {
      return <h1>Hello, {props.name}</h1>;
  }
接收参数:props 一个对象
返回:一个 React element -
way 2: Class Components
class Welcome extends React.Component {
  render() {
      return <h1>Hello, {this.props.name}</h1>;
  }
}
2. Rendering a Component
<body>
<div id="root"></div>
<script type="text/babel">
function Welcome (props) {
    return <h1>Hello {props.name} !</h1>;
}
const element = <Welcome name="Sara" />;
ReactDOM.render(
    element,
    document.getElementById('root')
);
</script>
</body>- 当 React 遇到用户自定义的组件时,它给组件传递一个包含 JSX 属性的对象,这个对象是
props。{ name:"Sara" } //props 对象 -
上例的执行:
- 调用
ReactDOM.render(),插入一个<Welcome /> 组件 - React 调用
Welcome组件,props对象为 {name:"Sara"} - Welcome组件输出
<h1>Hello Sara</h1> - React 更新 DOM 节点
- 调用
-
组件的名字一定要大写字母开头
3. Composing Components
组件内使用可以用另一个组件:
<body>
<div id="root"></div>
<script type="text/babel">
function Welcome (props) {
    return <h1>Hello {props.name} !</h1>;
}
function App() {
    return (
        <div>
            <Welcome name="Sara" />
            <Welcome name="John" />
            <Welcome name="Jane" />
        </div>
    );
}

ReactDOM.render(
    <App />,
    document.getElementById('root')
);
</script>
</body>
4. Props are Read-Only
React 必须遵守的一条严格的准则:
所有的 React 组件必须是 pure function,因为 props 是只读的
pure function: 函数体的执行不修改传入的参数值
三、State and Lifecycle
-
state可以动态地改变数据。它是私有的和完全由组件控制的。 - 使用
Class Component定义的组件比Functional Component多了一些特性,就是拥有 例如:state 。 - 生命周期钩子 (lifecycle hooks):声明在组件中,当组件
mount和unmount(刚植入和刚移除)时执行的方法. - The componentDidMount() hook runs after the component output has been rendered to the DOM.(
componentDidMount()方法在组件的输出植入到 DOM 中的时候执行)。 -
this.props和this.state这些是在React.Component中定义的,用户自定义的组件继承了React.Component,所以不需要重新声明。 - 在拥有许多组件的应用中,当组件被移除时,释放组件已经占用的资源是非常重要的。
1. 时钟例子
//时钟例子:
<body>
<div id="root"></div>
<script type="text/babel">
//定义一个组件 Clock 继承了React.Component
class Clock extends React.Component {
    constructor(props) {
        super(props);
        this.state = { date:new Date() };
    } // 在constructor 中初始化 this.state

    componentDidMount() {
        this.timeId = setInterval(()=>this.tick(),1000);
    } //Lifecycle hooks (生命周期钩子) 当DOM “mount”的时候调用

    componentWillUnmount() {
        clearInterval(this.timeId);
    } //Lifecycle hooks (生命周期钩子) 当DOM “unmount”(刚被移除)的时候调用

    tick() {
        this.setState({date:new Date()});// this.setState()方法更新state的值
    }

    render() {
        return (
            <div>
                <h2>{ this.state.date.toLocaleTimeString() }</h2>
            </div>
        );//返回要渲染的DOM
    }
}

ReactDOM.render(
    <Clock />,
    document.getElementById("root")
);//Clock组件插入ID为“root”的div元素中
</script>
</body>- 上面的时钟代码的执行过程:
- 当
<Clock />组件传递给ReactDOM.render(), React 调用Clock组件的constructor,由于Clock组件需要先显示当前的时间,在constructor中初始化this.state的值。 - React 接着调用
Clock组件的render()方法,Clock组件render()的输出返回要渲染的 DOM 元素。 - 当 DOM 元素插入后,React 调用生命周期钩子
componentDidMount()。在这个方法中,Clock组件生成一个计时器,要求浏览器每秒钟调用一次tick()函数。 - 在
tick()方法中调用this.setState()方法,更新state的值,更新 DOM 的内容。 - 当
Clock组件从 DOM 中移除时,React调用componentWillUnmout()方法,清除计时器。
- 当
2. 正确使用 state
- 不要使用赋值的方法直接修改
state的值:this.state.comment = 'hello'; //wrongthis.setState({ comment:'hello'}); //correctconstructor(props) { super(props); this.state = {comment:'hello'}; } -
state是异步更新的
由于this.props和this.state是异步更新的,所以不应该直接使用它们来设置新的state值this.setState({ counter: this.state.counter + this.props.increment, }); //wrong使用接收一个函数作为参数的
setState():
第一个参数:prevState(state 的上一个值)
第二个参数:propsthis.setState((prevState, props) => ({ counter: prevState.counter + props.increment })); //correct -
this.state的值可以是一个对象,这个对象包含几个独立的属性,可以用多个setState()独立的更新每一个属性 -
单向数据流
一个组件可以将它的state值作为props传递给它的子组件而与外部的其他组件无关。
四、Handling Events
<body>
<div id="root"></div>
<script type="text/babel">
class ToggleBtn extends React.Component {
    constructor(props) {
        super(props);
        this.state = { isToggle: true };
        this.handleClick = this.handleClick.bind(this);
    }

    handleClick() {
        this.setState((prevState) => ({
            isToggle: !prevState.isToggle
        }));
    }

    render() {
        return(
            <button onClick={this.handleClick}>{ this.state.isToggle? "ON":"OFF" }</button>
        );
    }
}

ReactDOM.render(
    <ToggleBtn />,
    document.getElementById("root")
);

</script>
</body>
五、Conditional Rendering
1. example 1:
有两个组件:一个是 LoginGreeting 另一个是 LogoutGreeting;
在第三个组件 Greeting 中,使用了这两个组件中的其中一个,根据 Greeting 组件的 props 对象的 greet 属性值
<body>
<div id="root"></div>
<script type="text/babel">
function LoginGreeting() {
    return <div>welcome back!</div>
}

function LogoutGreeting() {
    return <div>Thankyou!</div>
}

function Greeting (props) {
    const greet = props.greet;
    if(greet) {
        return <LoginGreeting />;
    }
    else {
        return <LogoutGreeting />;
    }
}
ReactDOM.render(<Greeting greet={true}/>,document.getElementById("root"));
</script>
</body>
2. example 2: 使用元素变量
根据不同的 state 值,将不同的组件赋给一个元素变量,在另一个组件中使用变量名插入这个组件。
<body>
<div id="root"></div>
<script type="text/babel">
function LoginBtn (props) {
    return <button  onClick={props.Click}>Login</button>
}
function LogoutBtn (props) {
    return <button  onClick={props.Click}>Logout</button>
}
class LoginControl extends React.Component {
    constructor(props) {
        super(props);
        this.state = { isLogined: false };
        this.handleClick = this.handleClick.bind(this);
    }

    handleClick () {
        this.setState((prevState) => ({
            isLogined: !prevState.isLogined
        }));
    }

    render() {
        const loginState = this.state.isLogined;
        let button = null;
        //根据state的loginState的值将不同的组件赋给button
        if(!loginState) {
            button = <LoginBtn Click={this.handleClick} />;
        }
        else {
            button = <LogoutBtn Click={this.handleClick} />;
        }
        return (
            <div>
                {button}
            </div>
        );
    }
}
ReactDOM.render(<LoginControl />,document.getElementById("root"));
</script>
</body>
3. example 3: 用短路与 && 操作符
只要当 && 的左操作数为假时,表达式返回假,不计算右操作数;只有当左操作数为真时,才会计算右操作数的值,返回右操作数的值。
<body>
<div id="root"></div>
<script type="text/babel">
function Mailbox (props) {
    const unreadmessage = props.unreadmessage;
    return (
        <div>
            { unreadmessage.length > 0 &&
            <h2>You have { unreadmessage.length } messages unread.</h2>}
        </div>
    );
}
const message = ['chendahong','lindamao','haha'];
ReactDOM.render(<Mailbox unreadmessage={message}/>,document.getElementById("root"));
</script>
</body>
4. example 4: condition? true : false
当 condition 的值为真时,返回冒号左边的表达式的值,当 condition 的值为假时,返回冒号右边的表达式的值
<body>
<div id="root"></div>
<script type="text/babel">
class Login extends React.Component {
    constructor(props) {
        super(props);
        this.state = { isLogined: false}
    }
    render() {
        const isLogined = this.state.isLogined;
        return (
            <h2>you are { isLogined? 'login':'logout' }</h2>
        );
    }
}
ReactDOM.render(<Login />,document.getElementById("root"));
</script>
</body>
也可以返回更大的表达式,但是降低了可读性:
render() {
  const isLoggedIn = this.state.isLoggedIn;
  return (
    <div>
      {isLoggedIn ? (
      //isLoggedIn 为 true 时返回 LogoutButton 组件
        <LogoutButton onClick={this.handleLogoutClick} />
      ) : (
      //isLoggedIn 为 false 时返回 LoginButton 组件
        <LoginButton onClick={this.handleLoginClick} />
      )}
    </div>
  );
}
5. example 5: 使用返回null来隐藏一个组件
<body>
<div id="root"></div>
<script type="text/babel">
function Warning (props) {
    const isWarn = props.isWarn;
    if(!isWarn) {
        return null;
    }
    else {
        return (
            <div>Be careful!</div>
        );
    }
}

class Symbol extends React.Component {
    constructor(props) {
        super(props);
        this.state={ isWarn: true };
        this.handleClick = this.handleClick.bind(this);
    }

    handleClick() {
        this.setState((prevState) => ({
            isWarn: !prevState.isWarn
        }));
    }

    render() {
        return (
            <div>
                <Warning isWarn={this.state.isWarn}/>
                <button onClick={this.handleClick}>{this.state.isWarn? 'Hide':'Show'}</button>
            </div>
        );
    }
}

ReactDOM.render(<Symbol />,document.getElementById("root"));
</script>
</body>- 组件返回
null不影响组件的生命周期方法,例如componentWillUpdate和componentDidUpdate依然可以被调用。
六、Lists and Keys
1. example 1:
使用 map() 函数遍历 numbers 数组,每次遍历返回一个 <li> 元素,将遍历后返回的结果数组赋给 listItems,用一个 <ul> 将结果数组包裹起来植入 DOM
<body>
<div id="root"></div>
<script type="text/babel">
const numbers = [1,2,3,4,5];
const listItems = numbers.map((number)=>
<li>{number}{listItems}</ul>,
document.getElementById("root"));
</script>
</body>2. example 2:
组件接收一个数组,返回一个列表:
<body>
<div id="root"></div>
<script type="text/babel">
function NumberList (props) {
const numberItem = props.numbers.map((number)=>
<li>{number}{numberItem}</ul>
);
}
const numbers = [1,2,3,4,5];
ReactDOM.render(
<NumberList numbers={numbers} />,
document.getElementById("root")
);
</script>
</body>3. example 3:
当运行上面那些代码的时候,会在控制台得到一个 warning,需要给列表元素增加 key 属性
<body>
<div id="root"></div>
<script type="text/babel">
function NumberList (props) {
const numberItem = props.numbers.map((number)=>
// 为每个<li> 添加 key 属性
<li key={number.toString()}>{number}{numberItem}</ul>
);
}
const numbers = [1,2,3,4,5];
ReactDOM.render(
<NumberList numbers={numbers} />,
document.getElementById("root")
);
</script>
</body>4. example 4:
可以为数组元素对象设置一个ID属性 ,用来作为 key
<body>
<div id="root"></div>
<script type="text/babel">
function NumberList (props) {
const numberItem = props.numbers.map((number)=>
<li key={number.id}>{number.text}{numberItem}</ul>
);
}
const numbers = [
{
id:1,
text:'one'
},
{
id:2,
text:'two'
}
];
ReactDOM.render(
<NumberList numbers={numbers} />,
document.getElementById("root")
);
</script>
</body>如果没有ID属性作为 key ,也可以使用数组元素的索引作为 key:
(不推荐使用索引 index 作为 key,因为当数组可以重排的时候,速度会变慢)
<body>
<div id="root"></div>
<script type="text/babel">
function NumberList (props) {
const numberItem = props.numbers.map((number,index)=>
<li key={index}>{number}{numberItem}</ul>
);
}
const numbers = ['one','two','three'];
ReactDOM.render(
<NumberList numbers={numbers} />,
document.getElementById("root")
);
</script>
</body>5. example 5:
拆分组件的时候,要将 key 作为组件的属性,而不要把它放在组件返回的 <li> 元素中
//wrong, 这样子相当于没有设置 key,控制台仍然会有关于 key 的 warning
<body>
<div id="root"></div>
<script type="text/babel">
function NumberList (props) {
    return (
        <li key={props.value.toString()}>{props.value}</li>
    );
}

function App (props) {
    return (
        <ul>{props.numbers.map((number)=>
            <NumberList value={number} />
            )}
        </ul>
    );
}
const numbers = ['one','two','three'];

ReactDOM.render(
    <App numbers={numbers} />,
    document.getElementById("root")
);
</script>
</body>
//correct
<body>
<div id="root"></div>
<script type="text/babel">
function NumberList (props) {
return (
<li>{props.value}</li>
);
}
function App (props) {
return (
<ul>{props.numbers.map((number)=>
<NumberList key={number.toString()} value={number} />
)}
</ul>
);
}
const numbers = ['one','two','three'];
ReactDOM.render(
<App numbers={numbers} />,
document.getElementById("root")
);
</script>
</body>6. example 6:
一个数组中每个数组元素的 key 必须互不相同,但是不同数组可以有相同的 key:
<body>
<div id="root"></div>
<script type="text/babel">
function App(props) {
    const sidebar = (
        <ul>
            {props.contents.map((content) =>
            //每个使用map遍历的数组元素都要有key
            <li key={content.id}>{content.title}</li>
            )}
        </ul>
    );
    const text = (
        <div>
            {props.contents.map((content) =>
            //每个使用map遍历的数组元素都要有key
            <div key={content.id}>{content.title} : {content.text} </div>
            )}
        </div>
    );
    return (
        <div>
            {sidebar}
            <hr/>
            {text}
        </div>
    );
}

const contents = [
    {
        id:1,
        title:'Hello',
        text:'Hello World!'
    },
    {
        id:2,
        title:'Welcome',
        text:'Welcome to our world!'
    }
];

ReactDOM.render(
    <App contents={contents} />,
    document.getElementById("root")
);
</script>
</body>
七、 Forms
1. example 1: Controlled Component
<input> 的 value 值由 React 的 state 控制:
<body>
<div id="root"></div>
<script type="text/babel">
class NameForm extends React.Component {
    constructor(props) {
        super(props);
        this.state = {value:''};
        this.handleSubmit = this.handleSubmit.bind(this);
        this.handleChange = this.handleChange.bind(this);
    }

    handleSubmit(event) {
        console.log("submit: "+ this.state.value);
        event.preventDefault();// React 中要明确调用event.preventDefalut()方法来阻止提交事件的默认行为;
    }

    handleChange(event) {
        //强行将用户的输入转化为大写
        this.setState({value:event.target.value.toUpperCase()});
    }

    render() {
        return (
            <form onSubmit={this.handleSubmit}>
                <input type="text" value={this.state.value} onChange={this.handleChange} />
                <input type="submit" value="Submit" />
            </form>)
    }
}

ReactDOM.render(
    <NameForm />,
    document.getElementById("root")
);
</script>
</body>
2. example 2: textarea
<body>
<div id="root"></div>
<script type="text/babel">
class EssayForm extends React.Component {
    constructor(props) {
        super(props);
        this.state = {value:'Please input here'};
        this.handleSubmit = this.handleSubmit.bind(this);
        this.handleChange = this.handleChange.bind(this);
    }

    handleSubmit(event) {
        console.log("submit: "+ this.state.value);
        event.preventDefault();
    }

    handleChange(event) {
        this.setState({value:event.target.value});
    }

    render() {
        return (
            <form onSubmit={this.handleSubmit}>
                <textarea value={this.state.value} onChange={this.handleChange} />
                <input type="submit" value="Submit" />
            </form>)
    }
}

ReactDOM.render(
    <EssayForm />,
    document.getElementById("root")
);
</script>
</body>
3. example 3: select
在 React 中通过给 <select> 标签设置 value 值来设置选择的选项;<select> 的 value 值与 <option> 的 value 值相同,则选中该 <option> ;
这种方法更为方便,只要更新
<select> 的 value 值即可改变选择的选项。
<body>
<div id="root"></div>
<script type="text/babel">
class FlavorForm extends React.Component {
    constructor(props) {
        super(props);
        this.state = { value: 'apple' };
        this.handleChange = this.handleChange.bind(this);
        this.handleSubmit = this.handleSubmit.bind(this);
    }

    handleChange(event) {
        this.setState({
            value: event.target.value
        });
    }

    handleSubmit(event) {
        event.preventDefault();
        console.log("you choose "+this.state.value);
    }

    render() {
        return(
            <form onSubmit={this.handleSubmit}>
                <label>
                    Pick your favorite favor:
                    <select value={this.state.value} onChange={this.handleChange}>
                        <option value="grape">grape</option>
                        <option value="apple">apple</option>
                        <option value="banana">banana</option>
                    </select>
                </label>
                <input type="submit" value="Submit" />
            </form>
        );
    }
}

ReactDOM.render(
    <FlavorForm />,
    document.getElementById("root")
);
</script>
</body>
4. example 4 :
当你需要处理多个 <input> 的时候,可以通过给每个 <input> 设置 name 属性,让事件处理函数根据 event.target.name 的值来决定做什么事情
<body>
<div id="root"></div>
<script type="text/babel">
class Reservation extends React.Component {
    constructor(props) {
        super(props);
        this.state = {
            isGoing: true,
            guestNumber:2
        };
        this.handleChange = this.handleChange.bind(this);
    }

    handleChange(event) {
        const target = event.target;
        const value = target.type ==='checkbox'? target.checked:target.value;
        const name = target.name;
        this.setState({
            [name]: value
        });
        console.log("change");
        console.log(value);
        console.log(name);
    }

    render() {
        return(
            <form>
                <label>
                    isGoing:
                    <input type="checkbox" name="isGoing" checked={this.state.isGoing} onChange={this.handleChange}/>
                </label>
                <br />
                <label>
                    GuestNumber:
                    <input type="number" name="guestNumber" value={this.state.guestNumber} onChange={this.handleChange}/>
                </label>
            </form>
        );
    }
}

ReactDOM.render(
    <Reservation />,
    document.getElementById("root")
);
</script>
</body>
[ name ]: ES6 计算属性名
this.setState({
  [name]: value
});
在 ES5 中相当于:
var partialState = {};
partialState[name] = value;
this.setState(partialState);
八、Lifting State Up
-
经常在几个组件中,他们的数据受同一个变化的数据的影响,这时就要把
state提到离这些组件最近的共同的父组件中。 -
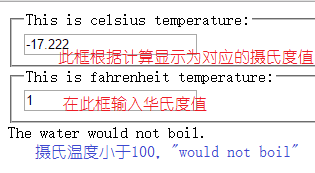
例如下面的例子中,输入摄氏度的组件
<TemperatureInput />和输入华氏度的组件<TemperatureInput />他们的value值相互影响,在摄氏度输入框输入的摄氏度值会转化为华氏度显示在华氏度的输入框,同样,输入的华氏度也会转化为摄氏度在摄氏度输入框显示。 -
他们有共同的父组件
<Calculator/>,将state值设置在<Calculator/>中,根据state值的scale属性值判断是哪个输入框在输入,由此可将另一个输入框根据华氏度和摄氏度的转换公式进行转换。 -
<BoilingVerdict>组件根据摄氏度输入框的值显示不同的提示语,摄氏度值大于等于100,则显示:The water would boil.摄氏度值小于100,则显示:The water would not boil.
<body>
<div id="root"></div>
<script type="text/babel">

//<BoilingVerdict>组件根据摄氏度输入框的值显示不同的提示语,
//摄氏度值大于等于100,则显示:The water would boil.
// 摄氏度值小于100,则显示:The water would not boil.
function BoilingVerdict (props) {
    if(props.celsius >= 100) {
        return (
            <div>The water would boil.</div>
        );
    }
    else {
        return (
            <div>The water would not boil.</div>
        );
    }
}

//华氏度转摄氏度
function toCelsius(temperature) {
    return (temperature - 32) * 5 / 9;
}

//摄氏度转华氏度
function toFahrenheit(temperature) {
    return (temperature * 9 / 5 + 32);
}

//转换函数,根据参数convert,如果传入toCelsius,则转为摄氏度,
//如果传入toFahrenheit,则转为华氏度
function Convert(input,convert) {
    const temperature = parseFloat(input);
    if(Number.isNaN(temperature)) {
        return ''; //如果输入非数字,返回' ';
    }
    else {
        const output = convert(temperature);
        const rounded = Math.round(output * 1000)/1000;
        return rounded.toString();
    }
}

//温度值输入组件
class TemperatureInput extends React.Component {
    constructor(props) {
        super(props);
        this.handleChange = this.handleChange.bind(this);
    }

    handleChange(event) {
        this.props.onChange(event.target.value);
    }

    render() {
        return(
            <fieldset>
                // 显示对应的输入框名字
                <legend>This is {this.props.scale} temperature:</legend>
                <input type="text" value={this.props.value} onChange={this.handleChange}/>
            </fieldset>
        );
    }
}

class Calculator extends React.Component {
    constructor(props) {
        super(props);
        this.state = {
            scale:'c',
            value:''
        };
        this.handleCelsiusChange = this.handleCelsiusChange.bind(this);
        this.handleFahrenheitChange = this.handleFahrenheitChange.bind(this);
    }

    handleCelsiusChange(value) {
        this.setState({
            scale:'c',
            value: value
        });
    }

    handleFahrenheitChange(value) {
        this.setState({
            scale:'f',
            value: value
        });
    }

    render() {
        const scale = this.state.scale;
        const value = this.state.value;
        const celsius = scale ==='c'? value:Convert(value,toCelsius);
        const fahrenheit = scale ==='f'? value:Convert(value,toFahrenheit);
        return(
            <div>
                <TemperatureInput scale="celsius" value={celsius} onChange={this.handleCelsiusChange} />
                <TemperatureInput scale="fahrenheit" value={fahrenheit} onChange={this.handleFahrenheitChange}/>
                <BoilingVerdict celsius={celsius} />
            </div>
        );
    }

}

ReactDOM.render(
    <Calculator />,
    document.getElementById("root")
);
</script>
</body>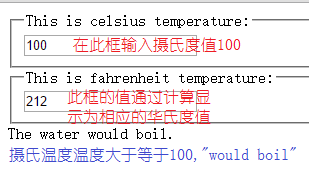
九、Composition
1. example 1:
有一些组件一开始我们不知道他们的子节点是什么的时候,可以使用 {props.children} 在使用这个组件的时候再将子节点作为 props 的一个属性传递给该组件。
function Dialog(props) {
    return(
        <div>
            {props.children}
        </div>
    );
}

function WelcomeDialog() {
    return(
      // Dialog 标签中间的 内容就作为Dialog组件的子节点
        <Dialog>
            <h1>Welcome!</h1>
            <p>Thankyou for your visit!</p>
        </Dialog>
    );
}
2. example 2:
也可以使用自定义的属性名,在组件中多处插入不同的内容:
function SplitPane(props) {
    return(
        <div>
            <div>{props.left}</div>
            <div>{props.right}</div>
        </div>
    );
}

function App() {
    return(
        // <WelcomeDialog/>和<Chat/>是两个已经定义的组件
        <SplitPane left={<WelcomeDialog/>} right={<Chat/>} />
    );
}
3. example 3:Specialization
专门化:定义一个组件,在另一个组件中通过传入属性值,将该组件具体化为一个特殊的组件。
// 无内容的对话框组件轮廓
function Dialog(props) {
    return(
        <div>
            <h1>{props.title}</h1>
            <p>{props.message}</p>
        </div>
    );
}
//设置组件的属性值,传入具体的内容,使之成为一个专门的有特殊用处的 组件
function WelcomeDialog() {
    return(
        <Dialog title="Welcome" message="Hello" />
    );
}
十、Thinking in React
- React 的目的是使用 JavaScript 快速地构建大型的 Web Apps。
- 使用 React 构建项目的流程如下例:
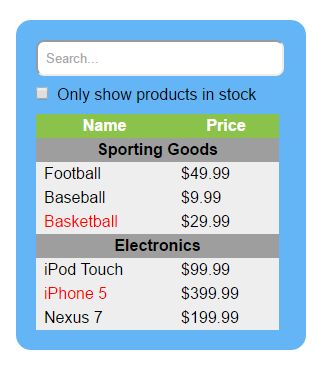
首先由你的 app 样式图开始,将你的 app 划分为由各个组件组成的一个大组件:
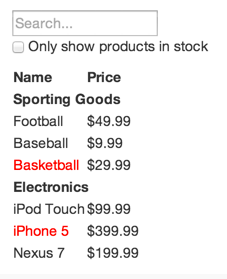
// 你的数据
[
  {category: "Sporting Goods", price: "$49.99", stocked: true, name: "Football"},
  {category: "Sporting Goods", price: "$9.99", stocked: true, name: "Baseball"},
  {category: "Sporting Goods", price: "$29.99", stocked: false, name: "Basketball"},
  {category: "Electronics", price: "$99.99", stocked: true, name: "iPod Touch"},
  {category: "Electronics", price: "$399.99", stocked: false, name: "iPhone 5"},
  {category: "Electronics", price: "$199.99", stocked: true, name: "Nexus 7"}
];
Step 1: Break The UI Into A Component Hierarchy
- 把 UI 按层次划分成一个个组件:首先用一个个方框将你的 UI 划分成一个个组件,并给每个组件命名,根据一个组件只完成一件事的原则来划分组件。
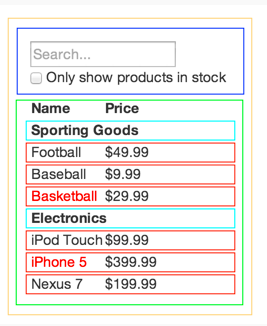
- 明确每个组件的功能:
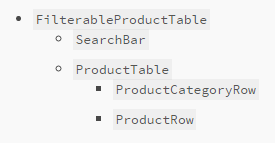
FilterableProductTable (orange)包含了整个样例SearchBar (blue)接收所有用户输入,包括输入框的输入和复选框的勾选ProductTable (green)基于用户的输入显示和过滤数据集ProductCategoryRow (turquoise)显示每个分类的标题ProductRow (red)显示每一种产品的信息
这样就将整个样例如下划分了层次,包含在一个组件下的将作为它的子元素:
Step 2: Build A Static Version in React
- 用React建立静态的样式:这个过程使用
props从父组件传递数据给子组件,而不要使用state,state是用来交互的,传递动态变化的数据的。 - 可以采用自顶向下也可以采用自底向上的顺序构建每一个组件。
Step 3: Identify The Minimal (but complete) Representation Of UI State
-
思考本例子中的每一个数据有:
- 原始的产品表单
- 用户的输入文本
- 复选框的值
- 过滤的产品表单
-
决定哪一项数据成为
state思考的三个问题:- 它是通过父组件的
props属性传递来的吗?如果是,它不是state; - 它是否在一段时间内保持不变?如果是,它不是
state; - 你是否可以通过其他
state或者props值计算出它的值?如果可以,它不是state。
- 它是通过父组件的
-
在本例中,原始的产品表单是通过
props传递的,不是state;
用户输入的文本和复选框的值是动态的随着用户任意变化的,它是state;
过滤的产品表单可以通过用户的输入和复选框的值计算显示,不是state;
因此,本例的state是用户输入的文本和复选框的值
Step 4: Identify Where Your State Should Live
-
明确state值放置的位置:
React 是单向数据流的;
每一个组件都根据state植入某些内容;
每个组件有一个共同的父组件,这个组件拥有state。 -
本例中,过滤的产品表单
ProductTable是根据state值计算出来的,SearchBar的文本框值和复选框值根据state来显示,每个组件共同的父组件是FilterableProductTable,因此FilterableProductTable拥有state:输入的过滤文本和复选框的值。
Step 5: Add Inverse Data Flow
最后本例的代码及最后的样式见我的Github。