为了提高性能,减少数据库的压力,使用缓存是非常好的手段之一。本文,讲解 Spring Boot 如何集成缓存管理。
博客地址:blog.720ui.com/
声明式缓存
Spring 定义 CacheManager 和 Cache 接口用来统一不同的缓存技术。例如 JCache、 EhCache、 Hazelcast、 Guava、 Redis 等。在使用 Spring 集成 Cache 的时候,我们需要注册实现的 CacheManager 的 Bean。
Spring Boot默认集成CacheManager
Spring Boot 为我们自动配置了多个 CacheManager 的实现。
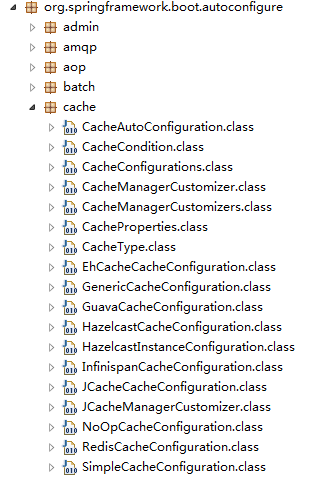
Spring Boot 为我们自动配置了 JcacheCacheConfiguration、 EhCacheCacheConfiguration、HazelcastCacheConfiguration、GuavaCacheConfiguration、RedisCacheConfiguration、SimpleCacheConfiguration 等。
默认的 ConcurrenMapCacheManager
Spring 从 Spring3.1 开始基于 java.util.concurrent.ConcurrentHashMap 实现的缓存管理器。所以, Spring Boot 默认使用 ConcurrentMapCacheManager 作为缓存技术。
以下是我们不引入其他缓存依赖情况下,控制台打印的日志信息。
Bean 'cacheManager' of type [class org.springframework.cache.concurrent.ConcurrentMapCacheManager]实战演练
Maven 依赖
首先,我们先创建一个 POM 文件。
<project xmlns="http://maven.apache.org/POM/4.0.0" xmlns:xsi="http://www.w3.org/2001/XMLSchema-instance"
    xsi:schemaLocation="http://maven.apache.org/POM/4.0.0 http://maven.apache.org/xsd/maven-4.0.0.xsd">
    <modelVersion>4.0.0</modelVersion>

    <parent>
        <groupId>org.springframework.boot</groupId>
        <artifactId>spring-boot-starter-parent</artifactId>
        <version>1.3.3.RELEASE</version>
     </parent>

    <groupId>com.lianggzone.demo</groupId>
    <artifactId>springboot-action-cache</artifactId>
    <version>0.1</version>
    <packaging>jar</packaging>
    <name>springboot-action-cache</name>

    <dependencies>
        <dependency>
            <groupId>org.springframework.boot</groupId>
            <artifactId>spring-boot-starter</artifactId>
        </dependency>
        <dependency>
          <groupId>org.springframework.boot</groupId>
          <artifactId>spring-boot-starter-web</artifactId>
      </dependency>

        <dependency>
            <groupId>org.springframework.boot</groupId>
            <artifactId>spring-boot-starter-cache</artifactId>
        </dependency>
    </dependencies>
    <build>
        <plugins>
            <plugin>
                <groupId>org.apache.maven.plugins</groupId>
                <artifactId>maven-compiler-plugin</artifactId>
                <configuration>
                    <defaultLibBundleDir>lib</defaultLibBundleDir>
                    <source>1.7</source>
                    <target>1.7</target>
                    <encoding>UTF-8</encoding>
                </configuration>
            </plugin>
            <plugin>
                <groupId>org.apache.maven.plugins</groupId>
                <artifactId>maven-resources-plugin</artifactId>
                <configuration>
                    <encoding>UTF-8</encoding>
                    <useDefaultDelimiters>false</useDefaultDelimiters>
                    <escapeString>\</escapeString>
                    <delimiters>
                        <delimiter>${*}</delimiter>
                    </delimiters>
                </configuration>
            </plugin>
            <plugin>
          <groupId>org.springframework.boot</groupId>
          <artifactId>spring-boot-maven-plugin</artifactId>
            </plugin>
        </plugins>
    </build>
</project>
其中,最核心的是添加 spring-boot-starter-cache 依赖。
<dependency>
    <groupId>org.springframework.boot</groupId>
    <artifactId>spring-boot-starter-cache</artifactId>
</dependency>
开启缓存支持
在 Spring Boot 中使用 @EnableCaching 开启缓存支持。
@Configuration
@EnableCaching
public class CacheConfiguration {}
服务层
创建一个服务类
@Service("concurrenmapcache.cacheService")
public class CacheService {

}
首先,我们先来讲解下 @Cacheable 注解。@Cacheable 在方法执行前 Spring 先查看缓存中是否有数据,如果有数据,则直接返回缓存数据;若没有数据,调用方法并将方法返回值放进缓存。有两个重要的值, value,返回的内容将存储在 value 定义的缓存的名字对象中。key,如果不指定将使用默认的 KeyGenerator 生成。
我们在查询方法上,添加 @Cacheable 注解,其中缓存名称为 concurrenmapcache。
@Cacheable(value = "concurrenmapcache")
public long getByCache() {
    try {
        Thread.sleep(3 * 1000);
    } catch (InterruptedException e) {
        e.printStackTrace();
    }
    return new Timestamp(System.currentTimeMillis()).getTime();
}
@CachePut 与 @Cacheable 类似,但是它无论什么情况,都会将方法的返回值放到缓存中, 主要用于数据新增和修改方法。
@CachePut(value = "concurrenmapcache")
public long save() {
    long timestamp = new Timestamp(System.currentTimeMillis()).getTime();
    System.out.println("进行缓存:" + timestamp);
    return timestamp;
}
@CacheEvict 将一条或多条数据从缓存中删除, 主要用于删除方法,用来从缓存中移除相应数据。
@CacheEvict(value = "concurrenmapcache")
public void delete() {
    System.out.println("删除缓存");
}
控制层
为了展现效果,我们先定义一组简单的 RESTful API 接口进行测试。
@RestController("concurrenmapcache.cacheController")
@RequestMapping(value = "/concurrenmapcache/cache")
public class CacheController {
@Autowired
private CacheService cacheService;
/**
* 查询方法
*/
@RequestMapping(value = "", method = RequestMethod.GET)
public String getByCache() {
Long startTime = System.currentTimeMillis();
long timestamp = this.cacheService.getByCache();
Long endTime = System.currentTimeMillis();
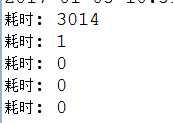
System.out.println("耗时: " + (endTime - startTime));
return timestamp+"";
}
/**
* 保存方法
*/
@RequestMapping(value = "", method = RequestMethod.POST)
public void save() {
this.cacheService.save();
}
/**
* 删除方法
*/
@RequestMapping(value = "", method = RequestMethod.DELETE)
public void delete() {
this.cacheService.delete();
}
}运行
@RestController
@EnableAutoConfiguration
@ComponentScan(basePackages = { "com.lianggzone.springboot" })
public class WebMain {

    public static void main(String[] args) throws Exception {
        SpringApplication.run(WebMain.class, args);
    }
}
课后作业
我们分为几个场景进行测试。
- 多次调用查询接口,查看缓存信息是否变化,控制台日志是否如下?你得到的结论是什么?
- 调用保存接口,再调用查询接口,查看缓存信息是否变化?你得到的结论是什么?
- 调用删除接口,再调用查询接口,接口响应是否变慢了?你再看看控制台日志,你得到的结论是什么?
扩展阅读
如果想更深入理解 Spring 的 Cache 机制,这边推荐两篇不错的文章。
源代码
相关示例完整代码: springboot-action
(完)
更多精彩文章,尽在「服务端思维」微信公众号!