

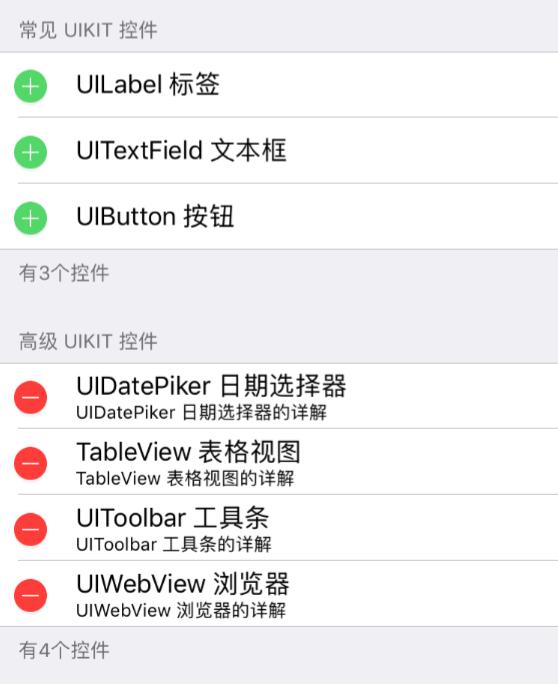
1,下面的样例是给表格UITableView添加编辑功能:
(1)给表格添加长按功能,长按后表格进入编辑状态
(2)在编辑状态下,第一个分组处于删除状态,第二个分组处于插入状态
(3)点击删除图标,删除对应条目
(4)点击添加图标,插入一条新数据
import UIKit
class ViewController: UIViewController ,UITableViewDelegate, UITableViewDataSource, UIGestureRecognizerDelegate {
var tableView:UITableView!
var allNames:Dictionary!
var addHeaders:[String]!
override func viewDidLoad() {
super.viewDidLoad()
// Do any additional setup after loading the view, typically from a nib.
allNames =
[
0:[String](["UILabel 标签", "UITextField 文本框", "UIButton 按钮"]),
1:[String](["UIDatePiker 日期选择器", "TableView 表格视图", "UIToolbar 工具条", "UIWebView 浏览器"])
]
print(allNames)
addHeaders = ["常见 UIKit 控件","高级 UIKit 控件"]
// 创建表格
tableView = UITableView.init(frame: self.view.frame, style: UITableViewStyle.grouped)
tableView.delegate = self
tableView.dataSource = self
self.view .addSubview(tableView)
// 注册cell
tableView .register(UITableViewCell.self, forCellReuseIdentifier: "cell")
// 创建表头标签
let headerLabel = UILabel.init(frame: CGRect(x:0, y:20, width:375, height:30))
headerLabel.backgroundColor = UIColor.yellow
headerLabel.textColor = UIColor.red
headerLabel.numberOfLines = 0
headerLabel.lineBreakMode = .byWordWrapping
headerLabel.text = "高级 UIKit"
headerLabel.textAlignment = NSTextAlignment.center
headerLabel.font = UIFont.systemFont(ofSize: 15)
tableView.tableHeaderView = headerLabel
let longPress = UILongPressGestureRecognizer.init(target: self, action: #selector(longPressAction))
longPress.delegate = self
longPress.minimumPressDuration = 1
tableView .addGestureRecognizer(longPress)
}
func longPressAction(recognizer:UILongPressGestureRecognizer) {
if recognizer.state == UIGestureRecognizerState.began {
print("UIGestureRecognizerStateBegan");
}
if recognizer.state == UIGestureRecognizerState.changed {
print("UIGestureRecognizerStateChanged");
}
if recognizer.state == UIGestureRecognizerState.ended {
print("UIGestureRecognizerStateEnded");
if tableView.isEditing == true {
tableView.isEditing = false
}
else
{
tableView.isEditing = true
}
}
}
// 创建分区
func numberOfSections(in tableView: UITableView) -> Int {
return allNames.count
}
// 每个分区的行数
func tableView(_ tableView: UITableView, numberOfRowsInSection section: Int) -> Int {
return allNames[section]!.count
}
// 分区头部显示
func tableView(_ tableView: UITableView, titleForHeaderInSection section: Int) -> String? {
return addHeaders[section]
}
// 分区尾部显示
func tableView(_ tableView: UITableView, titleForFooterInSection section: Int) -> String? {
let data = allNames[section]
return "有\(data!.count)个控件"
}
// 显示cell内容
func tableView(_ tableView: UITableView, cellForRowAt indexPath: IndexPath) -> UITableViewCell {
let identify = "cell"
let secno = indexPath.section
let data = allNames[secno]
var cell = UITableViewCell()
cell = UITableViewCell.init(style: UITableViewCellStyle.subtitle, reuseIdentifier: identify)
if secno == 0 {
cell.accessoryType = .disclosureIndicator
cell.textLabel?.text = data?[indexPath.row]
cell.imageView?.image = UIImage(named:"bug")
}
else
{
cell.textLabel?.text = data?[indexPath.row]
cell.detailTextLabel?.text = "\(data![indexPath.row])的详解"
}
return cell
}
// cell的选中事件
func tableView(_ tableView: UITableView, didSelectRowAt indexPath: IndexPath) {
// 确定该分组的内容
let str = allNames[indexPath.section]?[indexPath.row]
print("str\(str)")
}
// 设置单元格的编辑的样式
func tableView(_ tableView: UITableView, editingStyleForRowAt indexPath: IndexPath) -> UITableViewCellEditingStyle {
if indexPath.section == 0 {
return UITableViewCellEditingStyle.insert
}
else
{
return UITableViewCellEditingStyle.delete
}
}
// 设置确认删除按钮的文字
func tableView(_ tableView: UITableView, titleForDeleteConfirmationButtonForRowAt indexPath: IndexPath) -> String? {
return "确认删除"
}
// 单元格编辑后的响应方法
func tableView(_ tableView: UITableView, commit editingStyle: UITableViewCellEditingStyle, forRowAt indexPath: IndexPath) {
if editingStyle == UITableViewCellEditingStyle.delete {
self.allNames[indexPath.section]?.remove(at: indexPath.row)
tableView.setEditing(false, animated: true)
}
else if editingStyle == UITableViewCellEditingStyle.insert
{
allNames[indexPath.section]?.insert("插入的", at: indexPath.row)
tableView.setEditing(false, animated: true)
}
tableView.reloadData()
}
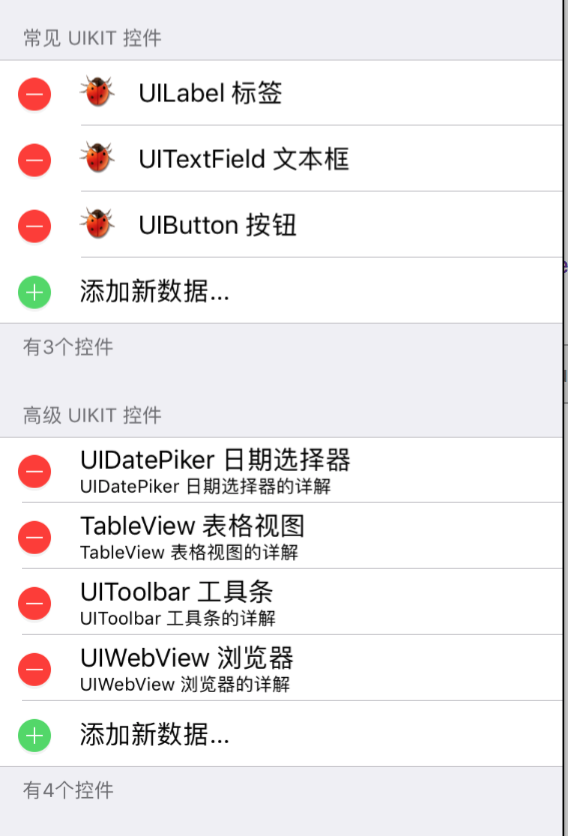
}功能改进
(1)默认情况下所有单元格都无法进行滑动删除等编辑操作。
(2)长按表格进入编辑状态,所有单元格都可以进行删除操作。
(3)同时在编辑状态下,在下方会自动出现一个新增操作单元格。点击前面的加号,便会给数据集中添加一条新数据。
import UIKit

class ViewController: UIViewController ,UITableViewDelegate, UITableViewDataSource, UIGestureRecognizerDelegate {

    var tableView:UITableView!
    var allNames:Dictionary!
    var addHeaders:[String]!


    override func viewDidLoad() {
        super.viewDidLoad()
        // Do any additional setup after loading the view, typically from a nib.
   allNames =
    [
        0:[String](["UILabel 标签", "UITextField 文本框", "UIButton 按钮"]),
        1:[String](["UIDatePiker 日期选择器", "TableView 表格视图", "UIToolbar 工具条", "UIWebView 浏览器"])
        ]

        print(allNames)

        addHeaders = ["常见 UIKit 控件","高级 UIKit 控件"]
        // 创建表格
        tableView = UITableView.init(frame: self.view.frame, style: UITableViewStyle.grouped)
        tableView.delegate = self
        tableView.dataSource = self
        self.view .addSubview(tableView)

        // 注册cell
        tableView .register(UITableViewCell.self, forCellReuseIdentifier: "cell")

        // 创建表头标签
        let headerLabel = UILabel.init(frame: CGRect(x:0, y:20, width:375, height:30))
        headerLabel.backgroundColor = UIColor.yellow
        headerLabel.textColor = UIColor.red
        headerLabel.numberOfLines = 0
        headerLabel.lineBreakMode = .byWordWrapping
        headerLabel.text = "高级 UIKit"
        headerLabel.textAlignment = NSTextAlignment.center
        headerLabel.font = UIFont.systemFont(ofSize: 15)
        tableView.tableHeaderView = headerLabel

        let longPress = UILongPressGestureRecognizer.init(target: self, action: #selector(longPressAction))
        longPress.delegate = self
        longPress.minimumPressDuration = 1
        tableView .addGestureRecognizer(longPress)
    }

    func longPressAction(recognizer:UILongPressGestureRecognizer)  {

        if recognizer.state == UIGestureRecognizerState.began {
             print("UIGestureRecognizerStateBegan");
        }
        if recognizer.state == UIGestureRecognizerState.changed {
            print("UIGestureRecognizerStateChanged");
        }
        if recognizer.state == UIGestureRecognizerState.ended {
            print("UIGestureRecognizerStateEnded");

            if tableView.isEditing == true {
                tableView.isEditing = false
            }
            else
            {
                tableView.isEditing = true
            }

            tableView.reloadData()
        }
    }

    // 创建分区
    func numberOfSections(in tableView: UITableView) -> Int {
        return allNames.count
    }

    // 每个分区的行数
    func tableView(_ tableView: UITableView, numberOfRowsInSection section: Int) -> Int {

        var count =  allNames[section]!.count

        if tableView.isEditing {
            count += 1
        }

        return count

    }

    // 分区头部显示
    func tableView(_ tableView: UITableView, titleForHeaderInSection section: Int) -> String? {
        return addHeaders[section]
    }

    // 分区尾部显示
    func tableView(_ tableView: UITableView, titleForFooterInSection section: Int) -> String? {
        let data = allNames[section]
        return "有\(data!.count)个控件"
    }

    // 显示cell内容
    func tableView(_ tableView: UITableView, cellForRowAt indexPath: IndexPath) -> UITableViewCell {
        let identify = "cell"

        let secno = indexPath.section
        let data = allNames[secno]

        var cell = UITableViewCell()

        if secno == 0 {

            cell = UITableViewCell.init(style: UITableViewCellStyle.subtitle, reuseIdentifier: identify)
            if tableView.isEditing && indexPath.row == data?.count {
                 cell.textLabel?.text = "添加新数据..."
            }
            else
            {
                cell.accessoryType = .disclosureIndicator
                cell.textLabel?.text = data?[indexPath.row]
                cell.imageView?.image = UIImage(named:"bug")
            }
        }
        else if secno == 1
        {
             cell = UITableViewCell.init(style: UITableViewCellStyle.subtitle, reuseIdentifier: identify)


            if tableView.isEditing && indexPath.row == data?.count {
                cell.textLabel?.text = "添加新数据..."
            }
            else
            {
                cell.textLabel?.text = data?[indexPath.row]
                cell.detailTextLabel?.text = "\(data![indexPath.row])的详解"
            }
        }

      return cell

    }

    // cell的选中事件
    func tableView(_ tableView: UITableView, didSelectRowAt indexPath: IndexPath) {

        // 确定该分组的内容
        let str = allNames[indexPath.section]?[indexPath.row]
        print("str\(str)")
    }

    // 设置单元格的编辑的样式
    func tableView(_ tableView: UITableView, editingStyleForRowAt indexPath: IndexPath) -> UITableViewCellEditingStyle {
        if indexPath.section == 0 {
            if tableView.isEditing == false {
                return UITableViewCellEditingStyle.none
            }
            else if indexPath.row == allNames[indexPath.section]?.count {
                return UITableViewCellEditingStyle.insert
            }else {
                return UITableViewCellEditingStyle.delete
            }

        }
        else
        {

            if tableView.isEditing == false {
                return UITableViewCellEditingStyle.none
            }
            else if indexPath.row == allNames[indexPath.section]?.count {
                return UITableViewCellEditingStyle.insert
            }else {
                return UITableViewCellEditingStyle.delete
            }
        }
    }

    // 设置确认删除按钮的文字
    func tableView(_ tableView: UITableView, titleForDeleteConfirmationButtonForRowAt indexPath: IndexPath) -> String? {
        return "确认删除"
    }

    // 单元格编辑后的响应方法
    func tableView(_ tableView: UITableView, commit editingStyle: UITableViewCellEditingStyle, forRowAt indexPath: IndexPath) {
        if editingStyle == UITableViewCellEditingStyle.delete {
            self.allNames[indexPath.section]?.remove(at: indexPath.row)
//            tableView.setEditing(false, animated: true)
        }

        else if editingStyle == UITableViewCellEditingStyle.insert
        {
            allNames[indexPath.section]?.insert("插入的", at: indexPath.row)
//            tableView.setEditing(false, animated: true)
        }

        tableView.reloadData()
    }


    override func didReceiveMemoryWarning() {
        super.didReceiveMemoryWarning()
        // Dispose of any resources that can be recreated.
    }


}