

一个tableView可以被水平和垂直滑动吗?
免责申明(必读!):本博客提供的所有教程的翻译原稿均来自于互联网,仅供学习交流之用,切勿进行商业传播。同时,转载时不要移除本申明。如产生任何纠纷,均与本博客所有人、发表该翻译稿之人无任何关系。谢谢合作!
应用程序日常开发工作的现实之一就是克服日常的挑战.原文
远非是我们要抱怨它。我们喜欢每一个新的障碍并且爱解决各种各样的困惑和难题为我们的客户服务。
我们最近的挑战就是用一个tableView来实现水平和垂直的滑动。条件是:当水平滑动时第一列和垂直滑动时的第一行要保持静止.
最后,我们需要给这个tableView包含一个巨大的数据,因此它重要性就是能够平稳的滑动。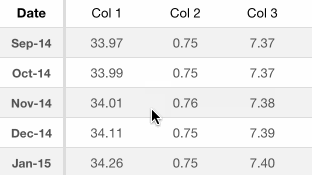
挑战
首先,我们简单说明下挑战–有时在开发的第一步就是要明确实际的问题是什么:
- 创建一个水平和垂直滑动的tableView.
- 水平滑动第一列和垂直滑动第一行的粘性.
- 使用大数据的情况下,必须要保持平滑的滚动.
第一次尝试-UITableView
我们开始考虑在UIScrollView中包含一个UITableView,但经过一些尝试,我们意识到:定制它的滚动和粘性是一个棘手的任务。
使用UITableView来做出必要的定制工作,真的很痛苦.因此,我们决定使用可定制的UICollectionView.
第二次尝试-UICollectionView
UICollectionView提供了强大的定制化服务,允许你设置一个自定义的UICollectionFlowLayout.不幸的是,网格布局的滚动只能沿着一个轴滑动:要么是水平要么是垂直.
我们希望我们能嵌入一个UIScrollView的集合,允许我们能够两个方向都能滑动,因此多方考虑我们决定使用UICollectionFlowLayout的父类UICollectionViewLayout的子类。
UICollectionViewLayout子类
以下是创建collectionView 的步骤:
- 创建一个
UICollectionViewLayout的子类CustomCollectionViewLayout. - 在
storyboard中拖动一个UICollectionView.我们也可以使用代码创建,这取决于你自己. -
在
storyboard中的Attributes Inspector设置一些属性.我们设置Layout为Custom,设置Class为CustomCollectionViewLayout.Scrolling Enabled为选中状态,如果我们想要每次只滑动一个方向,选中Direction Lock Enabled.否则,会同一时刻滑动两个方向.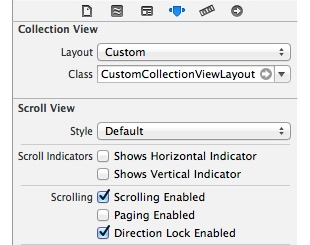
- 最后,将
UICollectionView连接到UIViewController.不要忘记连接dataSource和delegate. - 在我们的
CollectionView中,这个视图表示row和列所在的row,因此记住sections的索引下标和item的索引下标.这取决我们设置collectionView flow layout的方向.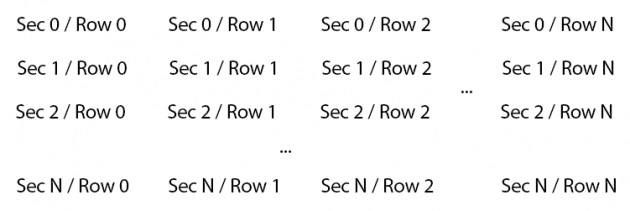
-
一旦完成了设置
collectionView的方式,我们就需要设置我们自己所要创建的custom collection view layout.首先,我们要设置3个管理所有数据的属性.@property (nonatomic,strong) NSMutableArray *itemAttributes; @property (nonatomic,strong) NSMutableArray *itemsSize; @property (nonatomic, assign) CGSize contentSize; -
如果你要自定义
item的大小,你需要定义以下方法:- (CGSize)sizeForItemWithColumnIndex:(NSUInteger)columnIndex;我强烈推荐你计算item大小存储到
itemsSize中,是为了每一个列只计算一次.提高性能. -
写如下方法并返回
YES,是为了调用当你每次滑动CollectionView的时候都能够调用prepareLayout方法.你必须设置这个。-(BOOL)shouldInvalidateLayoutForBoundsChange:(CGRect)newBounds { return YES; } -
你需要调用以下方法布局显示的items
/** * CGRectOffset: 返回一个原点在源矩形基础上进行了偏移的矩 形。 * CGRectInset: 返回一个与源矩形共中心点的,或大些或小些的新 矩形。 * CGRectIntegral: 返回包围源矩形的最小整数矩形。 * const CGRect CGRectZero: 一个原点在(0, 0),且长宽均为 0 的常数矩形。这个零矩形与 CGRectMake(0.0f, 0.0f, 0.0f, 0.0f) 是等 价的。 * const CGRect CGRectNull: 空矩形。这个会在,比如说,求两 个不相交的矩形的相交部分时返回。注意,空矩形不是零矩形。 * const CGRect CGRectInfinite: 无穷大矩形。 * CGRectDivide: 将源矩形分为两个子矩形。 */ - (NSArray *)layoutAttributesForElementsInRect:(CGRect)rect { NSMutableArray *attributes = [@[] mutableCopy]; for (NSArray *section in self.itemAttributes) { [attributes addObjectsFromArray:[section filteredArrayUsingPredicate:[NSPredicate predicateWithBlock:^BOOL(UICollectionViewLayoutAttributes *evaluatedObject, NSDictionary *bindings) { return CGRectIntersectsRect(rect, [evaluatedObject frame]); }]]]; } return attributes; } -
你需要根据
indexPath返回layout attributes,如果才能返回出正确的item attribute.- (UICollectionViewLayoutAttributes *)layoutAttributesForItemAtIndexPath:(NSIndexPath *)indexPath { return self.itemAttributes[indexPath.section] [indexPath.row]; } -
你还需要返回
collectionView内容视图的滑动大小.- (CGSize)collectionViewContentSize { return self.contentSize; } -
最后,需要设
prepareLayout方法.我们重画collectionView这将要被每次调用.- (void)prepareLayout; -
最后,我们要确定要展示的数据,否则返回
voidif ([self.collectionView numberOfSections] == 0) { return; } -
现在必须检查我们是否已经计算了
item的attribute.在确定的情况下,我们将要使用这个attributes来粘性头部(第15步).否则,我们要每一次都计算,并且保存他们到itemAttributes数组中.基本上,我们为了保证它们可见,是通过遍历所有的
items然后计算item的size、frame和zIndex.最后,我们使用
last item来计算contentSize为了计算出content的全部高度.// 以下代码只在prepareLayout中执行一次 self.itemAttributes = [@[] mutableCopy]; self.itemsSize = [@[] mutableCopy]; // Tip:我们可以使用NSUInteger来代替numberOfItemsInSection // NSUInteger numberOfItems = [self.collectionView numberOfItemsInSection:section]; //计算每一列中item 的大小 if (self.itemsSize.count != NUMBEROFCOLUMNS) { [self calculateItemsSize]; } // 通过循环计算items for (int section = 0; section < [self.collectionView numberOfSections]; section++) { NSMutableArray *sectionAttributes = [@[] mutableCopy]; for (NSUInteger index = 0; index < NUMBEROFCOLUMNS; index++) { CGSize itemSize = [self.itemsSize[index] CGSizeValue]; // 每一次都创建一个UICollectionViewLayoutAttributes,并且保存到数组中 NSIndexPath *indexPath = [NSIndexPath indexPathForItem:index inSection:section]; UICollectionViewLayoutAttributes *attributes = [UICollectionViewLayoutAttributes layoutAttributesForCellWithIndexPath:indexPath]; attributes.frame = CGRectIntegral(CGRectMake(xOffset, yOffset, itemSize.width, itemSize.height)); if (section == 0 && index == 0) { attributes.zIndex = 1024; //设置(Sec0Row0)的第一项,使其能在第一列和第一行之上 } else if (section == 0 || index == 0) { attributes.zIndex = 1023; //设置第一列和第一行在其余为设置的item之上 } if (section == 0) { CGRect frame = attributes.frame; frame.origin.y = self.collectionView.contentOffset.y; attributes.frame = frame; // 顶部(第一行)黏性 } if (index == 0) { CGRect frame = attributes.frame; frame.origin.x = self.collectionView.contentOffset.x; attributes.frame = frame; // 左部(第一列)黏性 } [sectionAttributes addObject:attributes]; xOffset = xOffset+itemSize.width; column++; // 如果最后的列,定义最终的宽度 if (column == NUMBEROFCOLUMNS) { if (xOffset > contentWidth) { contentWidth = xOffset; } // Reset values column = 0; xOffset = 0; yOffset += itemSize.height; } } [self.itemAttributes addObject:sectionAttributes]; } //获取最后的一个item 来计算 content的全部高度 UICollectionViewLayoutAttributes *attributes = [[self.itemAttributes lastObject] lastObject]; contentHeight = attributes.frame.origin.y+attributes.frame.size.height; self.contentSize = CGSizeMake(contentWidth, contentHeight); -
事实上我们已经在之前计算过
items attributes,我们只需要(垂直滑动的时候)通过设置first row的y-offset和(水平滑动)设置first columns的x-offset即可.//如果不进入以下if语句,就会执行计算方法 if (self.itemAttributes.count > 0) { for (int section = 0; section < [self.collectionView numberOfSections]; section++) { NSUInteger numberOfItems = [self.collectionView numberOfItemsInSection:section]; for (NSUInteger index = 0; index < numberOfItems; index++) { if (section != 0 && index != 0) { //这是我们不需要黏性的内容 continue; } UICollectionViewLayoutAttributes *attributes = [self layoutAttributesForItemAtIndexPath:[NSIndexPath indexPathForItem:index inSection:section]]; if (section == 0) { // 顶部(第一行)黏性 CGRect frame = attributes.frame; frame.origin.y = self.collectionView.contentOffset.y; attributes.frame = frame; } if (index == 0) { // 左部(第一列)黏性 CGRect frame = attributes.frame; frame.origin.x = self.collectionView.contentOffset.x; attributes.frame = frame; } } } return; }
