

引言
之前看北京GDG直播收获颇丰,我打算用Github API来实践一下Piasy提出的完美model,这是这个系列的第二篇,时下非常流行apt生成代码,大家喜闻乐见的ButterKnife就是一个典型的例子,Google出品的AutoValue也是其中的翘楚,这篇文章讲的是怎么使用Sqldelight配合AutoValue完成数据的持久化(数据库),以及使用SqlBrite访问数据库,希望能通过这篇文章让你了解Sqldelight和SqlBrite。
没看第一篇的同学先补补课:
github
在这个小项目中我将实践这个系列文章的所有技术,正在持续更新。
github.com/Bigmercu/Pe…
欢迎star fork issue
Sqldelight 建造数据库和实体
之前文章我有说过一种观点,为啥有的工具老觉得使用起来很麻烦,为什么原作不再封装一下,那是因为封装度越高,可DIY性越少。
现在流行的数据库访问相关的开源库不少,比如GreenDao,Realm等等,大多都是ORM(Object Relational Mapping)架构的,但是,ORM可能存在性能和内存的问题以及难以实现复杂的功能,ORM使用起来确实方便快捷,但是封装度比较高,所以可DIY性比较低,square公司这个业界良心不能忍受,所以开源了Sqldelight。
- 它可以让我们根据SQL代码直接生成实体
- 轻量级,可以真正,大部分代码都是运行时生成
- 和AutoValue结合以后大大减少了代码量
- 和Rxjava结合使用
生成实体和数据库Model
Gradle配置
在Project#build.gradle中
 buildscript {
 repositories {
   mavenCentral()
 dependencies {
   classpath 'com.squareup.sqldelight:gradle-plugin:0.4.4'
在Model#build.gradle中加入
apply plugin: 'com.squareup.sqldelight'
dependencies {
 ...
   compile 'com.squareup.sqlbrite:sqlbrite:0.7.0'
.sq文件书写
首先要有一个正确的路径,我的路径是这样的,注意包名要一致,包的位置不要搞错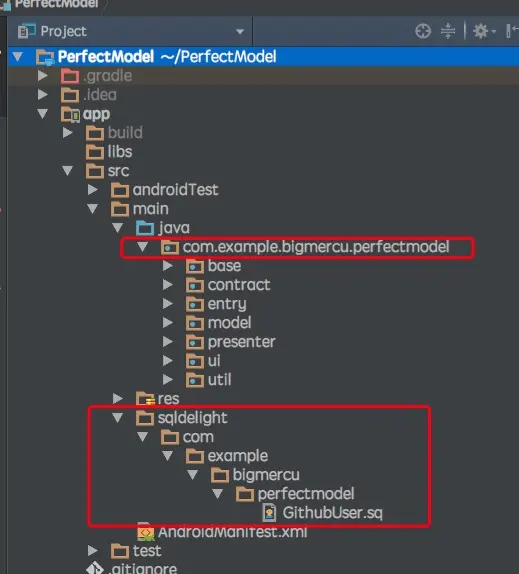
在.sq文件里要写什么?
CREATE TABLE bigmercu_test (
 id INTEGER NOT NULL PRIMARY KEY,
 login TEXT NOT NULL COLLATE NOCASE,
 age INTEGER,
 email TEXT,
 name TEXT
 select_by_name:
 SELECT *
 FROM bigmercu_test
 WHERE name = ?;
首先是一个建表语句,它支持这些数据类型:
some_long INTEGER,
some_double REAL,
some_string TEXT,
some_blob BLOB,
some_int INTEGER AS Integer,
some_short INTEGER AS Short,
some_float REAL AS Float 然后就是一个查询语句,和一般查询语句没有区别,在前面有一个select_by_login:这里是你给这个查询定义的一个Name,使用的时候需要通过它来调用。
写好.sq文件以后,rebuild一下,生成了如下的Model接口
public interface BigmecuTestModel {
 String TABLE_NAME = "bigmercu_test";
 String ID = "id";
 String LOGIN = "login";
 String AGE = "age";
 String EMAIL = "email";
 String NAME = "name";
 String CREATE_TABLE = ""
     + "CREATE TABLE bigmercu_test (\n"
     + "  id INTEGER NOT NULL PRIMARY KEY,\n"
     + "  login TEXT NOT NULL COLLATE NOCASE,\n"
     + "  age INTEGER,\n"
     + "  email TEXT,\n"
     + "  name TEXT\n"
     + ")";
 String SELECT_BY_NAME = ""
     + "SELECT *\n"
     + "FROM bigmercu_test\n"
     + "WHERE name = ?";
 long id();
 String login();
 Long age();
 String email();
 String name();
 interface Creator {
   T create(long id, @NonNull String login, @Nullable Long age, @Nullable String email, @Nullable String name);
 final class Mapper implements RowMapper {
   private final Factory bigmecuTestModelFactory;
   public Mapper(Factory bigmecuTestModelFactory) {
     this.bigmecuTestModelFactory = bigmecuTestModelFactory;
   public T map(@NonNull Cursor cursor) {
     return bigmecuTestModelFactory.creator.create(
         cursor.getLong(0),
         cursor.getString(1),
         cursor.isNull(2) ? null : cursor.getLong(2),
         cursor.isNull(3) ? null : cursor.getString(3),
         cursor.isNull(4) ? null : cursor.getString(4)
 final class Marshal {
   protected final ContentValues contentValues = new ContentValues();
   Marshal( BigmecuTestModel copy) {
     if (copy != null) {
       this.id(copy.id());
       this.login(copy.login());
       this.age(copy.age());
       this.email(copy.email());
       this.name(copy.name());
   public ContentValues asContentValues() {
     return contentValues;
   public Marshal id(long id) {
     contentValues.put(ID, id);
     return this;
   public Marshal login(String login) {
     contentValues.put(LOGIN, login);
     return this;
   public Marshal age(Long age) {
     contentValues.put(AGE, age);
     return this;
   public Marshal email(String email) {
     contentValues.put(EMAIL, email);
     return this;
   public Marshal name(String name) {
     contentValues.put(NAME, name);
     return this;
 final class Factory {
   public final Creator creator;
   public Factory(Creator creator) {
     this.creator = creator;
   public Marshal marshal() {
     return new Marshal(null);
   public Marshal marshal(BigmecuTestModel copy) {
     return new Marshal(copy);
   public Mapper select_by_nameMapper() {
     return new Mapper(this);
可以看到,里面包含了
- 表名
- 建表语句->
CREATE_TABLE - 前面在.sq里面写的query语句->
SELECT_BY_NAME long id();还有类似这样的声明,看过我上一篇的同学应该熟悉,这是给AutoValue用于生成Entry的Creator用于创建一个对象,在这里就是创建AutoValue_BigmecuTestModel对象Mapper用于映射,(将query结果存到Cursor缓冲区,使用Creator方法)返回一个(AutoValue_BigmecuTestModel)对象。Marshal(马歇尔???)用于通过数据(一个对象)来创建一个ContentValues,sqlDelite的update方法参数如下,其中的ContentValues就是由Marshal()来创建public int update(@NonNull String table, @NonNull ContentValues values, @Nullable String whereClause, @Nullable String... whereArgs) { return update(table, values, CONFLICT_NONE, whereClause, whereArgs);Factory方法:可以看到里面包括了Creator,Marshal还有我们自己定义的select_by_nameMapper,对,他就是一个仓库,通过它我们可以访问除了Mapper以外的方法。
实体
上面生成了BigmecuTestModel接口,通过实现这个Model接口我们就可以生成实体了。
这里是AutoValue拓展了一下,没看AutoValue的同学在这里补课:完美Model之AutoValue使用
- 类名保持和.sq文件的一致,就是后续实体的名字。
- 将类声明为abstract并实现前面生成的Model接口。
- 声明一个FACTORY静态对象,在其中实现create方法,并返回实体的对象。后续我们就通过这个FACTORY去访问大部分Sqldelight提供的方法(除了MAPPER)。
- typeAdapter 是用于Gson的适配器。
- MAPPER 前面说了,我们通过查询得到cursor,在MAPPER.map(cursor)中传入cursor就能返回一个对象。
public abstract class BigmercuTest implements BigmecuTestModel {
   public static final BigmercuTest.Factory FACTORY = new Factory<>(new Creator() {
       public BigmercuTest create(long id, @NonNull String login, @Nullable Long age,
                                      @Nullable String email, @Nullable String name) {
           return new AutoValue_BigmercuTest(id,login,age,email,name);
   });
   public static TypeAdapter typeAdapter(final Gson gson){
       return new AutoValue_BigmercuTest.GsonTypeAdapter(gson);
public static final RowMapper MAPPER = FACTORY.select_by_nameMapper();这个实体生成了$AutoValue_BigmercuTest和AutoValue_BigmercuTest$AutoValue_BigmercuTest就是标准的AutoValue声明实体的方式AutoValue_BigmercuTest就是最后生成的实体
结构图,将就看一下,结构比较简单就不画类图了
SqlBrite 访问数据库
SQLiteOpenHelper
使用原始的方法访问数数据库肯定是需要SQLiteOpenHelper的:
一个典型的SQLiteOpenHelper,加入了单利模式获取helper实例。
public final class GithubUserHepler extends SQLiteOpenHelper {
   private static final String TAG = GithubUserHepler.class.getSimpleName();
   private static final String DB_NAME = "GithubUserDB";
   private static final int DATABASE_VERSION = 1;
   private static GithubUserHepler mGithubUserHepler;
   public GithubUserHepler(Context context) {
       super(context, DB_NAME, null, DATABASE_VERSION);
   public static GithubUserHepler gitInstance(){
       return GithubUserHeplerInstanceHolder.hepler;
   public static class GithubUserHeplerInstanceHolder{
       private static GithubUserHepler hepler = new GithubUserHepler(ContextHolder.getContext());
   public void onCreate(SQLiteDatabase sqLiteDatabase) {
       sqLiteDatabase.execSQL(GithubUser.CREATE_TABLE);
   public void onUpgrade(SQLiteDatabase sqLiteDatabase, int oldVersion, int newVersion) {
       Log.d(TAG,"upgrade");
这样就完成了第一步,建好了数据库,有了实体,还定义了一些访问操作。
访问操作
初始化操作
这样就能获得一个操作数据库读写的对象 mBriteDatabase
SqlBrite sqlBrite = SqlBrite.create();
mBriteDatabase = sqlBrite.wrapDatabaseHelper(GithubUserHepler.gitInstance(),Schedulers.io());这里使用GithubUser.FACTORY.marshal()来生成contentValues,根据id进行插入,需要注意的是,这里id要写成id=?,因为在标准SQL语句中最后是where id = ?这里用问号来等待后续参数填入。
mBriteDatabase.update(GithubUser.TABLE_NAME,GithubUser.FACTORY.marshal()
                                .avatar_url(githubUser.avatar_url())
                              ...
                                .repos_url(githubUser.repos_url())
                                .asContentValues(),"id=?", String.valueOf(githubUser.id()));
insert操作同理
mBriteDatabase.insert(GithubUser.TABLE_NAME,GithubUser.FACTORY.marshal()
                                 .avatar_url(githubUser.avatar_url())
                               ...
                                 .repos_url(githubUser.repos_url())
                                 .asContentValues(), SQLiteDatabase.CONFLICT_IGNORE);
update操作不仅仅插入数据,源码文档里这么说
Update rows in the specified {@code table} and notify any subscribed queries. This method
will not trigger a notification if no rows were updated.
insert的文档这么说
Insert a row into the specified {@code table} and notify any subscribed queries.
它们不仅仅会更新数据,同事还会通知所有的订阅者,之前说过,它的很强的一个使用就是可以和Rxjava结合使用,当我们在Rxjava中执行一个查询以后,后续数据更新会自动通知查询订阅者。这才是它牛逼之处之一。
和Rxjava结合
使用方法和Retrofit类似,GithubUser.SELECT_BY_LOGIN是我们在前面的.sq文件中定义的查询,输入一个参数,参数得用new String[]{name}的形式,然后就能得到一个SqlBrite.Query,run这个query可以得到一个Cursor,通过这个Cursor就可以得到对象了,神奇之处在于,当你查询的数据源,比如我查询id=007的User,我在其他地方update这个user,这里会被通知User更新,Observable会发射最新的User。
我在这里面的使用场景是,我先从本地获取数据显示,再从网络获取数据存入数据库且不用通知更新,已经订阅的数据库查询Observable会收到notify然后发射最新的数据,简单的解决了两个数据源的问题。
mLocalDataSubscription = mBriteDatabase
             .createQuery(GithubUser.TABLE_NAME, GithubUser.SELECT_BY_LOGIN, new String[]{name})
             .observeOn(AndroidSchedulers.mainThread())
             .subscribe(new Action1() {
                 public void call(SqlBrite.Query query) {
                     Cursor cursor = query.run();
                     while (cursor.moveToNext()) {
                         mGithubUser = GithubUser.MAPPER.map(cursor);
                     if(mGithubUser != null){
                         Log.d(TAG,"local data:  " + mGithubUser.toString());
                         listener.onSuccess(mGithubUser);
             });
最后,不要忘了关闭数据库和取消订阅,避免内存泄露。
mBriteDatabase.close();
if(mLocalDataSubscription != null && !mLocalDataSubscription.isUnsubscribed()){
   mLocalDataSubscription.unsubscribe();