

上一篇教程中我们已经实现了Logo的动画,打开上次完成到一半的项目,我们接着实现背景的动画。 没有完成上次作业的同学请自觉到走廊罚站。
网格
试着脑补一下,一堆UIViews飞出TileGridView的样子……停停停,就此打住不要再想《创:战纪》了,我们还是一起来看看吧!
背景网格由一系列TileView组成,依附于它们的父类TileGridView。为了能有个直观的理解,我们打开TileView.swift找到init(frame:),在末尾添加这个方法:
编译运行一下程序。
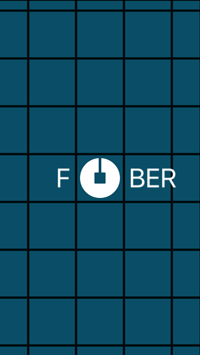
可以看到,这些TileView堆叠在一起形成了网格。这里的排列逻辑是在TileGridView.swift的renderTileViews()方法里实现的。好在这个网格排列的逻辑已经提前实现好了,我们唯一要做的就是添加动画。
让TileView动起来
TileGridView唯一的直接子视图是containerView,所有的TileView都包含其中,作为containerView的子视图。此外,TileGridView还有一个叫做tileViewRows的属性,它是一个二维数组,装着所有添加到containerView的TileView。
重新定位到TileView的init(frame:),删除刚刚添加的显示边框的代码,取消掉注释的那几行用来添加chimeSplashImage的代码。现在它看起来应该是这样的:
overrideinit(frame:CGRect){

super.init(frame:frame)

layer.contents=TileView.chimesSplashImage.CGImage

layer.shouldRasterize=true
编译运行一下。

酷!!!看到胜利的曙光了!
我们还需要给TileGridView(以及所有的TileView)添加些动画效果。打开TileView.swift,定位到startAnimatingWithDuration(_:beginTime:rippleDelay:rippleOffset:)方法,一言不合就甩出下面的代码:
// 设定时间函数

lettimingFunction=CAMediaTimingFunction(controlPoints:0.25,0,0.2,1)

letlinearFunction=CAMediaTimingFunction(name:kCAMediaTimingFunctionLinear)

leteaseOutFunction=CAMediaTimingFunction(name:kCAMediaTimingFunctionEaseOut)

leteaseInOutTimingFunction=CAMediaTimingFunction(name:kCAMediaTimingFunctionEaseInEaseOut)

letzeroPointValue=NSValue(CGPoint:CGPointZero)

varanimations=[CAAnimation]()
这些代码设定了一些备用的时间函数。接着添加下面的代码:
ifshouldEnableRipple{

// 变形动画(快速放大再缩小,类似心跳)

letscaleAnimation=CAKeyframeAnimation(keyPath:"transform.scale")

scaleAnimation.values=[1,1,1.05,1,1]

scaleAnimation.keyTimes=TileView.rippleAnimationKeyTimes

scaleAnimation.timingFunctions=[linearFunction,timingFunction,timingFunction,linearFunction]

scaleAnimation.beginTime=0.0

scaleAnimation.duration=duration

animations.append(scaleAnimation)

// 位移动画(心跳动画产生的同时进行位移)

letpositionAnimation=CAKeyframeAnimation(keyPath:"position")

positionAnimation.duration=duration

positionAnimation.timingFunctions=[linearFunction,timingFunction,timingFunction,linearFunction]

positionAnimation.keyTimes=TileView.rippleAnimationKeyTimes

positionAnimation.values=[zeroPointValue,zeroPointValue,NSValue(CGPoint:rippleOffset),zeroPointValue,zeroPointValue]

positionAnimation.additive=true

animations.append(positionAnimation)shouldEnableRipple是一个布尔值,用来控制是否把变形动画和位移动画添加到刚刚创建的animations数组里。当一个TileView不在TileGridView的边缘时,它的shouldEnableRipple属性为true。这个逻辑已经在创建TileView的时候提前设定好了,就在TileGridView的renderTitleViews()方法里。
再添加一个透明度动画:
提示:下面的动画要放在
if语句块外面,不然动画会产生撕裂。
// 透明度动画

letopacityAnimation=CAKeyframeAnimation(keyPath:"opacity")

opacityAnimation.duration=duration

opacityAnimation.timingFunctions=[easeInOutTimingFunction,timingFunction,timingFunction,easeOutFunction,linearFunction]

opacityAnimation.keyTimes=[0.0,0.61,0.7,0.767,0.95,1.0]

opacityAnimation.values=[0.0,1.0,0.45,0.6,0.0,0.0]

animations.append(opacityAnimation)这段动画代码的作用显而易见,详细设定了一些keyTimes(关键帧)。
现在我们把这些动画组合起来:
// 合成动画

letgroupAnimation=CAAnimationGroup()

groupAnimation.repeatCount=Float.infinity

groupAnimation.fillMode=kCAFillModeBackwards

groupAnimation.duration=duration

groupAnimation.beginTime=beginTime+rippleDelay

groupAnimation.removedOnCompletion=false

groupAnimation.animations=animations

groupAnimation.timeOffset=kAnimationTimeOffset

layer.addAnimation(groupAnimation,forKey:"ripple")上面的代码给TileView添加了一个groupAnimation。注意,groupAnimation里有可能包含有一个或三个动画,取决于shouldEnableRipple的具体值。
现在我们已经编写好每一个TileView的动画了,是时候在TileGridView里调用看看了。转到TileGridView.swift,在startAnimatingWithBeginTime(_:)方法里添加下面的代码:
// 计算view到中心的距离

private funcdistanceFromCenterViewWithView(view:UIView)->CGFloat{

guard letcenterTileView=centerTileViewelse{return0.0}

letnormalizedX=(view.center.x-centerTileView.center.x)

letnormalizedY=(view.center.y-centerTileView.center.y)

returnsqrt(normalizedX*normalizedX+normalizedY*normalizedY)
编译运行。
嗯这绝对看起来好多了,但AnimatedULogoView的辐射效果,应该给网格里的TileView传递类似冲击波的效果才对。这说明,我们需要根据每个TileView到中心的距离,设定不同的延迟时间,应该是距离乘上一个常数。
在startAnimatingWithBeginTime(_:)的下面,添加一个新方法:
// 计算view到中心的距离

private funcdistanceFromCenterViewWithView(view:UIView)->CGFloat{

guard letcenterTileView=centerTileViewelse{return0.0}

letnormalizedX=(view.center.x-centerTileView.center.x)

letnormalizedY=(view.center.y-centerTileView.center.y)

returnsqrt(normalizedX*normalizedX+normalizedY*normalizedY)
简单计算了传入视图的中心到centerTileView中心的距离。
回到startAnimatingWithBeginTime(_:),把它替换下面的代码:
private funcnormalizedVectorFromCenterViewToView(view:UIView)->CGPoint{

letlength=self.distanceFromCenterViewWithView(view)

// 排除距离为0的情况

guard letcenterTileView=centerTileView wherelength!=0else{returnCGPointZero}

// 把距离沿着x、y方向分解

letdeltaX=view.center.x-centerTileView.center.x

letdeltaY=view.center.y-centerTileView.center.y

// 获得方向的单位向量

returnCGPoint(x:deltaX/length,y:deltaY/length)用刚刚添加的distanceFromCenterViewWithView()方法决定延迟的时间。
编译运行。
这下好多了!现在这个动画看起来有点给力了,但还是缺了点细节。TileViews应该按照物理规律,根据冲击波的大小和方向移动(译者吐槽:这年头不会点物理都不好意思说自己会写代码)。
在distanceFromCenterViewWithView()下面再新添一个方法:
private funcnormalizedVectorFromCenterViewToView(view:UIView)->CGPoint{

letlength=self.distanceFromCenterViewWithView(view)

// 排除距离为0的情况

guard letcenterTileView=centerTileView wherelength!=0else{returnCGPointZero}

// 把距离沿着x、y方向分解

letdeltaX=view.center.x-centerTileView.center.x

letdeltaY=view.center.y-centerTileView.center.y

// 获得方向的单位向量

returnCGPoint(x:deltaX/length,y:deltaY/length)再次回到startAnimatingWithBeginTime(_:),把它改成下面这样:
private funcstartAnimatingWithBeginTime(beginTime:NSTimeInterval){

fortileRowsintileViewRows{

forviewintileRows{

letdistance=self.distanceFromCenterViewWithView(view)

varvector=self.normalizedVectorFromCenterViewToView(view)

vector=CGPoint(x:vector.x*kRippleMagnitudeMultiplier*distance,y:vector.y*kRippleMagnitudeMultiplier*distance)

view.startAnimatingWithDuration(kAnimationDuration,beginTime:beginTime,rippleDelay:kRippleDelayMultiplier*NSTimeInterval(distance),rippleOffset:vector)现在我们计算出了TileView应该移动的向量,并用它来设定rippleOffset。
编译运行。
太酷了!就差最后点睛的“放大”效果了。它应该恰好发生在我们开始改变遮罩层边界的时候。
在startAnimatingWithBeginTime(_:)方法的最上面添加下面的代码:
letlinearTimingFunction=CAMediaTimingFunction(name:kCAMediaTimingFunctionLinear)

letkeyframe=CAKeyframeAnimation(keyPath:"transform.scale")

keyframe.timingFunctions=[linearTimingFunction,CAMediaTimingFunction(controlPoints:0.6,0.0,0.15,1.0),linearTimingFunction]

keyframe.repeatCount=Float.infinity;

keyframe.duration=kAnimationDuration

keyframe.removedOnCompletion=false

keyframe.keyTimes=[0.0,0.45,0.887,1.0]

keyframe.values=[0.75,0.75,1.0,1.0]

keyframe.beginTime=beginTime

keyframe.timeOffset=kAnimationTimeOffset

containerView.layer.addAnimation(keyframe,forKey:"scale")
编译运行。
完美!我们已经完成了一个高质量的动画,当然肯定还是会有很多Fuber用户在Twitter上吐槽我们的动画。无论如何,干的漂亮!
提示:试着修改
kRippleMagnitudeMultiplier和kRippleDelayMultiplier的值,看看有什么好玩的变化。
作为收尾,前往RootContainerViewController.swift。在viewDidLoad()方法里,把最后一行代码从showSplashViewControllerNoPing()改成showSplashViewController()。
最后再编译运行一次,检查一下我们的工作。

是时候奖励自己一下了,真的是个很不错的启动画面。
教程之后
你可以在这里下载完整的Fuber项目。
如果你想要更加深入了解动画,可以看看这里的iOS 动画教程。
原文链接:https://www.raywenderlich.com/133224/how-to-create-an-uber-splash-screen
第一时间获取iOS优质中文教程,扫描下方的二维码订阅程序猴猴猴,或订阅我的博客:www.jiarui-blog.com。

模仿Uber的启动画面(下)
