

1、介绍
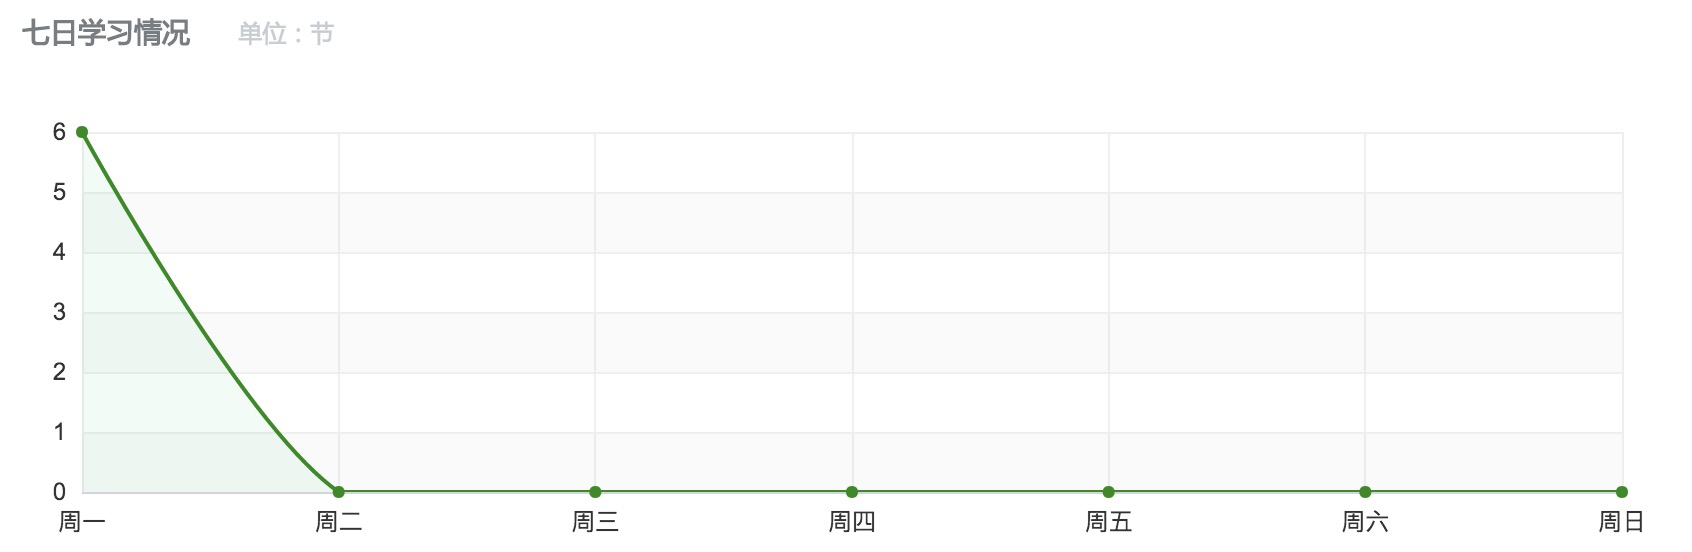
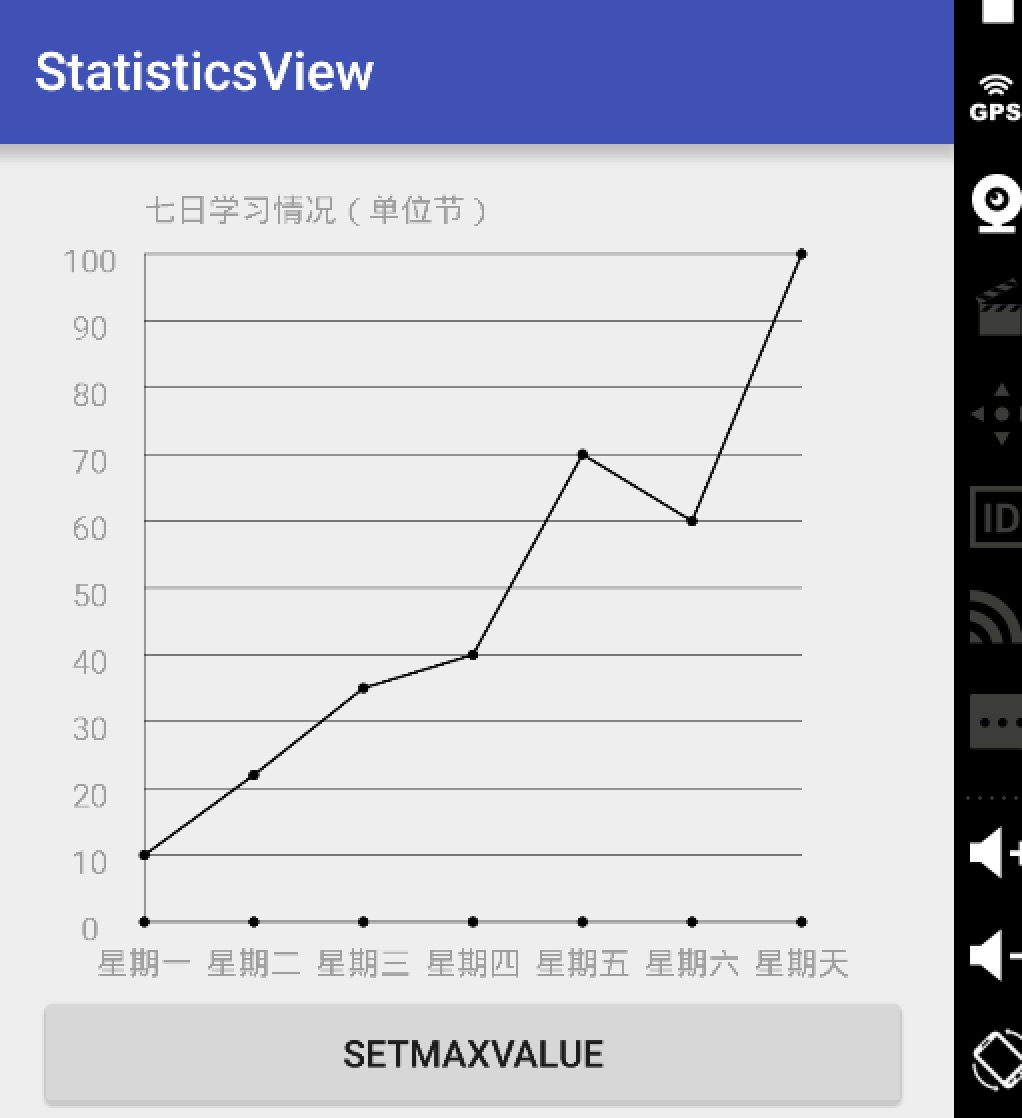
周末在逛慕课网的时候,看到了一张学习计划报告图,详细记录了自己一周的学习情况,天天都是0节课啊!正好在学习Android自定义View,于是就想着自己去写了一个,这里先给出一张慕课网的图,和自己的效果图。
yissan的博客,未经允许严禁转载 blog.csdn.net/yissan
2、实现分析
我们要实现这样一个折线统计图,必要的信息主要有下面几个
先看纵轴,纵轴需要的信息有最大值,还有用来确定每个间距代表的单位,比如最大值是100,我们还要有一个将值分为几份的数据。
接下来看横轴,因为横轴的信息一般是文字,不能像数字通过累加就可以得到,所以直接保存一个字符串数组变量。
然后就到了折线了,画折线只需要每个横轴单位的纵轴数据y坐标确定然后连接起来就ok了,这里只需要根据左边的单位的间距和每个单位的值就可以获取到y的具体坐标。
那么总结起来就需要:
1、纵轴最大值
2、纵轴分割数量
3、纵轴每个小单位的值 通过 最大值/分割数量计算
4、用来横轴显示的数组
5、横轴间距、纵轴间距
6、具体的数组(用来画折线)
有了上面的信息就可以去draw了,下面开始具体的自定义View步骤讲解
3、具体实现
在之前的文章,写过一篇介绍了自定义的步骤的文章——一起来学习Android自定义控件1,我们就按照这个步骤来讲解说明。
(1) 创建View
主要确定该继承View还是一些特定的View,定义和获取属性、添加设置属性方法。
定义属性
在构造方法中获取属性
public class StatisticsView extends View {

    //画横纵轴
    private Paint mBorderPaint;

    //画坐标点的圆心
    private Paint circlePaint;

    //画折线图
    private Paint mPathPaint;

    private Path mPath;

    //纵轴最大值
    private int maxValue = 100;


    //纵轴分割数量
    private int dividerCount = 10;


    private String title = "七日学习情况(单位节)";

    //纵轴每个单位值
    private int perValue = maxValue/dividerCount;

    //底部显示String
    private String[] bottomStr = {};


    //具体的值
    private float[] values = {};


    //底部横轴单位间距
    private float bottomGap;


    //左边纵轴间距
    private float leftGap;

    private TextPaint textPaint;


    public void setValues(float[] values) {
        this.values = values;
        invalidate();
    }


    public void setBottomStr(String[] bottomStr) {
        this.bottomStr = bottomStr;
        requestLayout();
    }

    public StatisticsView(Context context) {
        super(context);
    }

    public StatisticsView(Context context, AttributeSet attrs) {
        this(context, attrs,0);
    }

    public StatisticsView(Context context, AttributeSet attrs, int defStyleAttr) {
        super(context, attrs, defStyleAttr);
        TypedArray array = context.obtainStyledAttributes(attrs, R.styleable.StatisticsView);

        maxValue =array.getInt(R.styleable.StatisticsView_maxValue,100);
        dividerCount = array.getInt(R.styleable.StatisticsView_dividerCount,10);
        title = array.getString(R.styleable.StatisticsView_title);

        int lineColor = array.getColor(R.styleable.StatisticsView_lineColor,Color.BLACK);
        int textColor =array.getColor(R.styleable.StatisticsView_textColor,Color.BLACK);

        mBorderPaint = new Paint();
        circlePaint = new Paint();
        mPathPaint = new Paint();


        mBorderPaint.setAntiAlias(true);
        mBorderPaint.setColor(lineColor);
        mBorderPaint.setStrokeWidth(1);
        mBorderPaint.setStyle(Paint.Style.STROKE);

        mPathPaint.setAntiAlias(true);
        mPathPaint.setStyle(Paint.Style.STROKE);
        mPathPaint.setStrokeWidth(3);

        textPaint = new TextPaint();
        textPaint.setColor(textColor);
        textPaint.setTextSize(dip2px(getContext(),12));
        mPath = new Path();
        circlePaint.setStyle(Paint.Style.FILL);
        circlePaint.setAntiAlias(true);

        array.recycle();

    }
}
上面的代码简单的获取到了属性、初始化了一些信息。同时对外提供了设置values值的方法
(2)处理View的布局
处理布局首先考虑的是根据需要重写onMeasure方法。这里为了简单就直接让wrap_content的情况下直接宽高相等。当然你也可以有一个代表每个间距宽高的属性,然后去计算wrap_content下的宽高。
 @Override
    protected void onMeasure(int widthMeasureSpec, int heightMeasureSpec) {
        int widthMode = MeasureSpec.getMode(widthMeasureSpec);
        int widthSize = MeasureSpec.getSize(widthMeasureSpec);
        int heightMode = MeasureSpec.getMode(heightMeasureSpec);
        int heightSize = MeasureSpec.getSize(heightMeasureSpec);

        if (widthMode==MeasureSpec.EXACTLY&&heightMode==MeasureSpec.EXACTLY){
            setMeasuredDimension(widthSize,heightSize);
        }else if (widthMeasureSpec==MeasureSpec.EXACTLY){
            setMeasuredDimension(widthSize,widthSize);
        }else if (heightMeasureSpec==MeasureSpec.EXACTLY){
            setMeasuredDimension(heightSize,heightSize);
        }

    }
由于在draw的时候要确定横轴的单位间距,我们需要获取它,一般我们获取值可以在onSizeChange方法中获取,但是由于我们底部的gap需要根据要显示几个来确定。但是才开始的时候bottomStr[]的length为0,之后通过set方法为bottomStr设置不会再次调用onSizeChange。bottomGap就会是最开始的值,这样效果会出问题,所以就在onLayout方法中获取。
    @Override
    protected void onLayout(boolean changed, int left, int top, int right, int bottom) {
        bottomGap = getWidth()/(bottomStr.length+1);
        leftGap = getHeight()/(dividerCount+2);
        super.onLayout(changed, left, top, right, bottom);
    }
(3)、绘制View(Draw)
接下来就可以实现onDraw()来绘制View了
@Override
    protected void onDraw(Canvas canvas) {
        super.onDraw(canvas);

        if (bottomStr==null||bottomStr.length==0){
            return;
        }

        //画左边的线
        canvas.drawLine(bottomGap,getHeight()-leftGap,bottomGap,leftGap,mBorderPaint);


        float fontHeight =(textPaint.getFontMetrics().descent-textPaint.getFontMetrics().ascent);
        //画下边线
        canvas.drawLine(bottomGap,getHeight()-leftGap,getWidth()-bottomGap,getHeight()-leftGap,mBorderPaint);
        for (int i = 1;i<=bottomStr.length;i++){ canvas.drawCircle(i*bottomGap,getHeight()-leftGap,6,circlePaint);="" canvas.drawText(bottomStr[i-1],i*bottomGap-(textPaint.measureText(bottomStr[i-1])="" 2),getHeight()-leftGap="" 2+fontHeight="" 2,textPaint);="" }="" canvas.drawText(title,bottomGap,leftGap="" for="" (int="" i="1;i<=dividerCount+1;i++){" 画左边的字="" canvas.drawText(perValue*(i-1)+"",bottomGap="" 2-(textPaint.measureText(perValue*(i-1)+"")="" 2),(((dividerCount+2-i)))*leftGap+fontHeight="" 画横线="" canvas.drawLine(bottomGap,getHeight()-((i)*leftGap),getWidth()-bottomGap,getHeight()-((i)*leftGap),mBorderPaint);="" **="" *="" 画轨迹="" y的坐标点根据="" y="" leftGap="values[i]/perValue" 计算="" if="" (i="=0){" mPath.moveTo(bottomGap,(dividerCount+1)*leftGap-(values[i]*leftGap="" perValue));="" }else{="" mPath.lineTo((i+1)*bottomGap,(dividerCount+1)*leftGap-(values[i]*leftGap="" 画轨迹圆点="" canvas.drawCircle((i+1)*bottomGap,(dividerCount+1)*leftGap-(values[i]*leftGap="" perValue),6,circlePaint);="" canvas.drawPath(mPath,mPathPaint);="" public="" static="" int="" dip2px(Context="" context,="" float="" dpValue)="" {="" final="" scale="context.getResources().getDisplayMetrics().density;" return="" (int)="" (dpValue="" +="" 0.5f);="" }<="" code=""/>
代码都加了注释,主要是一些计算,还有drawLine,drawPath,drawText,以及获取text宽高的一些知识。
yissan的博客,未经允许严禁转载 blog.csdn.net/yissan
4、使用
声明View,然后在Activity里获取View并且调用setBottomStr和setValues方法
public void invalidate(View view) {
this.view.setBottomStr(new String[]{"星期一","星期二","星期三","星期四","星期五","星期六","星期天"});
this.view.setValues(new float[]{10f,90f,33f,66f,42f,99f,0f});
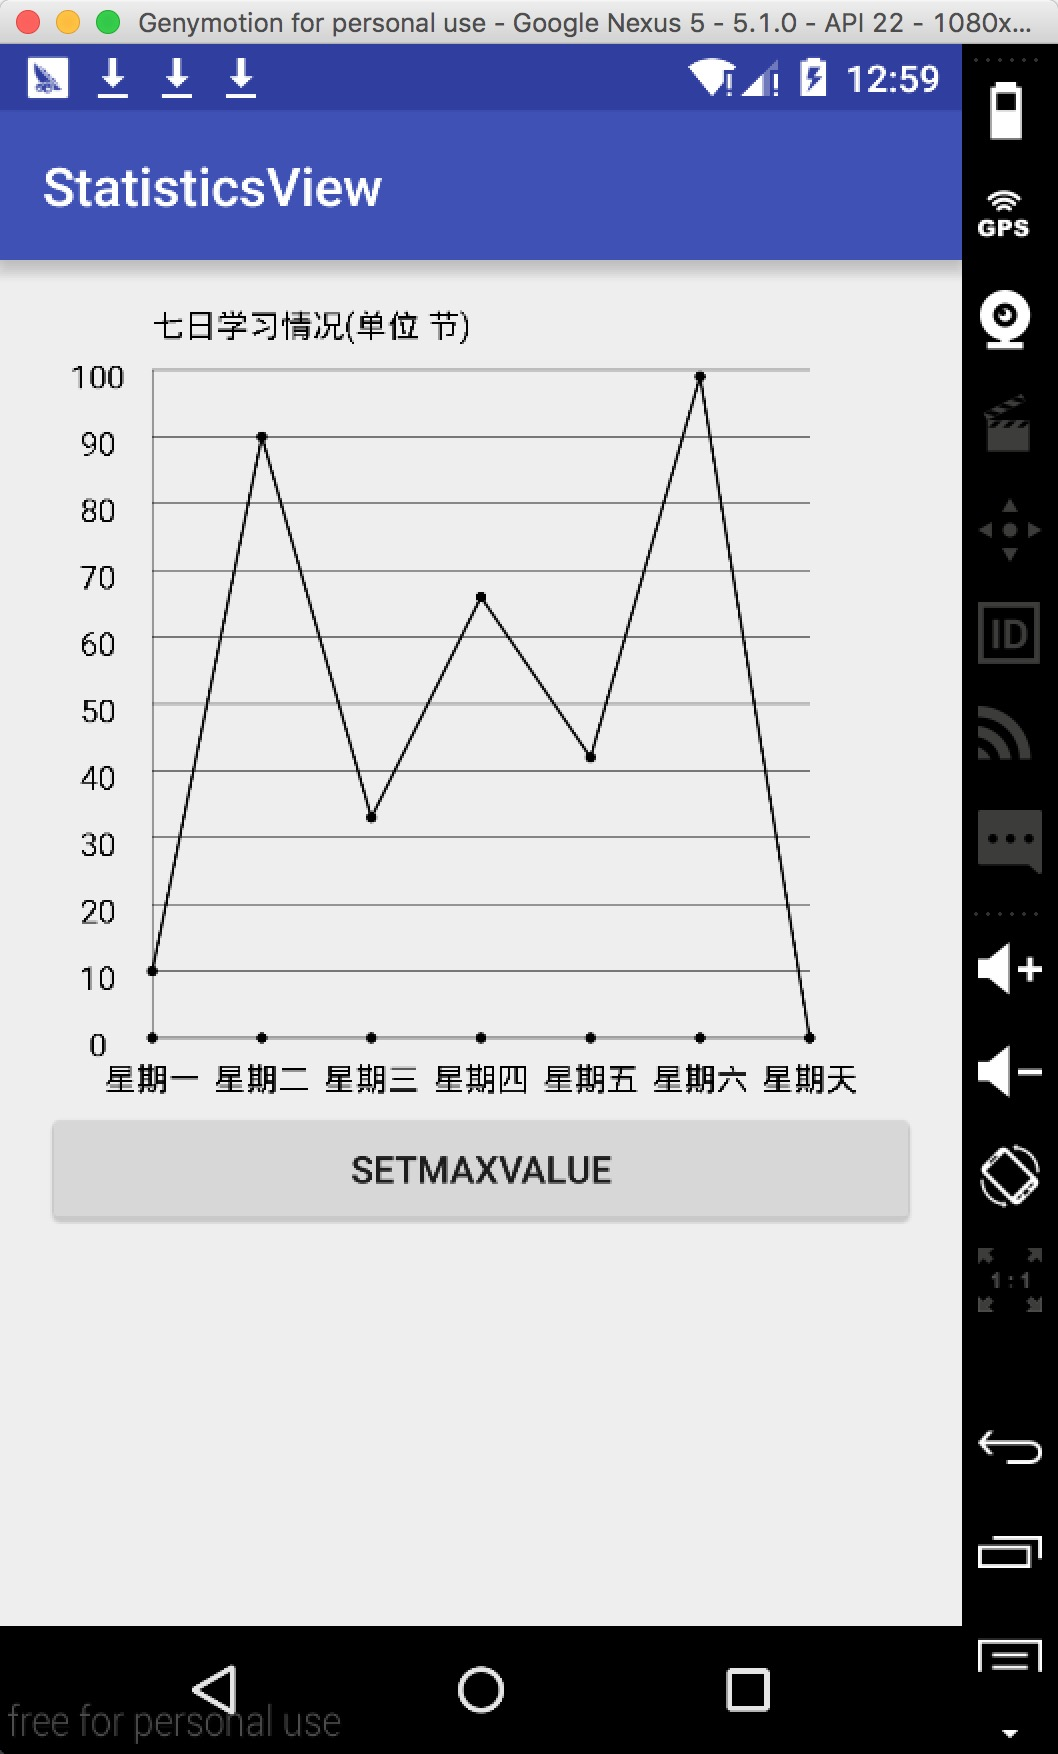
}再来一张效果图
5、总结
自定义View就是多练,看到一个喜欢的效果,想不想能不能自己的画一个,时间久了,相信我们都可以轻松的写出很好的自定义View
因为最近工作有点忙,所以很多地方不完善。在这里分享一下,希望大家喜欢。
觉得不错的话,动动手赞或者评论一下,算是对我的一种鼓励。
