

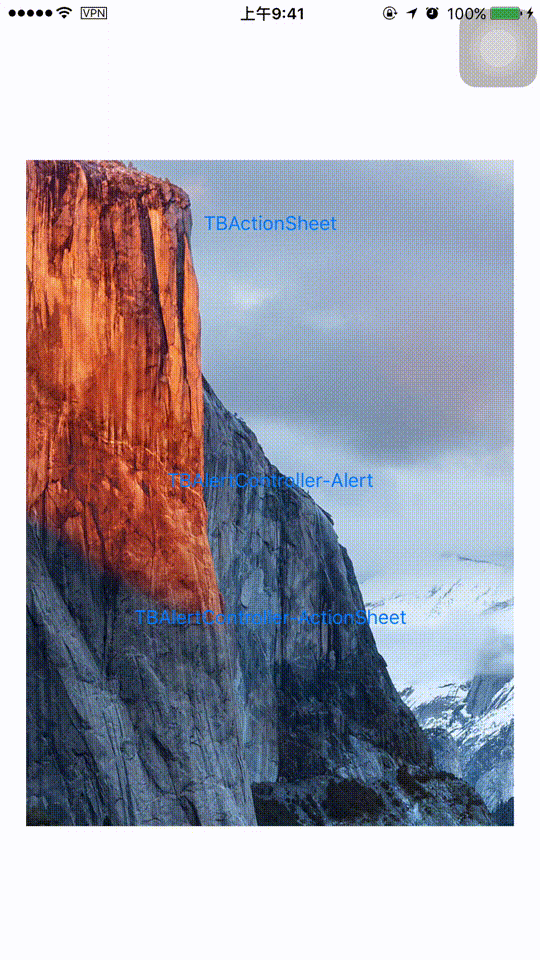
iOS 系统自带的 UIActionSheet 无法满足开发中高度个性化的 UI 风格和代码风格,所以我决定自己动手丰衣足食,于是 TBActionSheet 诞生了:
Github:github.com/yulingtianx…
TBActionSheet 不仅还原了 UIActionSheet 的几乎所有功能和 API,还在此基础上支持如下功能:
- block 语法
- 插入自定义的 Header 视图
- 自定义字体、颜色、尺寸、圆角等
- 将毛玻璃效果支持到了 iOS7,且可以定义颜色
- 支持 Cocoapods 和 Carthage
- 支持在 Title 下面设置 Message
- 支持点击背景关闭
- 可以在显示后动态更新 UI
为何要造这个轮子
可能上午视觉同学要求所有系统版本的 ActionSheet 都要做成 iOS9 的圆角样式,下午就推翻做成跟微信一模一样,晚上又觉得微信的好丑风格不搭。。。如何以不变应万变?自己造个万能轮子!
其实有一些开源的 ActionSheet,但都不满足我的要求:高度个性化,私人定制,而且几乎其他开源的 ActionSheet 都不支持自动旋转,只支持竖屏不能横屏。而系统的 UIActionSheet 是支持这个功能的。TBActionSheet 做到在 iOS8+ 上的旋转屏幕适配,之所以不兼容 iOS7+ 是因为 iOS7 和 iOS8+ 的旋转机制和坐标体系有较大差别,总结为一个字:懒!
其实造这个轮子的原因还真就是因为懒!因为视觉同学经常会调整风格,改来改去真的会产生大量废弃的冗余代码,因为怕未来某个时间点又被改回去,所以不敢删代码只好注释掉。我就是要做个高度个性化的组件,每次修改 UI 只需要修改几个属性就可以。
针对上面功能列表列出的第 1 条和第 6 条,系统的 UIAlertController 也可以办得到,但缺点是只能在 iOS8+ 使用。而 UIActionSheet 和 UIAlertView 却在 iOS8.3 被废弃,这是个青黄不接的年代,为此我曾经开发了 TBAlertController 来兼容高低各种版本的系统,实现原理在 腾讯实习第一个月工作总结 有详细讲解。TBAlertController 使用的都是系统控件,不可定制,但也被我集成到了 TBActionSheet 项目中。
在做到功能强大高度个性化的同时也要注重对系统控件原有 API 的最大还原,在绝大多数情况下只需要将代码中的 UI 替换成 TB 即可,降低改动成本。
界面组成
从 UI 上大致划分成几个区域,它们都在 TBActionSheet 的视图层级树中:
TBActionBackground为半透明背景TBActionContainer是容纳 Sheet 视图的容器titleLabel和messageLabel属性是标题和消息,类型为UILabelcustomView属性是个普通的UIView,供使用者传入自定义视图TBActionButton是对应着每个 Action 的按钮
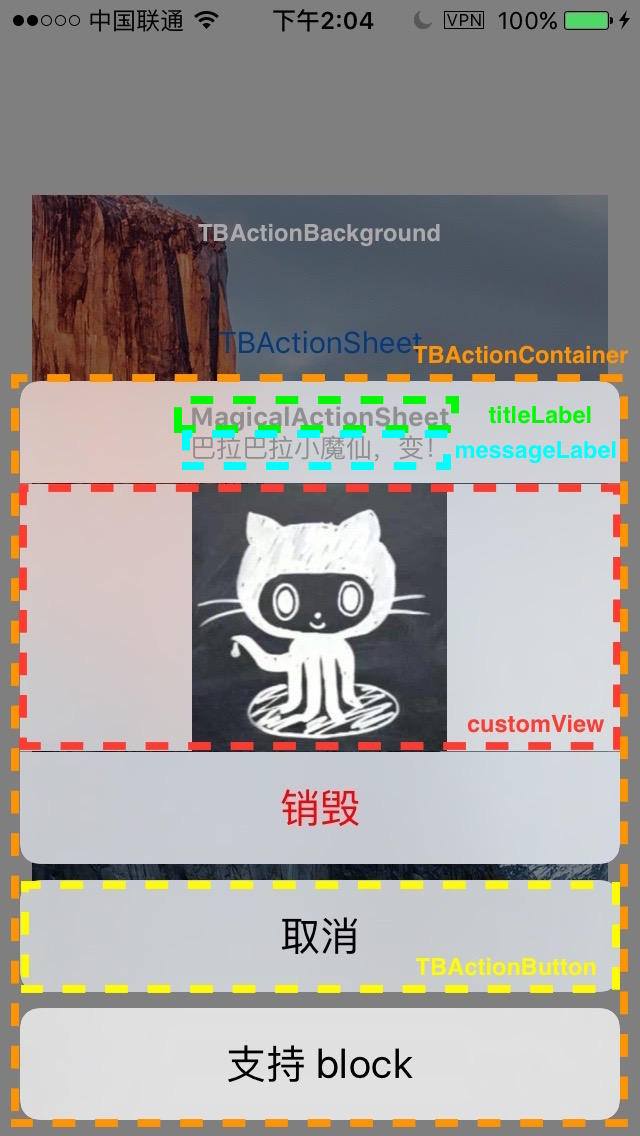
所有的坐标和尺寸都是代码计算出来的,没有用自动布局,容器的大小是根据其子视图的 frame 决定的,这其中包含很多计算。
在实际使用时只需使用 TBActionSheet 就可以了,所以上面提到的类都是幕后工作者。我将会讲述每部分具体实现和一些功能点的实现。
背景
背景是 TBActionSheet 的子视图中最底层的视图。
TBActionBackground 继承于 UIImageView,虽然目前只是个拥有半透明黑色的可相应点击事件的视图,但是考虑到拓展性,允许使用者在背景上设置图片。
点击背景后会调用父视图 TBActionSheet 的 close 方法关闭,后续会有详述。
容器
我在实现的时候没有使用自动布局,而是自己计算 frame。容器的作用是把一系列内容包装起来,方便计算 frame。TBActionContainer 容纳了整个 ActionSheet 的主体功能视图,系统的毛玻璃效果也是在这添加的。
TBActionSheet 中好多属性其实并不是作为 TBActionSheet 的子视图,而是 TBActionContainer 的子视图,比如:titleLabel、messageLabel、customView 以及buttons 数组中的 TBActionButton 对象。既然这些视图都是容器的子视图,为何不在容器中声明对应的属性呢?目的是尽量将视图暴露给 TBActionSheet 上集中处理,也方便对外集中提供属性和接口。
TBActionContainer 中有对 TBActionSheet 的弱引用,目的是便于获取一些属性值。
容器从上到下依次为 header,custom,footer 以及 buttons 和 separators 数组。Separator 指的是按钮之间的空隙,可以设置背景颜色。也就是说容器下面还有几个小容器,比如 header 容纳标题和消息,custom 容纳自定义视图,而 footer 目前是空的,仅作为拓展。
TBActionContainer 继承于 UIImageView,header,custom,footer 类型也都是 UIImageView。这是为了实现毛玻璃效果,后续会有详述。
标题&消息
系统的 UIActionSheet 只支持标题没有消息,但可以通过换行的方式伪装下标题和消息。我这里当然是用两个 UILabel 来实现标题和消息的啦,字体颜色也尽量还原 UIAlertController 的样式。
TBActionSheet 的 titleLabel 和 messageLabel 属性是 readonly 的,它们都是 TBActionContainer 的 header 属性的子视图。
自定义视图
TBActionSheet 的 customView 属性可供使用者传入一个 UIView 对象,它是 TBActionContainer 的 custom 属性的子视图。自定义视图能够接收到触摸事件。
按钮
所有的按钮都存储于 TBActionSheet 的 buttons 数组中,类型为 TBActionButton。
TBActionButton 继承于 UIButton,有三种 style:
typedef NS_ENUM(NSInteger, TBActionButtonStyle) {
    TBActionButtonStyleDefault = 0,
    TBActionButtonStyleCancel,
    TBActionButtonStyleDestructive
    };
TBActionButton 还提供了 normalColor 和 highlightedColor 属性,用于设置按钮不同状态下的颜色。如果开启了毛玻璃效果且让 Container 的背景透明,那就需要为容器中每个单独的视图添加毛玻璃效果,所以每个按钮背后都需要分别放置一个同等大小的视图用于毛玻璃效果和变换颜色。behindColorView 属性就是设置颜色的视图。在按钮高亮时它的 alpha 会被设成 0.5。有关毛玻璃效果具体实现细节后续会详述。
为了支持 block 语法,TBActionButton 内部保留了一个只读的 block 属性 handler,而设置 block 只能通过它的工厂方法,实现如下:
+ (instancetype)buttonWithTitle:(NSString *)title style:(TBActionButtonStyle)style handler:(void (^ __nullable)( TBActionButton * _Nonnull button))handler{
    TBActionButton *button = [TBActionButton buttonWithType:UIButtonTypeCustom];    button.style = style
    button.handler = handler
    button.clipsToBounds = YES
    [button setTitle:title forState:UIControlStateNormal]
    [button setBackgroundColor:[UIColor clearColor]]
    [button.titleLabel setFont:[UIFont systemFontOfSize:20]]
    return button;}
除了这个版本的工厂方法,还有个不提供 handler 参数的版本:
+ (instancetype)buttonWithTitle:(NSString *)title style:(TBActionButtonStyle)style;
至于 block 的属性内存管理语义是用 strong 还是 copy,其实这是个历史问题,在 MRC 时代是需要用 copy 的,因为 ARC 会自动帮我们进行 copy,所以这里用 strong 也可以。苹果官方的态度比较换旧,建议仍然使用 copy,虽然这并没什么乱用。
因为按钮的数量毕竟有限,对于按钮圆角的实现就不需要考虑性能问题了。有关圆角的这部分后续会有专门一节叙述。
接口实现
TBActionSheet 具有 UIActionSheet 的几乎所有接口和属性,可以说前者是后者的超集。之所以说『几乎』,是因为我在 UIWindow 上模态显示 ActionSheet,相当于 UIAlertController 的做法,于是以下 UIActionSheet 的接口我目前并没有实现:
- (void)showFromToolbar:(UIToolbar *)view;
- (void)showFromTabBar:(UITabBar *)view;
- (void)showFromBarButtonItem:(UIBarButtonItem *)item animated:(BOOL)animated ;
- (void)showFromRect:(CGRect)rect inView:(UIView *)view animated:(BOOL)animated;
- (void)showInView:(UIView *)view;
除此之外 UIActionSheet 的属性和接口在 TBActionSheet 都有山寨,只是把 UI 换成了 TB,比如 delegate
@property(nullable,nonatomic,weak) id delegate;
TBActionSheetDelegate 中的方法跟 UIActionSheetDelegate 中的方法 selector 完全一样。
初始化
初始化方法的设计延续了 UIActionSheet 的接口,在此基础上还加了个带有 message 参数的方法。为了减少冗余代码,实现高内聚低耦合的设计模式,一般会写一个参数最多功能最全的方法,其他参数少的方法去调用前者。这种层层 Forward 参数的方式在 API 设计中很常见。由于这两个方法都带有可变参数,且不能在一个带有可变参数的方法中直接调用另一个带有可变参数的方法。因为函数参数入栈或者存入寄存器的方式都是有规可循的,我也曾尝试过在 x86-64 下找出指针固定的偏移量,遵循 x86-64 calling convention 下的可变参数调用从而修正 va_list 结构体的值。x86 下 va_list 是个 char *,而 x86-64 架构下 va_list 是个结构体:
typedef struct {
   unsigned int gp_offset;
   unsigned int fp_offset;
   void *overflow_arg_area;
   void *reg_save_area;
   } va_list[1];
我当时正是给结构体中的数据加上一段位移,使其在可变参数函数之间调用时不 crash,但这样意义不大。关于 va_list 与 calling convention 的细节可以参考 c/c++ 里面的变长参数的实现 和 System V Application Binary Interface 第52页,这里不再做延伸。
简单的做法是写一个方法接受参数类型为 va_list,将大部分公共逻辑写在里面。这些公共逻辑包括调用 init,给 title、message 和 delegate属性赋值,添加 Cancel 和 Destructive 按钮,遍历 va_list 添加按钮:
- (instancetype)initWithTitle:(NSString *)title message:(nullable NSString *)message delegate:(id)delegate cancelButtonTitle:(nullable NSString *)cancelButtonTitle destructiveButtonTitle:(nullable NSString *)destructiveButtonTitle firstOtherButtonTitle:(NSString *)firstOtherButtonTitle titleList:(va_list)argList
{
    self = [self init];
    if (self) {
        _title = title;
        _message = message;
        _delegate = delegate;
        if (destructiveButtonTitle) {
            _destructiveButtonIndex = [self addButtonWithTitle:destructiveButtonTitle style:TBActionButtonStyleDestructive];
        }
        if (firstOtherButtonTitle) {
            [self addButtonWithTitle:firstOtherButtonTitle style:TBActionButtonStyleDefault];
            NSString* eachArg;
            while ((eachArg = va_arg(argList, NSString*))) {
                [self addButtonWithTitle:eachArg style:TBActionButtonStyleDefault];
            }
        }
        if (cancelButtonTitle) {
            _cancelButtonIndex = [self addButtonWithTitle:cancelButtonTitle style:TBActionButtonStyleCancel];
        }
    }
    return self;
    }
因为第一个参数不包含在 va_list 中,所以也需要把第一个参数传入。va_arg (va_list ap, type) 像个迭代器一样每次根据 type 计算位移获取参数并更新 va_list。 va_list 的初始化是用 va_start 宏初始化的,并以 va_end 宏结束。有关这些宏的定义,详见 stdarg.h 和 这篇文章。
于是那两个可变参数的初始化方法代码大大减少,调用上面的方法就可以。这样先将可变参数内容初始化到 va_list 中再传参调动的方式避免了 calling convention 的问题:
- (instancetype)initWithTitle:(NSString *)title delegate:(id)delegate cancelButtonTitle:(nullable NSString *)cancelButtonTitle destructiveButtonTitle:(nullable NSString *)destructiveButtonTitle otherButtonTitles:(nullable NSString *)otherButtonTitles, ... NS_REQUIRES_NIL_TERMINATION
{
    va_list argList;
    va_start(argList, otherButtonTitles);
    self = [self initWithTitle:title message:nil delegate:delegate cancelButtonTitle:cancelButtonTitle destructiveButtonTitle:destructiveButtonTitle firstOtherButtonTitle:otherButtonTitles titleList:argList];
    va_end(argList);
    return self;
    }
- (instancetype)initWithTitle:(NSString *)title message:(nullable NSString *)message delegate:(id)delegate cancelButtonTitle:(nullable NSString *)cancelButtonTitle destructiveButtonTitle:(nullable NSString *)destructiveButtonTitle otherButtonTitles:(nullable NSString *)otherButtonTitles, ... NS_REQUIRES_NIL_TERMINATION
{
    va_list argList;
    va_start(argList, otherButtonTitles);
    self = [self initWithTitle:title message:message delegate:delegate cancelButtonTitle:cancelButtonTitle destructiveButtonTitle:destructiveButtonTitle firstOtherButtonTitle:otherButtonTitles titleList:argList];
    va_end(argList);
    return self;
    }
为了减少冗余代码我也是拼了。。。下面继续说 init 方法。主要工作是对一些属性的初始化工作,并将背景和容器依次添加为子视图,还有监听状态栏朝向变化的通知:
- (instancetype)init
{
    self = [super initWithFrame:[UIScreen mainScreen].bounds];
    if (self) {
        self.backgroundColor = [UIColor clearColor];
        _background = [[TBActionBackground alloc] initWithFrame:self.bounds];
        [self addSubview:_background];
        _actionContainer = [[TBActionContainer alloc] initWithSheet:self];
        [self addSubview:_actionContainer];
        _buttons = [NSMutableArray array];
        _separators = [NSMutableArray array];
        _cancelButtonIndex = -1;
        _destructiveButtonIndex = -1;
        [[NSNotificationCenter defaultCenter] addObserver:self selector:@selector(statusBarDidChangeOrientation:) name:UIApplicationDidChangeStatusBarOrientationNotification object:nil];
    }
    return self;
    }
添加按钮
添加按钮的实现就是调用 TBActionButton 的工厂方法新建一个按钮,然后将其设置好点击事件处理的方法后,将按钮实例添加到 buttons 数组中。针对按钮不同的风格,会更新 cancelButtonIndex 和 destructiveButtonIndex,这里做了个兼容性的妥协:UIActionSheet 提供的接口只能至多有一个 cancelButtonTitle 或 destructiveButtonTitle,而 UIAlertController 的接口却支持多个。TBActionSheet 支持多个 cancelButtonTitle 或 destructiveButtonTitle,但 cancelButtonIndex 和 destructiveButtonIndex 总是被更新为最后一个添加的对应风格按钮的 Index:
- (NSInteger)addButtonWithTitle:(nullable NSString *)title style:(TBActionButtonStyle)style handler:(void (^ __nullable)( TBActionButton * _Nonnull button))handler
{
    TBActionButton *button = [TBActionButton buttonWithTitle:title style:style handler:handler];
    [button addTarget:self action:(buttonTapped:) forControlEvents:UIControlEventTouchUpInside];
    [self.buttons addObject:button];
    NSInteger index = self.buttons.count - 1;
    switch (style) {
        case TBActionButtonStyleDefault: {
            ;
            break;
        }
        case TBActionButtonStyleCancel: {
            self.cancelButtonIndex = index;
            break;
        }
        case TBActionButtonStyleDestructive: {
            self.destructiveButtonIndex = index;
            break;
        }
        default: {
            break;
        }
    }
    return index;
    }
添加按钮时把传入的 style 和 handler 再次传给了 TBActionButton 的工厂方法。此外还有两个参数更简洁的方法可供选择,实现如下:
- (NSInteger)addButtonWithTitle:(NSString *)title
{
    return [self addButtonWithTitle:title style:TBActionButtonStyleDefault];
    }
- (NSInteger)addButtonWithTitle:(NSString *)title style:(TBActionButtonStyle)style
{
    return [self addButtonWithTitle:title style:style handler:nil];
    }
这也是顺应了之前的设计,减少冗余代码。
show
在调用 show 方法之前,使用者可能会修改一些属性的值,所以大量的绘制和计算都是在 show 方法调用时执行的。在显示 ActionSheet 的时候需要有一组动画效果:将背景颜色由透明设成半透明黑色,并将容器从屏幕外由下至上平移至屏幕底部。
- (void)show
{
    if ([self.delegate respondsToSelector:@selector(willPresentAlertView:)]) {
        [self.delegate willPresentActionSheet:self];
    }
    [self setupNewWindow];
    [self setupLayout];
    [self setupStyle];
    void(^animations)(void) = ^() {
        self.background.backgroundColor = [UIColor colorWithWhite:0 alpha:0.5];
        [self setupContainerFrame];
    };
    void(^completion)(BOOL finished) = ^(BOOL finished) {
        if ([self.delegate respondsToSelector:@selector(didPresentActionSheet:)]) {
            [self.delegate didPresentActionSheet:self];
        }
        self.visible = YES;
    };
    if (kiOS7Later) {
        [UIView animateWithDuration:self.animationDuration delay:0 usingSpringWithDamping:self.animationDampingRatio initialSpringVelocity:self.animationVelocity options:UIViewAnimationOptionCurveEaseInOut animations:animations completion:completion];
    }
    else {
        [UIView animateWithDuration:self.animationDuration delay:0 options:UIViewAnimationOptionCurveEaseInOut animations:animations completion:completion];
    }
    }
在动画开始之前最关键的三个步骤是:
- 设置新的
UIWindow:setupNewWindow - 设置布局:
setupLayout - 设置毛玻璃效果、圆角、背景颜色等风格:
setupStyle
setupNewWindow
setupNewWindow 的具体实现如下:
- (void)setupNewWindow
{
    if ([self isVisible]) {
        return;
    }
    self.previousKeyWindow = [UIApplication sharedApplication].keyWindow;
    [self.previousKeyWindow interruptGesture];
    TBActionSheetController *actionSheetVC = [[TBActionSheetController alloc] initWithNibName:nil bundle:nil];
    actionSheetVC.actionSheet = self;
    self.window = [[UIWindow alloc] initWithFrame:[UIScreen mainScreen].bounds];
    self.window.autoresizingMask = UIViewAutoresizingFlexibleWidth | UIViewAutoresizingFlexibleHeight;
    self.window.opaque = NO;
    self.window.rootViewController = actionSheetVC;
    [self.window makeKeyAndVisible];
    }
在把新的 UIWindow 搬到屏幕上之前先用 previousKeyWindow 属性记录下当前的 keyWindow,因为以后会经常用到它。下面会详细展开讲述 setupNewWindow 方法都干了啥。
Autorotation
之前说过 TBActionSheet 是在 UIWindow 上模态展示,其实这么做的另一个原因是为了更方便地实现自动旋转。旋转事件的传递路径为:UIApplication -> UIWindow -> rootViewController -> rootViewController.view。所以需要将 TBActionSheet 作为 rootViewController.view 的子视图,这样让其跟着屏幕一起旋转。而在 iOS7 时代,UIWindow 是不会跟着一起旋转的,其 bounds 是不变的,坐标系计算跟 iOS8 之后的不同,所以 TBActionSheet 自动旋转目前仅支持 iOS8+。为了方便在控制器中处理旋转事件,我写了个 TBActionSheetController,它对 TBActionSheet 有一个弱引用,只是为了方便一些操作。
实现自动旋转的主要流程是:
- 新建一个
TBActionSheetController实例actionSheetVC - 新建一个
UIWindow实例window并赋值给window属性 window.rootViewController = actionSheetVC[actionSheetVC.view addSubview: YOUR_VIEW]
YOUR_VIEW 就是想要自动旋转的视图,在这里就是 TBActionSheet 实例啦。
完成了以上流程后,还需要在 TBActionSheet 接受到朝向变化的通知后手动更新 frame 和 bounds。PS:因为我们没使用自动布局,而是手动调整 frame。
- (void)statusBarDidChangeOrientation:(NSNotification *)notification {
    self.bounds = [UIScreen mainScreen].bounds;
    self.background.frame = self.bounds;
    [self setupContainerFrame];
    }
setupContainerFrame 方法在后面会讲到。
interruptGesture
如果作用于 previousKeyWindow 上的手势触发了 ActionSheet 的显示,但此时这个手势没有终止(比如 Pan 手势一直在捕获),这时就会引发一系列问题(测试的同学功不可没),必须中断其他窗口正在捕获的手势。思路是递归遍历子视图树中的所有手势对象,针对 Tap 和 Pan 这两种手势做中断处理。中断的方法就是将 enabled 设为 NO 再设为 YES:
- (void)interruptGesture
{
    for (UIGestureRecognizer *gesture in self.gestureRecognizers) {
        if (([gesture isKindOfClass:[UITapGestureRecognizer class]] || [gesture isKindOfClass:[UIPanGestureRecognizer class]]) && gesture.enabled == YES) {
            gesture.enabled = NO;
            gesture.enabled = YES;
        }
    }
    for (UIView *subview in self.subviews) {
        [subview interruptGesture];
    }
    }
TBActionSheetController
为了让 ActionSheet 自动旋转,还需要覆写 TBActionSheetController 的 shouldAutorotate 方法并返回 YES,以及在 supportedInterfaceOrientations 方法中返回想要旋转的朝向 Mask。为了让 TBActionSheetController 的状态栏风格和 Hidden 状态与 ActionSheet 展现之前相同,还需要覆写 preferredStatusBarStyle 和 prefersStatusBarHidden 这两个方法。通过 previousKeyWindow 可以递归找到最顶层的控制器,并递归调用 childViewControllerForStatusBarXXX 方法向其获取可以代表状态栏风格或 Hidden 的控制器。这里用到了一些关于 UIWindow 的辅助方法,具体实现在 UIWindow (TBAdditions) 类别中。
setupLayout
因为没有用自动布局,所以需要在容器中从上到下依次排列视图,宽度由 sheetWidth 属性得知,只需计算好当前的纵坐标。纵坐标是根据各组件高度累加计算的,所以本质上还是对高度的计算。titleLabel 和 messageLabel 的高度可根据字体和文字内容计算出来。customView 是由调用方提供,高度也可以获得。按钮的高度由 buttonHeight 属性决定。除此之外还有视图之间的空隙,大部分都是小的空隙,Cancel 按钮上下都是大空隙。我将大小空隙的高度分别『钦定』为 8point 和 0.5point,并没提供属性用于个性化。其实这里叫『空隙』不准确,应该是『隔板(Separator)』,因为我在控件之间加了透明的 UIView,它可以根据需求变换背景颜色。
setupLayout 方法的主要流程如下(忽略创建和添加 Separator):
- 根据
title和message属性依次为titleLabel和messageLabel创建实例,并添加到容器中(actionContainer.header),计算frame。 - 处理调用者传入的
customView,添加到容器中(actionContainer.custom),计算customView的frame。 - 遍历
buttons数组向容器中(actionContainer)添加按钮,计算按钮的frame,并根据按钮样式调整文字颜色和 Separator 高度。 - 根据
offsetY属性计算容器下方需要『空』出来的高度。offsetY为 ActionSheet 下方的 y 轴位移,向下为正,非负值无效,默认值为 -8。最后计算容器的frame。
这部分的计算略复杂,只是阐述下思想。但这还不是最复杂的部分。
setupStyle
此方法主要是设置风格,比如毛玻璃效果、圆角和颜色等,依赖于 setupLayout 的结果。
微信的样式是整个容器背景全带毛玻璃效果,且没有圆角;系统样式中 iOS9 和 iOS8 只有按钮和标题部分带毛玻璃效果,其余地方镂空透明的,且 iOS9 的圆角更大些。iOS7 没有毛玻璃效果。TBActionSheet 有几个属性用来调节这些参数:
backgroundTransparentEnabled是否让 ActionSheet 背景透明(镂空)blurEffectEnabled是否启用毛玻璃效果rectCornerRadius矩形圆角半径ambientColorActionSheet 的环境色
BlurEffect & Separator
UIVisualEffectView 只支持 iOS8+,为了兼容 iOS7 及更低版本,我的策略是将屏幕上容器区域矩形进行截图,并做三次 Box 模糊处理,并将图片设置为容器的图片(但愿你还记得它们都是 UIImageView),模拟毛玻璃效果。苹果在 WWDC2013 给出了开源实现,使用的是 CI 框架的 Box 模糊函数,效率比高斯模糊要高:ios_uiimageeffects.zip。针对容器镂空的情况,不能将容器矩形整体截图,需要将非镂空控件的每一部分单独截图并做模糊处理,然后将处理好的图片设置为控件的图片(因为容器中的控件都是 UIImageView 或 UIButton,不包含 Separator)。而使用 UIVisualEffectView 的时候也同样遵循这个道理。 UIVisualEffectView 的优点是针对变化的背景可以实时渲染出毛玻璃效果,而截图手动 Box 模糊就做不到这点;缺点是除非使用 UIVisualEffectView 的私有接口否则不能调节模糊半径,而 CI 框架提供的函数可以做到。
也就是说这里需要做两个判断:
- 毛玻璃效果策略:iOS8+ 用
UIVisualEffectView;否则用截图和 Box 模糊;如果不开启毛玻璃效果则使用半透明(alpha=0.5)的背景色(ambientColor) - ActionSheet 背景是否镂空:不镂空则对容器矩形整体截图,镂空则只对容器内的控件(
header,custom和按钮)矩形截图。
因为 iOS7 下的毛玻璃效果使用的是截图,所以需要在设备屏幕旋转时刷新下 UI,再次调用 setupStyle 方法。需要覆写 TBActionSheetController 中下面的方法:
- (void)didRotateFromInterfaceOrientation:(UIInterfaceOrientation)fromInterfaceOrientation
{
    if (self.actionSheet.blurEffectEnabled && !kiOS8Later) {
        [self.actionSheet setupStyle];
    }
    }
截屏
截屏就是在屏幕上的进行截图,表面上看上去很简单,但实践的时候也会碰到坑。首先我要截取的肯定是 ActionSheet 出现之前的屏幕,所以之前提到过的 previousKeyWindow 属性就又派上用场了,它是 ActionSheet 展现前的窗口,通过它可以获取到最顶层的控制器,然后获取控制器管理的 view,接着就是用 UIKit 那套函数截图。这里需要区分下 iOS6 和 iOS7+ 渲染视图层级要调用不同的接口,并注意一个仅仅发生在 iOS7 上的 crash:如果截屏区域的长或宽过小时将会引发 crash,这是 iOS7 系统的 bug。
 *  从区域截屏 * *  @param aRect 区域 *  @param view  截取的 view * *  @return  截取的图片 */
- (UIImage *)screenShotRect:(CGRect)aRect
{
    UIViewController *topController = [self.previousKeyWindow currentViewController];
    UIView *view = topController.view;
    UIGraphicsBeginImageContext(view.bounds.size);
    if ([view respondsToSelector:@selector(drawViewHierarchyInRect:afterScreenUpdates:)]) {
        const CGFloat crashMagicNumber = 0.3;
        if (view.frame.size.width >= crashMagicNumber && view.frame.size.height >= crashMagicNumber ) {
            [view drawViewHierarchyInRect:self.bounds afterScreenUpdates:YES];
        }
    }
    else {
        [view.layer renderInContext:UIGraphicsGetCurrentContext()];
    }
    UIImage *screenshotimage = UIGraphicsGetImageFromCurrentImageContext();
    UIGraphicsEndImageContext();
    return [self cutFromImage:screenshotimage inRect:aRect];
    }
在图片中截取图片时需要注意 Retina 屏幕的 scale 问题,区分『坐标点』与『像素点』就好。还有要注意如果截图矩形 rect 如果超出了图片 image 范围,超出的那部分会是透明的。
 *  从图片中切图 * *  @param image 要被切的图片 *  @param rect  这里可以设置想要截图的区域 * *  @return 截图 */
- (UIImage *)cutFromImage:(UIImage *)image inRect:(CGRect) rect
{
    CGImageRef imageRef = image.CGImage;
    CGRect transRect = CGRectMake(rect.origin.x*image.scale, rect.origin.y*image.scale, rect.size.width*image.scale, rect.size.height*image.scale);
    CGImageRef imageRefRect =CGImageCreateWithImageInRect(imageRef, transRect);
    UIImage *sendImage = [[UIImage alloc] initWithCGImage:imageRefRect scale:image.scale orientation:UIImageOrientationUp];
    NSData *imageViewData = UIImagePNGRepresentation(sendImage);
    CGImageRelease(imageRefRect);
    return [UIImage imageWithData:imageViewData];
    }
ambientColor
环境色其实就是容器的背景颜色,但不能叫 backgroundColor,因为 UIView 中已经有个 backgroundColor 属性了,如果我们自己强制声明重名的属性会导致奇怪的问题。比如设置好的背景色在程序运行中自动被设成其他颜色(一般是黑色),而且是随机出现的,而且一旦出现就会一直复现,除非杀进程。PS:别问我为啥知道这么多,都是泪啊!用在公司项目中被测试同学提过好多次 bug!
回归正题!如何将环境色加入到容器中呢?毕竟有多种情况,但其思想跟毛玻璃模糊的思路差不多:
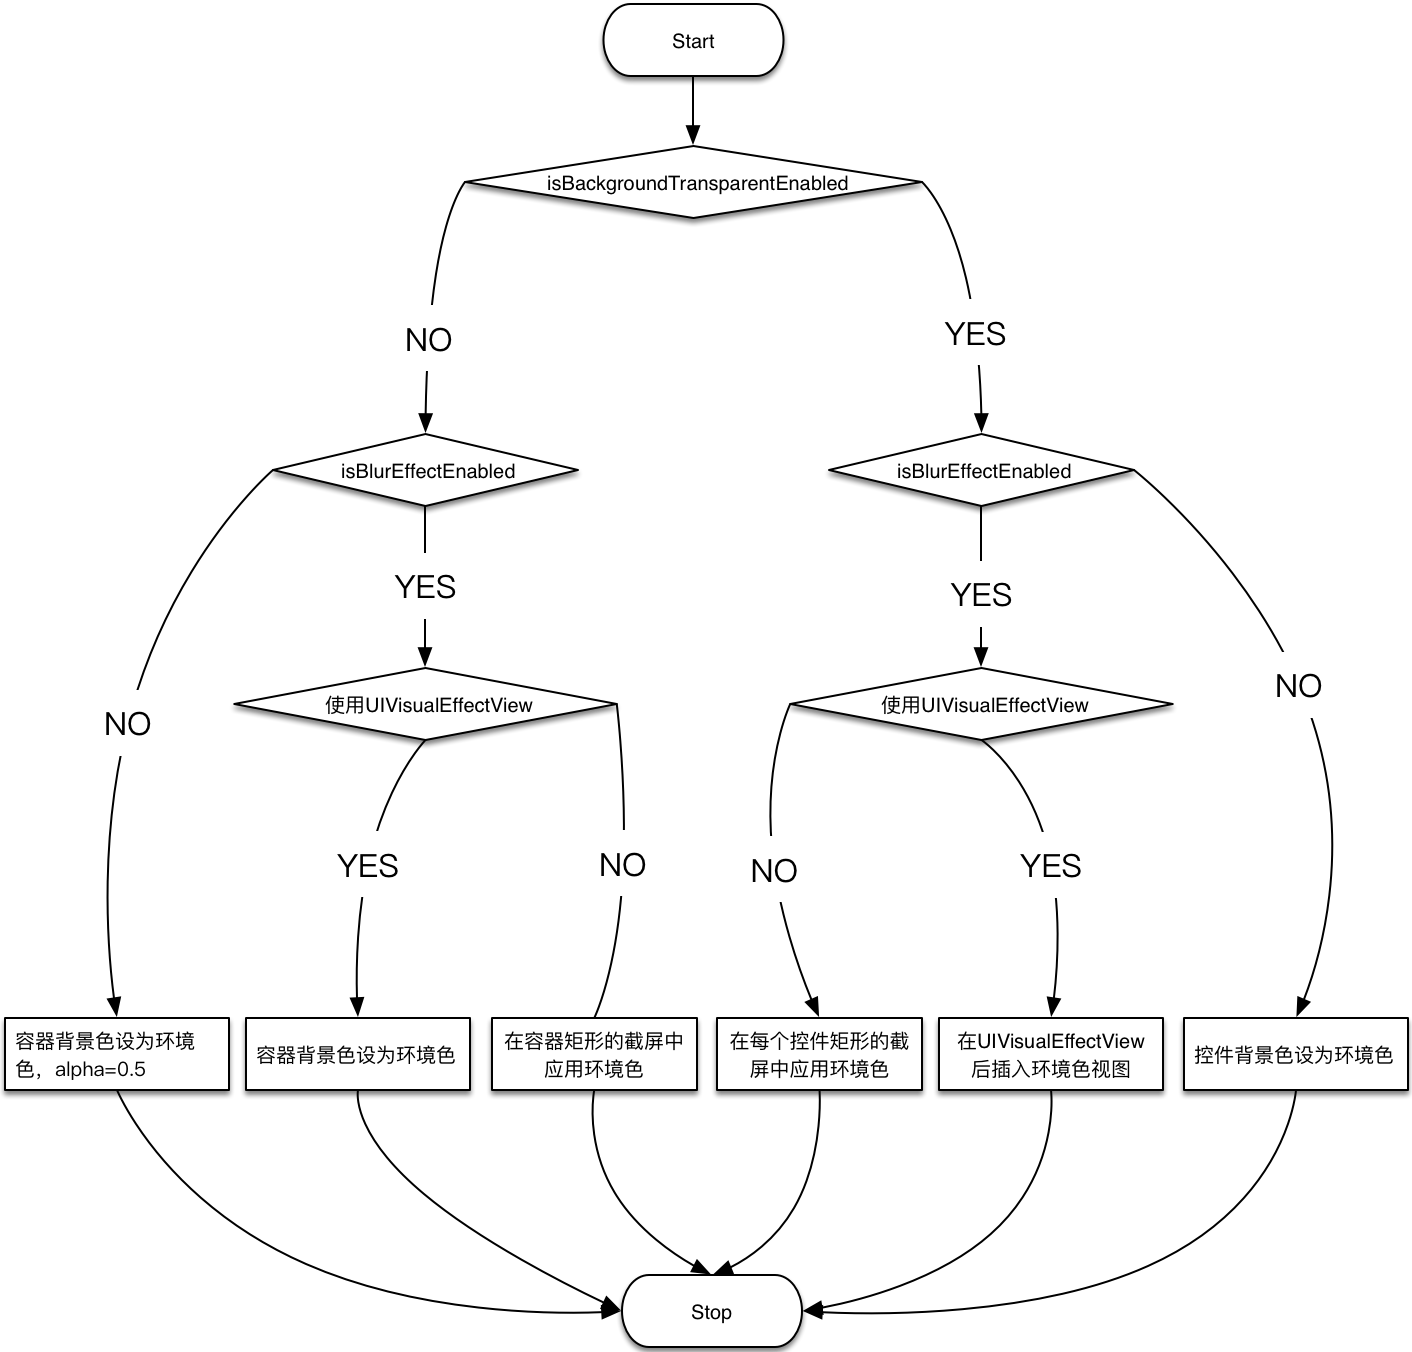
值得一提的是在倒数第二个分支『在 UIVisualEffectView 后插入环境色视图』。是在控件的后面插入
UIVisualEffectView 后再插入一层背景颜色为 ambientColor 的 UIView。如果控件类型为 TBActionButton,那么需要将其 behindColorView 属性设为背景色为 ambientColor 的 UIView 对象。原因是按钮此时无背景色,高亮状态需要调节 behindColorView 的 alpha。
这部分的代码逻辑其实略复杂,但还不是最烧脑的。
Separator
在 setupLayout 中创建的 Separator 都会添加到 separators 数组中,并作为容器的子视图参与 UI 绘制:
- (void)addSeparatorLineAt:(CGPoint) point isBigFragment:(BOOL) isBigFragment{
    UIView *separatorLine = [[UIView alloc] initWithFrame:CGRectMake(point.x, point.y, self.sheetWidth, isBigFragment?bigFragment:smallFragment)];    separatorLine.backgroundColor = self.separatorColor;    [self.actionContainer addSubview:separatorLine];    [self.separators addObject:separatorLine];}
Separator 只是个普通的 UIView,可以透明也可以有颜色,这取决于调用者的口味。微信样式中按钮之间是有些深色的,可以通过 separatorColor 属性来设置这个颜色。Separator 的两种尺寸之前提到过,BigFragment 为 8point,位于 Cancel 按钮上下,即使 Cancel 按钮在中间,也可以应付自如。
RectCorner
圆角的实现不复杂,但是判断哪里需要处理成圆角很复杂:哪个 UIView 的哪个角需要处理成圆角
我写了个 UIView (TBRectCorner) 类别方便加圆角,原理是用贝塞尔曲线的 bezierPathWithRoundedRect:byRoundingCorners:cornerRadii: 方法绘制圆角矩形路径 maskPath,然后将其 CGPath 作为 layer.mask 的路径。用贝塞尔曲线的优点就是可以针对矩形某个单独的角做圆角,而这正是我需要的。我在 UIView (TBRectCorner) 中以关联对象的方式加了个 tbRectCorner 属性,用于标记圆角类型(TBRectCorner)。ActionSheet 中的控件一共有四种圆角类型:顶部圆角、底部圆角、全圆角和无圆角。
typedef NS_OPTIONS(NSUInteger, TBRectCorner) {
    TBRectCornerTop = 1 << 0,
    TBRectCornerBottom = 1 << 1,
    TBRectCornerNone = 0,
    TBRectCornerAll = TBRectCornerTop|TBRectCornerBottom,
    };
@interface UIView (TBRectCorner)
@property (nonatomic,assign) TBRectCorner tbRectCorner;
- (void)setCornerRadius:(CGFloat) radius;
@end
而判断哪里需要圆角的过程就复杂了,用到了大量的 if-else 判断来修改 tbRectCorner 属性。这项工作复杂的原因就在于其布局不确定性,加圆角的规则如下:
- 整个容器的边缘都有圆角。容器内部 Separator 为 BigFragment 的上下边缘都有圆角。(Cancel 按钮上下的 Separator 都为 BigFragment)
title和message如果都为nil,也就是容器的header无内容,则容器顶部圆角加在custom顶部。- 如果传入的
customView为nil,则容器的custom无内容,则容器顶部圆角加在第一个按钮顶部。 - 容器底部圆角加在最后一个按钮底部。
具体实现代码就不贴了,分散在 setupStyle 方法的多个位置。
setupContainerFrame
show 方法中的动画会将整个容器从屏幕外右下至上滑动至屏幕底部,动画的终点就是容器最终的 frame。在计算纵坐标时需要考虑到 iOS7 的状态栏的高度:
- (void)setupContainerFrame
{
    self.actionContainer.frame = CGRectMake(kContainerLeft, kScreenHeight - self.actionContainer.frame.size.height - (!kiOS7Later? 20: 0), self.actionContainer.frame.size.width, self.actionContainer.frame.size.height);
    }
除此之外还用到了几个自定义的宏,都是为了简化代码的:
#define kScreenWidth [UIScreen mainScreen].bounds.size.width
#define kScreenHeight [UIScreen mainScreen].bounds.size.height
#define kContainerLeft ((kScreenWidth - self.sheetWidth)/2)
动画
从 iOS7 开始 UIKit 支持了 Spring 动画,有趣的是 SpriteKit 和 UIDynamic 也是在 iOS7 新加入的。我猜其底层实现应该是公用的。
我只是简单的支持了弹簧动画,添加了几个属性作为动画参数而已。可能今后会丰富下动画种类,或是提供接口,让调用者传入自定义的动画。
目前调节动画的参数有三个属性:animationDuration,animationDampingRatio 和 animationVelocity。
close & buttonTapped
用户点击背景或者按钮时,ActionSheet 会执行消失动画,并伴随着 delegate 的一些回调或是执行 block。这两个方法的实现差不多,仅以 buttonTapped 为例讲解一下。
- (void)buttonTapped:(TBActionButton *)sender
{
    if (![self isVisible]) {
        return;
    }
    NSUInteger index = [self.buttons indexOfObject:sender];
    [UIView animateWithDuration:self.animationDuration delay:0 options:UIViewAnimationOptionCurveEaseInOut animations:^{
        self.background.backgroundColor = [UIColor colorWithWhite:0 alpha:0];
        self.actionContainer.frame = CGRectMake(kContainerLeft, kScreenHeight, self.actionContainer.frame.size.width, self.actionContainer.frame.size.height);
    } completion:^(BOOL finished) {
        if ([self.delegate respondsToSelector:@selector(actionSheet:willDismissWithButtonIndex:)]) {
            [self.delegate actionSheet:self willDismissWithButtonIndex:index];
        }
        self.window.rootViewController = nil;
        [self.previousKeyWindow makeKeyAndVisible];
        if ([self.delegate respondsToSelector:@selector(actionSheet:clickedButtonAtIndex:)]) {
            [self.delegate actionSheet:self clickedButtonAtIndex:index];
        }
        if (sender.handler) {
            __weak __typeof(TBActionButton *)weakSender = sender;
            sender.handler(weakSender);
        }
        if ([self.delegate respondsToSelector:@selector(actionSheet:didDismissWithButtonIndex:)]) {
            [self.delegate actionSheet:self didDismissWithButtonIndex:index];
        }
        self.visible = NO;
    }];
    }
动画就不多说了,基本就是 show 方法中动画的逆动画。其余还有很多 delegate 回调,注意调用的顺序需要还原 UIActionSheet 的调用顺序,也不必多说。针对带有 block 的按钮,执行 block 时要避免内存泄露:
__weak __typeof(TBActionButton *)weakSender = sender;
sender.handler(weakSender);
还有就是处理 UIWindow 的切换和释放 rootViewController:
self.window.rootViewController = nil;
[self.previousKeyWindow makeKeyAndVisible];
只要调用方不再对 ActionSheet 有强引用,window 就会被释放,不会造成内存泄露。
一些细节
Marco
项目中用到了一些 UIKit 自带的宏,其实它们好多都是使用 __attribute__ 的偷懒方式,目的是告诉编译器一些事情。
UI_APPEARANCE_SELECTOR
在声明属性的时候,考虑到方便一个应用内控件的统一风格,使用到了 UI_APPEARANCE_SELECTOR 宏。在 iOS8 之前 UIAppearance 不支持 BOOL 类型,需要用 NSInteger 替代。所有声明带有 UI_APPEARANCE_SELECTOR 的属性都在 initialize 初始化:
+ (void)initialize
{
    if (self != [TBActionSheet class]) {
        return
    }
    TBActionSheet *appearance = [self appearance]
    appearance.buttonHeight = 56
    appearance.offsetY = - bigFragment;    appearance.tintColor = [UIColor blackColor];    appearance.destructiveButtonColor = [UIColor redColor]
    appearance.cancelButtonColor = [UIColor blackColor];    appearance.sheetWidth = MIN(kScreenWidth, kScreenHeight) - 20
    appearance.backgroundTransparentEnabled = YES
    appearance.backgroundTouchClosureEnabled = YES
    appearance.blurEffectEnabled = YES
    appearance.rectCornerRadius = 10
    appearance.ambientColor = [UIColor colorWithWhite:1 alpha:0.65]
    appearance.separatorColor = [UIColor clearColor]
    appearance.animationDuration = 0.2
    appearance.animationDampingRatio = 1
    appearance.animationVelocity = 1
    appearance.supportedInterfaceOrientations = UIInterfaceOrientationMaskAll
    }
当然我是不建议调用者直接在这里改源码来配置个性化的 ActionSheet ,而是应该使用 UIAppearance 在外部进行配置,或是针对某个实例的属性做修改。
UI_APPEARANCE_SELECTOR 的定义如下:
__attribute__((annotate("ui_appearance_selector")))
有时候自己创建了一个类,但是想禁用一些从父类继承来的方法,就可以使用 NS_UNAVAILABLE 宏。比如在 TBActionSheet 类中我禁用了这个初始化方法:
- (instancetype)initWithFrame:(CGRect)frame NS_UNAVAILABLE;
NS_UNAVAILABLE 其实有一些替代者,从下面的宏定义可以看出:
#define NS_UNAVAILABLE UNAVAILABLE_ATTRIBUTE
#define UNAVAILABLE_ATTRIBUTE __attribute__((unavailable))
#define __unavailable	__attribute__((unavailable))
然而上面的这些宏都是不含提示信息的,想要带提示信息还是老老实实写 __attribute__ 吧。下面是 TBActionContainer 的初始化方法声明:
- (instancetype)initWithSheet:(TBActionSheet *)actionSheet;
- (instancetype)initWithFrame:(CGRect)frame __attribute__((unavailable("initWithFrame: not available, please use initWithSheet:")));
- (instancetype)init __attribute__((unavailable("init not available, please use initWithSheet:")));
NS_ASSUME_NONNULL_BEGIN(_END)
llvm 6.1 为 Objective-C 加入了 Nullability 的新特性后,头文件们一个个都更啰嗦了。可以默认一段代码的属性或参数为非空,针对可能为空的则用 nullable 修饰。但我们声明的大部分属性或者方法参数都是非空的,大量的 nonnull 会降低可读性,所以苹果提供了 Audited Regions 宏,也就是 NS_ASSUME_NONNULL_BEGIN 和 NS_ASSUME_NONNULL_END。在头文件中这对儿宏之间区域的代码都会被审查,指针都会被默认为是 nonnull。TBActionSheet 适配了 Nullability 特性,更多内容可以参考官方的Nullability and Objective-C。
动态配置
iOS 系统的 UIActionSheet 在展现后就不能做修改了,而我的 TBActionSheet 可以做到实时动态更新,比如动态添加按钮:

在动态配置 TBActionSheet 的属性后必须调用以下方法刷新 UI:
[self.actionSheet setupLayout]
[self.actionSheet setupStyle]
[self.actionSheet setupContainerFrame]
为了实现动态配置,需要有一个还原机制来清理之前的状态。比如容器内有很多子视图,诸如那些 Separator 和 UIVisualEffectView 对象都是一次性使用的,在布局发生变化后必须清理掉它们,并重新生成一遍。容器内这些没有存储数据的视图都是没必要重用的,只需要清理掉重新创建一遍即可。这样虽然可能会带来性能问题,不过考虑到按钮的数量毕竟有限,所以这些一次性的视图数量并不多。而且重用它们需要修改它们的 frame,需要单独花精力管理它们,带来的成本更大。有时简单粗暴点更好,毕竟动态配置这种场景不多。
还有就是一些视图背景颜色的还原,每次设置前先将其设为 nil。
属性
UIActionSheet 中除了 UIActionSheetStyle actionSheetStyle 属性,其余属性都已实现。因为 TBActionSheet 的样式可高度个性化定制,所以不再需要 UIActionSheetStyle 这种枚举了。可以说 TBActionSheet 在属性上依然『几乎』是 UIActionSheet 的超集。
TBActionSheet 的属性实在是太多了,因为它完全是手撸的,太灵活了。但总结起来无非就是『尺寸』、『样式』、『状态』、『内容』、『标记』和『动画&朝向』这几大类。
尺寸
 *  按钮高度 */
@property(nonatomic) CGFloat buttonHeight UI_APPEARANCE_SELECTOR;
 *  actionsheet下方的 y 轴位移,向下为正,非负值无效,默认值为 -8 */
 @property(nonatomic) CGFloat offsetY UI_APPEARANCE_SELECTOR;
 *  sheet 的宽度,也就是按钮宽度 */
 @property(nonatomic) CGFloat sheetWidth UI_APPEARANCE_SELECTOR;
 *  矩形圆角半径 */
 @property(nonatomic,assign) CGFloat rectCornerRadius UI_APPEARANCE_SELECTOR;
样式
 *  文字颜色 */
@property(nonatomic,strong) UIColor *tintColor UI_APPEARANCE_SELECTOR;
 *  Destructive 按钮文字颜色 */
 @property(nonatomic,strong) UIColor *destructiveButtonColor UI_APPEARANCE_SELECTOR;
 *  Cancel 按钮文字颜色 */
 @property(nonatomic,strong) UIColor *cancelButtonColor UI_APPEARANCE_SELECTOR;
 *  分割线颜色 */
 @property(nonatomic,strong) UIColor *separatorColor UI_APPEARANCE_SELECTOR;
 *  按钮字体 */
 @property(nonatomic,strong) UIFont *buttonFont UI_APPEARANCE_SELECTOR;
 *  ActionSheet 的环境色 */
 @property(nonatomic,strong) UIColor *ambientColor UI_APPEARANCE_SELECTOR;
状态
 *  是否可见 */
@property(nonatomic,readonly,getter=isVisible) BOOL visible;
 *  是否让 ActionSheet 背景透明 */
 @property(nonatomic, getter=isBackgroundTransparentEnabled) NSInteger backgroundTransparentEnabled UI_APPEARANCE_SELECTOR;
 *  是否点击背景后关闭 ActionSheet */
 @property(nonatomic, getter=isBackgroundTouchClosureEnabled) NSInteger backgroundTouchClosureEnabled UI_APPEARANCE_SELECTOR;
 *  是否启用毛玻璃效果 */
 @property(nonatomic, getter=isBlurEffectEnabled) NSInteger blurEffectEnabled UI_APPEARANCE_SELECTOR;
内容
@property(nonatomic,copy)  NSString * _Nullable  title;
@property(nonatomic,copy)  NSString * _Nullable  message;
 *  标题 UILabel */
 @property(nonatomic,strong,nullable,readonly) UILabel *titleLabel;
 *  Message UILabel */
 @property (nonatomic,strong,nullable,readonly) UILabel *messageLabel;
 *  自定义视图 */
 @property(nonatomic,strong,nullable) UIView *customView;
标记
 *   标记藏于 ActionSheet 下面的 UIWindow */
@property (weak, nonatomic, readonly) UIWindow *previousKeyWindow;
@property(nonatomic) NSInteger cancelButtonIndex;
@property(nonatomic) NSInteger destructiveButtonIndex;
@property(nonatomic,readonly) NSInteger firstOtherButtonIndex;
动画&朝向
@property(nonatomic,readonly) NSInteger numberOfButtons;
 *  动画持续时长 */
 @property(nonatomic,assign) NSTimeInterval animationDuration UI_APPEARANCE_SELECTOR;
 *  动画弹簧效果衰弱比例,值为 1 时无摆动,值越接近 0 摆动越大 */
 @property(nonatomic,assign) CGFloat animationDampingRatio UI_APPEARANCE_SELECTOR;
 *  动画弹簧效果初速度。如果动画总距离为 200 点,想让初速度为每秒 100 点,那么将值设为 0.5 */
 @property(nonatomic,assign) CGFloat animationVelocity UI_APPEARANCE_SELECTOR;
 *  支持的朝向 */
 @property(nonatomic,assign) UIInterfaceOrientationMask supportedInterfaceOrientations UI_APPEARANCE_SELECTOR;
属性存取器
其实属性存取器并不都是必要的,很多 set 方法可以不写,毕竟所有的布局和样式都在最后的 show 方法中决定。但一些改动不大的轻量级属性修改还是可以接受的,这些属性的 set 方法实现也比较简单。动态配置需要再次调用 setupLayout、setupStyle 以及 setupContainerFrame,而这些轻量级的属性修改则可立即生效,无需再调用那三个方法。
按钮字体的存取器建立在对 buttons 数组的遍历上:
- (void)setButtonFont:(UIFont *)buttonFont{
     (buttonFont && [self buttonFont] != buttonFont) {
        for (TBActionButton *btn in self.buttons) {
            btn.titleLabel.font = buttonFont;        }
    }
    }
- (UIFont *)buttonFont{
    return self.buttons.lastObject.titleLabel.font;}
firstOtherButtonIndex 是只读属性,它也是遍历 buttons 数组,知道找到第一个 Default 风格的按钮:
- (NSInteger)firstOtherButtonIndex
{
    for (int i=0; i
        if (self.buttons[i].style==TBActionButtonStyleDefault) {
            return i;
        }
    }
    return -1;
    }
Separator 的颜色修改需要更新 separators 数组所有的元素:
- (void)setSeparatorColor:(UIColor *)separatorColor
{
    if (separatorColor && separatorColor != _separatorColor) {
        _separatorColor = separatorColor;
        for (UIView *separator in self.separators) {
            separator.backgroundColor = separatorColor;
        }
    }
    }
ActionSheet 是否可见,取决于窗口及控制器是否存在:
- (BOOL)isVisible
{
    return !!self.window && self.window.rootViewController;
    }
backgroundTouchClosureEnabled 的更新需要同步到背景 userInteractionEnabled 属性:
- (void)setBackgroundTouchClosureEnabled:(NSInteger)backgroundTouchClosureEnabled{
    _backgroundTouchClosureEnabled = backgroundTouchClosureEnabled;    self.background.userInteractionEnabled = backgroundTouchClosureEnabled;}
后记
我也没想到一个简简单单的 ActionSheet 也会写的这么复杂,早知道会这样我真的不敢下手。以至于写完后还没测试就用在了公司的项目中,各种爆 Bug 然后 Debug。同事们各种提意见然后我再去完善。第一次线上版本全部替换成 TBActionSheet 后出了 Bug,这真的是实习生干的 23333 这锅我背了!
其实写这个轮子是留下了很多遗憾和不足的:
- 一开始觉得布局很简单,无非就是几个 Button 啊 Label 啊,所以没用自动布局。后面功能越来越多布局开始变得复杂,需要大量计算,想想真是后悔。但再往后动态配置和个性化程度大大提升,发现已经复杂到不适合用自动布局,不知是否有些心安
- 系统控件的实现是用
UITableView或UICollectionView来实现的,在长按按钮滑动选择的时候,TBActionSheet就做不到系统控件那样了。如果重写的话一定要用 Table 啊 - 属性名几经修改,接口也有小幅度修改,功能强大但也已经臃肿
- 没能做到全功能适配 iOS7,或许是自己太懒了。其实有写过二维变换模拟系统的旋转动画,并进行了复杂的数学坐标推导出变换公式,最后觉得还是效果不满意,并投入太多精力,遂放弃
- 当时因为业务忙,写的代码真是乱,现在还在一点点整理。。。说啥都是借口!
其实一开始我也想当把标题党,把文章标题写成『这可能是东半球最牛逼的 ActionSheet』,想想还是算了。我从不求 star 从不求转发,踏实点好😄。
因为写得比较匆忙,逻辑比较复杂的地方可能描述不清,还请大神们多多提建议和指正。更希望能看到有建设性的 PR,一起将其完善。
