Spring Boot 学习笔记(三) 整合 MyBatis + Druid
- Spring Boot 学习笔记 源码地址
- Spring Boot 学习笔记(一) hello world
- Spring Boot 学习笔记(二) 整合 log4j2
- Spring Boot 学习笔记(三) 整合 MyBatis + Druid
0. 环境说明
- MyBatis Generator 1.3.6
- MySQL 5.7.17
- 驱动:mysql-connector-java-5.1.2.jar
1. MyBatis Generator
MyBatis Generator是一款在使用mybatis框架时,自动生成model,dao和mapper的工具,很大程度上减少了业务开发人员的手动编码时间。
我们将使用这个工具自动化的构建 MVC 框架中 M 层所需要的东西。
2. 创建本地数据库
在本地的数据库中创建一张表
1# 创建数据库
2CREATE DATABASE LEARNING CHARACTER SET utf8;
3
4USE LEARNING;
5
6# 创建表结构
7CREATE TABLE ACCOUNT_INFO(
8    ACCOUNT_ID INTEGER PRIMARY KEY AUTO_INCREMENT,
9    NAME VARCHAR(50),
10    PWD VARCHAR(50),
11    BALANCE INTEGER
12);
13
14# 插入一条数据
15INSERT INTO ACCOUNT_INFO VALUES(NULL,'root','root',100);
3. 使用MyBatis Generator
下载地址:
如果你是Windows用户,下载mysql-connector的时候可以选择 Platform Independent 版本
将下载好的MySQL驱动jar包放到generator的lib目录下,
确保mybatis-generator-core-1.3.6.jar和mysql-connector-java-5.1.2.jar在同一个目录下。
准备一个 configuration.xml 的配置文件,内容如下:
1<?xml version="1.0" encoding="UTF-8"?>
2<!DOCTYPE generatorConfiguration
3  PUBLIC "-//mybatis.org//DTD MyBatis Generator Configuration 1.0//EN"
4  "http://mybatis.org/dtd/mybatis-generator-config_1_0.dtd">
5
6<generatorConfiguration>
7     <!-- 配置驱动jar包路径.用了相对路径 -->
8    <classPathEntry location="mysql-connector-java-5.1.2.jar" />
9
10    <context id="DB2Tables" targetRuntime="MyBatis3">
11        <!-- 为了防止生成的代码中有很多注释,比较难看,加入下面的配置控制 -->
12        <commentGenerator>
13            <property name="suppressDate" value="true" />
14            <property name="suppressAllComments" value="true" />
15        </commentGenerator>
16         <!-- 数据库连接 -->
17        <jdbcConnection driverClass="com.mysql.jdbc.Driver"
18            connectionURL="jdbc:mysql://localhost/LEARNING" userId="root"
19            password="********">
20            <property name="remarks" value="true" />
21        </jdbcConnection>
22
23        <javaTypeResolver>
24            <property name="forceBigDecimals" value="false" />
25        </javaTypeResolver>
26        <!-- 数据表对应的model 层  -->
27        <javaModelGenerator targetPackage="com.zdran.springboot.dao"
28            targetProject="D:\bxwzh">
29            <property name="enableSubPackages" value="true" />
30        </javaModelGenerator>
31        <!-- sql mapper 隐射配置文件 -->
32        <sqlMapGenerator targetPackage="com.zdran.springboot.mapping"
33            targetProject="D:\bxwzh">
34            <property name="enableSubPackages" value="true" />
35        </sqlMapGenerator>
36        <!-- 在ibatis2 中是dao层,但在mybatis3中,其实就是mapper接口 -->
37        <javaClientGenerator type="XMLMAPPER"
38            targetPackage="com.zdran.springboot.mapper" targetProject="D:\bxwzh">
39            <property name="enableSubPackages" value="true" />
40        </javaClientGenerator>
41
42    <!-- 要对哪些数据表进行生成操作,必须要有一个. -->
43    <table tableName="ACCOUNT_INFO" domainObjectName="AccountInfo"></table>
44    </context>
45</generatorConfiguration>
注意:数据库的密码需要换成你自己的。targetProject=”D:\bxwzh,这个目录尽量是空文件夹
在 generator 的lib目录下执行下面的命令:
1java -jar mybatis-generator-core-1.3.6.jar -configfile configuration.xml  -overwrite
2
3出现:MyBatis Generator finished successfully. 就说明成功了。
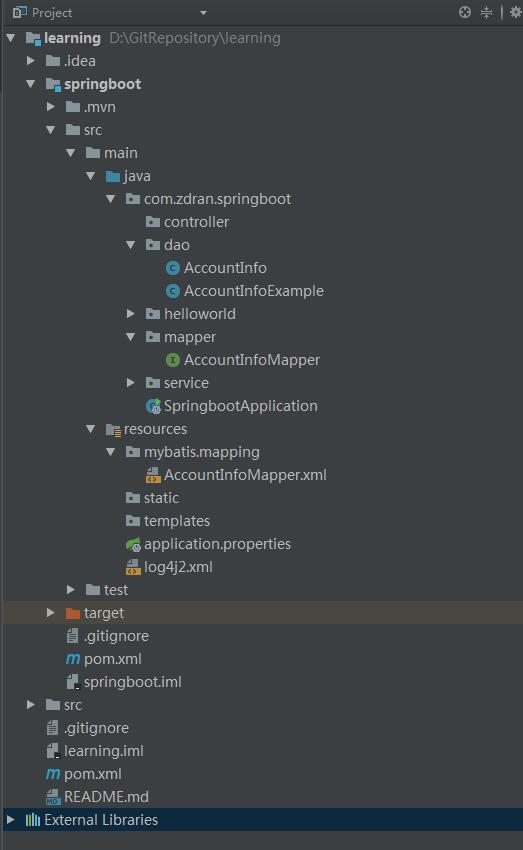
我们直接将com目录拷贝到项目目录下面去
在resources 新建 mybaits 目录,然后将 mapping 文件夹移动到 mybaits 下
现在我们的项目结构是下面这样的:

添加 mybaits依赖:
1<!--springBoot和mybatis继承-->
2<dependency>
3    <groupId>org.mybatis.spring.boot</groupId>
4    <artifactId>mybatis-spring-boot-starter</artifactId>
5    <version>1.3.2</version>
6    <!-- 移除 logging -->
7    <exclusions>
8        <exclusion>
9            <groupId>org.springframework.boot</groupId>
10            <artifactId>spring-boot-starter-logging</artifactId>
11        </exclusion>
12    </exclusions>
13</dependency>
14<!-- mysql 驱动-->
15<dependency>
16    <groupId>mysql</groupId>
17    <artifactId>mysql-connector-java</artifactId>
18    <version>5.1.2</version>
19</dependency>
4. 添加MyBatis的配置
在配置文件里添加下面的配置:
1mybatis:
2  mapperLocations: classpath:mybatis/mapping/*.xml
3  typeAliasesPackage: com.zdran.springboot.dao
4
5spring:
6    datasource:
7        name: test
8        url: jdbc:mysql://localhost:3306/LEARNING
9        username: root
10        password: ********
11        driver-class-name: com.mysql.jdbc.Driver
5. 测试一下
在 SpringbootApplication 类上面添加包的扫描路径
1
2/**
3 * 启动程序
4 * Create by zdRan on 2018/6/28
5 *
6 * @author cm.zdran@gmail.com
7 */
8@SpringBootApplication
9@MapperScan(basePackages = "com.zdran.springboot.mapper")
10public class SpringbootApplication {
11
12    public static void main(String[] args) {
13        SpringApplication.run(SpringbootApplication.class, args);
14    }
15}
16
下面我们实现一个根据姓名查询账号信息的接口。创建对应的controller、service等
Service 层的实现:
1/**
2 * Create by ranzd on 2018/7/2
3 *
4 * @author cm.zdran@gmail.com
5 */
6@Service
7public class AccountServiceImpl implements AccountService {
8    @Autowired
9    AccountInfoMapper accountInfoMapper;
10
11    @Override
12    public AccountInfo queryByName(String name) {
13        AccountInfoExample example = new AccountInfoExample();
14        example.createCriteria().andNameEqualTo(name);
15        List<AccountInfo> accountInfoList = accountInfoMapper.selectByExample(example);
16        if (accountInfoList != null && accountInfoList.size() != 0) {
17            return accountInfoList.get(0);
18        }
19        return null;
20    }
21}
Controller层的实现:
1/**
2 * Create by ranzd on 2018/7/3
3 *
4 * @author cm.zdran@gmail.com
5 */
6@RestController
7@RequestMapping("/account")
8public class AccountController {
9    private Logger logger = LoggerFactory.getLogger(AccountController.class);
10
11    @Autowired
12    AccountService accountService;
13
14    @GetMapping("/get/{name}")
15    public AccountInfo getAccountByName(@PathVariable String name) {
16        logger.info("根据姓名获取账号信息。入参:name:{}", name);
17        AccountInfo accountInfo = accountService.queryByName(name);
18        if (accountInfo == null) {
19            logger.info("根据姓名获取账号信息。获取失败");
20        }
21        logger.info("根据姓名获取账号信息。出参:accountInfo:{}", accountInfo.22    [native code]
23}">toString());
24        return accountInfo;
25    }
26}
运行一下,访问 http://localhost:9090/learning/account/get/root
url最后的 root 用户名
5. 集成 druid
上面的配置方法是最简单的配置方法。还有一种常常用于生产环境的配置方法。
添加 druid 依赖
1<dependency>
2    <groupId>com.alibaba</groupId>
3    <artifactId>druid</artifactId>
4    <version>1.1.1</version>
5</dependency>
添加druid配置
1
2spring:
3    datasource:
4        url: jdbc:mysql://localhost:3306/LEARNING
5        username: root
6        password: ********
7        driver-class-name: com.mysql.jdbc.Driver
8        initialSize: 5
9        minIdle: 5
10        maxActive: 10
11        maxWait: 10000
12        timeBetweenEvictionRunsMillis: 60000
13        minEvictableIdleTimeMillis: 300000
14        testOnBorrow: false
15        testOnReturn: false
16        testWhileIdle: true
17        keepAlive: true
18        removeAbandoned: true
19        removeAbandonedTimeout: 80
20        logAbandoned: true
21        poolPreparedStatements: true
22        maxPoolPreparedStatementPerConnectionSize: 20
23        filters: stat,slf4j,wall
添加依赖,方便使用 ConfigurationProperties 注解,来读取yml里的配置信息
1<!-- 为了方便使用@ConfigurationProperties注解 -->
2<dependency>
3    <groupId>org.springframework.boot</groupId>
4    <artifactId>spring-boot-configuration-processor</artifactId>
5    <optional>true</optional>
6</dependency>
创建 druid 配置文件读取类
1/**
2 * Create by ranzd on 2018/7/3
3 *
4 * @author cm.zdran@gmail.com
5 */
6@Configuration
7@ConfigurationProperties(prefix = "spring.datasource")
8public class DruidDataSourceProperties {
9
10    private String driverClassName;
11    private String url;
12    private String username;
13    private String password;
14
15    private int initialSize;
16    private int minIdle;
17    private int maxActive;
18    private long maxWait;
19    private long timeBetweenEvictionRunsMillis;
20    private long minEvictableIdleTimeMillis;
21    private boolean testOnBorrow;
22    private boolean testOnReturn;
23    private boolean testWhileIdle;
24    private boolean keepAlive;
25    private boolean removeAbandoned;
26    private int removeAbandonedTimeout;
27    private boolean logAbandoned;
28    private boolean poolPreparedStatements;
29    private int maxPoolPreparedStatementPerConnectionSize;
30    private String filters;
31
32    //省略了所有属性的 get 、set方法
33}
34
上面的代码省略了所有属性的 get 、set方法,你的本地代码一定要有get、set方法
删除 yml 里的 mybaits 配置:
1mybatis:
2  mapperLocations: classpath:mybatis/mapping/*.xml
3  typeAliasesPackage: com.zdran.springboot.dao
4
删除 SpringbootApplication 类上面的 MapperScan 注解
1@MapperScan(basePackages = "com.zdran.springboot.mapper")创建 mybaits 的配置类:
1/**
2 * Create by ranzd on 2018/7/3
3 *
4 * @author cm.zdran@gmail.com
5 */
6@Configuration
7@EnableTransactionManagement
8@MapperScan(
9        basePackages = "com.zdran.springboot.mapper",
10        sqlSessionFactoryRef = "learningSqlSessionFactory")
11public class MyBatisConfig {
12    private Logger logger = LoggerFactory.getLogger(MyBatisConfig.class);
13
14    @Autowired
15    DruidDataSourceProperties druidDataSourceProperties;
16
17    @Bean(name = "learningSqlSessionFactory")
18    @Primary
19    public SqlSessionFactory learningSqlSessionFactory() throws Exception {
20        final SqlSessionFactoryBean sessionFactory = new SqlSessionFactoryBean();
21        sessionFactory.setDataSource(getDruidDataSource());
22        sessionFactory.setTypeAliasesPackage("com.zdran.springboot.dao");
23        sessionFactory.setMapperLocations(new PathMatchingResourcePatternResolver()
24                .getResources("classpath:/mybatis/mapping/*.xml"));
25        return sessionFactory.getObject();
26    }
27
28    @Bean(name = "learningDataSource")
29    public DataSource getDruidDataSource() {
30        DruidDataSource druidDataSource = new DruidDataSource();
31        druidDataSource.setDriverClassName(druidDataSourceProperties.getDriverClassName());
32        druidDataSource.setUrl(druidDataSourceProperties.getUrl());
33        druidDataSource.setUsername(druidDataSourceProperties.getUsername());
34        druidDataSource.setPassword(druidDataSourceProperties.getPassword());
35        druidDataSource.setInitialSize(druidDataSourceProperties.getInitialSize());
36        druidDataSource.setMinIdle(druidDataSourceProperties.getMinIdle());
37        druidDataSource.setMaxActive(druidDataSourceProperties.getMaxActive());
38        druidDataSource.setMaxWait(druidDataSourceProperties.getMaxWait());
39        druidDataSource.setTimeBetweenEvictionRunsMillis(
40            druidDataSourceProperties.getTimeBetweenEvictionRunsMillis());
41        druidDataSource.setMinEvictableIdleTimeMillis(
42            druidDataSourceProperties.getMinEvictableIdleTimeMillis());
43        druidDataSource.setTestOnBorrow(druidDataSourceProperties.isTestOnBorrow());
44        druidDataSource.setTestOnReturn(druidDataSourceProperties.isTestOnReturn());
45        druidDataSource.setTestWhileIdle(druidDataSourceProperties.isTestWhileIdle());
46        druidDataSource.setKeepAlive(druidDataSourceProperties.isKeepAlive());
47        druidDataSource.setRemoveAbandoned(druidDataSourceProperties.isRemoveAbandoned());
48        druidDataSource.setRemoveAbandonedTimeout(
49            druidDataSourceProperties.getRemoveAbandonedTimeout());
50        druidDataSource.setLogAbandoned(druidDataSourceProperties.isLogAbandoned());
51
52        druidDataSource.setPoolPreparedStatements(
53            druidDataSourceProperties.isPoolPreparedStatements());
54        druidDataSource.setMaxPoolPreparedStatementPerConnectionSize(
55            druidDataSourceProperties.getMaxPoolPreparedStatementPerConnectionSize());
56        try {
57            druidDataSource.setFilters(druidDataSourceProperties.getFilters());
58            druidDataSource.init();
59        } catch (SQLException e) {
60            logger.error("数据源初始化失败", e);
61        }
62        return druidDataSource;
63    }
64}
65
OK!重新启动测试一下刚才的接口。
转载请注明出处
本文链接:zdran.com/20180703.ht…