

阻塞队列
阻塞队列是一种队列,一种可以在多线程环境下使用,并且支持阻塞等待的队列。也就是说,阻塞队列和一般的队列的区别就在于:
- 多线程环境支持,多个线程可以安全的访问队列
- 支持生产和消费等待,多个线程之间互相配合,当队列为空的时候,消费线程会阻塞等待队列不为空;当队列满了的时候,生产线 程就会阻塞直到队列不满。
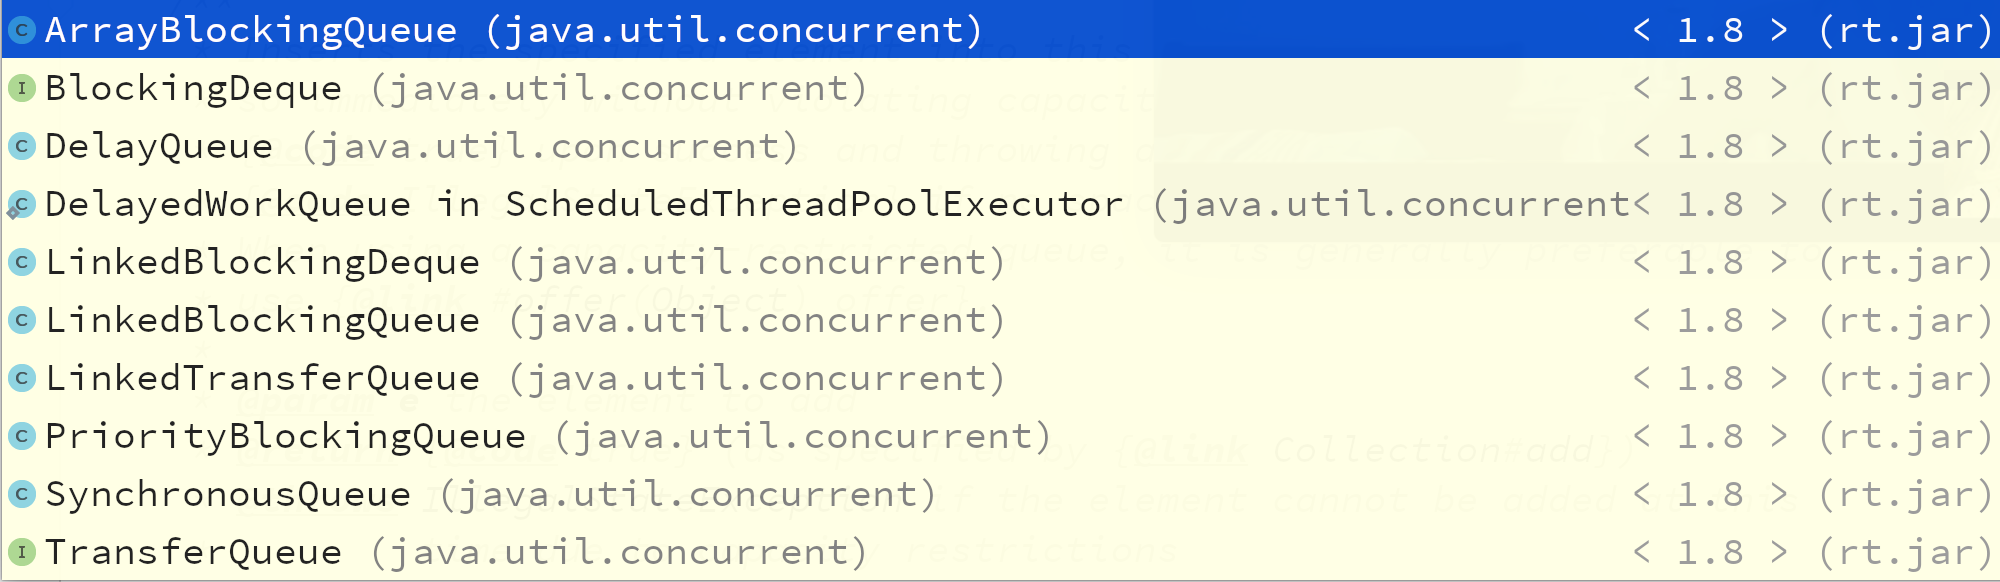
Java提供了丰富的阻塞队列,下面的类图展示了java提供的阻塞队列:
阻塞队列在java中的一种典型使用场景是线程池,在线程池中,当提交的任务不能被立即得到执行的时候,线程池就会将提交的任务放到一个阻塞的任务队列中来,比如下面的代码:
    public static ExecutorService newFixedThreadPool(int nThreads) {
        return new ThreadPoolExecutor(nThreads, nThreads,
                                      0L, TimeUnit.MILLISECONDS,
                                      new LinkedBlockingQueue<Runnable>());
    }
newFixedThreadPool使用可LinkedBlockingQueue这种阻塞队列。
    public static ExecutorService newCachedThreadPool() {
        return new ThreadPoolExecutor(0, Integer.MAX_VALUE,
                                      60L, TimeUnit.SECONDS,
                                      new SynchronousQueue<Runnable>());
    }
newFixedThreadPool使用了SynchronousQueue这种队列,这种队列的特点是不缓存数据,而是缓存线程,线程分为生产者线程和消费者线程,一个生产者线程和一个消费者线程是互补的,当一个生产者线程遇到一个消费者线程的时候就会直接进行数据交换,所以这种队列的技术点比较高,理解起来难度较大。一个线程只能缓存一个数据,当一个线程插入数据之后就会被阻塞,直到另外一个线程消费了其中的数据。
阻塞队列还提供了其他类型的队列,包括双端阻塞队列,延时阻塞队列,延时阻塞队列的使用可以在newScheduledThreadPool中找到,newScheduledThreadPool里面使用延时阻塞队列来调度周期性任务执行。
下面展示的是BlockingQueue提供的一些方法:
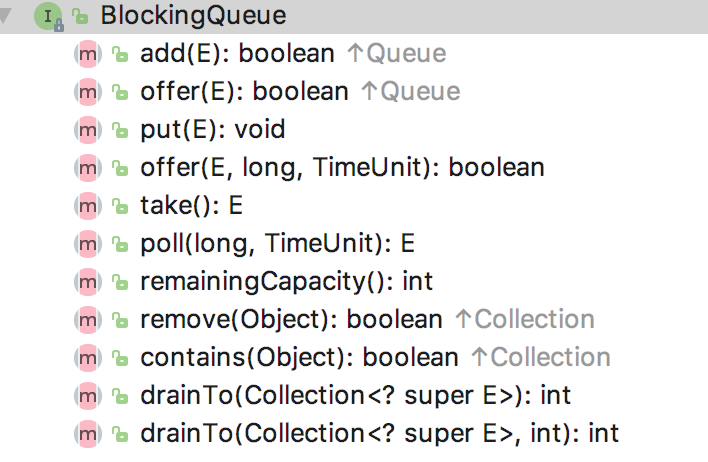
根据插入和取出两种类型的操作,具体分为下面一些类型:
| 操作类型 | Throws Exception | Special Value | Blocked | Timed out |
|---|---|---|---|---|
| 插入 | add(o) | offer(o) | put(o) | offer(o, timeout, unit) |
| 取出(删除) | remove(o) | poll() | take() | poll(timeout, unit) |
- Throws Exception 类型的插入和取出在不能立即被执行的时候就会抛出异常。
- Special Value 类型的插入和取出在不能被立即执行的情况下会返回一个特殊的值(true 或者 false)
- Blocked 类型的插入和取出操作在不能被立即执行的时候会阻塞线程直到可以操作的时候会被其他线程唤醒
- Timed out 类型的插入和取出操作在不能立即执行的时候会被阻塞一定的时候,如果在指定的时间内没有被执行,那么会返回一个特殊值
本文将对java的阻塞队列进行一些分析,分为下面几个内容进行组织:
- 介绍最为基本和最为简单的ArrayBlockingQueue和LinkedBlockingQueue,也是最常用的
- LinkedBlockingDeque,双端阻塞队列
- DelayQueue延时队列,这是一个非常有趣的阻塞队列,你同样可以参考DelayedWorkQueue的实现
- PriorityBlockingQueue优先阻塞队列,很明显这在需要多线程支持、需要优先级队列支持的场景下会被运用
- 然后是SynchronousQueue同步队列,这是最为复杂的队列(个人认为),本文将知识尝试分析,更为具体的、更为深入的分析应该阅读源码,并且阅读源码中提到的一些paper
ArrayBlockingQueue和LinkedBlockingQueue
ArrayBlockingQueue和LinkedBlockingQueue是最为常用的阻塞队列,前者使用一个有边界的数组来作为存储介质,而后者使用了一个没有边界的链表来存储数据。下面分别分析一下他们的实现细节:
ArrayBlockingQueue
ArrayBlockingQueue需要你提供数组的大小,下面是ArrayBlockingQueue提供的三个构造函数:
public ArrayBlockingQueue(int capacity): // 初始化数组大小

public ArrayBlockingQueue(int capacity, boolean fair): //初始化数组大小,并且设定是否是fire模式

public ArrayBlockingQueue(int capacity, boolean fair, Collection<? extends E> c) //初始化数组大小,设置是否是fire模式,然后使用一个集合初始化阻塞队列
在狗仔函数中有两个比较关键的参数,一个是capacity代表阻塞队列使用的数组的长度,另外一个是fair,代表阻塞队列的一种策略选择,用于构造用于线程同步的锁(ReentrantLock),关于ReentrantLock的细节不在本文的叙述范围,关于java锁的详细内容将在其他的篇章中单独学习分析。
下面展示了ArrayBlockingQueue的一些关键的成员变量:
    /** The queued items */
    final Object[] items;

    /** items index for next take, poll, peek or remove */
    int takeIndex;

    /** items index for next put, offer, or add */
    int putIndex;

    /** Number of elements in the queue */
    int count;

    /*
     * Concurrency control uses the classic two-condition algorithm
     * found in any textbook.
     */

    /** Main lock guarding all access */
    final ReentrantLock lock;

    /** Condition for waiting takes */
    private final Condition notEmpty;

    /** Condition for waiting puts */
    private final Condition notFull;
关于成员变量已经在注释里面解释了,ArrayBlockingQueue使用了ReentrantLock来做同步,使用两个Condition来做插入同步和获取同步。下面是两个重要的方法,一个用于将一个元素插入队列中去,一个用于从队列中获取一个元素,并且从队列中删除:
    private void enqueue(E x) {
        // assert lock.getHoldCount() == 1;
        // assert items[putIndex] == null;
        final Object[] items = this.items;
        items[putIndex] = x;
        if (++putIndex == items.length)
            putIndex = 0;
        count++;
        notEmpty.signal();
    }
首先,将变量放在合适的位置,然后更新索引。最为重要的是 notEmpty.signal()这句话会唤醒任意一个等待在notEmpty这个条件变量上的线程,关于signal()这个方法的描述,可以见下面的描述:
     * Wakes up one waiting thread.
     *
     * <p>If any threads are waiting on this condition then one
     * is selected for waking up. That thread must then re-acquire the
     * lock before returning from {@code await}.
那为什么需要这样做呢?notEmpty这个条件变量用于表示队列是否有数据,插入数据势必会让队列不为空,而在插入数据之前,可能会有线程已经尝试来获取数据了,那么就会等待在这个条件变量上面,那么当插入数据之后,需要唤醒这些线程,为了减少不必要的麻烦,这个条件变量在插入一个数据之后仅仅唤醒一个等待在这个条件变量上的线程。
还有一点需要注意,这个数组的使用配合了两个游标变量:takeIndex和putIndex,配合这两个变量之后数组的使用就像是一个环形队列一样了。注意,可能有人担心会有一种情况,队列满了之后没有消费线程,再次插入第一个队列的元素会被覆盖吗?这就多虑了,具体我们看下面的代码:
    public void put(E e) throws InterruptedException {
        checkNotNull(e);
        final ReentrantLock lock = this.lock;
        lock.lockInterruptibly();
        try {
            while (count == items.length)
                notFull.await();
            enqueue(e);
        } finally {
            lock.unlock();
        }
    }
上面的代码展示了put操作的细节,可以很明显的看到,当数组中的元素数量达到设定的容量之后就会在notFull这个条件变量上等待,而不会再次调用enqueue这个方法来插入,所以不会出现上面的那种情况。
       private E dequeue() {
        // assert lock.getHoldCount() == 1;
        // assert items[takeIndex] != null;
        final Object[] items = this.items;
        @SuppressWarnings("unchecked")
        E x = (E) items[takeIndex];
        items[takeIndex] = null;
        if (++takeIndex == items.length)
            takeIndex = 0;
        count--;
        if (itrs != null)
            itrs.elementDequeued();
        notFull.signal();
        return x;
    }
上面的代码展示了获取一个队列元素的方法细节。依然需要关注的是notFull.signal(),这句话的意思是:唤醒一个等待在notFull这个条件变量上的线程。具体的语义是什么呢?就是,有可能有线程在进行插入操作的时候会发现队列被用完了,那么就会阻塞到notFull这个条件变量上,当某个线程获取了一个元素之后,队列就有空闲的空间可以插入了,那么就可以唤醒一个等待在这个条件变量上的线程了,具体就是唤醒一个等待插入的线程开始活动。 下面具体分析一下几个重要的方法:
- put(o)
put方法的内容上文中已经提到过,在此不再罗列,它是一个阻塞方法,在操作不能立刻得到执行的时候会阻塞等待。具体的就是,如果发现队列使用的数组没有可用的容量了,那么就等待在一个条件变量上,而这个条件变量需要在有空闲空间的时候唤醒等待在他上面的线程。
- offer(e)
该方法在插入操作不能立即执行的时候就会返回false,否则会返回true代表插入成功了。具体的细节见下面的代码:
  public boolean offer(E e) {
        checkNotNull(e);
        final ReentrantLock lock = this.lock;
        lock.lock();
        try {
            if (count == items.length)
                return false;
            else {
                enqueue(e);
                return true;
            }
        } finally {
            lock.unlock();
        }
    }
当然在多线程环境下,插入操作需要锁住,也就是靠锁来达到同步线程的功能。
- offer(e, timeout, unit)
和offer(e)一样在操作不能执行的时候就会返回特殊值,不同的是会等待一段时间,然后再返回。
- take()
take操作会在获取元素失败的时候阻塞直达有线程唤醒它。下面是具体的细节:
    public E take() throws InterruptedException {
        final ReentrantLock lock = this.lock;
        lock.lockInterruptibly();
        try {
            while (count == 0)
                notEmpty.await();
            return dequeue();
        } finally {
            lock.unlock();
        }
    }
- poll()
poll和offer类似,只是poll从队列中获取数据,而offer插入数据。
- poll(timeout, unit)
和offer(o, timeout, unit) 类似
- peek()
    public E peek() {
        final ReentrantLock lock = this.lock;
        lock.lock();
        try {
            return itemAt(takeIndex); // null when queue is empty
        } finally {
            lock.unlock();
        }
    }
peek操作会取得队列头的内容,但是不会将其从队列中删除,下次peek还是同样的内容。
- remove(e)方法
队列可以插入,可以获取,当然还可以删除,remove(e)方法只会删除第一个匹配的元素,remove(e)方法借助removeAt(index)方法来删除一个元素,在删除成功的时候会返回true,否则会返回false。下面具体分析一下removeAt(index)这个方法:
    void removeAt(final int removeIndex) {
        // assert lock.getHoldCount() == 1;
        // assert items[removeIndex] != null;
        // assert removeIndex >= 0 && removeIndex < items.length;
        final Object[] items = this.items;
        if (removeIndex == takeIndex) {
            // removing front item; just advance
            items[takeIndex] = null;
            if (++takeIndex == items.length)
                takeIndex = 0;
            count--;
            if (itrs != null)
                itrs.elementDequeued();
        } else {
            // an "interior" remove

            // slide over all others up through putIndex.
            final int putIndex = this.putIndex;
            for (int i = removeIndex;;) {
                int next = i + 1;
                if (next == items.length)
                    next = 0;
                if (next != putIndex) {
                    items[i] = items[next];
                    i = next;
                } else {
                    items[i] = null;
                    this.putIndex = i;
                    break;
                }
            }
            count--;
            if (itrs != null)
                itrs.removedAt(removeIndex);
        }
        notFull.signal();
    }
删除的思路就是:和删除数组中的元素一样,需要移动数组,所以这个操作是比较耗时的,在删除一个元素完成后,有可能有线程等待在插入元素的条件变量上,而现在有空闲的空间可以插入元素了,所以需要唤醒一个等待的线程让他插入元素。
关于ArrayBlockingQueue的内容就分析到这里,这是一个最为简单的阻塞队列实现,对ArrayBlockingQueue的分析也较为细节,下面分析LinkedBlockingQueue的时候有的内容就会一笔带过,因为LinkedBlockingQueue和ArrayBlockingQueue事一样的,只是ArrayBlockingQueue使用数组做队列,而LinkedBlockingQueue使用链表做队列。如何选择哪种阻塞队列和如何选择数组和链表这两种数据结构的思路是一样的,对于频繁进行队列元素获取操作的场景下,首选ArrayBlockingQueue,而在需要频繁进行队列元素删除、添加的场景下首选LinkedBlockingQueue。
LinkedBlockingQueue
LinkedBlockingQueue使用链表来作为队列的数据结构,下面就是链表节点的数据结构,可以发现是非常简单的:
    static class Node<E> {
        E item;

        /**
         * One of:
         * - the real successor Node
         * - this Node, meaning the successor is head.next
         * - null, meaning there is no successor (this is the last node)
         */
        Node<E> next;

        Node(E x) { item = x; }
    }
下面展示了LinkedBlockingQueue的关键成员变量:
/** The capacity bound, or Integer.MAX_VALUE if none */
    private final int capacity;

    /** Current number of elements */
    private final AtomicInteger count = new AtomicInteger();

    /**
     * Head of linked list.
     * Invariant: head.item == null
     */
    transient Node<E> head;

    /**
     * Tail of linked list.
     * Invariant: last.next == null
     */
    private transient Node<E> last;

    /** Lock held by take, poll, etc */
    private final ReentrantLock takeLock = new ReentrantLock();

    /** Wait queue for waiting takes */
    private final Condition notEmpty = takeLock.newCondition();

    /** Lock held by put, offer, etc */
    private final ReentrantLock putLock = new ReentrantLock();

    /** Wait queue for waiting puts */
    private final Condition notFull = putLock.newCondition();
需要注意的是,LinkedBlockingQueue的插入操作和获取数据的操作使用了不同的锁,文档解释是使用了“two lock queue”算法,具体的细节可以参考:two lock queue Algorithm
下面展示了两个操作条件变量的util方法:
    /**
     * Signals a waiting take. Called only from put/offer (which do not
     * otherwise ordinarily lock takeLock.)
     */
    private void signalNotEmpty() {
        final ReentrantLock takeLock = this.takeLock;
        takeLock.lock();
        try {
            notEmpty.signal();
        } finally {
            takeLock.unlock();
        }
    }

    /**
     * Signals a waiting put. Called only from take/poll.
     */
    private void signalNotFull() {
        final ReentrantLock putLock = this.putLock;
        putLock.lock();
        try {
            notFull.signal();
        } finally {
            putLock.unlock();
        }
    }
signalNotEmpty方法首先获取takeLock,然后对等待在notEmpty这个条件变量上的某个线程进行唤醒操作。而signalNotFull则首先获取putLock,然后对等待在notFull这个条件变量上的某个线程进行唤醒操作。和ArrayBlockingQueue一样,LinkedBlockingQueue也提供了两个插入队列和从队列获取元素的方法:
    /**
     * Links node at end of queue.
     *
     * @param node the node
     */
    private void enqueue(Node<E> node) {
        // assert putLock.isHeldByCurrentThread();
        // assert last.next == null;
        last = last.next = node;
    }

    /**
     * Removes a node from head of queue.
     *
     * @return the node
     */
    private E dequeue() {
        // assert takeLock.isHeldByCurrentThread();
        // assert head.item == null;
        Node<E> h = head;
        Node<E> first = h.next;
        h.next = h; // help GC
        head = first;
        E x = first.item;
        first.item = null;
        return x;
    }
相比于ArrayBlockingQueue更为简单了,只是一些链表操作,新的元素将被放到链表的尾部,而获取元素的操作将从链表首部获取节点。
下面的代码展示了put操作的细节:
    /**
     * Inserts the specified element at the tail of this queue, waiting if
     * necessary for space to become available.
     *
     * @throws InterruptedException {@inheritDoc}
     * @throws NullPointerException {@inheritDoc}
     */
    public void put(E e) throws InterruptedException {
        if (e == null) throw new NullPointerException();
        // Note: convention in all put/take/etc is to preset local var
        // holding count negative to indicate failure unless set.
        int c = -1;
        Node<E> node = new Node<E>(e);
        final ReentrantLock putLock = this.putLock;
        final AtomicInteger count = this.count;
        putLock.lockInterruptibly();
        try {
            /*
             * Note that count is used in wait guard even though it is
             * not protected by lock. This works because count can
             * only decrease at this point (all other puts are shut
             * out by lock), and we (or some other waiting put) are
             * signalled if it ever changes from capacity. Similarly
             * for all other uses of count in other wait guards.
             */
            while (count.get() == capacity) {
                notFull.await();
            }
            enqueue(node);
            c = count.getAndIncrement();
            if (c + 1 < capacity)
                notFull.signal();
        } finally {
            putLock.unlock();
        }
        if (c == 0)
            signalNotEmpty();
    }
如果队列容量已经用完了,那么该线程就会阻塞在notFull这个条件变量上等待唤醒。如果队列以前为空,此次插入式第一个元素,那么有可能在插入元素之前已经有线程试图获取元素,那么这个试图获取元素的线程就会阻塞住,所以需要告诉它们中的一个,现在有数据可以获取了,可以醒来消费数据了。
下面的代码展示了take方法的细节:
    public E take() throws InterruptedException {
        E x;
        int c = -1;
        final AtomicInteger count = this.count;
        final ReentrantLock takeLock = this.takeLock;
        takeLock.lockInterruptibly();
        try {
            while (count.get() == 0) {
                notEmpty.await();
            }
            x = dequeue();
            c = count.getAndDecrement();
            if (c > 1)
                notEmpty.signal();
        } finally {
            takeLock.unlock();
        }
        if (c == capacity)
            signalNotFull();
        return x;
    }
和put方法相反,当队列里面没有数据的时候就会阻塞等待,获取元素成功之后会唤醒那些希望插入数据而被阻塞的线程(唤醒一个线程)。
最后分析一下remove(o)方法,下面是remove(o)的源码:
    public boolean remove(Object o) {
        if (o == null) return false;
        fullyLock();
        try {
            for (Node<E> trail = head, p = trail.next;
                 p != null;
                 trail = p, p = p.next) {
                if (o.equals(p.item)) {
                    unlink(p, trail);
                    return true;
                }
            }
            return false;
        } finally {
            fullyUnlock();
        }
    }
删除操作会同时将读和写锁都获取,然后再操作。同样只会删除第一个匹配的元素。删除成功会返回true,否则返回false。需要注意的是,当删除了一个元素只会,需要通知哪些等待插入而没有空闲空间而被阻塞的线程,告诉他们中的一个可以插入数据了。
LinkedBlockingDeque
LinkedBlockingDeque的实现依靠了双向链表,所以如果想要学习双向链表的话可以去看源码,主要是对双向链表的操作,在读和写上加上了锁,以及一些条件变量的操作而已,介于篇幅,本文不再叙述该部分内容,未来会基于LinkedBlockingDeque写一篇关于java中的链表操作的文章。
PriorityBlockingQueue
PriorityBlockingQueue是一个优先阻塞队列。所谓优先队列,就是每次从队队列里面获取到的都是队列中优先级最高的,对于优先级,PriorityBlockingQueue需要你为插入其中的元素类型提供一个Comparator,PriorityBlockingQueue使用这个Comparator来确定元素之间的优先级关系。我们应该知道有一种数据结构叫做堆,堆是一种二叉树,这个二叉树的特点是,任意的节点都比它的儿子节点大或者小,所以我们可以猜测,PriorityBlockingQueue中入队和出队的操作就是一系列操作堆这种数据结构的细节。 介于篇幅限制,本小节只分析PriorityBlockingQueue的入队操作,关于其他的比如出队、删除等操作均可参照入队操作。再者,关于堆这种数据结构的描述,不再本文中详细叙述,将和LinkedBlockingDeque中提到的链表一并在新的文章中分析总结。
下面是put(o)操作的调用链路:
put(o) -> offer(e) -> tryGrow -> siftUpComparable| siftUpUsingComparator
下面是offer(o)方法的代码:
    public boolean offer(E e) {
        if (e == null)
            throw new NullPointerException();
        final ReentrantLock lock = this.lock;
        lock.lock();
        int n, cap;
        Object[] array;
        while ((n = size) >= (cap = (array = queue).length))
            tryGrow(array, cap);
        try {
            Comparator<? super E> cmp = comparator;
            if (cmp == null)
                siftUpComparable(n, e, array);
            else
                siftUpUsingComparator(n, e, array, cmp);
            size = n + 1;
            notEmpty.signal();
        } finally {
            lock.unlock();
        }
        return true;
    }
当有限队列的容量不足时会进行扩容操作,当然使用数组扩容的老套路就是:获取一个新的容量足够大的数组,然后将原来的数组内容复制到新的数组中去,然后释放原先的老的数组。数组容量增长的策略如下:
int newCap = oldCap + ((oldCap < 64) ?(oldCap + 2) : (oldCap >> 1));
可以发现,如果原来的容量小于64,那么每次grow只会增长(2 + old),否则增长原来的一半。
队列容量增长完成之后,offer操作得以继续,会查看是否设定了Comparator,如果没有显示设定,那么就会试图去使用容器中元素的Comparator,否则使用设定好的Comparator,下面基于已经设定好Comparator的前提下分析。
    private static <T> void siftUpUsingComparator(int k, T x, Object[] array,
                                       Comparator<? super T> cmp) {
        while (k > 0) {
            int parent = (k - 1) >>> 1;
            Object e = array[parent];
            if (cmp.compare(x, (T) e) >= 0)
                break;
            array[k] = e;
            k = parent;
        }
        array[k] = x;
    }
这很明显就是一个将元素压入堆这种数据结构的算法啊,x为将要压入的数据,k为队列尾,array为目标数组,cmp为比较器。为了说明将一个元素压入堆中的具体过程,下面举一个栗子:
假设我们维持一个由基本类型int霸占的优先队列,我们希望每次获取到的都是最小的元素,并且假设现在堆中已经有了
几个数据:1,2,4,5,7,8,那堆的结构应该类似于:

            1
      |           |
      2           4
 |        |   |       |
 7        8   5       Nil

现在我们想要插入一个数据3,则具体过程为:

1、将3放在最后位置
2、将3和自己的父亲节点比较,如果小于父亲节点,那么交互
3、继续执行步骤2直到父亲节点的值小于自己,或者已经交换到根节点了,则压入完成

根据上面的三步,现在分析一下插入3之后的动作。首先,3和父亲节点4比较,3小于4成立,则3和4交换,然后3继续和
自己的父亲节点1做比较,1小于3,已经找到合适的位置了,不需要再比较交换了,则压入3成功,最后的堆的结构应该类似于:

            1
      |           |
      2           3
 |        |   |       |
 7        8   5       4

从堆中获取一个数据的分析和插入类似,不再赘述。
现在,我们来看一下siftUpUsingComparator这个方法,首先将x放在最末尾,然后和自己的父亲节点比较,如果满足Comparator条件则结束,否则继续向上比较。插入元素需要向上比较并且交换,而获取一个元素则需要先将末尾的元素放在根节点,然后向下比较并且交互。当然,插入一个元素之后,需要将等待获取元素而被阻塞的线程唤醒一个来消费数据。
DelayQueue
DelayQueue是一个延时队列,所谓延时队列就是消费线程将会延时一段时间来消费元素。介于篇幅限制,本小节只分析take()方法的实现细节,毕竟延时队列的特点就是在消费的时候,下面展示了take()方法的实现细节:
    public E take() throws InterruptedException {
        final ReentrantLock lock = this.lock;
        lock.lockInterruptibly();
        try {
            for (;;) {
                E first = q.peek();
                if (first == null)
                    available.await();
                else {
                    long delay = first.getDelay(NANOSECONDS);
                    if (delay <= 0)
                        return q.poll();
                    first = null; // don't retain ref while waiting
                    if (leader != null)
                        available.await();
                    else {
                        Thread thisThread = Thread.currentThread();
                        leader = thisThread;
                        try {
                            available.awaitNanos(delay);
                        } finally {
                            if (leader == thisThread)
                                leader = null;
                        }
                    }
                }
            }
        } finally {
            if (leader == null && q.peek() != null)
                available.signal();
            lock.unlock();
        }
    }
需要注意的是,在延时队列中存储的对象需要是Delayed的子类,下面是该类的细节:
public interface Delayed extends Comparable<Delayed> {

    /**
     * Returns the remaining delay associated with this object, in the
     * given time unit.
     *
     * @param unit the time unit
     * @return the remaining delay; zero or negative values indicate
     * that the delay has already elapsed
     */
    long getDelay(TimeUnit unit);
}
只有一个方法,就是要获取消费延时。
继续看take方法的细节。延时阻塞队列使用了优先阻塞队列来存储数据,数据的获取是有优先级的,这一点需要注意,在这点上,我们应该和java的线程池的调度线程池的实现联系起来,在java的调度线程池的实现上,也使用了延时队列,而优先级队列可以保证线程池调度的任务都是根据时间优先级被调度的。take方法首先从优先队列中获取第一个元素,然后询问是否需要延时,如果不需要,则直接返回,否则延时设定的时间之后再返回。
更多关于延时队列的内容,可以参考DelayQueue的源码,以及参考java调度线程池实现时使用的DelayedWorkQueue。
SynchronousQueue
最后分析的SynchronousQueue是最为复杂的阻塞队列。SynchronousQueue和前面分析的阻塞队列都不同,因为SynchronousQueue不存在容量的说法,任何插入操作都需要等待其他线程来消费,否则就会阻塞等待,也就是说,生产线程生产出一条数据之后就要等待消费者线程来将其消费掉,才能继续生产数据,否则就会阻塞等待消费。队列中会把到来的线程缓存起来,当然会进行一些操作,下面是大概的算法:
1、队列初始化为null
2、当一个线程达到之后,如果队列为null,则将该线程放到队列中去,否则,判断队列中的第一个元素是否和当前到达的元素
匹配,如果匹配,那么两个线程的数据交易完成,否则也将新到达的线程数据缓存到队列中。
SynchronousQueue有一个fair-mode参数,fair模式和non-fair模式。关于这两种模式的区别,可以参考下面的文档说明:
     * The (Lifo) stack is used for non-fair mode, and the (Fifo)
     * queue for fair mode. The performance of the two is generally
     * similar. Fifo usually supports higher throughput under
     * contention but Lifo maintains higher thread locality in common
     * applications.
SynchronousQueue通过使用Transferer类的transfer(E e, boolean timed, long nanos)方法来完成数据交易操作,根据fair模式和non-fair模式有两种类型的Transferer,fair模式对应于TransferQueue,non-fair模式对应TransferStack。
TransferQueue
首先分析fair模式下的操作。TransferQueue使用一个链表存储数据,下面展示了使用的链表节点的数据结构:
            volatile QNode next;          // next node in queue
            volatile Object item;         // CAS'ed to or from null
            volatile Thread waiter;       // to control park/unpark
            final boolean isData;
next指向下一个链表节点,item是该节点上的数据内容,waiter是等待在该节点上的线程,isData代表这是一个生产线程节点还是一个消费线程节点,如果是生产线程节点,那么isData就为true,消费线程节点就为false。下面来分析一下最为主要的方法:transfer(E e, boolean timed, long nanos)
对于该方法的运行原理,可以参考下面的描述:
             * 1. If queue apparently empty or holding same-mode nodes,
             *    try to add node to queue of waiters, wait to be
             *    fulfilled (or cancelled) and return matching item.
             *
             * 2. If queue apparently contains waiting items, and this
             *    call is of complementary mode, try to fulfill by CAS'ing
             *    item field of waiting node and dequeuing it, and then
             *    returning matching item.
总结一下,就是:
- 如果当前queue是null的话,或者队列头和当前线程持有相同的mode(读或者写),那么将当前元素插入队列中
- 如果当前操作和队列头的操作互补(也就是读-写,写-读),那么试图去交易数据
具体的代码看下面:
        E transfer(E e, boolean timed, long nanos) {
            QNode s = null; // constructed/reused as needed
            boolean isData = (e != null);

            for (;;) {
                QNode t = tail;
                QNode h = head;
                if (t == null || h == null)         // saw uninitialized value
                    continue;                       // spin

                if (h == t || t.isData == isData) { // empty or same-mode
                    QNode tn = t.next;
                    if (t != tail)                  // inconsistent read
                        continue;
                    if (tn != null) {               // lagging tail
                        advanceTail(t, tn);
                        continue;
                    }
                    if (timed && nanos <= 0)        // can't wait
                        return null;
                    if (s == null)
                        s = new QNode(e, isData);
                    if (!t.casNext(null, s))        // failed to link in
                        continue;

                    advanceTail(t, s);              // swing tail and wait
                    Object x = awaitFulfill(s, e, timed, nanos);
                    if (x == s) {                   // wait was cancelled
                        clean(t, s);
                        return null;
                    }

                    if (!s.isOffList()) {           // not already unlinked
                        advanceHead(t, s);          // unlink if head
                        if (x != null)              // and forget fields
                            s.item = s;
                        s.waiter = null;
                    }
                    return (x != null) ? (E)x : e;

                } else {                            // complementary-mode
                    QNode m = h.next;               // node to fulfill
                    if (t != tail || m == null || h != head)
                        continue;                   // inconsistent read

                    Object x = m.item;
                    if (isData == (x != null) ||    // m already fulfilled
                        x == m ||                   // m cancelled
                        !m.casItem(x, e)) {         // lost CAS
                        advanceHead(h, m);          // dequeue and retry
                        continue;
                    }

                    advanceHead(h, m);              // successfully fulfilled
                    LockSupport.unpark(m.waiter);
                    return (x != null) ? (E)x : e;
                }
            }
        }
可以看到,该方法的实现上是较为复杂的,下面我们根据上面提到的算法来分析一下这个方法的代码。
首先判断该调用是生成线程还是消费线程,也就是获得isData的值。然后和队列中的元素进行匹配,如果匹配成功,则交易数据,否则将此次操作的信息加入到队列中去,然后等待匹配。awaitFulfill方法负责等到匹配完成。
下面来分析一下一个具体的操作的执行流程,比如put操作。下面是put方法的代码:
    public void put(E e) throws InterruptedException {
        if (e == null) throw new NullPointerException();
        if (transferer.transfer(e, false, 0) == null) {
            Thread.interrupted();
            throw new InterruptedException();
        }
    }
可以看到put方法使用了transfer这个方法,而put方法属于写方法,所以第一个参数不为null,也就是isData为true。它需要和一个isData为false的操作相匹配。
关于更为具体和深入的内容,请查阅更多的资料以及去阅读源码,本文对该内容的分析到底为止。
TransferStack
关于TransferStack的分析,改日再谈!当然对于SynchronousQueue的分析也需要另外的篇幅,而本文为了文章内容的完整性提到了SynchronousQueue,但是SynchronousQueue过于复杂,首先是能力限制,目前无法深入分析SynchronousQueue的实现,再者篇幅限制,本文因为需要提供了大量的代码,篇幅过长影响阅读体验,很多内容点到为止,需要用其他的篇章来详细分析,这些内容包括:
- java中的链表操作
- java中的优先队列(堆)
- java中的锁
- 以及本小节内容(SynchronousQueue)
这些内容要么较为重要,要么较为复杂,需要重点关注!本文的重点在于java中的阻塞队列,文章描述了最为基本的阻塞队列ArrayBlockingQueue和LinkedBlockingQueue,以及PriorityBlockingQueue,然后是DelayQueue,最后提到了SynchronousQueue,当然还有很多需要补充的内容,以后会做补充!
