在这个 AI 日新月异的时代,AIGC(AI生成内容)已迅速席卷全球,甚至掀起了一场技术革命。然而,当我们谈论这些炫酷的大模型时,你是否思考过它们背后的秘密?是什么让这些开源模型如此强大?它们是如何被训练出来的,又如何能够在我们本地运行?更重要的是,这场技术浪潮已经涌来,我们要如何在这股洪流中找到自己的方向,不被时代所抛下?所以作者决定出一系列的文章来和大家一起探索一下AIGC的世界,专栏就叫《重生之我要学AIGC》,欢迎大家订阅!!!谢谢大家。
现在基本很多公司也加入了ai的队列里面去,也有了很多的ai产品,例如ai智能客服,大家第一个想到的是用什么语言进行开发呢,当我第一次听到java也能开发一个ai智能客服的时候我是很震惊的,后面了解到其实java也是调用的事别人的api,例如阿里对外开发的通义模型的接口给大家调用,那么这次我们就来带大家来开发一款基础的一个ai智能客服出来。
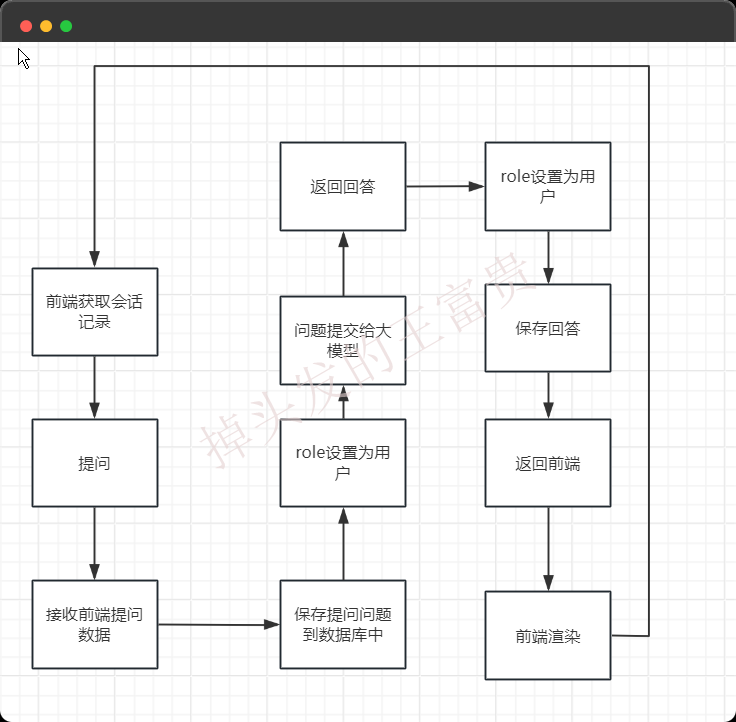
架构图
这次我们整体的架构图类似是这样的:
我们要用到的中间件为mysql,用来存储对话的数据,用到的orm框架为mybatisplus,后端框架自然是Springboot啦。
第一步,搭建一套Springboot服务
首先我们要搭建一套Springboot服务出来
<?xml version="1.0" encoding="UTF-8"?>
<project xmlns="http://maven.apache.org/POM/4.0.0" xmlns:xsi="http://www.w3.org/2001/XMLSchema-instance"
xsi:schemaLocation="http://maven.apache.org/POM/4.0.0 https://maven.apache.org/xsd/maven-4.0.0.xsd">
<parent>
<groupId>org.springframework.boot</groupId>
<artifactId>spring-boot-starter-parent</artifactId>
<version>2.7.12</version>
<relativePath/> <!-- lookup parent from repository -->
</parent>
<modelVersion>4.0.0</modelVersion>
<groupId>com.masiyi</groupId>
<artifactId>spring-ai</artifactId>
<version>0.0.1-SNAPSHOT</version>
<name>spring-ai</name>
<description>spring-ai</description>
<properties>
<java.version>23</java.version>
<project.build.sourceEncoding>UTF-8</project.build.sourceEncoding>
<project.reporting.outputEncoding>UTF-8</project.reporting.outputEncoding>
<spring-boot.version>2.7.12</spring-boot.version>
</properties>
<dependencies>
<dependency>
<groupId>org.springframework.boot</groupId>
<artifactId>spring-boot-starter-test</artifactId>
<scope>test</scope>
</dependency>
<dependency>
<groupId>com.alibaba.cloud</groupId>
<artifactId>spring-cloud-starter-alibaba-ai</artifactId>
</dependency>
<dependency>
<groupId>org.springframework.boot</groupId>
<artifactId>spring-boot-starter-web</artifactId>
</dependency>
<dependency>
<groupId>org.springframework.boot</groupId>
<artifactId>spring-boot-starter-webflux</artifactId>
</dependency>
<!--Mybatis-Plus-->
<dependency>
<groupId>com.baomidou</groupId>
<artifactId>mybatis-plus-boot-starter</artifactId>
<version>3.4.2</version>
</dependency>
<dependency>
<groupId>mysql</groupId>
<artifactId>mysql-connector-java</artifactId>
<version>8.0.32</version>
</dependency>
<dependency>
<groupId>org.projectlombok</groupId>
<artifactId>lombok</artifactId>
<version>1.18.30</version>
<scope>provided</scope>
</dependency>
</dependencies>
<dependencyManagement>
<dependencies>
<dependency>
<groupId>org.springframework.boot</groupId>
<artifactId>spring-boot-dependencies</artifactId>
<version>${spring-boot.version}</version>
<type>pom</type>
<scope>import</scope>
</dependency>
<dependency>
<groupId>com.alibaba.cloud</groupId>
<artifactId>spring-cloud-alibaba-dependencies</artifactId>
<version>2023.0.1.2</version>
<type>pom</type>
<scope>import</scope>
</dependency>
</dependencies>
</dependencyManagement>
<build>
<plugins>
<plugin>
<groupId>org.apache.maven.plugins</groupId>
<artifactId>maven-compiler-plugin</artifactId>
<version>3.8.1</version>
<configuration>
<source>17</source>
<target>17</target>
<encoding>UTF-8</encoding>
</configuration>
</plugin>
<plugin>
<groupId>org.springframework.boot</groupId>
<artifactId>spring-boot-maven-plugin</artifactId>
<version>${spring-boot.version}</version>
<configuration>
<mainClass>com.masiyi.springai.SpringAiApplication</mainClass>
<skip>true</skip>
</configuration>
<executions>
<execution>
<id>repackage</id>
<goals>
<goal>repackage</goal>
</goals>
</execution>
</executions>
</plugin>
</plugins>
</build>
<repositories>
<repository>
<id>spring-milestones</id>
<name>Spring Milestones</name>
<url>https://repo.spring.io/milestone</url>
<snapshots>
<enabled>false</enabled>
</snapshots>
</repository>
<repository>
<id>spring-snapshots</id>
<name>Spring Snapshots</name>
<url>https://repo.spring.io/snapshot</url>
<releases>
<enabled>false</enabled>
</releases>
</repository>
</repositories>
</project>
这里我们用到了几个依赖,有了这几个依赖之后我们可以快速搭建一个ai智能客服出来
Spring Cloud Starter Alibaba AI
- 提供了与阿里巴巴AI服务集成的Spring Cloud Starter。这里我们用到了阿里自己封装好的一套api,阿里对接的是自家的通义模型。
Spring Boot Starter Web
- 提供了一个基于Spring MVC的Web应用程序开发框架。意味着我们是一个web服务
Spring Boot Starter WebFlux
- 供了一个响应式Web框架,后期用于我们吐字的需要
MyBatis-Plus Boot Starter
- 提供了MyBatis-Plus的Spring Boot集成,MyBatis-Plus是一个MyBatis的增强工具。是我们的orm框架
MySQL Connector Java
- 提供了与MySQL数据库连接的JDBC驱动。
智能客服主要的是什么,我们一步一步来,我们是不是要把他的对话内容保存在我们的数据库,方便下次用户打开的时候可以查看之前的对话内容,我们就需要存储一个对话记录的表出来:
CREATE TABLE `customer` (
  `id` int(11) NOT NULL AUTO_INCREMENT,
  `role` tinyint(3) DEFAULT NULL COMMENT '角色',
  `content` varchar(1000) DEFAULT NULL COMMENT '内容',
  PRIMARY KEY (`id`)
) ENGINE=InnoDB AUTO_INCREMENT=3 DEFAULT CHARSET=utf8;
第二步,对接阿里的通义灵码
那么第二步,我们需要对接阿里的通义灵码
申请api-key,阿里的apikey是需要付费的,所以我们通过bailian.console.aliyun.com/ 购买对应的服务之后就可以申请我们的api-key
之后编写yml配置文件
server:
port: 8999
spring:
application:
name: tongyi-example
cloud:
ai:
tongyi:
connection:
api-key: sk-6670e214d0414bdbad173b7xxxx
我们按照上面配置好,如果是2023.0.1.2版本就按照上面写,官网的文档估计没有更新到最新版本,这部分还是作者看源码才知道要这么配置的。
配置好之后我们就可以来上手spring-cloud-starter-alibaba-ai了,关于spring-cloud-starter-alibaba-ai更更更详细的内容可以查看博主上一篇写的国外的Spring出AI了?阿里:没关系,我会出手。这里我们就不再详细介绍他了
第三步,写对话方法
新建一个web控制层
package com.masiyi.springai.controller;/*
* Copyright 2023-2024 the original author or authors.
*
* Licensed under the Apache License, Version 2.0 (the "License");
* you may not use this file except in compliance with the License.
* You may obtain a copy of the License at
*
* https://www.apache.org/licenses/LICENSE-2.0
*
* Unless required by applicable law or agreed to in writing, software
* distributed under the License is distributed on an "AS IS" BASIS,
* WITHOUT WARRANTIES OR CONDITIONS OF ANY KIND, either express or implied.
* See the License for the specific language governing permissions and
* limitations under the License.
*/
import com.masiyi.springai.service.TongYiService;
import org.springframework.beans.factory.annotation.Autowired;
import org.springframework.beans.factory.annotation.Qualifier;
import org.springframework.web.bind.annotation.CrossOrigin;
import org.springframework.web.bind.annotation.GetMapping;
import org.springframework.web.bind.annotation.RequestMapping;
import org.springframework.web.bind.annotation.RequestParam;
import org.springframework.web.bind.annotation.RestController;
import java.util.Map;
/**
* TongYi models Spring Cloud Alibaba Controller.
*
* @author yuluo
* @author <a href="mailto:yuluo08290126@gmail.com">yuluo</a>
* @since 2023.0.0.0
*/
@RestController
@RequestMapping("/ai")
@CrossOrigin
public class TongYiController {
@Autowired
@Qualifier("tongYiSimpleServiceImpl")
private TongYiService tongYiSimpleService;
@GetMapping("/example")
public String completion(
@RequestParam(value = "message", defaultValue = "Tell me a joke")
String message
) {
return tongYiSimpleService.completion(message);
}
@GetMapping("/stream")
public Map<String, String> streamCompletion(
@RequestParam(value = "message", defaultValue = "请告诉我西红柿炖牛腩怎么做?")
String message
) {
return tongYiSimpleService.streamCompletion(message);
}
}
有了之前我们封装好的api之后我们需要在对话的过程中把我们的问题和gpt的回答存到我们的数据库中去:
    @Override
    public String completion(String message) {
        Customer customer = new Customer();
        customer.setRole(1);
        customer.setContent(message);
        customerService.save(customer);
        Prompt prompt = new Prompt(new UserMessage(message));
        String content = chatModel.call(prompt).getResult().getOutput().getContent();
        Customer customer2 = new Customer();
        customer2.setRole(2);
        customer2.setContent(content);
        customerService.save(customer2);
        return content;
    }
这里我们把每次我们的问题和gpt的回答都存入数据库中,方便我们下次查看
完整的service如下:
package com.masiyi.springai.service.impl;
@Service
public class TongYiSimpleServiceImpl extends AbstractTongYiServiceImpl {
private static final Logger logger = LoggerFactory.getLogger(TongYiSimpleServiceImpl.class);
private final ChatModel chatModel;
private final StreamingChatModel streamingChatModel;
private final CustomerService customerService;
@Autowired
public TongYiSimpleServiceImpl(ChatModel chatModel, StreamingChatModel streamingChatModel, CustomerService customerService) {
this.customerService = customerService;
this.chatModel = chatModel;
this.streamingChatModel = streamingChatModel;
}
@Override
public String completion(String message) {
Customer customer = new Customer();
customer.setRole(1);
customer.setContent(message);
customerService.save(customer);
Prompt prompt = new Prompt(new UserMessage(message));
String content = chatModel.call(prompt).getResult().getOutput().getContent();
Customer customer2 = new Customer();
customer2.setRole(2);
customer2.setContent(content);
customerService.save(customer2);
return content;
}
}
没错,我们只调用了一个方法就获得了大模型的回答:chatModel.call
第四步,回显对话记录
我们需要写一个接口,用于首次进入页面的时候获取我们之前的聊天记录回显到前端。
@GetMapping("/history")
public List<Customer> history() {
return tongYiSimpleService.history();
}
@Override
public List<Customer> history() {
return customerService.list();
}
第五步,写个前端页面渲染一下
我们的前端代码如下
<!DOCTYPE html>
<html lang="en">
<head>
<meta charset="UTF-8">
<meta name="viewport" content="width=device-width, initial-scale=1.0">
<title>Chat History</title>
<style>
body {
font-family: Arial, sans-serif;
max-width: 600px;
margin: auto;
padding: 10px;
}
#chatBox {
border: 1px solid #ccc;
padding: 10px;
height: 400px;
overflow-y: scroll;
margin-bottom: 10px;
}
.message {
padding: 5px;
border-radius: 5px;
margin-bottom: 5px;
white-space: pre-wrap;
}
.user {
background-color: #e0f7fa;
text-align: right;
}
.assistant {
background-color: #e8f5e9;
text-align: left;
}
</style>
</head>
<body>
<h1>Chat Interface with History</h1>
<div id="chatBox"></div>
<script>
async function fetchHistory() {
try {
const response = await fetch('http://localhost:8088/ai/history');
if (!response.ok) throw new Error('Network response was not ok');
const history = await response.json();
history.forEach(item => {
const role = item.role === 1 ? 'user' : 'assistant';
displayMessage(role, item.content);
});
} catch (error) {
console.error('Error fetching chat history:', error);
}
}
function displayMessage(role, content) {
const chatBox = document.getElementById('chatBox');
const messageDiv = document.createElement('div');
messageDiv.className = `message ${role}`;
messageDiv.innerText = content;
chatBox.appendChild(messageDiv);
chatBox.scrollTop = chatBox.scrollHeight;
}
// Fetch and display chat history on page load
window.onload = fetchHistory;
</script>
</body>
</html>
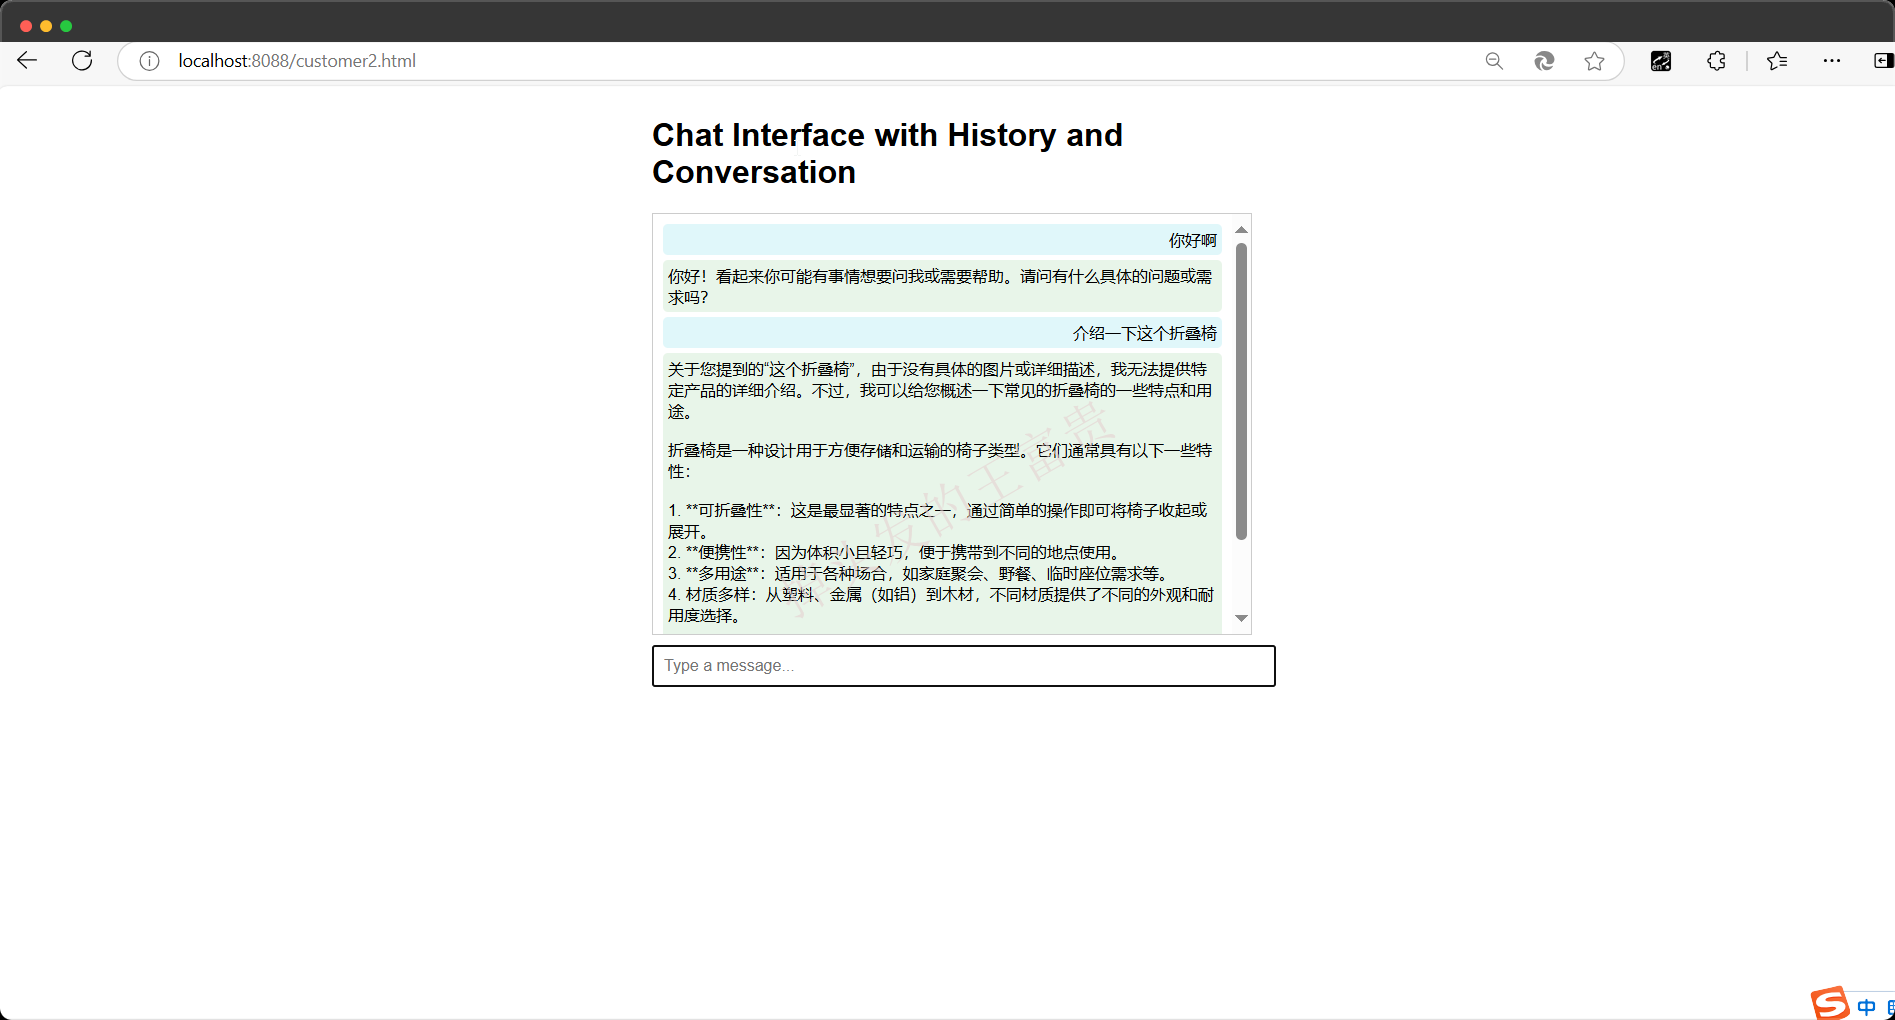
现在我们的页面以及出来了,那么怎么实现对话的功能呢?我们再加一个会话框,对接我们之前写的会话接口:

很好!!现在我们的ai客服具有了会话的功能,我们看一下我们前端的代码:
<!DOCTYPE html>
<html lang="en">
<head>
<meta charset="UTF-8">
<meta name="viewport" content="width=device-width, initial-scale=1.0">
<title>Chat Interface with History and Conversation</title>
<style>
body {
font-family: Arial, sans-serif;
max-width: 600px;
margin: auto;
padding: 10px;
}
#chatBox {
border: 1px solid #ccc;
padding: 10px;
height: 400px;
overflow-y: scroll;
margin-bottom: 10px;
}
.message {
padding: 5px;
border-radius: 5px;
margin-bottom: 5px;
white-space: pre-wrap;
}
.user {
background-color: #e0f7fa;
text-align: right;
}
.assistant {
background-color: #e8f5e9;
text-align: left;
}
#userInput {
width: 100%;
padding: 10px;
font-size: 16px;
}
</style>
</head>
<body>
<h1>Chat Interface with History and Conversation</h1>
<div id="chatBox"></div>
<input type="text" id="userInput" placeholder="Type a message..." onkeydown="if(event.key === 'Enter') sendMessage()">
<script>
// Fetch and display chat history
async function fetchHistory() {
try {
const response = await fetch('http://localhost:8088/ai/history');
if (!response.ok) throw new Error('Network response was not ok');
const history = await response.json();
history.forEach(item => {
const role = item.role === 1 ? 'user' : 'assistant';
displayMessage(role, item.content);
});
} catch (error) {
console.error('Error fetching chat history:', error);
}
}
// Display message in the chat box
function displayMessage(role, content) {
const chatBox = document.getElementById('chatBox');
const messageDiv = document.createElement('div');
messageDiv.className = `message ${role}`;
messageDiv.innerText = content;
chatBox.appendChild(messageDiv);
chatBox.scrollTop = chatBox.scrollHeight;
}
// Send a message and display assistant's response
async function sendMessage() {
const userInput = document.getElementById('userInput');
const messageContent = userInput.value.trim();
if (!messageContent) return;
// Display user's message
displayMessage('user', messageContent);
userInput.value = '';
try {
const response = await fetch(`http://localhost:8088/ai/example?message=${encodeURIComponent(messageContent)}`);
if (!response.ok) throw new Error('Network response was not ok');
const assistantResponse = await response.text();
displayMessage('assistant', assistantResponse);
} catch (error) {
console.error('Error fetching assistant response:', error);
displayMessage('assistant', 'Error: Unable to get response');
}
}
// Load chat history when the page loads
window.onload = fetchHistory;
</script>
</body>
</html>
因为之前我们把每次会话的内容都存在了我们的表中,所以下次页面进来的时候并不会丢失:
我们现在来看一下我们现在的流程图:

没错,形成了一个完美的循环,至此我们一个非常非常非常简单的一问一答的客服就做出来了
第六步,赋予知识
但是大家发现没有,他回答的内容都是和我们的产品:折叠椅无关的内容,这也太der了吧,既然我们是做ai客服,那么肯定是想用户问到我们产品的时候给个解答吧,所以这就引出了我们的下一个内容:知识库
我们先创建这么一张表
CREATE TABLE `knowledge` (
  `id` int(11) NOT NULL AUTO_INCREMENT,
  `knowledge` varchar(1000) DEFAULT NULL COMMENT '知识',
  PRIMARY KEY (`id`)
) ENGINE=InnoDB DEFAULT CHARSET=utf8 COMMENT='知识库';
我们现在要把我们产品(折叠椅)的内容写入到知识库
INSERT INTO `ai`.`knowledge` (`id`, `knowledge`) VALUES (1, '### 折叠椅介绍\r\n\r\n- **产品名称**:多功能轻便折叠椅\r\n- **材质**:采用高强度钢材和优质尼龙布料制成,确保椅子既坚固耐用又轻便易携。\r\n- **设计特点**:\r\n - **可折叠设计**:方便收纳与携带,适合户外活动、家庭聚会等多种场合使用。\r\n - **舒适坐感**:配备加厚坐垫,长时间使用也不会感到不适。\r\n - **承重能力强**:最大承重可达150公斤,适合不同体型的人群使用。\r\n - **多色可选**:提供多种颜色选择,满足个性化需求。\r\n- **适用场景**:适用于露营、钓鱼、野餐、家庭聚会、办公室休息区等场合。\r\n- **包装内容**:1把折叠椅、1个便携袋。\r\n\r\n### 价格\r\n\r\n- **市场价**:299元\r\n- **促销价**:239元(限时优惠)\r\n\r\n希望这款多功能轻便折叠椅能够为您的生活带来便利与舒适!');
好了,现在我们有自己的知识库了,那么我们再写一个携带知识库内容的方法:
String promptTemplate = """
你是一位专业的客服代表,负责解答用户关于产品的各种问题。以下是用户的问题和我们已有的产品知识:
用户问题: %s
产品知识:
%s
请根据以上信息回答用户的问题。
""";
/**
* 处理知识查询请求
*
* 本方法模拟了一个知识查询的过程,涉及到用户请求的保存、知识库的查询以及基于这些信息生成回复
* 它首先创建了一个表示用户请求的Customer对象,然后根据这个请求获取相应的知识信息,
* 最后生成并返回一个包含知识信息的回复
*
* @param message 用户的查询消息,用于检索知识库
* @return 根据知识库生成的回复内容
*/
@Override
public String knowledge(String message) {
// 创建一个表示用户请求的Customer对象,并设置其角色和内容
Customer customer = new Customer();
customer.setRole(1);
customer.setContent(message);
// 保存用户请求到数据库
customerService.save(customer);
// 从知识库中获取所有知识信息
List<Knowledge> list = knowledgeService.list();
// 提取所有知识内容并合并为一个字符串
String productKnowledge = list.stream().map(Knowledge::getKnowledge).reduce((a, b) -> a + "\n" + b).orElse("");
// 根据用户消息和知识库内容格式化提示模板
String format = String.format(promptTemplate, message, productKnowledge);
// 创建一个Prompt对象,用于生成回复
Prompt prompt = new Prompt(new UserMessage(format));
// 调用聊天模型生成回复内容
String content = chatModel.call(prompt).getResult().getOutput().getContent();
// 创建一个表示系统回复的Customer对象,并设置其角色和内容
Customer customer2 = new Customer();
customer2.setRole(2);
customer2.setContent(content);
// 保存系统回复到数据库
customerService.save(customer2);
// 返回生成的回复内容
return content;
}
controller层的代码:
@GetMapping("/knowledge")
public String knowledge(
@RequestParam(value = "message", defaultValue = "折叠椅多少钱")
String message
) {
return tongYiSimpleService.knowledge(message);
}
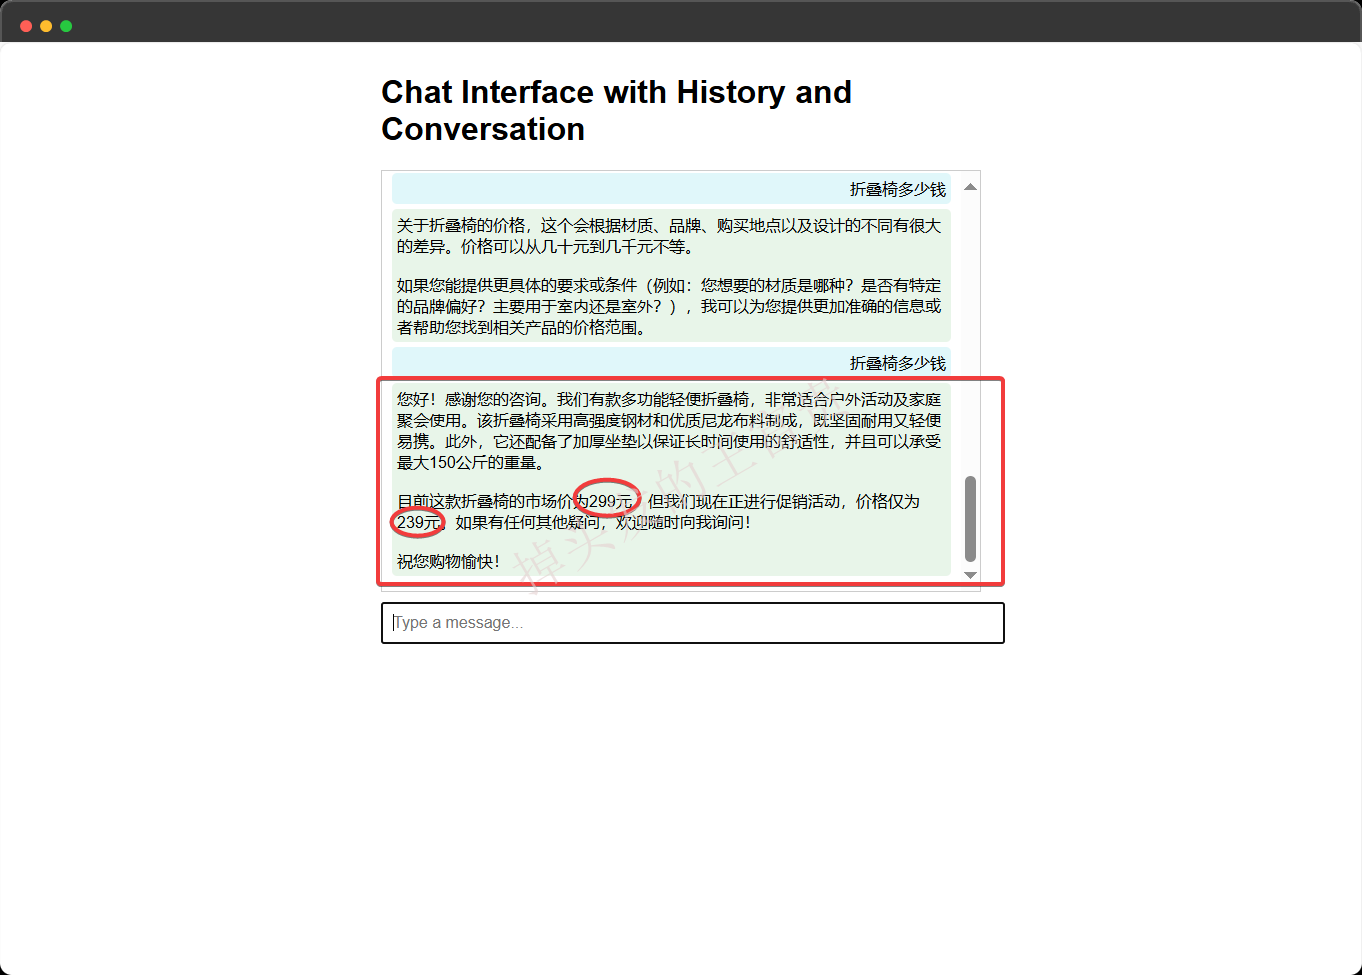
最后我们前端提问的接口换为/knowledge,那么我们现在问他折叠椅多少钱:

没错!!回答正确,我们再问问他其他关于折叠椅的内容:
没错!!回答完全正确!!至此我们的ai智能客服的青春版就做出来啦!!实际如果你要写一个商业版本的智能客服大概也是这样的一个流程,例如区分用户,隔离用户数据,携带上下文(订阅专栏,留个坑,下次会讲)让gpt理解你的意思,向量化等等我们后期都会慢慢开坑。
对了,这篇博客的源码我会放在公众号:掉头发的王富贵 中,回复:AI客服即可获取源代码