Sonic 云真机平台部署
1 简介
Sonic 云真机平台,是一个免费开源的云真机测试平台,旨在提供高效、可扩展的虚拟设备访问服务,它允许开发者和测试人员在云端远程访问和管理真实的硬件设备。Sonic 支持哪些设备?Android 设备、iOS 设备、车载设备、智能手表。- 为什么使用
Sonic?
- (1) 0 编码
UI 自动化:积木式创建步骤,一键分发多设备任务;
- (2) 在线代理抓包:一键连接代理抓包,团队协作轻松快捷;
- (3) 设备分布式集群:支持跨网段多机房,支持
Windows、Mac、Linux 平台;
- (4) 优秀周边生态:安卓
Apk、iOS 调试工具、Jenkins 插件、在线抓包工具;
- (5) 低成本维护:拖拽式排序交互,使用简单便捷;
- (6) 在线
WebView:提供在线调试 WebView,一键便利连接 devtools;
- (7) 可视化报表:测试截图、日志、录像,图表展示项目运行情况;
- (8) 轻松部署维护:
Docker 一键去中心化分布式,扩容缩容不再繁琐。
2 环境准备
Sonic 部署分为 前后端 部署以及 Agent 端 部署Windows 11 系统,虚拟机:VMware Workstation 17 Pro(17.0.0 build-20800274)Linux 系统:Ubuntu 22.04.3 64 位JDK:17+Sonic 版本:2.6.4
3 安装配置与部署
3.1 安装 MySQL
sudo apt-get update
sudo apt-get install mysql-server

# 安装成功后,查看安装的 mysql 版本
root@ubuntu:/opt/sonic# mysql --version
mysql  Ver 8.0.36-0ubuntu0.20.04.1 for Linux on x86_64 ((Ubuntu))
root@ubuntu:~
Securing the MySQL server deployment.
Connecting to MySQL using a blank password.
VALIDATE PASSWORD COMPONENT can be used to test passwords
and improve security. It checks the strength of password
and allows the users to set only those passwords which are
secure enough. Would you like to setup VALIDATE PASSWORD component?
Press y|Y for Yes, any other key for No: N
Skipping password set for root as authentication with auth_socket is used by default.
If you would like to use password authentication instead, this can be done with the "ALTER_USER" command.
See https://dev.mysql.com/doc/refman/8.0/en/alter-user.html
By default, a MySQL installation has an anonymous user,
allowing anyone to log into MySQL without having to have
a user account created for them. This is intended only for
testing, and to make the installation go a bit smoother.
You should remove them before moving into a production
environment.
Remove anonymous users? (Press y|Y for Yes, any other key for No) : Y
Success.
Normally, root should only be allowed to connect from
'localhost'. This ensures that someone cannot guess at
the root password from the network.
Disallow root login remotely? (Press y|Y for Yes, any other key for No) : N
... skipping.
By default, MySQL comes with a database named 'test' that
anyone can access. This is also intended only for testing,
and should be removed before moving into a production
environment.
Remove test database and access to it? (Press y|Y for Yes, any other key for No) : Y
- Dropping test database...
Success.
- Removing privileges on test database...
Success.
Reloading the privilege tables will ensure that all changes
made so far will take effect immediately.
Reload privilege tables now? (Press y|Y for Yes, any other key for No) : Y
Success.
All done!
- (4) 在
Ubuntu 服务器上配置 MySQL 以允许远程连接:
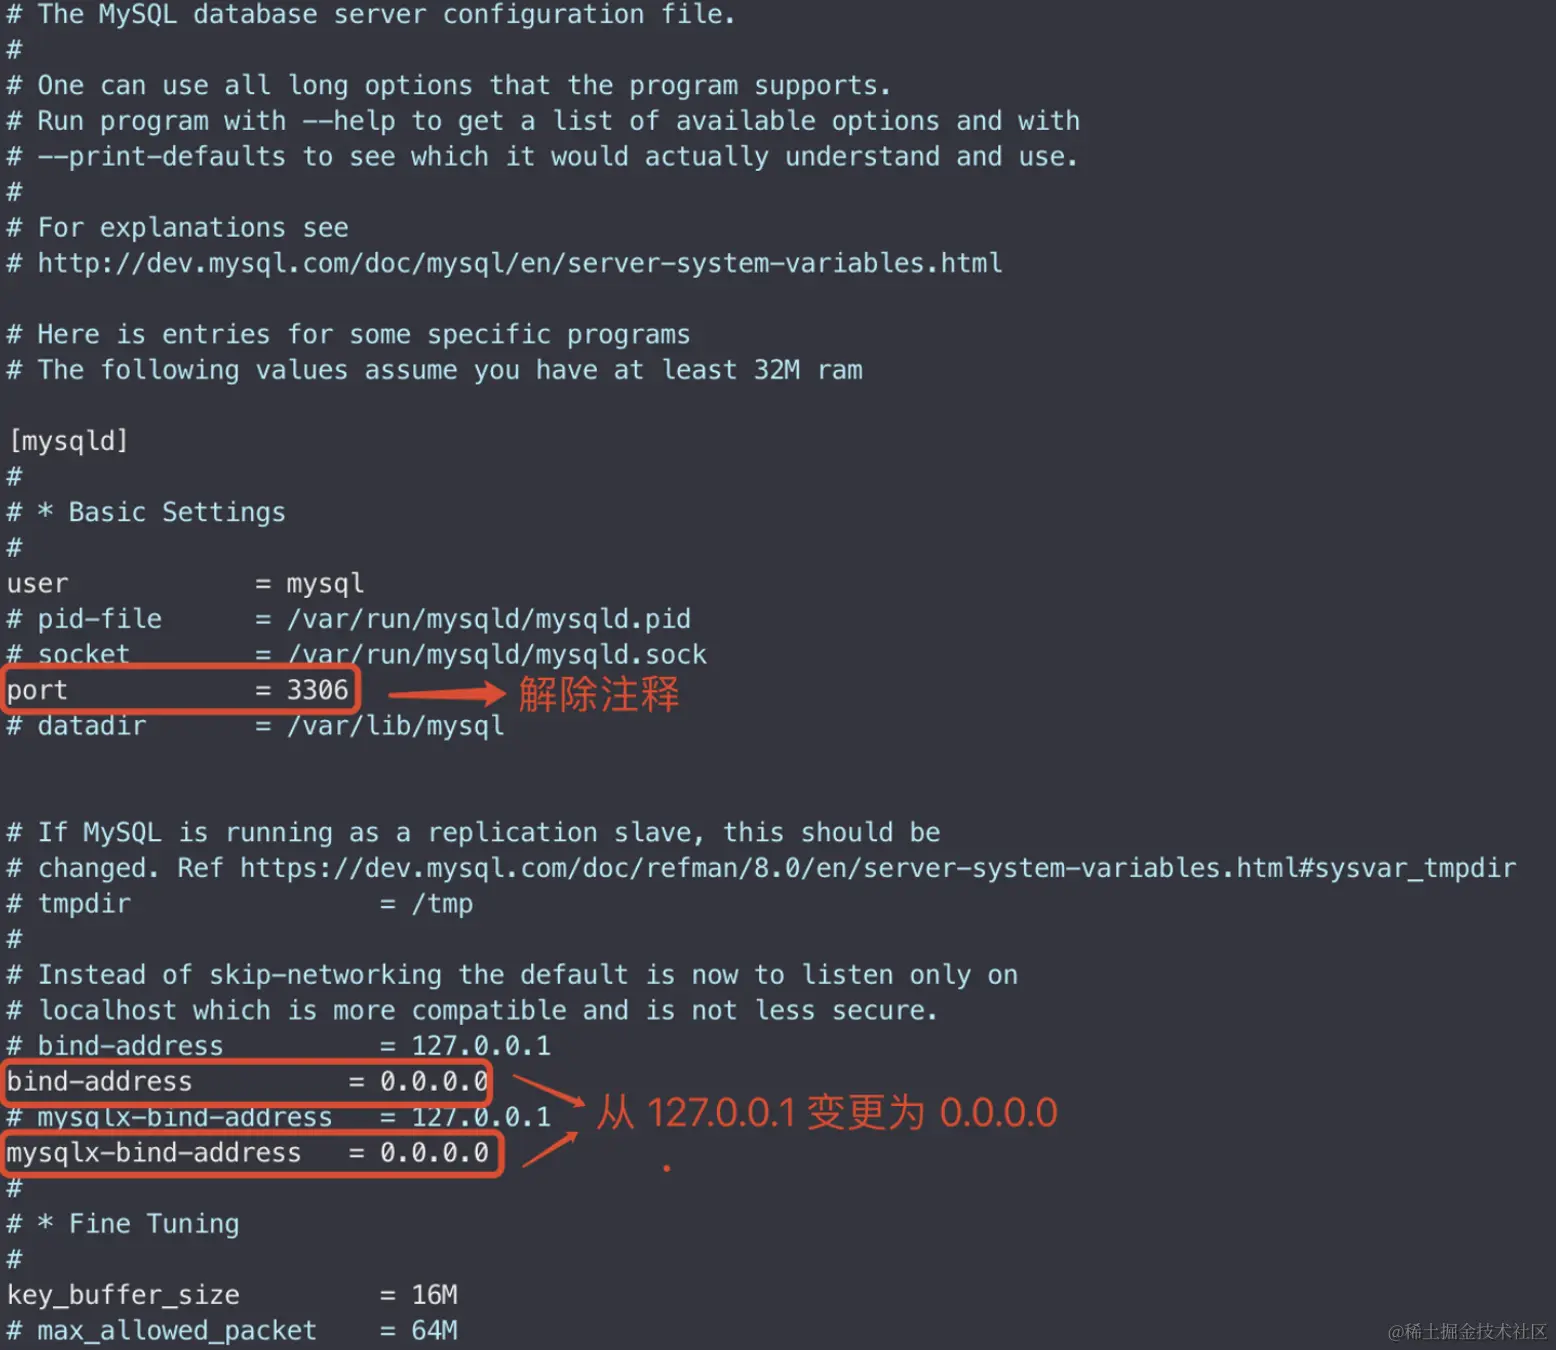
- 编辑
MySQL 的配置文件(通常是 /etc/mysql/mysql.conf.d/mysqld.cnf 或 /etc/mysql/my.cnf),注释掉或修改 bind-address 行,将其从 127.0.0.1(只允许本地连接)更改为 0.0.0.0(允许任何 IP 连接):
port = 3306

bind-address = 0.0.0.0
mysqlx-bind-address = 0.0.0.0
sudo systemctl restart mysql
- (5) 为
MySQL 设置 root 用户远程访问权限:
root@ubuntu:~
Enter password:
Welcome to the MySQL monitor. Commands end with ; or \g.
Your MySQL connection id is 10
Server version: 8.0.36-0ubuntu0.20.04.1 (Ubuntu)
Copyright (c) 2000, 2024, Oracle and/or its affiliates.
Oracle is a registered trademark of Oracle Corporation and/or its
affiliates. Other names may be trademarks of their respective
owners.
Type 'help;' or '\h' for help. Type '\c' to clear the current input statement.
mysql> use mysql;
Reading table information for completion of table and column names
You can turn off this feature to get a quicker startup with -A
Database changed
mysql> select host,user from user;
+-----------+------------------+
| host | user |
+-----------+------------------+
| localhost | debian-sys-maint |
| localhost | mysql.infoschema |
| localhost | mysql.session |
| localhost | mysql.sys |
| localhost | root |
+-----------+------------------+
5 rows in set (0.01 sec)
mysql> CREATE USER 'root'@'%' IDENTIFIED BY '123456';
Query OK, 0 rows affected (0.02 sec)
mysql> GRANT ALL PRIVILEGES ON *.* TO 'root'@'%' WITH GRANT OPTION;
Query OK, 0 rows affected (0.01 sec)
mysql> FLUSH PRIVILEGES;
Query OK, 0 rows affected (0.00 sec)
mysql> CREATE DATABASE sonic CHARACTER SET utf8 COLLATE utf8_general_ci;
Query OK, 1 row affected, 2 warnings (0.00 sec)

mysql> show databases;
+--------------------+
| Database           |
+--------------------+
| information_schema |
| mysql              |
| performance_schema |
| sonic              |
| sys                |
+--------------------+
5 rows in set (0.00 sec)
- (7) 确保
Ubuntu 服务器的防火墙允许 MySQL 端口 (默认是: 3306):
sudo ufw allow 3306
- (8) 从你的
Mac 电脑连接到 MySQL 数据库:
mysql -h <Ubuntu服务器IP> -u <username> -p
sudo apt-get remove mysql-server
sudo apt-get purge mysql-server
sudo apt-get autoremove
sudo rm -rf /var/lib/mysql
sudo rm -rf /var/log/mysql
sudo apt-get update
3.2 安装 docker
- (1) 安装必要的证书并允许
apt 包管理器使用以下命令通过 HTTPS 使用存储库:
sudo apt install apt-transport-https ca-certificates curl software-properties-common gnupg lsb-release
- (2) 添加
Docker 的官方 GPG 密钥:
curl -fsSL https://download.docker.com/linux/ubuntu/gpg | sudo gpg --dearmor -o /usr/share/keyrings/docker-archive-keyring.gpg
echo "deb [arch=$(dpkg --print-architecture) signed-by=/usr/share/keyrings/docker-archive-keyring.gpg] https://download.docker.com/linux/ubuntu $(lsb_release -cs) stable" | sudo tee /etc/apt/sources.list.d/docker.list > /dev/null
sudo apt update
sudo apt install docker-ce docker-ce-cli containerd.io docker-compose-plugin
root@ubuntu:~
● docker.service - Docker Application Container Engine
Loaded: loaded (/lib/systemd/system/docker.service; enabled; vendor preset>
Active: active (running) since Mon 2024-03-25 05:55:05 PDT; 48s ago
TriggeredBy: ● docker.socket
Docs: https://docs.docker.com
Main PID: 9709 (dockerd)
Tasks: 16
Memory: 30.1M
CGroup: /system.slice/docker.service
└─9709 /usr/bin/dockerd -H fd:// --containerd=/run/containerd/cont>
Mar 25 05:55:05 ubuntu systemd[1]: Starting Docker Application Container Engine>
Mar 25 05:55:05 ubuntu dockerd[9709]: time="2024-03-25T05:55:05.135314728-07:00>
Mar 25 05:55:05 ubuntu dockerd[9709]: time="2024-03-25T05:55:05.135975403-07:00>
Mar 25 05:55:05 ubuntu dockerd[9709]: time="2024-03-25T05:55:05.200514782-07:00>
Mar 25 05:55:05 ubuntu dockerd[9709]: time="2024-03-25T05:55:05.296978228-07:00>
Mar 25 05:55:05 ubuntu dockerd[9709]: time="2024-03-25T05:55:05.306969646-07:00>
Mar 25 05:55:05 ubuntu dockerd[9709]: time="2024-03-25T05:55:05.307023898-07:00>
Mar 25 05:55:05 ubuntu dockerd[9709]: time="2024-03-25T05:55:05.332335835-07:00>
Mar 25 05:55:05 ubuntu systemd[1]: Started Docker Application Container Engine.
lines 1-20/20 (END)
sudo systemctl enable docker
3.3 部署 sonic server
sudo mkdir /opt/sonic/sonic-server
chmod -R 777 /opt/sonic/sonic-server
cd /opt/sonic/sonic-server
wget https://github.com/SonicCloudOrg/sonic-server/releases/download/v2.6.4/sonic-server-v2.6.4.zip
unzip sonic-server-v2.6.4.zip
- (2) 编辑
.env 文件 (无需更改 docker-compose.yml 文件):
root@ubuntu:/opt/sonic/sonic-server
SONIC_SERVER_HOST=xxxx
SONIC_SERVER_PORT=3000
SONIC_EUREKA_USERNAME=sonic
SONIC_EUREKA_PASSWORD=sonic
SONIC_EUREKA_PORT=8761
MYSQL_HOST=xxxx
MYSQL_PORT=3306
MYSQL_DATABASE=sonic
MYSQL_USERNAME=root
MYSQL_PASSWORD=123456
SECRET_KEY=sonic
EXPIRE_DAY=14
PERMISSION_ENABLE=true
PERMISSION_SUPER_ADMIN=sonic
REGISTER_ENABLE=true
NORMAL_USER_ENABLE=true
LDAP_USER_ENABLE=false
LDAP_USER_ID=cn
LDAP_BASE_DN=ou=users
LDAP_BASE=ou=system
LDAP_USERNAME=uid=admin,ou=system
LDAP_PASSWORD=sonic
LDAP_URL=ldap://xxxx:10389
LDAP_OBJECT_CLASS=person
- (3) 确保
Ubuntu 服务器的防火墙允许相关端口:
sudo ufw allow 3000
sudo ufw allow 3306
sudo ufw allow 8761
cd /opt/sonic/sonic-server
docker compose up -d
- (5) 浏览器访问
http://serverip:3000,serverip 为 sonic server 部署的宿主机的 IP,进入 sonic 的注册登录界面且无报错则 sonic server 搭建完成。

3.4 部署 sonic agent
- 注意:
sonic agent 端可以部署在 Mac、Windows、Linux 等操作系统机器上,且支持部署多个,这里以 Windows 为例进行部署操作说明;
- (1) 在
sonic server 平台 Agent中心 新增 1 个 Agent,并复制 Agent Key:

- (2) 创建
sonic-agent 文件夹:
- 新建
sonic-agent 文件夹
mkdir C:\Users\<用户名>\work\sonic-agent
icacls "C:\Users\<用户名>\work\sonic-agent" /grant <用户名>:F /t
- 在
Windows 中 /grant 选项后面是要赋予权限的用户名和权限类型(:F 表示完全控制),/t 是递归地应用到所有子目录和文件;
- (3) 下载
sonic agent(Windows 直接浏览器访问下载然后解压即可):
wget https://github.com/SonicCloudOrg/sonic-agent/releases/download/v2.6.4/sonic-agent-v2.6.4-windows_x86_64.zip
unzip onic-agent-v2.6.4-windows_x86_64.zip
- (4) 修改
/config/application-sonic-agent.yml 文件配置信息:
sonic:
agent:
host: xx.xxx.xx.x
port: 7777
key: 47821753-6831-4de5-834c-4f59e3fa406c
server:
host: xx.xxx.xx.xx
port: 3000
modules:
android:
enable: true
use-adbkit: true
ios:
wda-bundle-id: com.sonic.WebDriverAgentRunner
chcp 65001
java -jar sonic-agent-windows-x86_64.jar
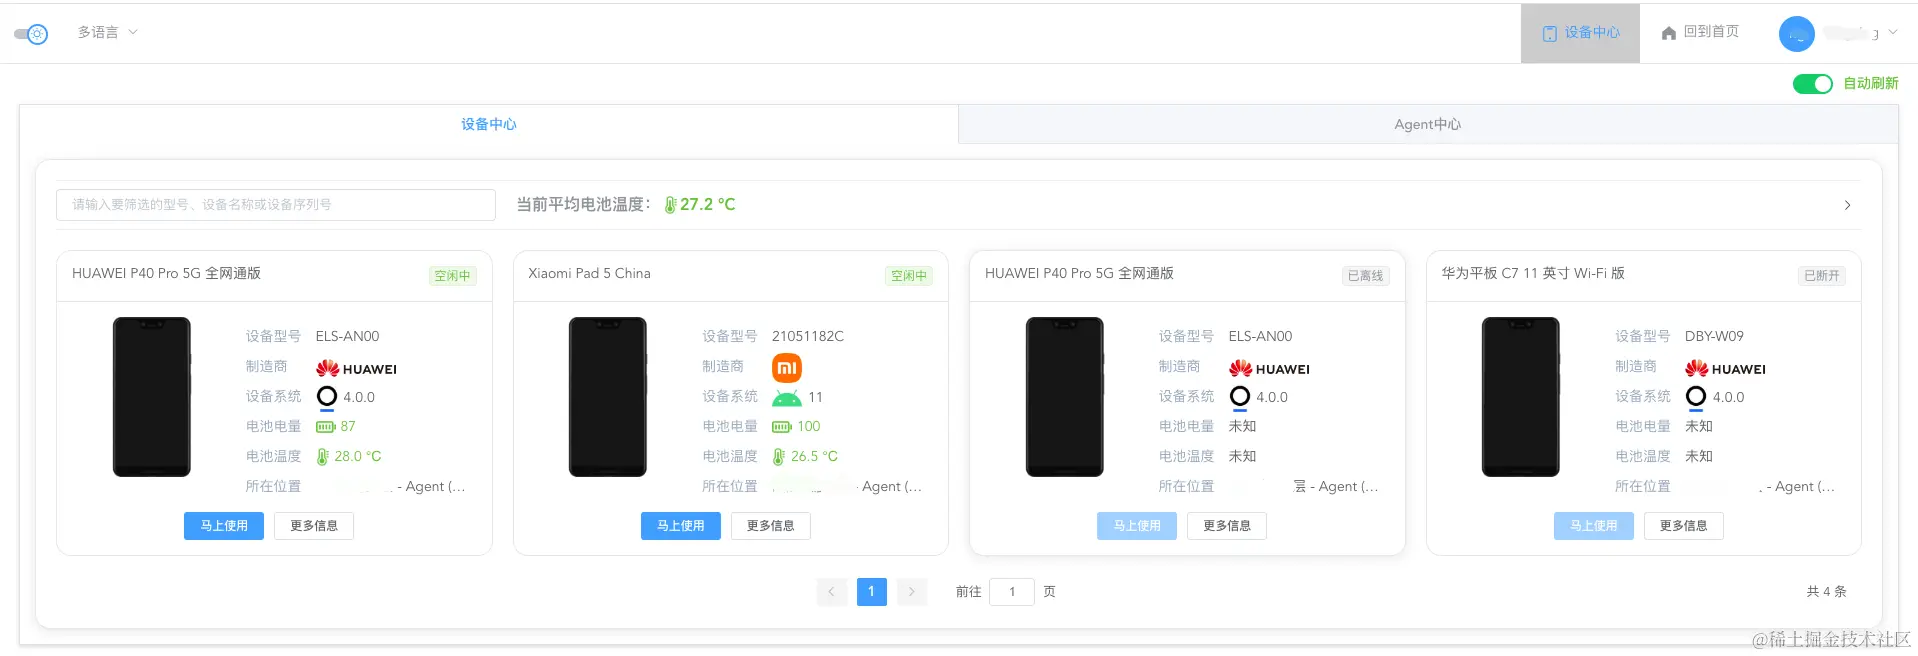
- 启动成功后刷新平台设备中心,可以看到设备在线,并可以正常使用:
4 设备接入
4.1 Android 设备接入
4.2 iOS 设备接入
5 参考文档


