

本文正在参加「金石计划」
flag:每月至少产出三篇高质量文章~
欢迎关注我的另外几篇文章:
- 【微前端】在造一个微前端轮子之前,你需要知道这些~
- 【重学CSS】图文并茂!一次性搞懂 Flex 布局,实现“布局自由”~
- 【重学CSS】图文并茂!一次性搞懂 Grid 布局,实现“布局自由”~
- 【脚手架】从0到1搭建React18+TS4.x+Webpack5项目(一)项目初始化
- 【脚手架】从0到1搭建React18+TS4.x+Webpack5项目(二)基础功能配置
- 【脚手架】从0到1搭建React18+TS4.x+Webpack5项目(三)代码质量和git提交规范
- 【React】万字长文!100+个让你事半功倍的常用 React Hooks 和工具包
- 【React】面试官:如何在页面刷新之后保持状态?看看你知道几种~
- 【2023】前端趋势前瞻,学起来!
在【微前端】在造一个微前端轮子之前,你需要知道这些~ 文中,我详细列举了当前实现微前端的多种方式,本文将基于 Webpack 5 Module Federation 从0到1实现一个以 React 项目为容器,集成多个 React 和 Vue 项目的微前端项目,文末有源码,请自行食用 ~
“Good frontend development is hard. Scaling frontend development so that many teams can work simultaneously on a large and complex product is even harder.” —— Martin Fowler
“好的前端开发很难。扩展前端开发,让许多团队可以同时在一个大型复杂的产品上工作,这就更难了。” —— 马丁·福勒
1、什么是模块联邦(Module Federation)
在模块联邦(Module Federation)出现之前,独立应用程序之间共享代码的可扩展解决方案,最接近的是 externals 或 DLLPlugin,强制集中依赖于外部文件。共享代码很麻烦,单独的应用程序并不是真正独立的,通常共享的依赖项数量有限。此外,在单独捆绑的应用程序之间共享实际功能代码或组件是不可行的、低效的且收益甚微的。
模块联邦(Module Federation)出现的动机:多个独立的构建可以组成一个应用程序,这些独立的构建之间不应该存在依赖关系,因此可以单独开发和部署它们。这通常被称作微前端,但并不仅限于此。—— module federation —— webpack 官方
Webpack模块联邦(Webpack Module Federation)是 Webpack 5 中引入的一项新功能,它允许不同的 Webpack构建 之间共享代码并动态加载依赖项。具体来说,它允许将应用程序拆分成多个独立的 Webpack构建(或称为远程应用程序),这些构建可以在运行时共享代码和依赖项。
通过使用 Webpack模块联邦,不同的团队可以独立地构建和部署其应用程序的各个部分,而不必将所有代码都打包到一个大的 JavaScript 文件中。这可以提高应用程序的性能和可维护性,同时使得不同团队之间的合作更加容易。
Webpack模块联邦包含两个主要概念:提供者(Provider) 和 使用者(Consumer)。提供者是将模块暴露给其他应用程序的 Webpack 构建,而使用者则是从提供者加载模块的 Webpack构建。使用 Webpack模块联邦 时,提供者将暴露一个或多个模块,这些模块可以由使用者在运行时动态加载和使用。
要使用Webpack模块联邦,需要在Webpack配置中添加相应的插件和配置。对于提供者,需要使用ModuleFederationPlugin插件配置要暴露的模块和提供者的名称。对于使用者,需要使用remoteEntry配置和remotes选项指定要从哪个提供者加载模块。
Webpack模块联邦是一项强大的功能,可以使得多个Webpack构建之间实现代码共享和动态加载,从而提高应用程序的性能和可维护性,同时使得不同团队之间的合作更加容易。
1.1 Module Federation 核心概念
Container
一个使用 ModuleFederationPlugin 构建的应用就是一个 Container,它可以加载其他的 Container,也可以被其他的 Container 加载。
Host&Remote
从消费者和生产者的角度看 Container,Container 可以分为 Host 和 Remote,Host 作为消费者,他可以动态加载并运行其他 Remote 的代码,Remote 作为提供方,他可以暴露出一些属性、方法或组件供 Host 使用,这里要注意的一点是一个 Container 既可以作为 Host 也可以作为 Remote。
Shared
shared 表示共享依赖,一个应用可以将自己的依赖共享出去,比如 react、react-dom、mobx等,其他的应用可以直接使用共享作用域中的依赖从而减少应用的体积。
其运行原理可看以下这几篇优质的文章,这里就不赘述了,否则又是一篇“万字长文”:
1.2 配置属性
下面是 Module Federation 的几个属性:
const HtmlWebpackPlugin = require("html-webpack-plugin");
const ModuleFederationPlugin = require("webpack/lib/container/ModuleFederationPlugin");

module.exports = {
    // ...

    plugins: [
        new ModuleFederationPlugin({
            name: '_app_one_remote',  // 当前APP作为remote暴露组件时的APP的名字
            library: 'app_one_remote', // 当前APP作为remote暴露组件时的library名字
            filename: 'remoteEntry.js',
            // 所有被暴露的组件会打包到这个文件中,同理使用者也需要从这里引入
            remotes: {
                app_two: "app_two_remote",
                app_three: "app_three_remote"
            },
            // 定义该库作为host时可能要引用的remote
            exposes: {
                'AppContainer': './src/App'
            },
            // 定义该库作为remote时,要暴露出去的组件。左边是相对路径和组件名字(其他库使用时候),右边是该组件在本库内的路径
            shared: ["react", "react-dom","react-router-dom"] // 和引入的组件公用的dependency
        })
    ]
};
1.2.1 name
在 Module Federation 中,每个模块都有一个名称。该名称将用于标识模块,并确保其他应用程序可以正确地引用该模块。name 属性用于指定模块的名称。例如:
plugins: [
    new ModuleFederationPlugin({
      name: 'she1',
    })
  ]
};
1.2.2 filename
filename 属性用于指定将要生成的远程模块的文件名。在本地开发模式下,该文件将被提供给其他远程应用程序使用。例如:
plugins: [
  new ModuleFederationPlugin({
    filename: 'she1/remoteShop.js'
  })
]
1.2.3 exposes
exposes 属性用于指定要暴露的模块和其导出项。它允许其他应用程序通过远程加载器使用这些模块。例如:
plugins: [
  new ModuleFederationPlugin({
    name: "myModule",
    exposes: {
        HomeComponent: './projects/app1-home/src/app/home/home.component.ts',
        ShellModule: './projects/app1-home/src/app/shell/shell.module.ts'
    }
  })
]
1.2.4 remotes
remotes 属性用于指定需要从其他应用程序远程加载的模块。例如:
plugins: [
  new ModuleFederationPlugin({
     remotes: {
        ShellModule: 'ShellModule@http://localhost:4400/remoteHome.js'
     }
  })
]
1.2.5 shared
shared 属性用于指定需要共享的模块,它允许你共享公共模块运行所依赖的节点库。如果两个应用程序都使用了同一版本的模块,则可以使用 shared 属性来共享该模块,从而减少应用程序的大小和加载时间。例如:
plugins: [
  new ModuleFederationPlugin({
   shared: {
      react: { eager: true, singleton: true },
      "react-dom": { eager: true, singleton: true },
      "place-my-order-assets": {eager: true, singleton: true},
    }
  })
]
在这个例子中,两个应用程序共享 React 和 React DOM 模块,它们都是单例模式,只有一个实例在内存中。
shared 选项使用 sharedPlugin,它有自己的一套配置属性。这有助于管理库在共享范围内的共享方式。
需要知道的一些重要配置选项是:
-
eager: 允许
Webpack直接包含共享包,而不是通过异步请求获取库。当eager设置为 时true,所有共享模块将与暴露的模块一起编译。 -
singleton: 在共享范围内只允许共享模块的单一版本。这意味着在任何情况下,页面上只会加载一个版本的包。如果一个范围已经有一个
@angular/core的版本,并且导入的模块使用了不同版本的@angular/core,Webpack将忽略新版本并使用范围中已经存在的版本。 -
StrictVersion: 允许 Webpack 在版本无效时拒绝共享模块。这在指定所需版本时很有用。
-
RequiredVersion: 此选项说明共享模块的所需版本。在 Webpack 官方文档中了解有关共享选项的更多信息。
1.3 Module Federation 的特点
1.3.1 支持在项目中直接导出某个模块,直接单独打包
目前,我们在跨项目/跨团队项目间复用时,主要用的方式还是以导出 npm包 为主,而npm包的抽离、发布、维护都需要一定的成本。而且当多个项目依赖同一个npm包时,若npm有升级,则所有依赖项目都要相应更新,然后重新发布。而且往往你在写某个逻辑的时候,可能并没有预想到后来有复用的可能,那么这个时候抽成npm包来复用还是比较麻烦的。
而 Module Federation 模块是可以在项目中直接导出某个模块,单独打包的,如下图:
这样就很灵活,在复用逻辑的时候可以做到尽可能对现有项目少改造,快速导出。
1.2.2 支持运行时加载
可以减少打包时的代码体积,使用起来和在同一个项目下无区别。
1.3.3 更小的加载体积
因为拆分打包,所以有了更小的加载体积,而且当前子系统已经下载的 chunk 可以被共享,如果可以复用,下一个子系统将不会再次下载。这也就具备了可以在项目运行时同步更新不同项目间的同一模块逻辑依赖且节约了代码构建成本,维护成本等。
1.3.4 其他
- 相比过去,
externals无法多版本共存,dll无法共享模块,Module Federation完美解决。 - 借助运行时动态加载模块的特性,可以做到更好的
A/B test Module Federation可以和服务端渲染结合使用,也与 CDN 的边缘计算契合的很好,畅想一下,它还能结合serverless做按需编译的加载。
1.4 Module Federation 的缺点
- 对环境要求略高,需要使用
webpack5,旧项目改造成本大。 - 对代码封闭性高的项目,依旧需要做npm那一套管理和额外的拉取代码,还不如npm复用方便。
- 拆分粒度需要权衡,虽然能做到依赖共享,但是被共享的lib不能做
tree-shaking,也就是说如果共享了一个lodash,那么整个lodash库都会被打包到shared-chunk中。虽然依赖共享能解决传统微前端的externals的版本一致性问题。 - webpack为了支持加载
remote模块对runtime做了大量改造,在运行时要做的事情也因此陡然增加,可能会对我们页面的运行时性能造成负面影响。 - 运行时共享也是一把双刃剑,如何去做版本控制以及控制共享模块的影响是需要去考虑的问题。
- 远程模块
typing的问题。
2、基于模块联邦实现微前端项目
2.1 创建三个前端项目
我们先使用 create-react-app 创建 3 个项目:container、micro-front-end-1 和 micro-front-end-2:
npx create-react-app container
npx create-react-app micro-front-end-1
npx create-react-app micro-front-end-2
2.2 改造 micro-front-end-1
cd micro-front-end-1
先安装webpack相关的依赖:
yarn add webpack webpack-cli webpack-server html-webpack-plugin webpack-dev-server -D
删除 micro-front-end-1/src/index.js 中的所有代码,并将其替换为:
在 micro-front-end-1 项目根目录中创建 webpack.config.js:
module.exports = {
  mode: "development",
};
在 package.json 中加入 script:
然后使用 webpack 打包 micro-front-end-1 代码:
yarn webpack
将会在根目录生成一个 dist 的产物文件夹:
接着添加 webpack server 配置:
const HtmlWebpackPlugin = require("html-webpack-plugin");

module.exports = {
  mode: "development",
  devServer: {
    port: 8081,
  },
  plugins: [
    new HtmlWebpackPlugin({
      template: "./public/index.html",
    }),
  ],
};
修改 package.json 中 webpack script:
 "scripts": {
    "webpack": "webpack serve",
    // ...
  },
清理掉 public/index.html 中的一些无用的代码:
<!DOCTYPE html>
<html lang="en">

<head>

</head>

<body>
  <div id="root"></div>
</body>

</html>
并将 src/index.js 中的代码改成:
document.querySelector("#root").innerHTML = `<h1>Micro-Front-End-1</h1>`;
然后运行 yarn webpack,这将启动一个位于 8081端口 的本地服务,在控制台,你就可以看到我们在 src/index.js 中写的代码:
2.3 改造 Container
cd container
安装一些必要的依赖:
yarn add webpack webpack-cli webpack-server html-webpack-plugin -D
在 container 的根目录也配置一个 webapck.config.js 文件:
const HtmlWebpackPlugin = require("html-webpack-plugin");

module.exports = {
  mode: "development",
  devServer: {
    port: 8080,
  },
  plugins: [
    new HtmlWebpackPlugin({
      template: "./public/index.html",
    }),
  ],
};
也在 package.json 的 scripts 中加入:
"webpack": "webpack serve",
改造 public/index.html 和 src/index.js:
<!DOCTYPE html>
<html lang="en">

<head>

</head>

<body>
    <div id="root"></div>
</body>

</html>
console.log("Container");
执行 yarn webpack,打开 http://localhost:8080/:
2.4 在 container 中引入 micro-front-end-1
2.4.1 引入 Module Federation
在 micro-front-end-1/webpack.config.js 中加入:
const HtmlWebpackPlugin = require("html-webpack-plugin");
const ModuleFederationPlugin = require("webpack/lib/container/ModuleFederationPlugin");

module.exports = {
  mode: "development",
  devServer: {
    port: 8081,
  },
  plugins: [
    new ModuleFederationPlugin({
      name: "microFrontEnd1",
      filename: "remoteEntry.js",
      exposes: {
        "./MicroFrontEnd1Index": "./src/index",
      },
    }),
    new HtmlWebpackPlugin({
      template: "./public/index.html",
    }),
  ],
};
这将从 micro-front-end-1 暴露出 index.js。(注意:这里使用了驼峰命名法)
2.4.2 在 container 中引入
在 container/webpack.config.js 中添加:
const HtmlWebpackPlugin = require("html-webpack-plugin");
const ModuleFederationPlugin = require("webpack/lib/container/ModuleFederationPlugin");

module.exports = {
  mode: "development",
  devServer: {
    port: 8080,
  },
  plugins: [
    new ModuleFederationPlugin({
      name: "container",
      remotes: {
        microFrontEnd1: "microFrontEnd1@http://localhost:8081/remoteEntry.js",
      },
    }),
    new HtmlWebpackPlugin({
      template: "./public/index.html",
    }),
  ],
};
然后,将 container/src/index.js 重命名为 container/src/bootstrap.js,并导入microFrontEnd1/MicroFrontEnd1Index(这是为了异步运行文件,直到它从 micro-front-end-1 获得数据到容器中。)
// container/src/bootstrap.js

import "microFrontEnd1/MicroFrontEnd1Index";

console.log("Container!");
创建一个新的 container/src/index.js 并导入 bootstrap.js:
// container/src/index.js

import("./bootstrap");
重新运行两个项目:
打开控制台,选择网络,禁用缓存,如下图所示:
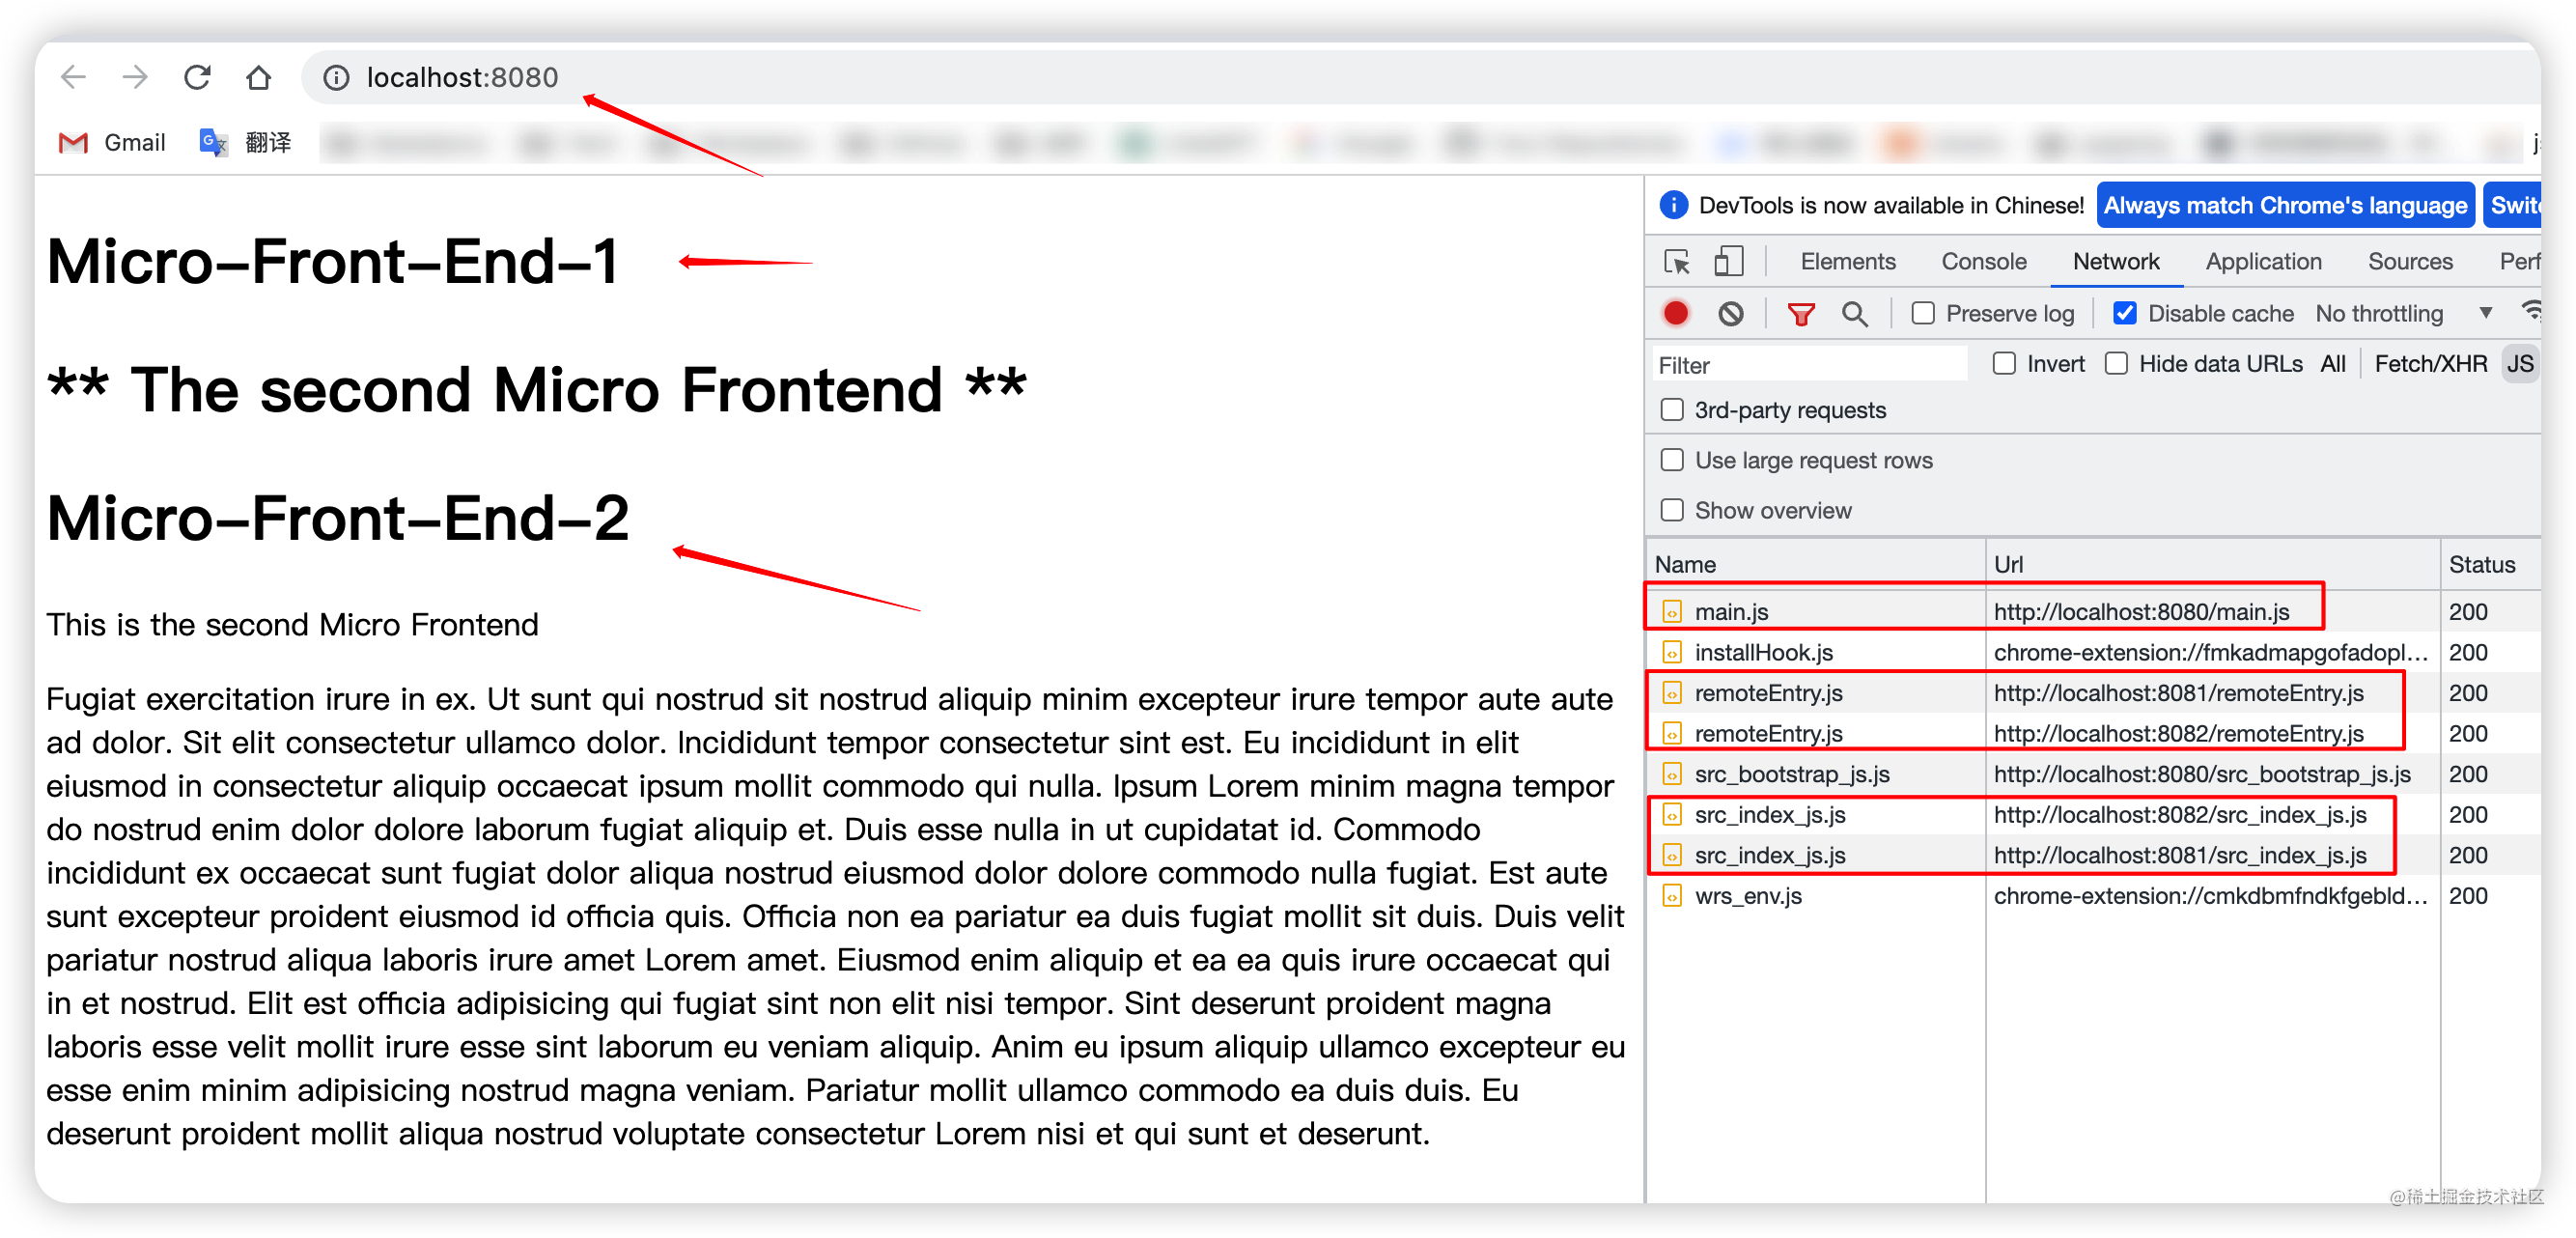
刷新页面:
右键单击名称旁边的标题,从菜单中选择Url,以显示被调用的URL
整个流程是这样的:
- 它首先在
http://localhost:8080/main.js上调用main.js,这就是容器。 - 在
http://localhost:8081/remoteEntry.js上调用了remoteEntry.js。这是micro-front-end-1 - 再次回到容器中调用
bootstrap - 最后从
micro-front-end-1(index.js)调用src_index_js.js,将其输出渲染在屏幕上
所有这些都基于 ModuleFederationPlugin:
webpack 使用 micro-front-end-1/webpack.config.js 的这个配置来创建http://localhost:8081/remoteEntry.js 和 http://localhost:8081/src_index_js.js。
然后 container/webpack.config.js 上的配置告诉服务器如何获取 http://localhost:8081/remoteEntry.js:
在 http://localhost:8081/remoteEntry.js 里获取 src_index_js.js 所需的信息:
模块联邦允许 JavaScript 在运行时将代码从 micro-front-end-1 动态地导入到 container 中。
2.5 改造并引入 micro-front-end-2
2.5.1 改造 micro-front-end-2
cd mirco-front-end-2
安装必要的依赖:
yarn add webpack webpack-cli webpack-server html-webpack-plugin -D
在 micro-front-end-2 的根目录下新建 webapck.config.js:
const HtmlWebpackPlugin = require("html-webpack-plugin");
const ModuleFederationPlugin = require("webpack/lib/container/ModuleFederationPlugin");

module.exports = {
  mode: "development",
  devServer: {
    port: 8082,
  },
  plugins: [
    new ModuleFederationPlugin({
      name: "microFrontEnd2",
      filename: "remoteEntry.js",
      exposes: {
        "./MicroFrontEnd2Index": "./src/index",
      },
    }),
    new HtmlWebpackPlugin({
      template: "./public/index.html",
    }),
  ],
};
接着在 package.json 中增加 webpack script:
 "scripts": {
    "webpack": "webpack serve",
    // ...
  },
删除 micro-front-end-2/public/index.html 的内容,并将 micro-front-end-1/public/index.html 的内容复制到其中。用一个新的id替换,如下所示:
// micro-front-end-2/public/index.html

<!DOCTYPE html>
<html lang="en">

<head>
</head>

<body>
  <div id="microFrontend2"></div>
</body>

</html>
删除 micro-front-end-2/src/index.js 的内容,并将 micro-front-end-1/public/index.html 的内容复制到其中。在<h1>标签中用你上面的id和服务名称替换:
// micro-front-end-2/src/index.js

document.querySelector('#microFrontend2').innerHTML =
    `<h1>Micro-Front-End-2</h1>
    <p>This is the second Micro Frontend</p>
    <p> Fugiat exercitation irure in ex. Ut sunt qui nostrud sit nostrud aliquip minim excepteur irure tempor aute aute ad dolor. Sit elit consectetur ullamco dolor.

Incididunt tempor consectetur sint est. Eu incididunt in elit eiusmod in consectetur aliquip occaecat ipsum mollit commodo qui nulla. Ipsum Lorem minim magna tempor do nostrud enim dolor dolore laborum fugiat aliquip et. Duis esse nulla in ut cupidatat id. Commodo incididunt ex occaecat sunt fugiat dolor aliqua nostrud eiusmod dolor dolore commodo nulla fugiat. Est aute sunt excepteur proident eiusmod id officia quis. Officia non ea pariatur ea duis fugiat mollit sit duis.

Duis velit pariatur nostrud aliqua laboris irure amet Lorem amet. Eiusmod enim aliquip et ea ea quis irure occaecat qui in et nostrud. Elit est officia adipisicing qui fugiat sint non elit nisi tempor. Sint deserunt proident magna laboris esse velit mollit irure esse sint laborum eu veniam aliquip. Anim eu ipsum aliquip ullamco excepteur eu esse enim minim adipisicing nostrud magna veniam. Pariatur mollit ullamco commodo ea duis duis. Eu deserunt proident mollit aliqua nostrud voluptate consectetur Lorem nisi et qui sunt et deserunt.</p>`
然后执行 yarn webapck,打开 http://localhost:8082/,就可以看到:
2.5.2 引入到 container 中
在 container/webpack.config.js 中增加:
const HtmlWebpackPlugin = require("html-webpack-plugin");
const ModuleFederationPlugin = require("webpack/lib/container/ModuleFederationPlugin");

module.exports = {
  mode: "development",
  devServer: {
    port: 8080,
  },
  plugins: [
    new ModuleFederationPlugin({
      name: "container",
      remotes: {
        microFrontEnd1: "microFrontEnd1@http://localhost:8081/remoteEntry.js",
        microFrontEnd2: "microFrontEnd2@http://localhost:8082/remoteEntry.js",
      },
    }),
    new HtmlWebpackPlugin({
      template: "./public/index.html",
    }),
  ],
};
在 container/src/bootstrab.js 中添加以下导入:
import "microFrontEnd1/MicroFrontEnd1Index";
import "microFrontEnd2/MicroFrontEnd2Index";

console.log("Container!");
在 container/public/index.html 中,添加一个 id 为 micro-front-end-2 的 div:
<!DOCTYPE html>
<html lang="en">
<head>
</head>
<body>
<div id="root"></div>
<h1>** The second Micro Frontend **</h1>
<div id="microFrontend2"></div>
</body>
</html>
重新启动 container 项目,并打开 http://localhost:8080/:
搞定~
2.6 集成 React 微前端
2.6.1 新建并改造 react-microfrontend-3
到目前为止,虽然我们使用 create-react-app 创建了三个项目,但是实际上我们还没有真正使用过 React。接下来,我们添加第三个微前端:react-microfrontend-3:
npx create-react-app react-microfrontend-3
安装必要的依赖:
yarn add webpack webpack-cli webpack-server html-webpack-plugin webpack-dev-server -D
在 package.json 中增加 webpack script:
 "scripts": {
    "webpack": "webpack serve",
    // ...
  },
我们需要一些规则才能将 JSX 转换为任何浏览器都可以理解的 JavaScript ES5。我们不必在前两个组件中执行此操作,因为它们都是纯 JavaScript。在 react-microfrontend-3 根目录下添加 webpack.config.js:
const HtmlWebpackPlugin = require("html-webpack-plugin");
const ModuleFederationPlugin = require("webpack/lib/container/ModuleFederationPlugin");

module.exports = {
  mode: "development",
  devServer: {
    port: 8083,
  },
  module: {
    rules: [
      {
        test: /\.js?$/,
        exclude: /node_modules/,
        loader: "babel-loader",
        options: {
          presets: [
            "@babel/preset-env", // 将高级语法转译至 ES5
            "@babel/preset-react", // 编译react语法至 ES5
          ],
        },
      },
    ],
  },

  plugins: [
    new ModuleFederationPlugin({
      name: "microFrontEnd3",
      filename: "remoteEntry.js",
      exposes: {
        "./MicroFrontEnd3Index": "./src/index",
      },
    }),
    new HtmlWebpackPlugin({
      template: "./public/index.html",
    }),
  ],
};
改造一下 src 文件:
- 增加
bootstrap.js文件:
import React from "react";
import ReactDOM from "react-dom";
import App from "./App";

ReactDOM.render(<App />, document.getElementById("react-microfrontend-3"));
- 重写
App.js:
import React from "react";

const App = () => {
  return (
    <main>
      <h1>This is the react-microfrontend-3 app</h1>
    </main>
  );
};
export default App;
- 重写
index.js:
import("./bootstrap");
记得也改造一下 public/index.html:
<!DOCTYPE html>
<html>
    <head></head>
    <body>
      <h1>react-microfrontend-3</h1>
        <div id="react-microfrontend-3"></div>
    </body>
</html>
然后执行 yarn webpack,打开 http://localhost:8083/:
2.6.2 引入到 container
跟上面两个项目引入的方式是一样的,在 container/src/bootstrap.js 中导入:
import "microFrontEnd1/MicroFrontEnd1Index";
import "microFrontEnd2/MicroFrontEnd2Index";
import "microFrontEnd3/MicroFrontEnd3Index";

console.log("Container!");
在 public/index.html 中增加一个 id 为 react-microfrontend-3 的 div:
<!DOCTYPE html>
<html lang="en">

<head>
</head>

<body>
  <div id="root"></div>
  <h1>** The second Micro Frontend **</h1>
  <div id="microFrontend2"></div>
  <div id="react-microfrontend-3"></div>
</body>

</html>
最后在 container/webpack.config.js 中引入:
const HtmlWebpackPlugin = require("html-webpack-plugin");
const ModuleFederationPlugin = require("webpack/lib/container/ModuleFederationPlugin");

module.exports = {
  mode: "development",
  devServer: {
    port: 8080,
  },
  plugins: [
    new ModuleFederationPlugin({
      name: "container",
      remotes: {
        microFrontEnd1: "microFrontEnd1@http://localhost:8081/remoteEntry.js",
        microFrontEnd2: "microFrontEnd2@http://localhost:8082/remoteEntry.js",
        microFrontEnd3: "microFrontEnd3@http://localhost:8083/remoteEntry.js",
      },
    }),
    new HtmlWebpackPlugin({
      template: "./public/index.html",
    }),
  ],
};
重启所有项目,你就可以在 http://localhost:8080/ 中看到我们引入了第三个 react 微前端了:
至此,我们便完成了一个基本的基于 webpack 模块联邦 的微前端项目了,code 请看这里 ~
2.7 集成 Vue 微前端
集成方式跟 react项目 几乎相同,这里就不赘述了,可看 源码 ~
最终效果图:
3、推荐阅读
- Webpack 5 Module Federation: A game-changer in JavaScript
- webpack-module-federation
- module-federation-examples
end~
