

毫无疑问,我们生活在编辑器的最好年代,Vim是仅在Vi之下的神级编辑器,而脱胎于Vim的NeoVim则是这个时代最好的编辑器,没有之一。异步支持、更好的内存管理、更快的渲染速度、更多的编辑命令,是大神Thiago de Arruda对开发者们最好的技术馈赠。
之前一篇:Win10系统下安装编辑器之神(The God of Editor)Vim并且构建Python生态开发环境(2020年最新攻略),我们已经领略了Vim的魅力,但时代不同了,繁琐的配置,差强人意的性能,很难不让人把目光投向NeoVim,正所谓江山代有人才出,一代更比一代强。
安装配置
首先去Github项目官网下载最新稳定版0.8.2:github.com/neovim/neov… C:\nvim-win64中。
NeoVim有两个启动程序,分别是nvim-qt.exe和nvim.exe,前者是基于Gui的客户端,后者则基于终端Terminal,解压之后,最好将bin目录配置到系统的环境变量:C:\nvim-win64\nvim-win64\bin ,如此,我们就可以在系统的任意位置启动NeoVim。
随后我们安装基于异步方法的插件管理工具:vim-plug。
首先,在vim-plug首页:github.com/junegunn/vi… 下载plug.vim配置文件,随后将其复制到到C:\Users\liuyue\AppData\Local\nvim\autoload下,如果没有这个文件夹,就自己建一个nvim\autoload文件夹。这里需要注意的是AppData目录默认是隐藏的,需要在windows目录选项中开启显示隐藏目录。
其后,在C:\Users\liuyue\AppData\Local\nvim\目录中建立NeoVim的初始化配置init.vim:
call plug#begin('C:\nvim-win64\nvim-win64\share\nvim\plugged)

"插件列表

call plug#end()
这里首行是插件的安装目录,随后只要把想要安装的插件写入到两个call关键字之间即可。
至此,NeoVim的安装就完成了。
第一个NeoVim插件
第一个NeoVim插件我们从主题入手,毕竟个性化是最不能被忽略的需求,这里主题推荐邪魅狂狷的One Dark主题:github.com/navarasu/on…
修改init.vim配置:
call plug#begin('C:\nvim-win64\nvim-win64\share\nvim\plugged')

Plug 'navarasu/onedark.nvim'


call plug#end()

let g:onedark_config = {
    \ 'style': 'warm',
\}
colorscheme onedark
这里添加Plug 'navarasu/onedark.nvim'插件,随后通过:
let g:onedark_config = {
    \ 'style': 'warm',
\}
colorscheme onedark
对NeoVim的主题进行设置,保存之后,在终端启动NeoVim:
nvim test.py
发现主题并未发生变化:
那是因为插件必须先进行安装,在命令模式输入:
:PlugInstall
随后重启nvim:
One Dark 主题跃然纸上。
目录管理
目录管理插件可以让开发者迅速地操作项目目录中的代码,这里推荐使用github.com/pablopunk/n… ,简单方便,开箱可用:
call plug#begin('C:\nvim-win64\nvim-win64\share\nvim\plugged')


Plug 'navarasu/onedark.nvim'

Plug 'pablopunk/native-sidebar.vim'


call plug#end()

let g:onedark_config = {
    \ 'style': 'warm',
\}
colorscheme onedark


let g:native_sidebar_shortcut = '<c-t>'
这里我们通过control+t来开启左侧目录树:
终端配置
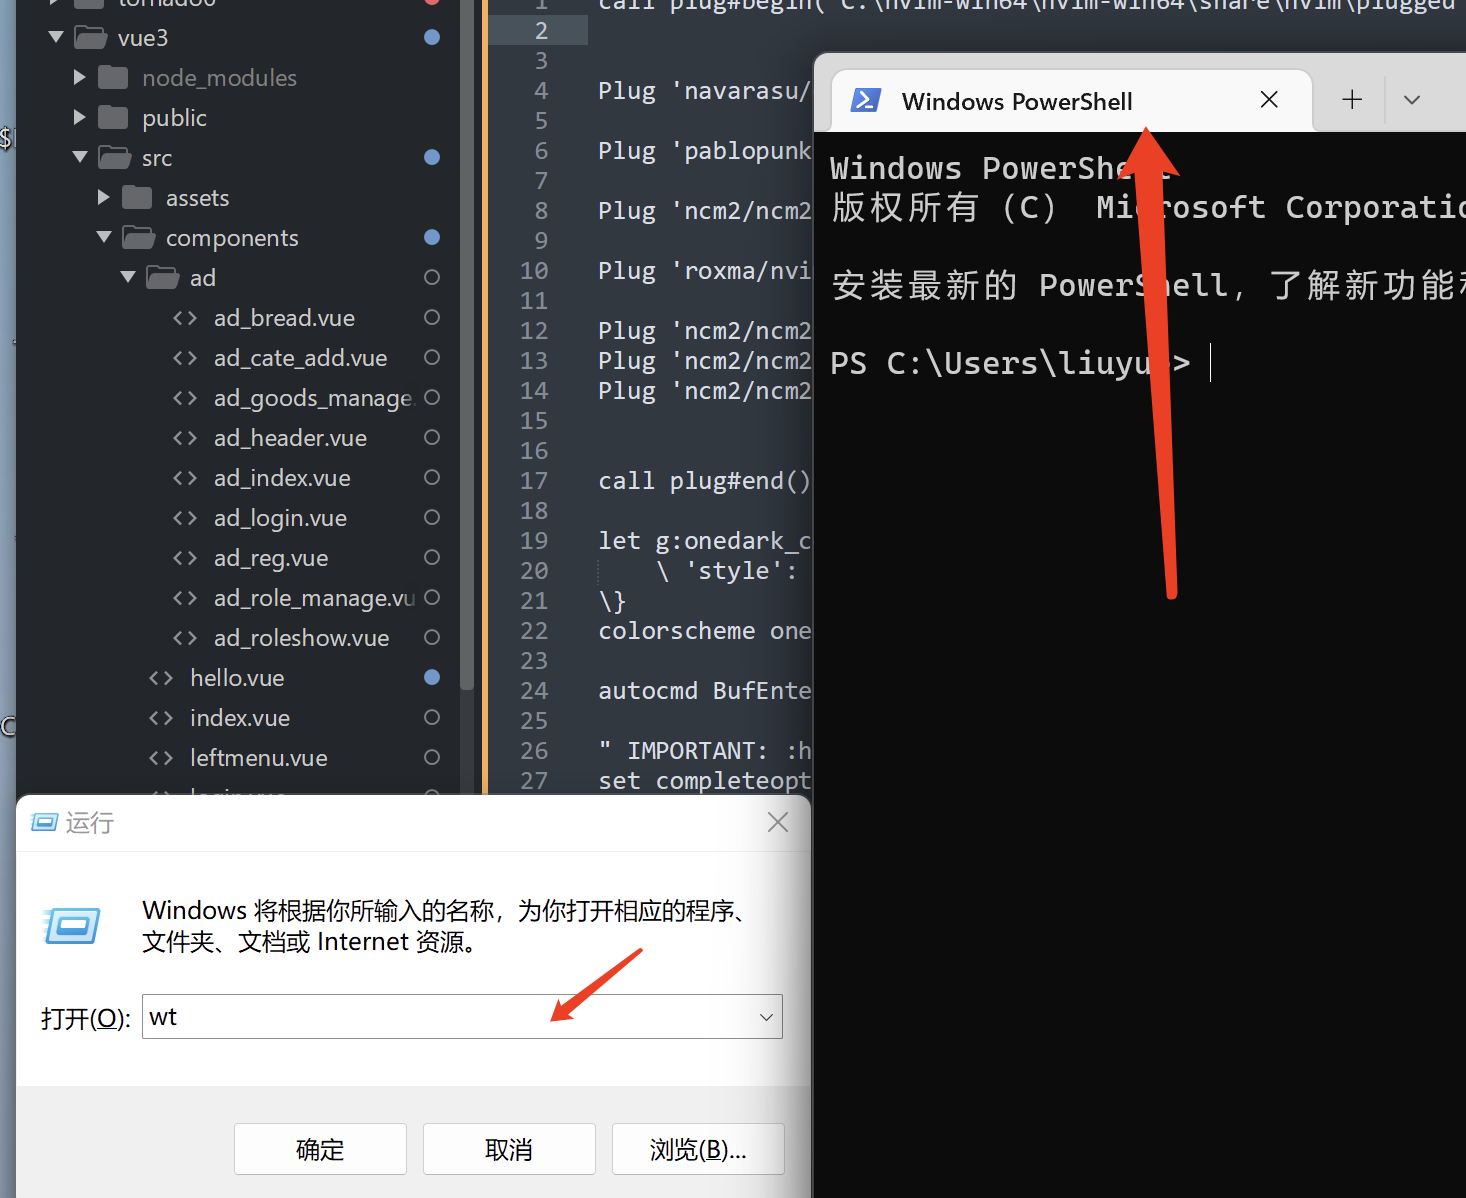
Windows11系统默认采用的还是Win10时代丑陋的CMD终端风格,但其实,Windows11也默认预装了最新的Windows Terminal终端。
首先按视窗建+R,输入wt 第一次启动Windows Terminal:
在终端窗口中点击下拉菜单,找到设置选项。
默认终端应用程序可以修改为 Windows Terminal,这样启动CMD时就是Windows Terminal 终端窗口了:

如此,NeoVim的字体风格就可以继承Windows Terminal的新风格了。
Python代码补全配置
用NeoVim来写Python代码,就会有代码补全的需求,业内比较流行的插件是jedi-vim:github.com/davidhalter…
jedi-vim针对开发者的需求,编写如语法增强、文档查看、自动补全等各类功能,并且进行了重构和集成,提供了开箱即用的统一解决方案,一经推出便广受好评,成为使用 Vim 进行 Python 开发的标配。
但是jedi-vim虽然开箱即用,但却是一坨杂乱的乱炖,不仅随着项目功能的增加变得越发庞大和迟缓(有点类似著名的node-moudles),代码的可读性也非常糟糕,难以维护和参与。
所以这里推荐性能更优越的ncm2,一个异步自动补全框架:github.com/ncm2/ncm2
首先安装相关依赖:
python3 -m pip install pynvim
python3 -m pip install jedi
pip3 install neovim --upgrade
随后编写配置:
call plug#begin('C:\nvim-win64\nvim-win64\share\nvim\plugged')


Plug 'navarasu/onedark.nvim'

Plug 'pablopunk/native-sidebar.vim'

Plug 'ncm2/ncm2'
Plug 'roxma/nvim-yarp'
Plug 'ncm2/ncm2-bufword'
Plug 'ncm2/ncm2-path'
Plug 'ncm2/ncm2-jedi'


call plug#end()

let g:onedark_config = {
    \ 'style': 'warm',
\}
colorscheme onedark

autocmd BufEnter * call ncm2#enable_for_buffer()

" IMPORTANT: :help Ncm2PopupOpen for more information
set completeopt=noinsert,menuone,noselect


let g:native_sidebar_shortcut = '<c-t>'
主要依赖这几个插件:
Plug 'ncm2/ncm2'
Plug 'roxma/nvim-yarp'
Plug 'ncm2/ncm2-bufword'
Plug 'ncm2/ncm2-path'
Plug 'ncm2/ncm2-jedi'
随后开启NeoVim进行安装:
:PlugInstall
重启NeoVim:
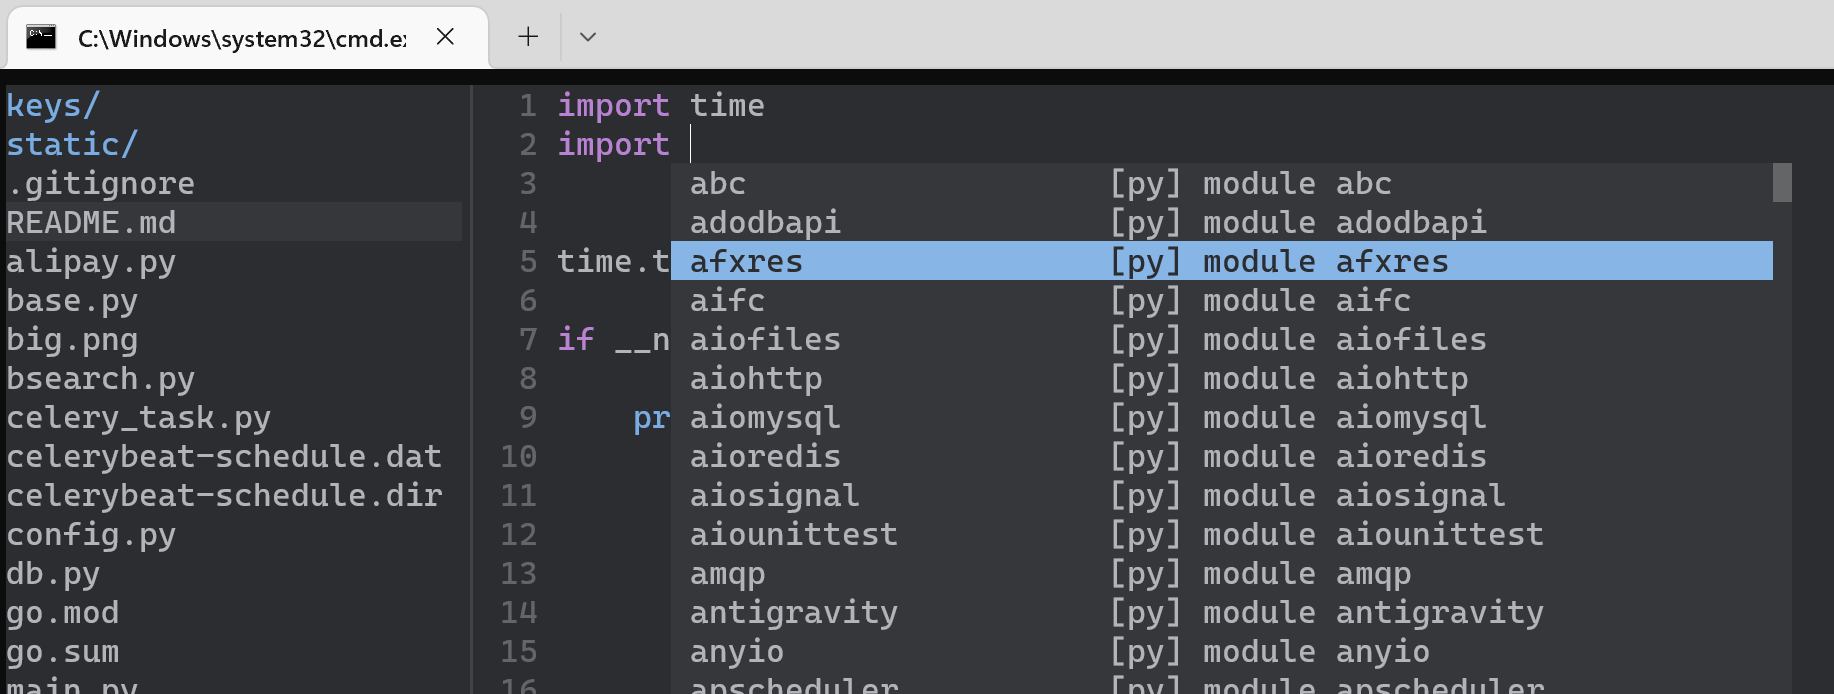
看起来还不错吧?
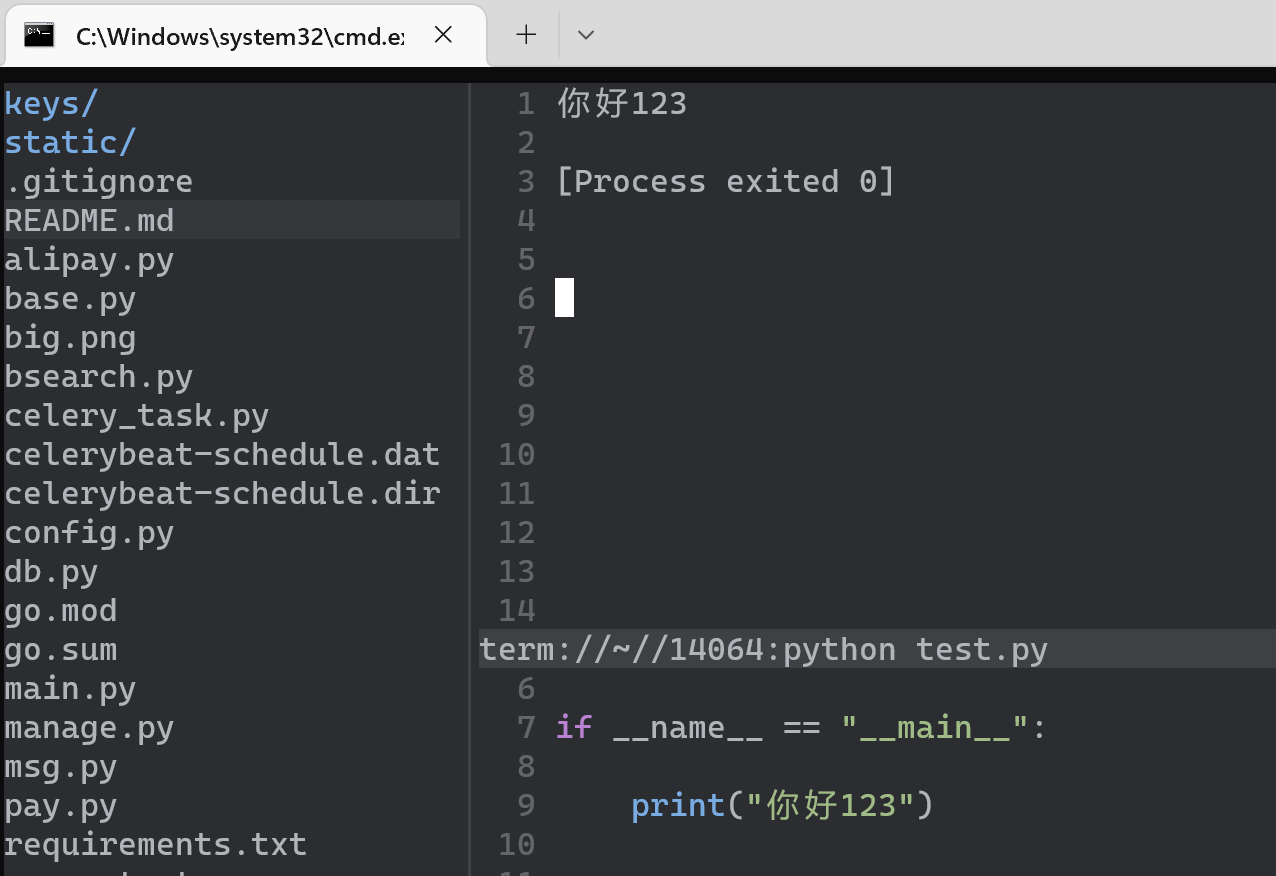
最后,继续修改配置,让NeoVim可以直接编译运行Python代码:
nnoremap <C-B> :sp <CR> :term python % <CR>
nnoremap <C-W> :bd!<CR>
这里通过control+b快捷键组合来编译运行,control+w组合键关闭弹窗:
轻量化、简单、快速,让普通小白也能玩得起来,这就是在Win11下用NeoVim编写Python的乐趣,奉上笔者的NeoVim完整配置:
call plug#begin('C:\nvim-win64\nvim-win64\share\nvim\plugged')


Plug 'navarasu/onedark.nvim'

Plug 'pablopunk/native-sidebar.vim'

Plug 'ncm2/ncm2'

Plug 'roxma/nvim-yarp'

Plug 'ncm2/ncm2-bufword'
Plug 'ncm2/ncm2-path'
Plug 'ncm2/ncm2-jedi'


call plug#end()

let g:onedark_config = {
    \ 'style': 'warm',
\}
colorscheme onedark

autocmd BufEnter * call ncm2#enable_for_buffer()

" IMPORTANT: :help Ncm2PopupOpen for more information
set completeopt=noinsert,menuone,noselect


let g:native_sidebar_shortcut = '<c-t>'

set clipboard^=unnamed,unnamedplus

syntax on                       "syntax highlighting, see :help syntax
filetype plugin indent on       "file type detection, see :help filetype
set number                      "display line number
set path+=**                    "improves searching, see :help path
set noswapfile                  "disable use of swap files
set wildmenu                    "completion menu
set backspace=indent,eol,start  "ensure proper backspace functionality
set undodir=~/.cache/nvim/undo  "undo ability will persist after exiting file
set undofile                    "see :help undodir and :help undofile
set incsearch                   "see results while search is being typed, see :help incsearch
set smartindent                 "auto indent on new lines, see :help smartindent
set ic                          "ignore case when searching

set expandtab                   "expanding tab to spaces
set tabstop=4                   "setting tab to 4 columns
set shiftwidth=4                "setting tab to 4 columns
set softtabstop=4               "setting tab to 4 columns
set showmatch                   "display matching bracket or parenthesis
set hlsearch incsearch          "highlight all pervious search pattern with incsearch

highlight ColorColumn ctermbg=9 "display ugly bright red bar at color column number

" Keybind Ctrl+l to clear search
nnoremap <C-l> :nohl<CR><C-l>:echo "Search Cleared"<CR>

" When python filetype is detected, F5 can be used to execute script
" autocmd FileType python nnoremap <buffer> <c-b> :<cr>:exec '!python' shellescape(expand('%:p'), 1)<cr>

nnoremap <C-B> :sp <CR> :term python % <CR>
nnoremap <C-W> :bd!<CR>
结语
NeoVim是Vim的精神复刻与肉体重生,承袭了Vim的所有操作技巧,假如我们说,二十一世纪以来编辑器领域有什么经典软件,无疑的,我们应该说,Vim和NeoVim是两个颠扑不破的巨石重镇,没有了它们,编辑器史上便要黯然失光。最后,奉上项目配置地址,与君共觞:github.com/zcxey2911/W…
