

如果你打算建立一个需要用户登录的原生Android应用,你应该使用Auth0。
实现用户登录/注销往往变成了自己的项目。仅仅实现用户想要的多种登录方式就很容易花费大量的时间。你还得处理诸如用户管理、扩展和安全等问题,每一个问题都可以有自己的文章。
有了Auth0和几行代码,你的应用程序可以有一个全功能的系统,支持用基本的用户名/密码组合、单点登录和社交账户、无密码登录、生物识别等方式登录。你也不必处理 "幕后 "的问题!
**本教程涵盖了使用Auth0在用Kotlin编写的Android应用中实现登录/注销的基本知识。**它还介绍了如何在用户配置文件中读写信息,以便你的应用程序可以为每个用户定制自己。在此过程中,你将熟悉Auth0仪表盘,并学习如何使用它来注册应用程序和用户。
如果你想在专注于构建和执行步骤的同时略过这些内容,请寻找🛠表情符号。
你要构建的内容
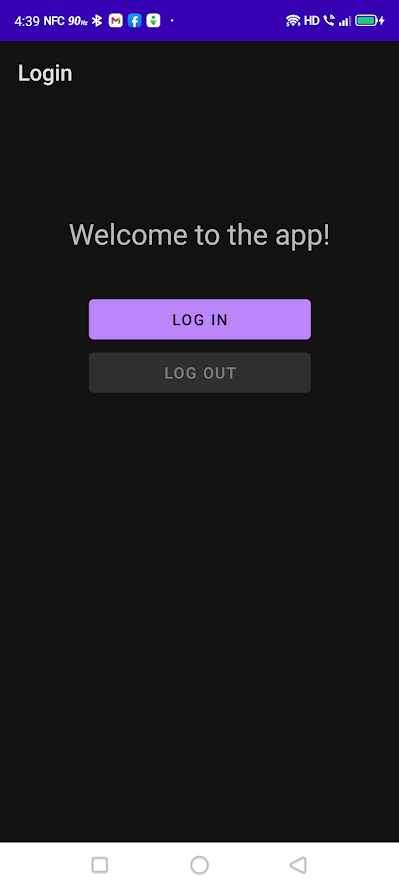
你将建立一个简单的、单屏幕的Android应用程序,允许用户使用Auth0登录和退出。在登录时,用户将能够从他们的用户资料中看到以下信息,即:
- 作为用户账户一部分的信息,即。
- 用户的姓名
- 用户的电子邮件地址
- 连接到用户账户的元数据,即:。
- 用户的国家
用户还可以编辑他们的国家,编辑的结果将存储在用户账户中。
当你启动完成的应用程序时,你会看到一个问候语、一个登录按钮和一个禁用的注销按钮。
点击登录按钮,用户就会进入登录界面,该界面出现在一个自定义的Chrome标签中。
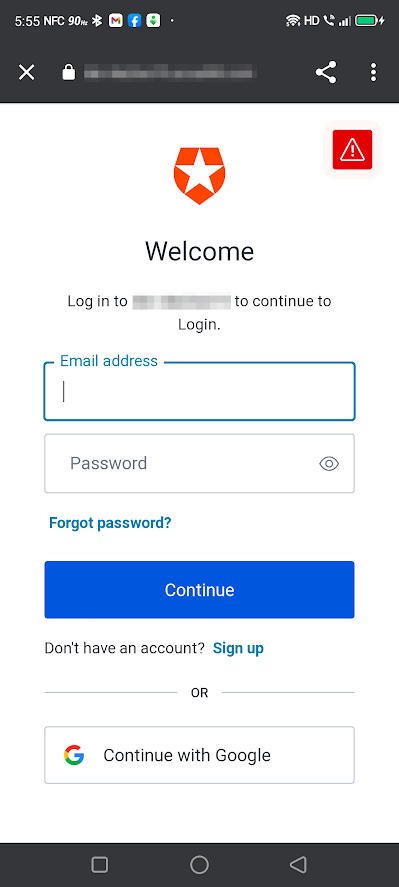
当你在你的应用程序中使用Auth0时,你将认证委托给一个集中的登录页面,就像谷歌属性(如Gmail和YouTube)在你登录时将你重定向到accounts.google.com的方式一样。在这个练习中,你将使用默认的登录页面的 "外观和感觉",但你可以定制它以符合你的应用程序或组织的品牌。
登录成功后,你会回到应用中,在那里你会看到以下变化。

- 问候语将变成一个通知,告诉你现在已经登录到应用程序了。
- 登录按钮现在将被禁用,而注销按钮现在将被启用。
- 你用来登录的用户账户的名称和电子邮件地址将被显示。
- 现在会有一个元数据部分,有一个可编辑的文本框(在安卓术语中是
EditText)和获取和设置按钮,允许你读取和写入用户账户元数据的country。
如你所料,注销是通过点击注销按钮完成的。一旦注销,你会看到屏幕上有以下变化。
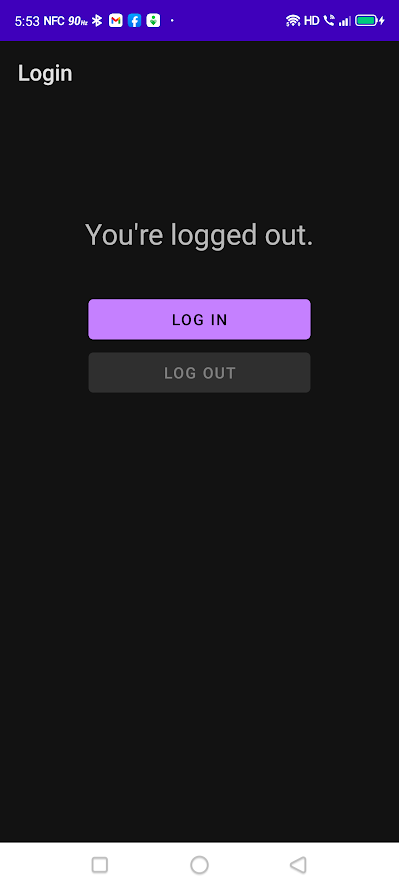
- 屏幕顶部的通知现在会通知你,你已经注销了该应用。
- 注销后会启用登录按钮,禁用注销按钮。
- 其他在你登录时可见的控件将不再可见。
前提条件
在这个编码练习中,你将需要以下东西。
你需要的东西
- **一个安卓开发设置。**确保你有以下东西,按照下面的顺序。
- Java SE开发工具包(JDK),版本11或更高。你可以通过打开命令行界面并输入以下内容来了解你电脑上的版本
java --version. - Android Studio。版本3.6(2020年2月)或更高版本。在写这篇文章时,我使用了当前稳定版本的Android Studio:2020.3.1版,也被称为 "北极狐"。
- 至少一个Android SDK(软件开发工具包)平台。你可以在Android Studio中确认你是否有一个(如果没有就安装一个)。打开工具→SDK管理器。你会看到一个Android SDK平台的列表。确保当前的SDK**(在撰写本文时为Android 11.0 (R))被选中;如果没有,请选中它,点击应用按钮,并在出现的确认对话框中点击确定按钮。等待SDK平台的安装,安装完成后点击完成**按钮。
- Java SE开发工具包(JDK),版本11或更高。你可以通过打开命令行界面并输入以下内容来了解你电脑上的版本
- 一个安卓设备,真实的或虚拟的。
- **使用一个真实的设备。**用USB线将设备连接到你的电脑。确保你的设备有开发选项和USB调试功能。
- **使用一个虚拟设备。**使用Android Studio,你可以建立一个虚拟设备(模拟器),在你的电脑上运行。这里是我的虚拟设备配方,它模拟了当前型号的廉价安卓手机。
- 打开工具→AVD管理器(AVD是 "Android虚拟设备 "的简称)。你的虚拟设备"窗口将出现。点击创建虚拟设备...按钮。
- 选择硬件窗口将出现。在手机类别中,选择Pixel 3a并点击下一步按钮。
- 系统图像窗口将出现,你会看到一个Android版本的列表。选择R(API 30,也被称为Android 11.0)。如果你在R旁边看到一个下载链接,点击它,等待操作系统下载,然后点击完成按钮。然后点击 "下一步"按钮。
- Android虚拟设备(AVD)窗口将出现。AVD名称字段应该包含Pixel 3a API 30,下面的两行应该有Pixel 3a和R的标题,而在启动方向部分,应该选择纵向。点击 "完成"按钮。
- 你将回到 "你的虚拟设备"窗口。列表中现在将包含Pixel 3a API 30,当你运行该应用程序时,该设备将可供你使用。
- 一个Auth0账户。 你可以现在就注册一个免费的,或者在文章的后面。
可能有用的东西
- **对Android开发有一点熟悉。**如果你是Android开发或Kotlin编程语言的新手,你可能会发现Android开发者的网站。 Kotlin中的Android基础知识是一个很好的介绍。
在Android Studio上设置项目
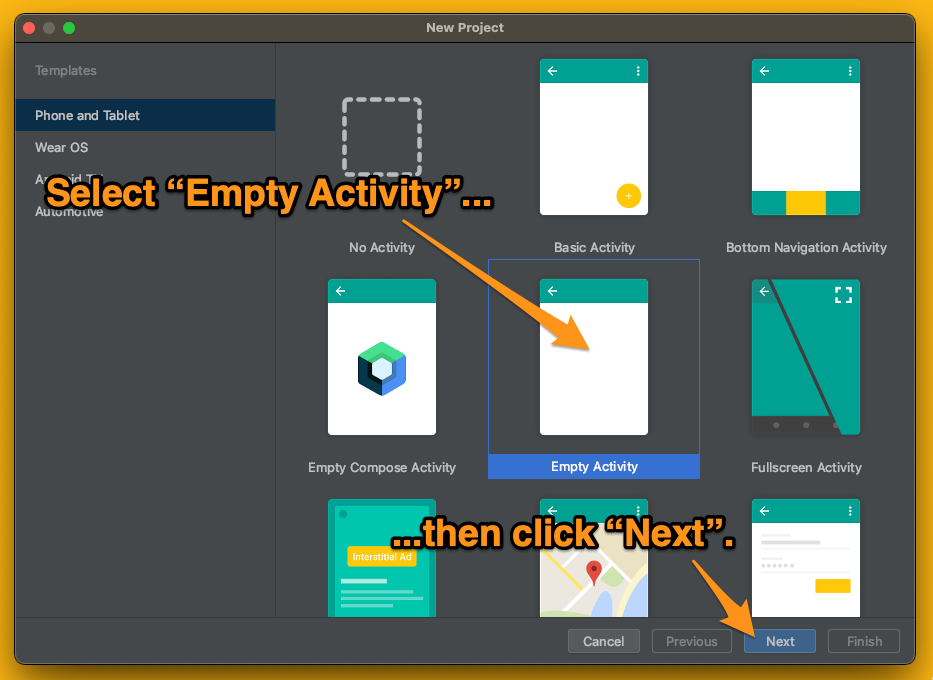
🛠 打开Android Studio。关闭任何打开的项目窗口,这将导致出现Welcome to Android Studio窗口。点击新建项目按钮,创建一个新的项目。

🛠 确保在出现的窗口左侧的菜单中选择手机和平板电脑,然后从模板选择中选择空活动。点击 "下一步"按钮。
🛠 在下一个窗口中,为应用程序输入一个名称,如登录。记下Android Studio在Package Name字段中生成的值--在向Auth0注册应用程序时,你会需要它。
如果你使用Login作为应用程序的名称,Android Studio将自动生成包名com.example.login。
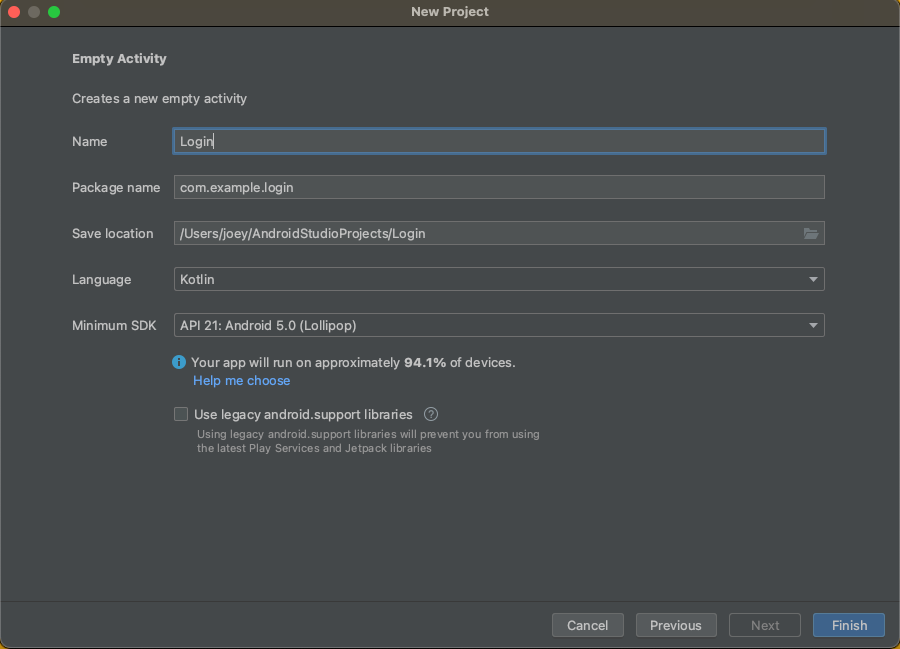
🛠 确保选择的语言是Kotlin,并且最小SDK设置为**API 21:Android 5.0(Lollipop)**或更高版本。
API 21可以追溯到2014年11月,是Auth0支持的最古老的Android版本。通过瞄准API 21或更高版本,你可以编写一个应用程序,在几乎95%的连接到Play Store的活跃Android设备上运行。
🛠 点击完成按钮。Android Studio会花一些时间来设置你的项目。
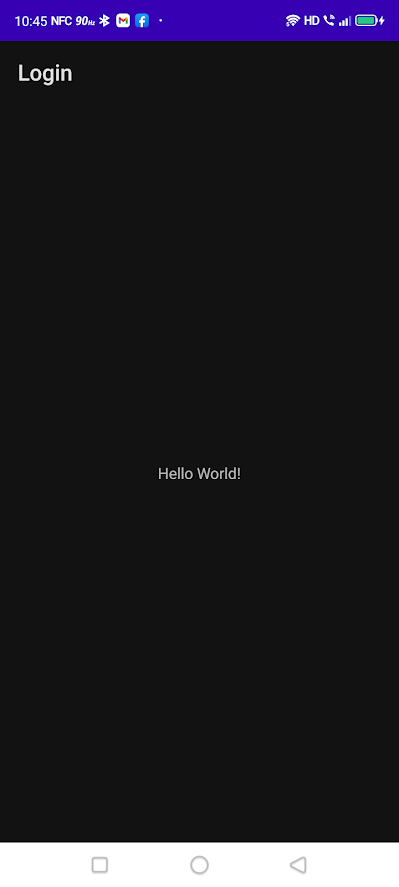
🛠 一旦Android Studio完成了项目的设置,运行该应用以确认其工作。你应该看到默认的 "你好,世界!"应用程序。
在Android Studio上设置好应用程序项目后,现在是时候把注意力转向Auth0方面了。
用Auth0注册应用程序
**要继续完成这一点,你将需要一个Auth0账户。**这是因为你的应用程序将把登录/注销过程的繁重工作委托给Auth0,这样你就可以把精力、能量和时间集中在你的应用程序的实际工作上,而不是担心验证用户和随之而来的所有边缘情况。
如果你已经有一个Auth0账户...
🛠 ......登录,跳过下一节,进入标题为的部分。 在Auth0注册你的应用.
如果你还没有一个Auth0账户...
🛠 ...那就去注册一个吧!这是免费的,而且我们已经非常小心地使这个过程尽可能地无痛。
Auth0将要求你只填写两个字:你的电子邮件地址和密码。我们 不会要求你提供信用卡号码或任何其他信息。如果这看起来太麻烦,你可以通过使用你的GitHub、谷歌或微软账户,一键注册。
一旦你提供了一个电子邮件地址和密码,你就会看到 "让我们为你设置成功 "的页面。
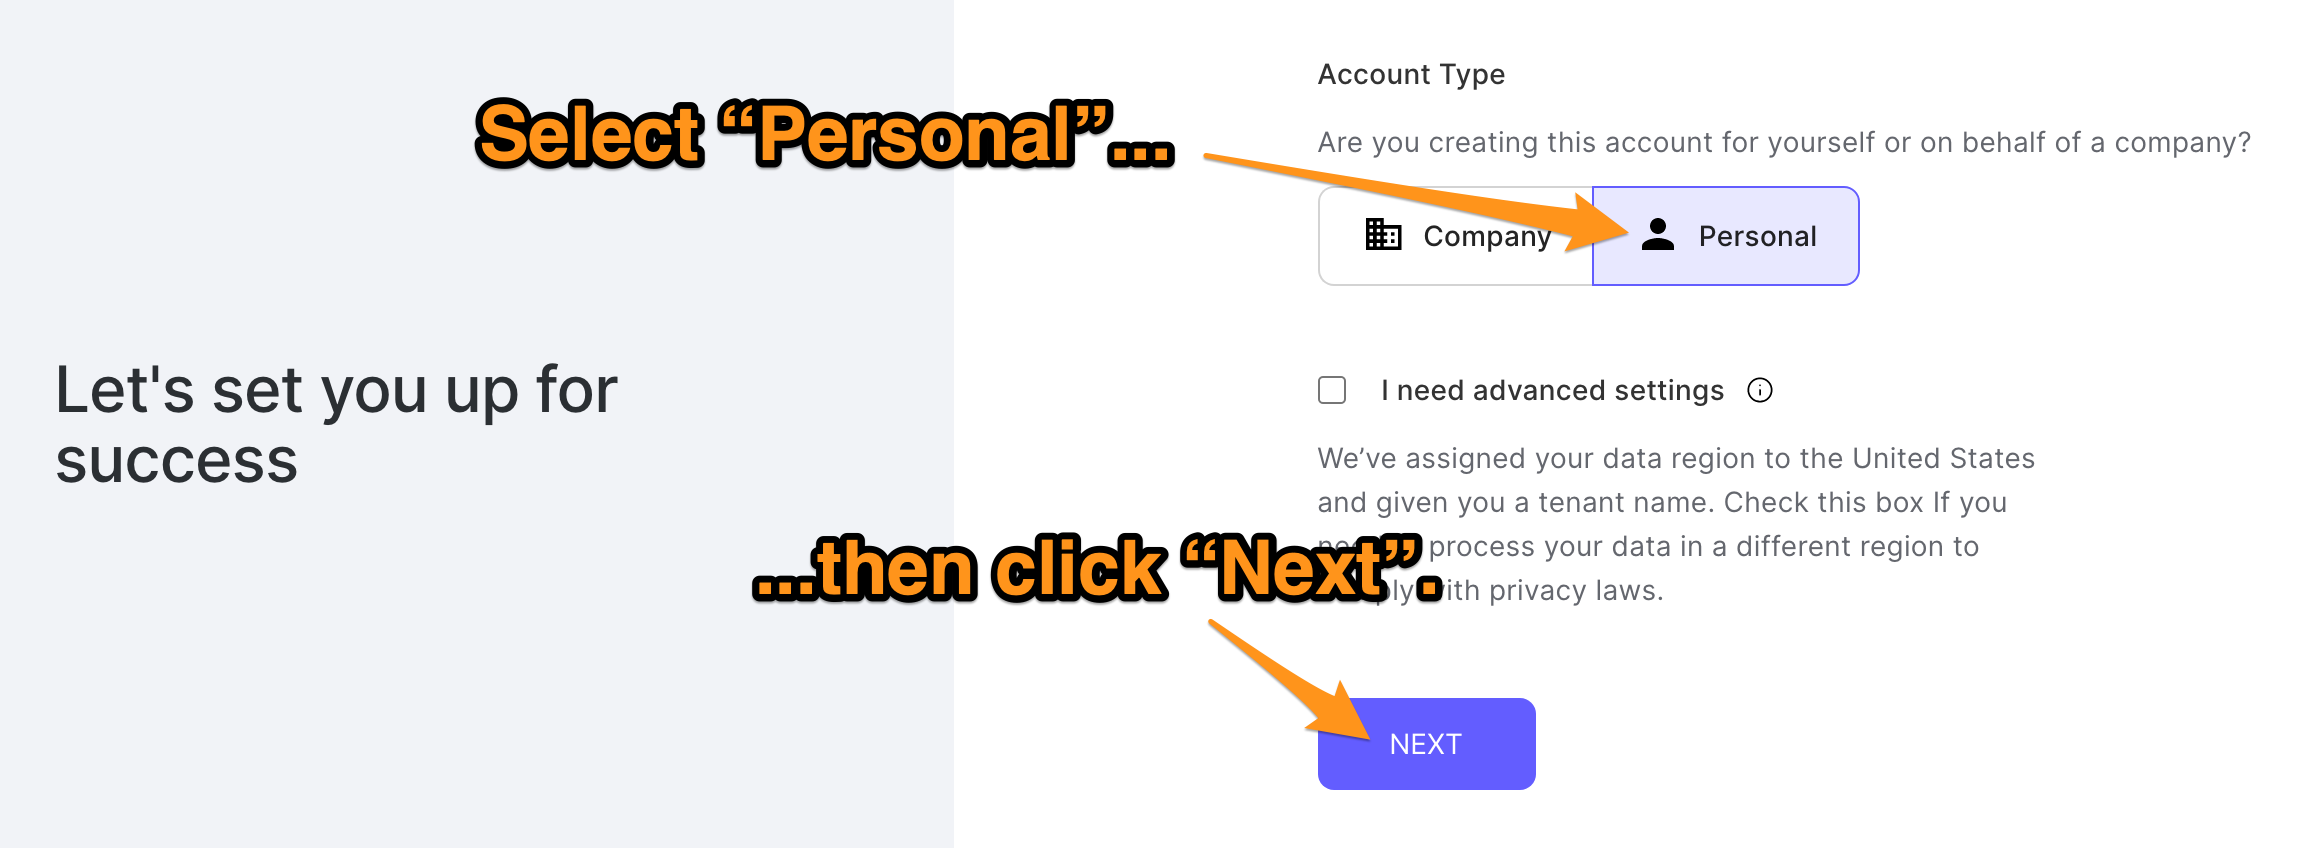
只需为你的账户类型选择个人,然后点击下一步按钮。你的注册过程将完成,你将看到Auth0的仪表板页面。
在Auth0注册你的应用程序
🛠 在Auth0仪表板左侧的菜单中,点击应用程序。
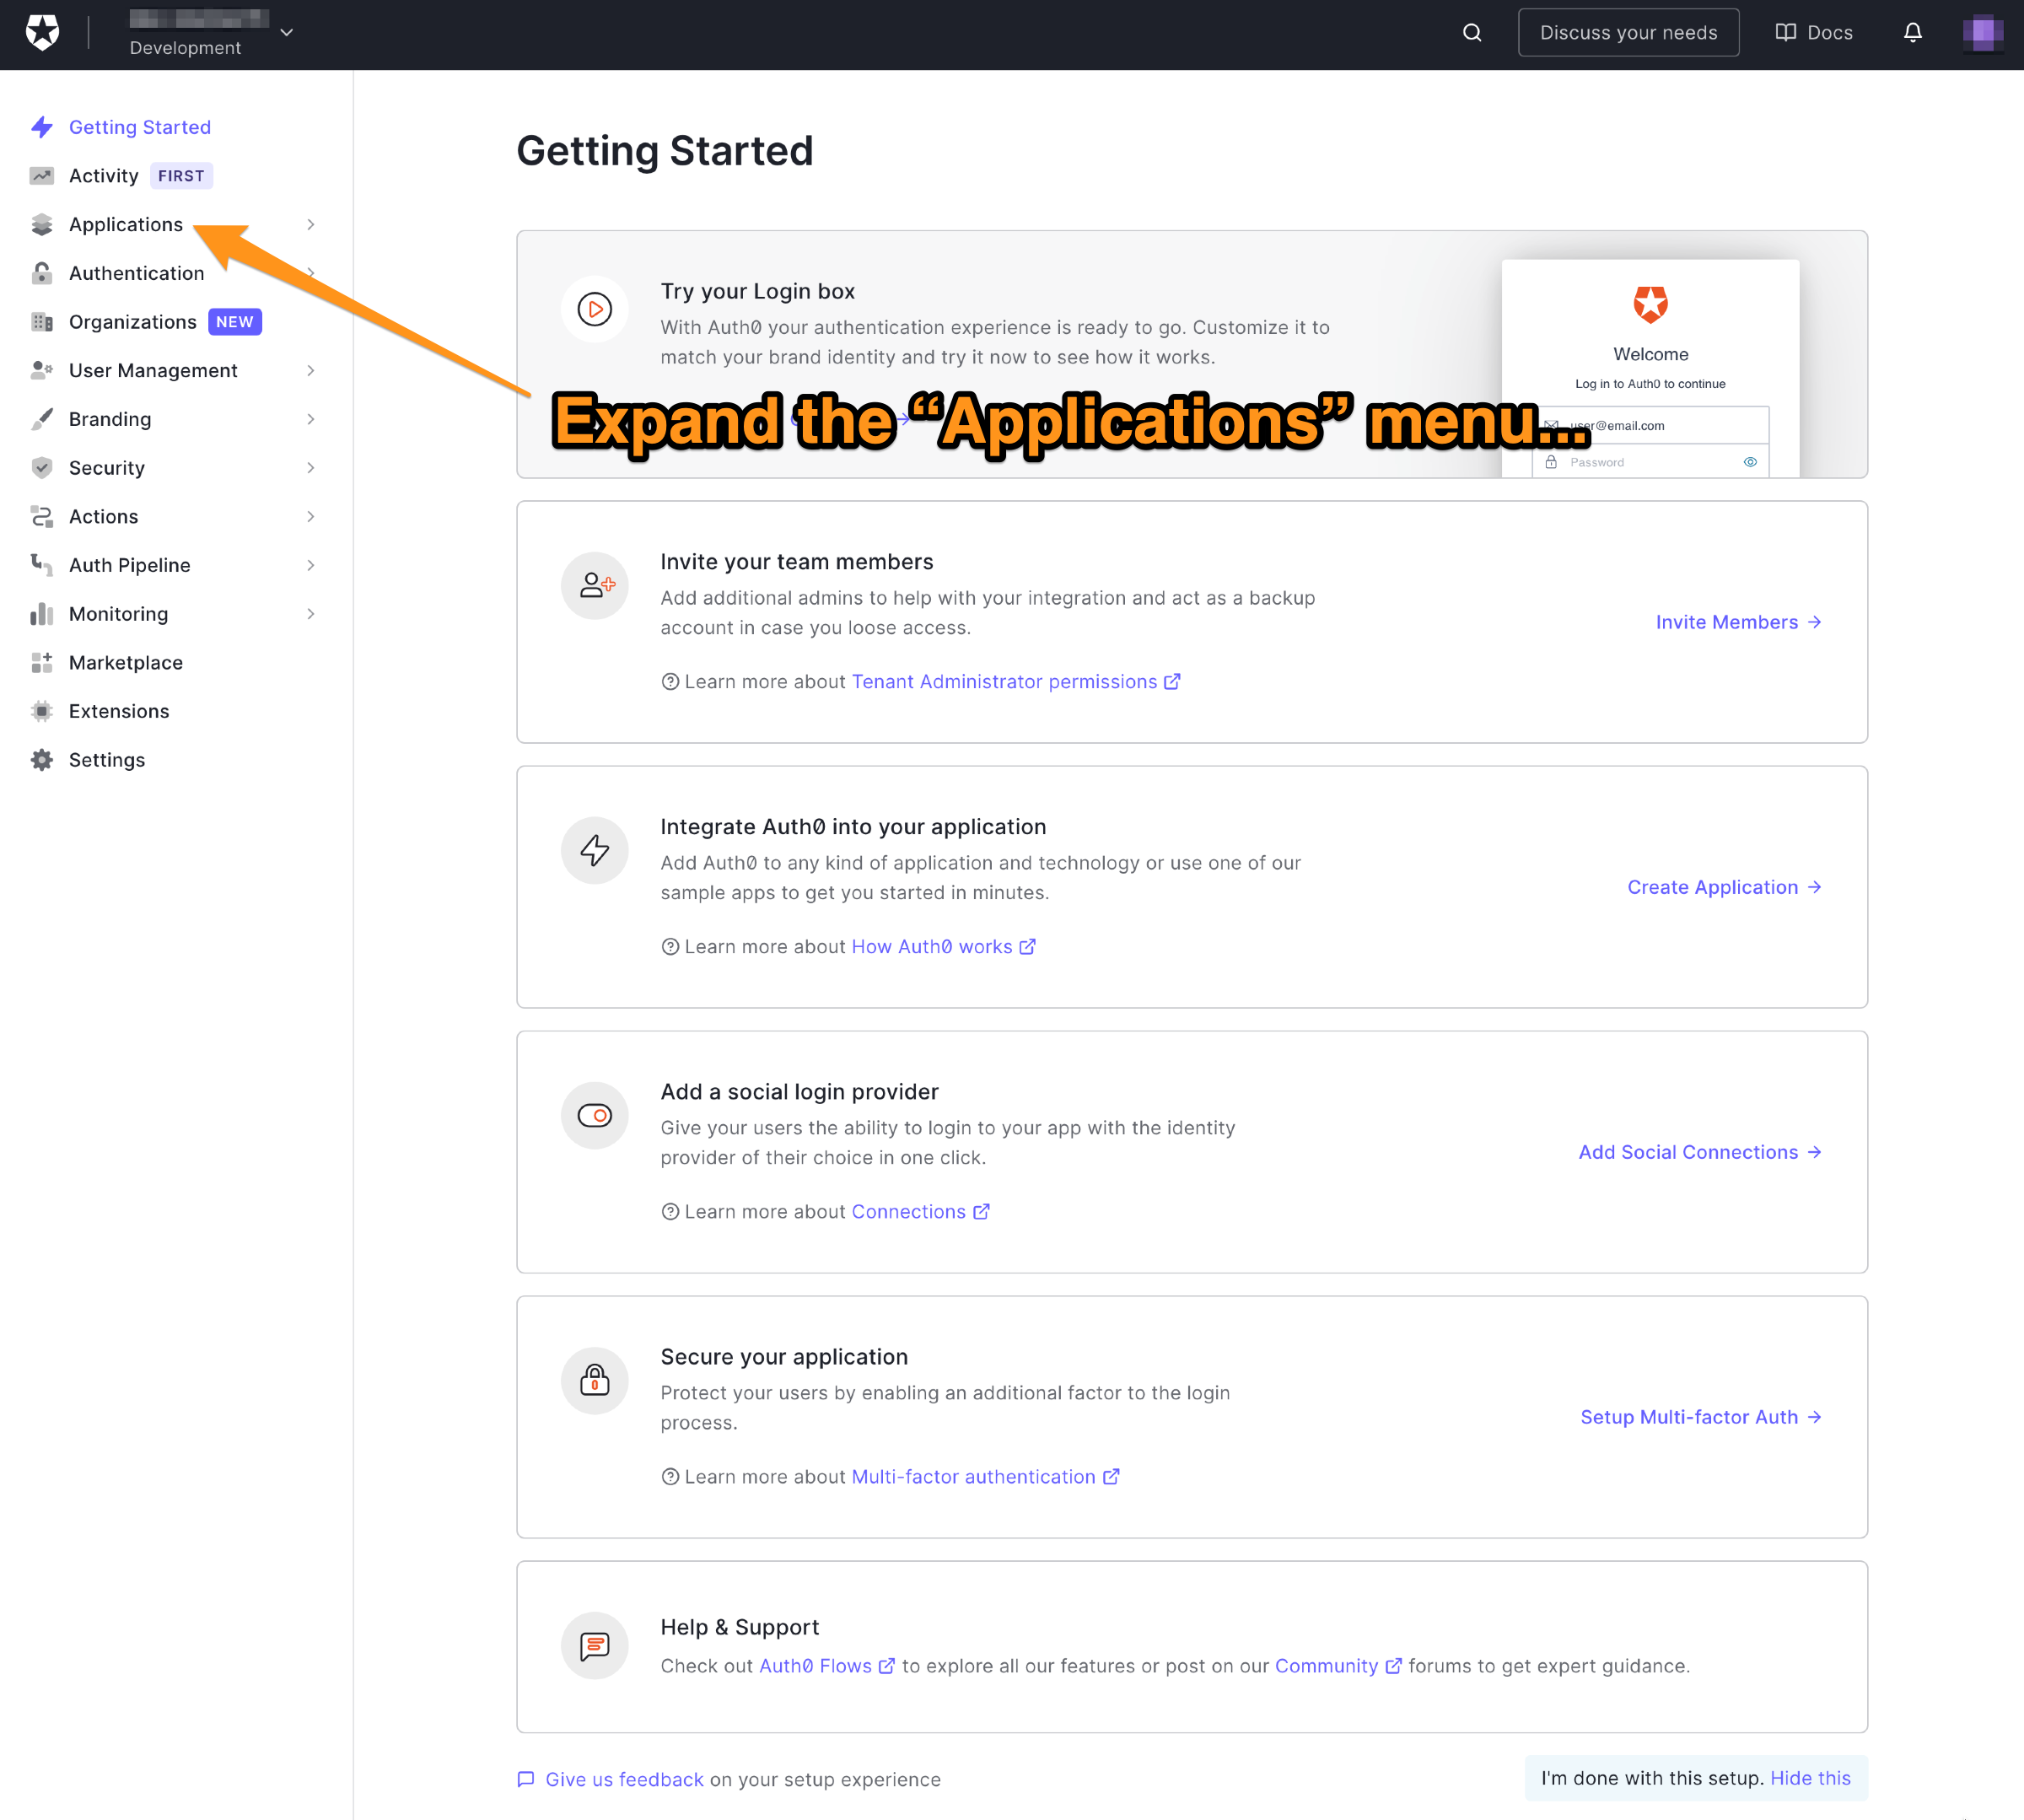
🛠 这将展开应用程序菜单。选择该菜单中的第一个项目,它也有一个名字叫 "应用程序"。
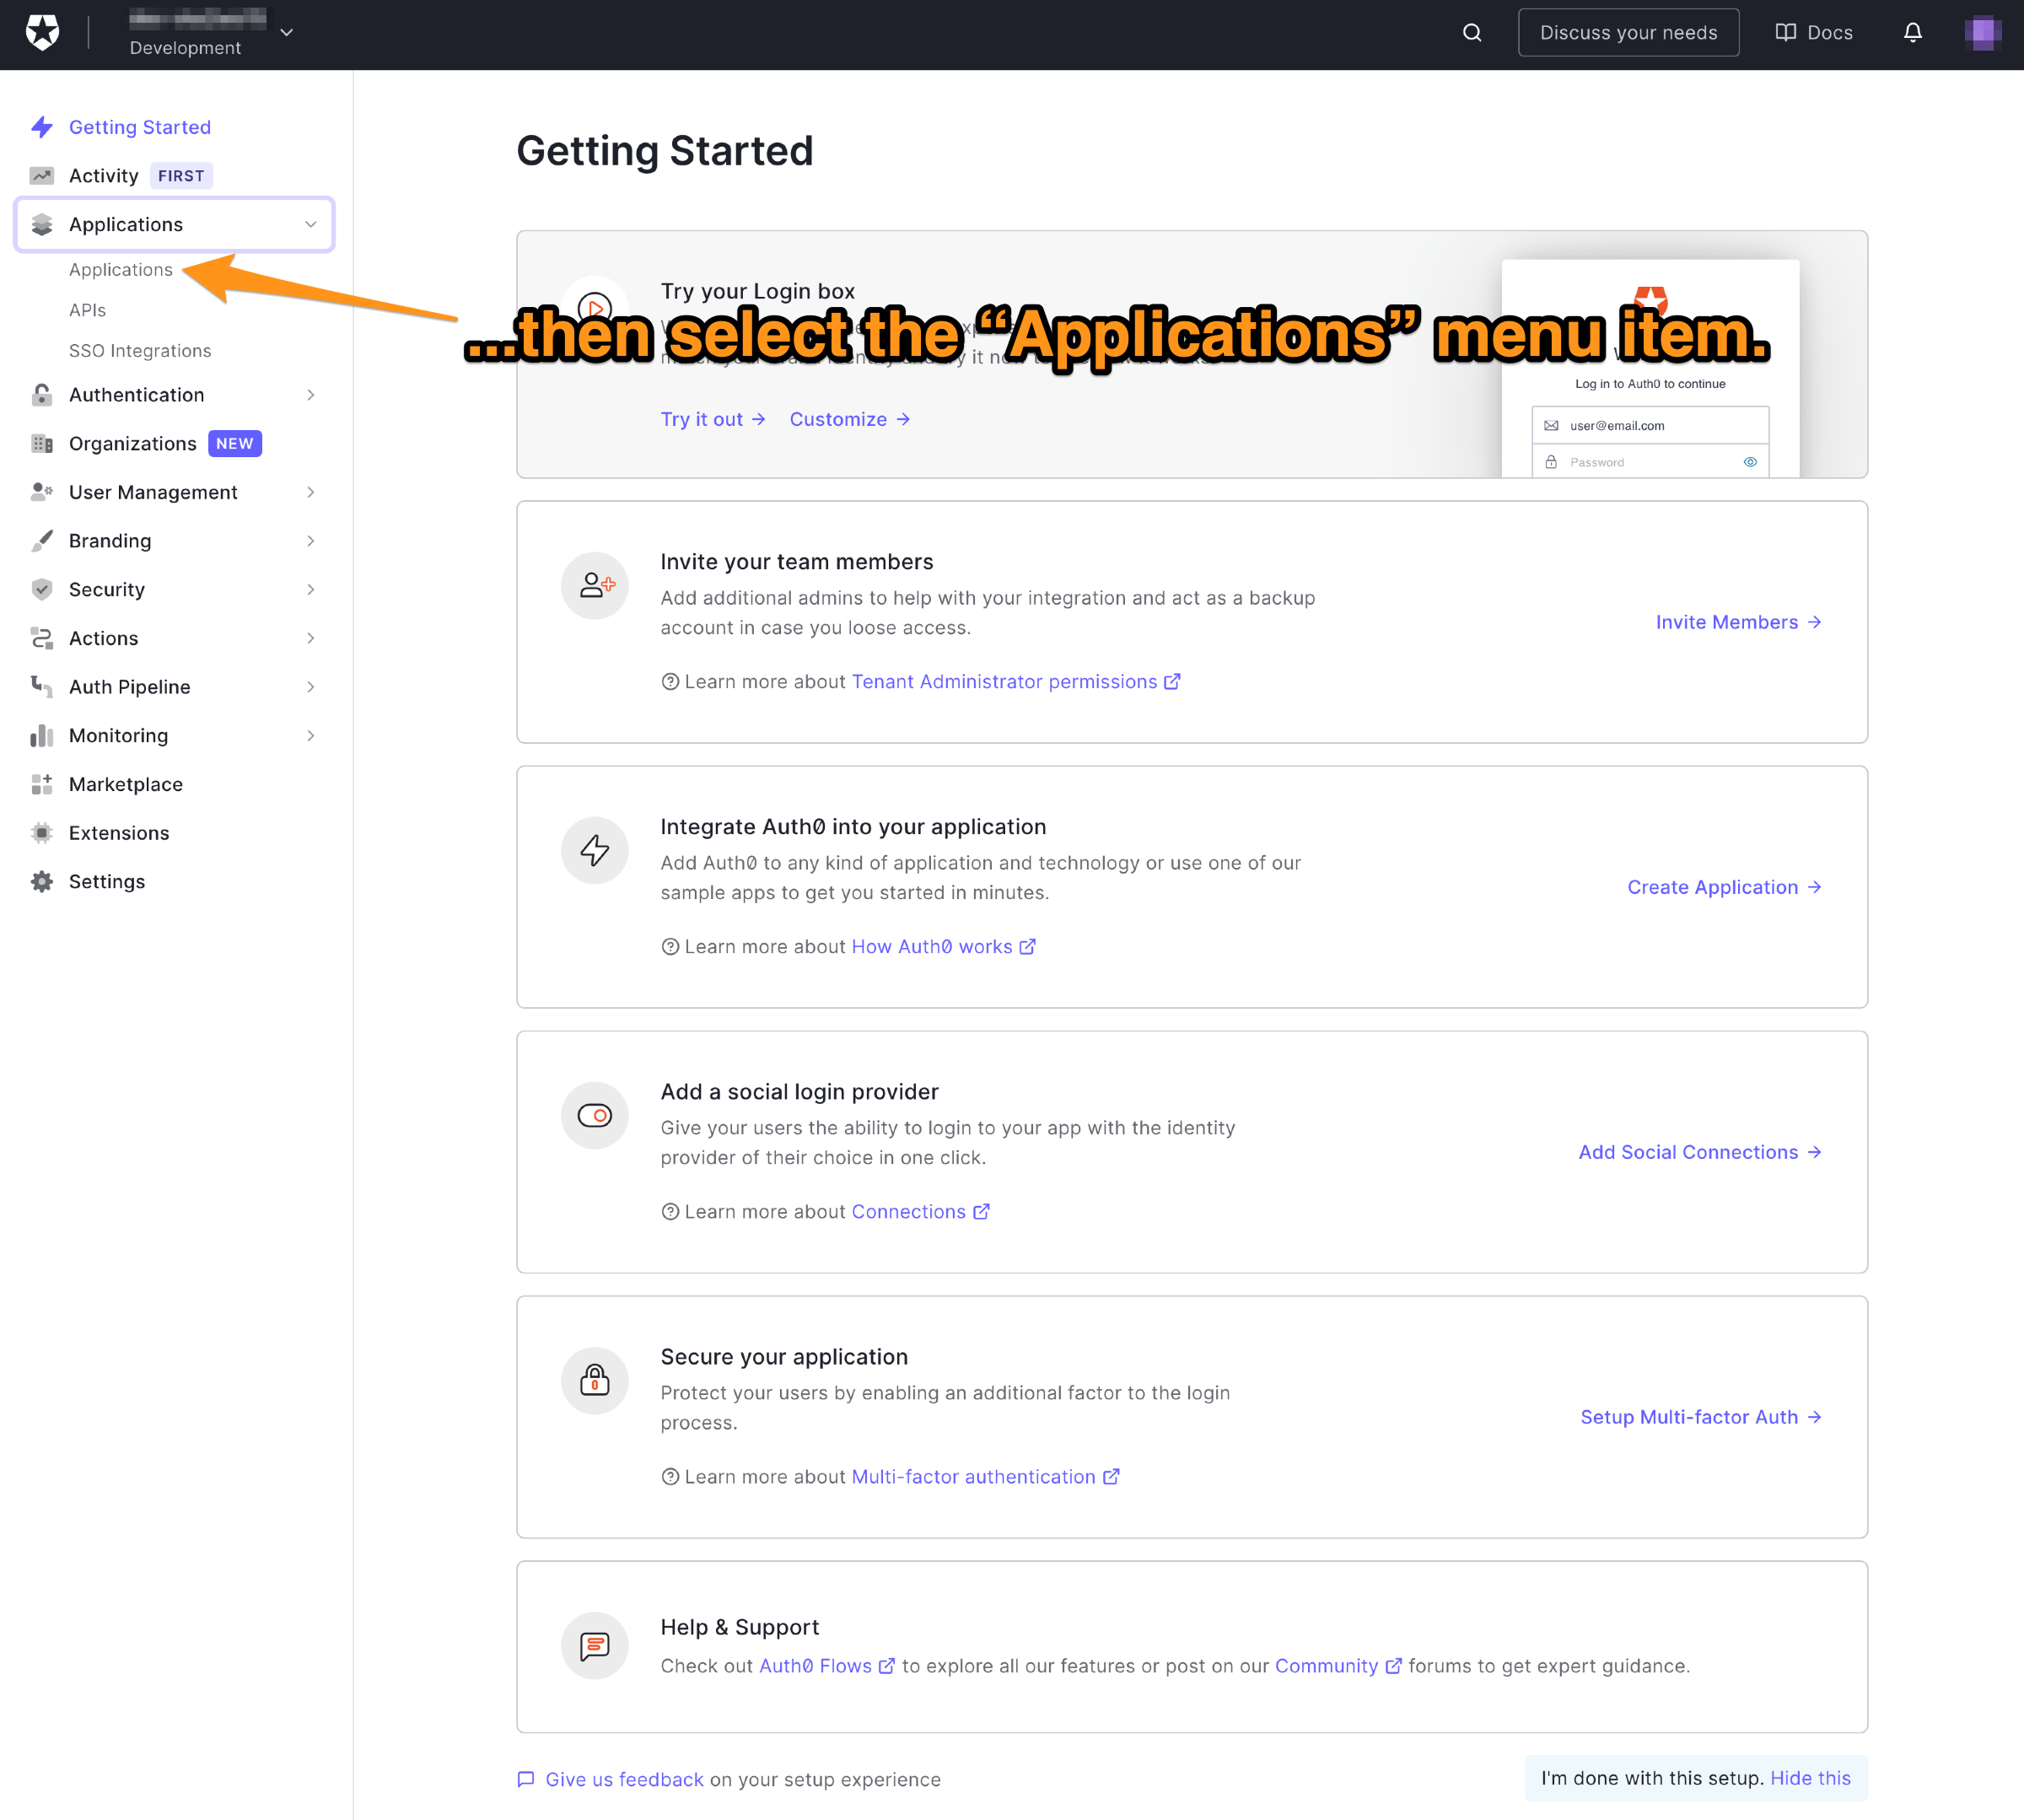
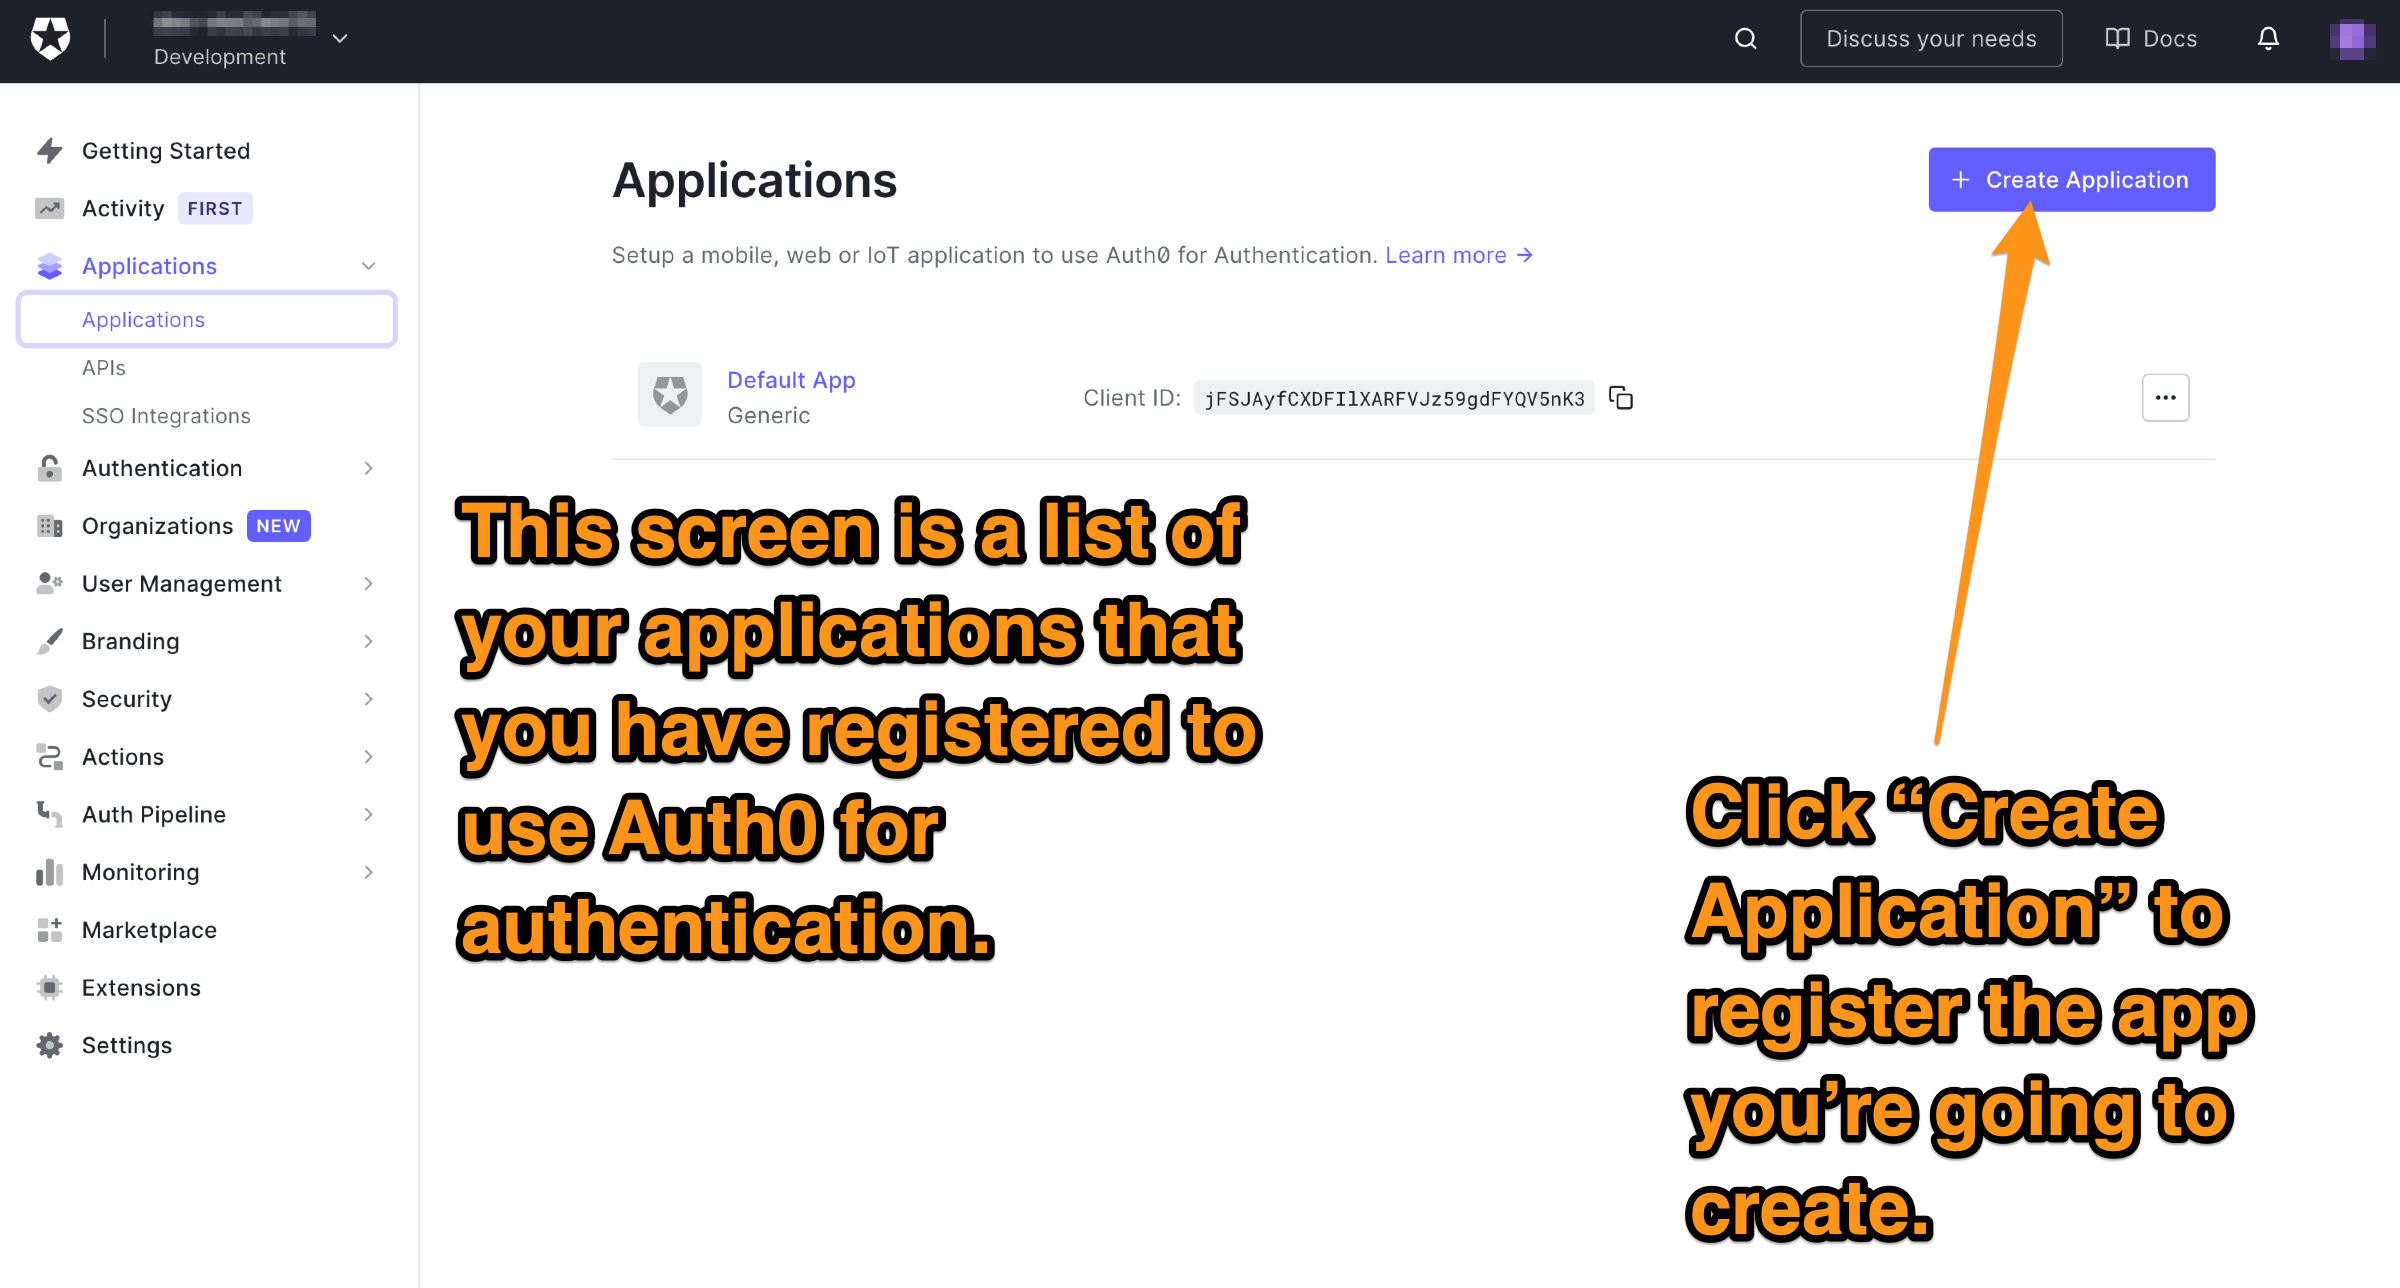
现在你将进入 "应用程序"页面。它列出了所有你已经注册的应用程序,以便Auth0能够处理它们的登录/注销过程。
🛠 让我们为你的应用程序创建一个新的注册。通过点击页面右上方的创建应用程序按钮来完成。
你会看到这个对话框出现。
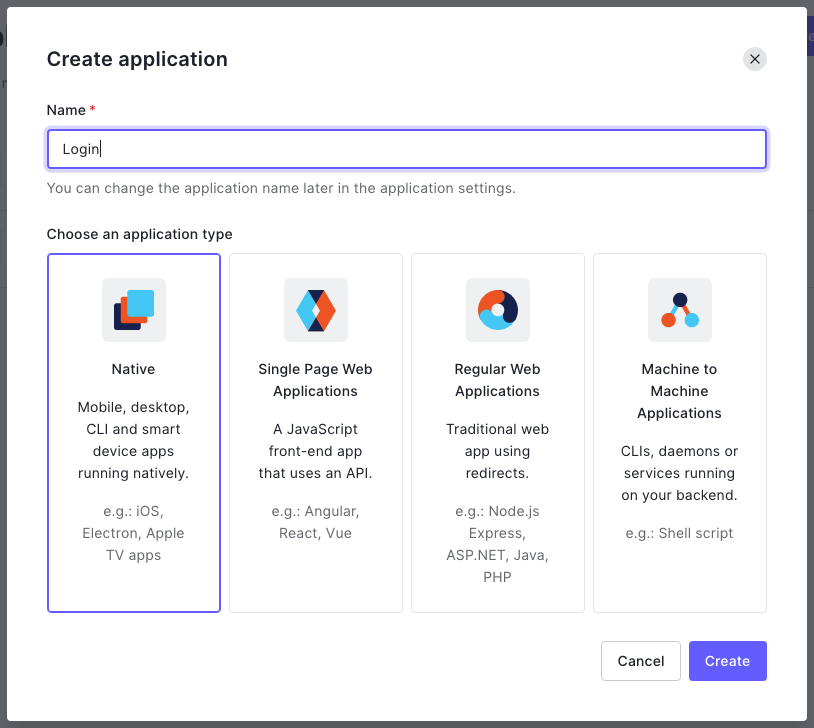
🛠 你需要提供两个信息才能继续。
- 在名称栏中为你的应用程序输入一个名称。使用与你的Android Studio项目相同的名称可能是最简单的(如果你一直按照我的例子,使用Login这个名称)。
- 指定应用程序的类型,在本例中是Native。
点击创建。你的应用程序的快速启动页面将会出现。
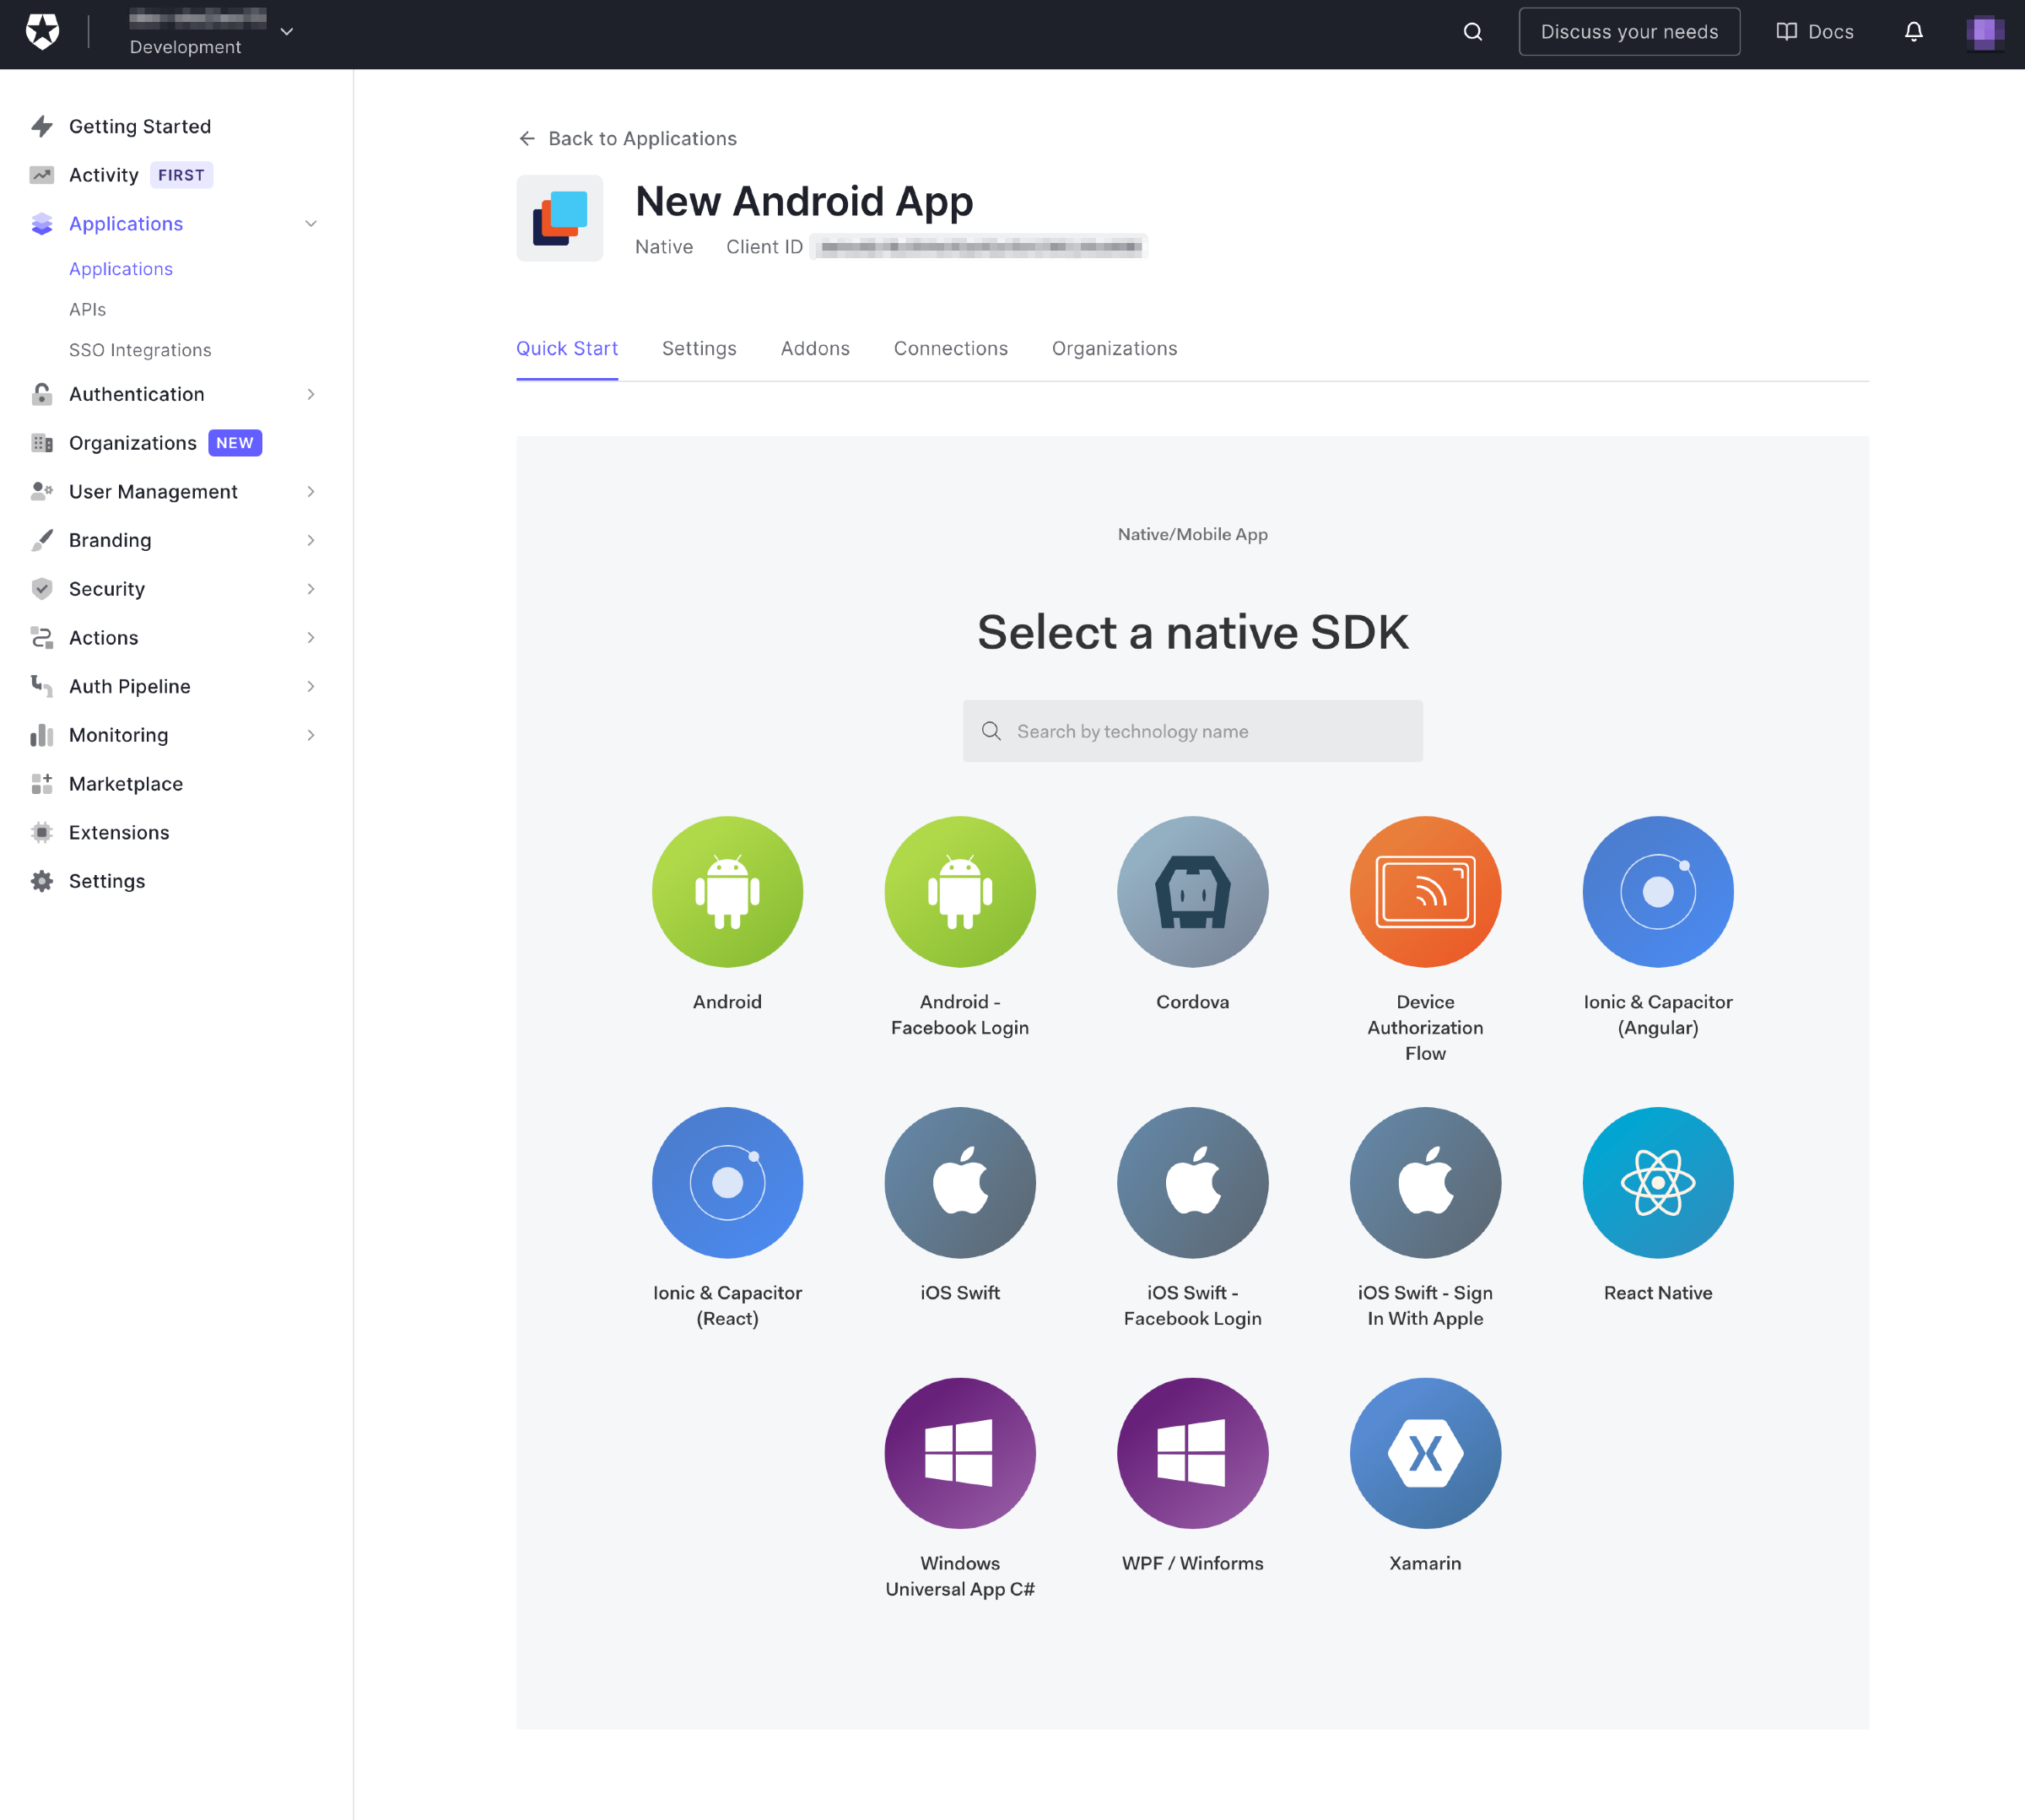
这个页面为你提供了几个不同平台的现成项目,你可以将其作为一个将登录/注销委托给Auth0的应用程序的基础。在这个练习中,你不会使用它们中的任何一个;相反,你将利用几个Auth0库并自己编写代码。这样做更有教育意义,更重要的是,更有乐趣。
🛠 单击 "设置"选项卡,这将带你到这个页面。
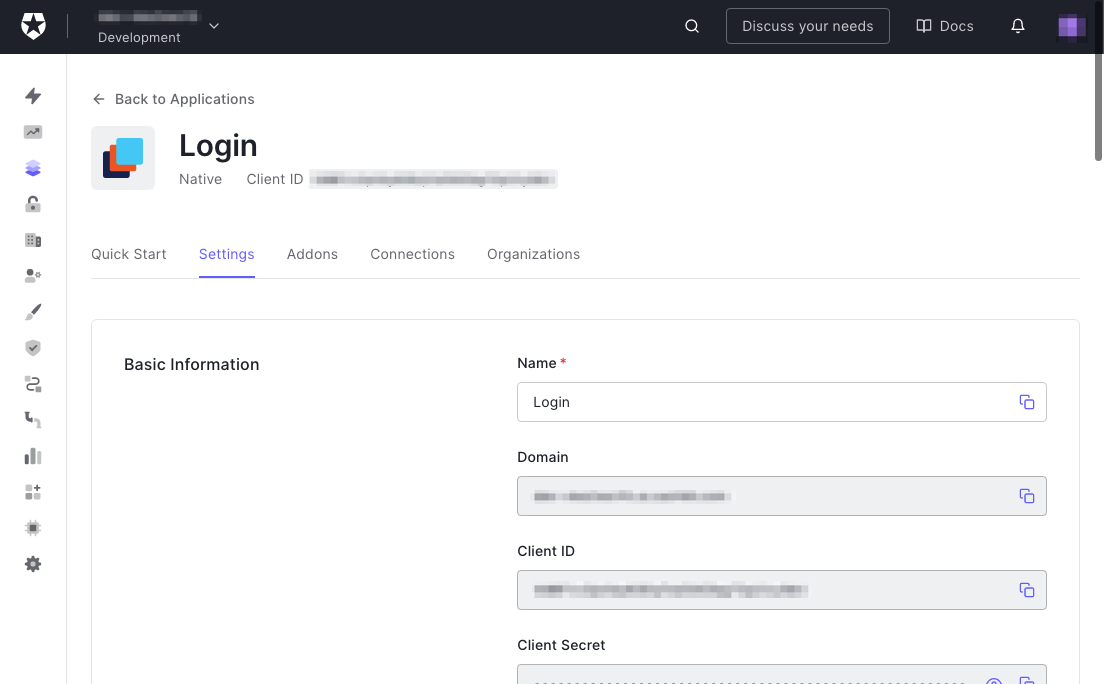
你将在这个页面上做两件关键的事情。
- 获取你的应用程序需要知道的关于Auth0的信息,以及
- 提供Auth0需要知道的关于你的应用程序的信息。
让我们来处理第一件事。获取你的应用程序需要的信息,即。
- 域名,这是你的应用用来联系Auth0的URL。它可以唯一地识别你的Auth0租户,它是你在Auth0账户中注册的应用程序、用户和其他信息的集合。
- 客户端ID,这是Auth0分配给你的应用程序的标识符。这是Auth0知道它在与你的哪个应用合作的方式。
🛠通过复制域和客户ID字段的内容来获得这一信息,以便日后参考。
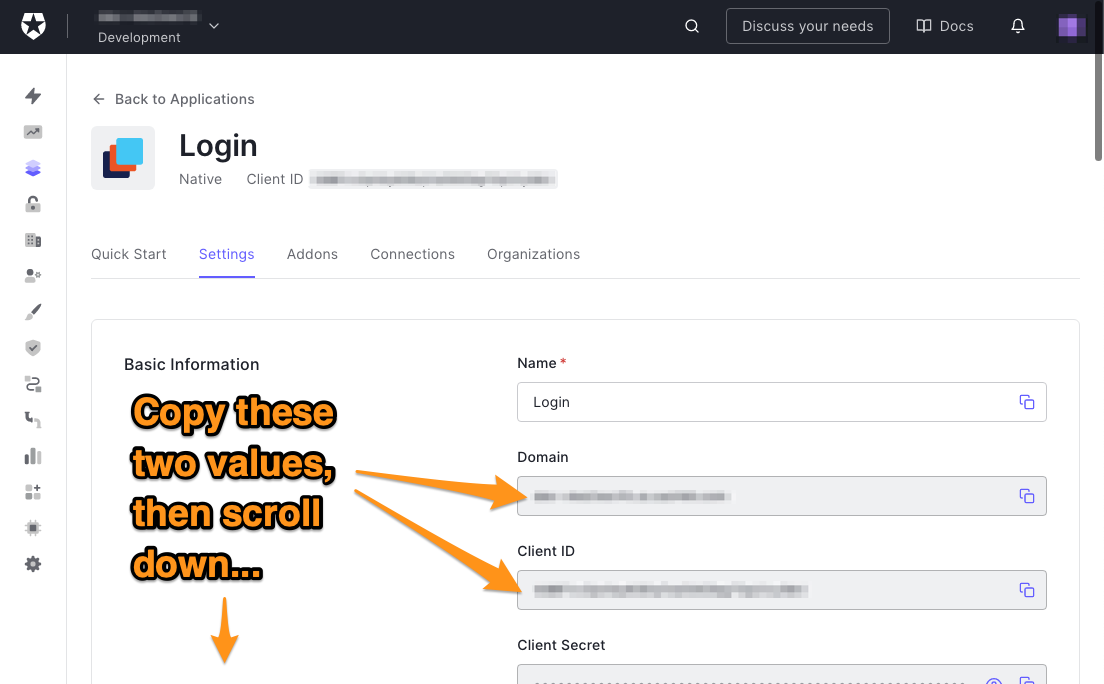
你很快就会把它们作为字符串资源输入你的Android Studio项目中。
🛠向下滚动到应用程序URI部分。这是你提供Auth0需要知道的关于你的应用程序的两个信息的地方,它们是。
- **回调URL:**用户成功登录后Auth0将重定向到的URL。可以有不止一个。
- **注销URL:**用户注销后Auth0将重定向到的URL。可以有多个这样的网址。
在这一点上,你可能在想。"等一下--我在写一个Android应用。它没有你用URL导航的网页,而是你用intents导航的活动!"
你说得很对。在原生应用程序的情况下,回调和注销的URL是同一个字符串,Auth0将这个字符串发送给你的应用程序,以通知它用户已经登录或注销了。
安卓本地应用程序用于回调URL和注销URL的字符串都使用这种格式。
{SCHEME}://{YOUR_DOMAIN}/android/{YOUR_APP_PACKAGE_NAME}/callback
🛠 要构建该字符串,请执行以下操作。
- 替换为
{SCHEME}用app。{SCHEME}是URL的协议,如果你在写一个网络应用,这个值应该是http,或者更好,https。由于这是一个Android原生应用程序,你可以为这个值选择任何字符串。我喜欢使用app。 - 替换为
{YOUR_DOMAIN}用你在本页前面看到的Domain字段的值。 - 替换为
{YOUR_APP_PACKAGE_NAME}替换为你的Android应用的包名。如果你一直按照本文的例子,你的应用程序的包名是com.example.login.
🛠 在允许回调URL和允许登录URL字段中都输入这个字符串。记住,这两个字段都是同一个字符串。
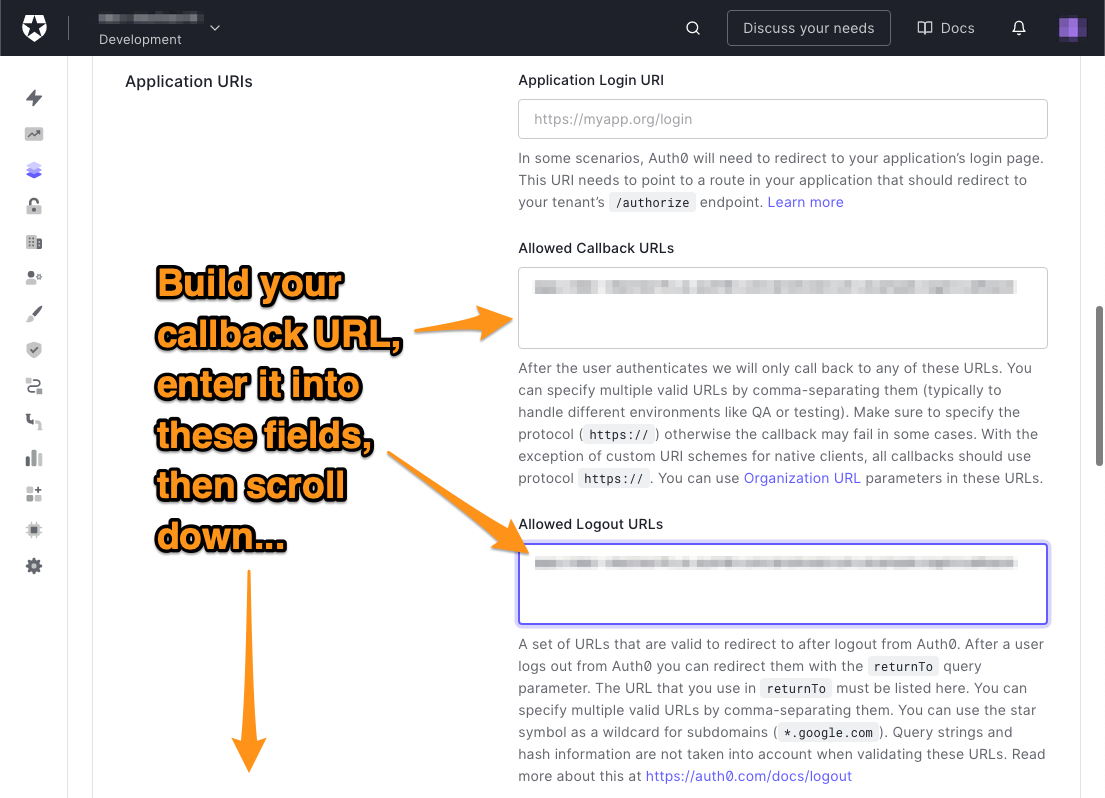
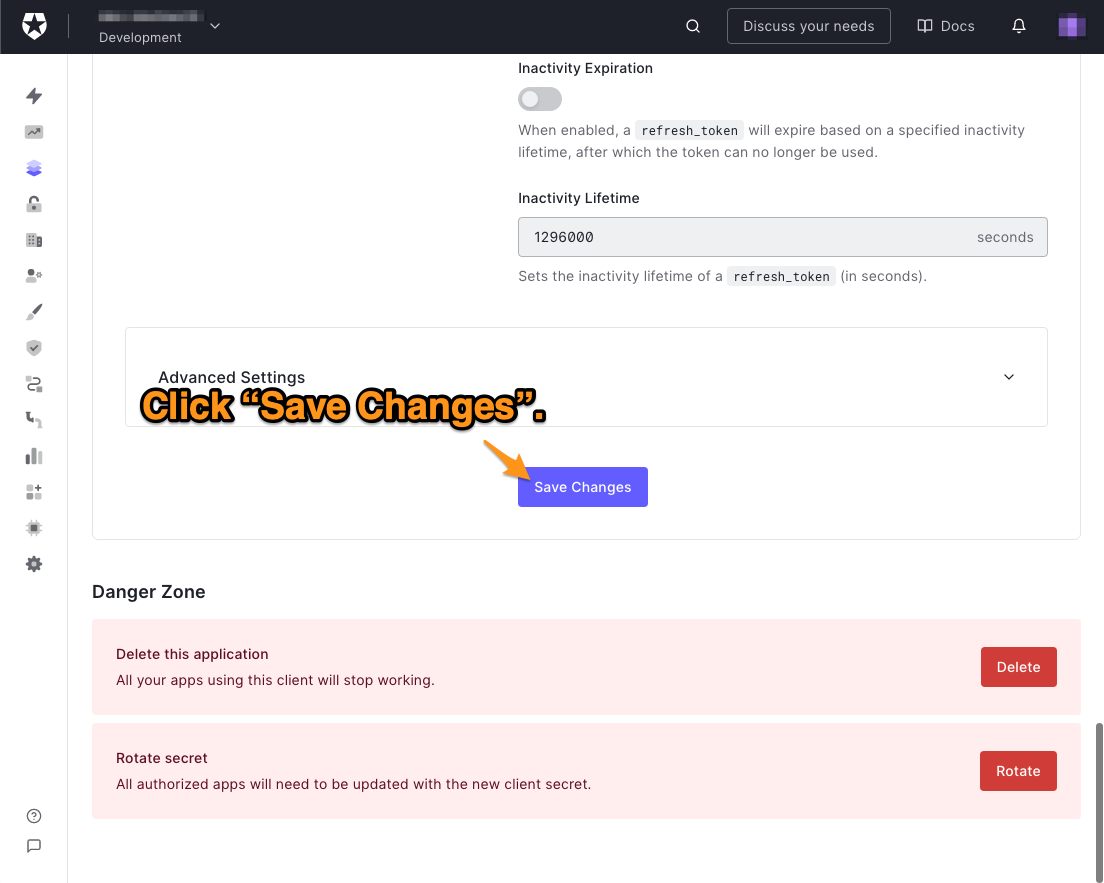
🛠 你已经完成了本页需要做的一切。向下滚动到页面的底部,点击保存更改按钮。
如果你的租户没有任何用户,请创建一个用户
如果你的租户是全新的,它将没有任何用户账户,这意味着没有任何方法可以登录到你的应用程序。如果是这种情况,请按照以下步骤创建一个用户。
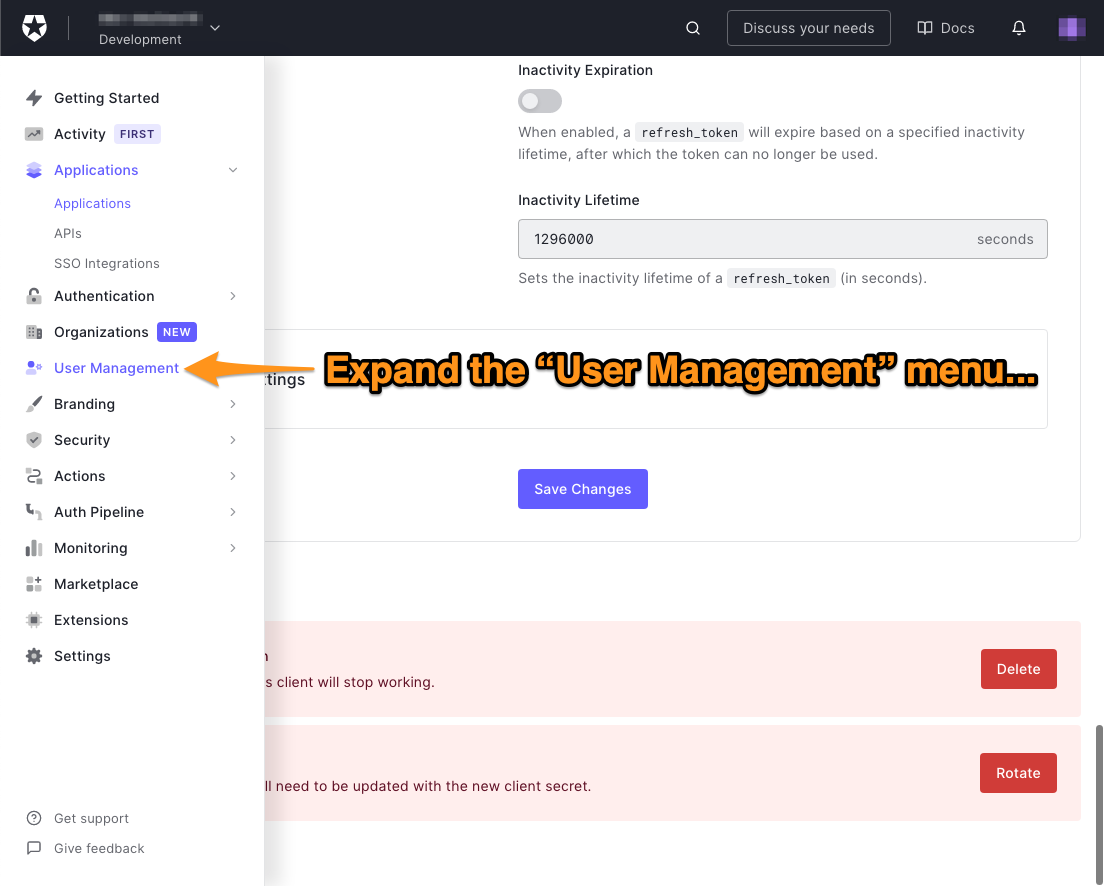
🛠 在Auth0仪表板左侧的菜单中,点击用户管理。
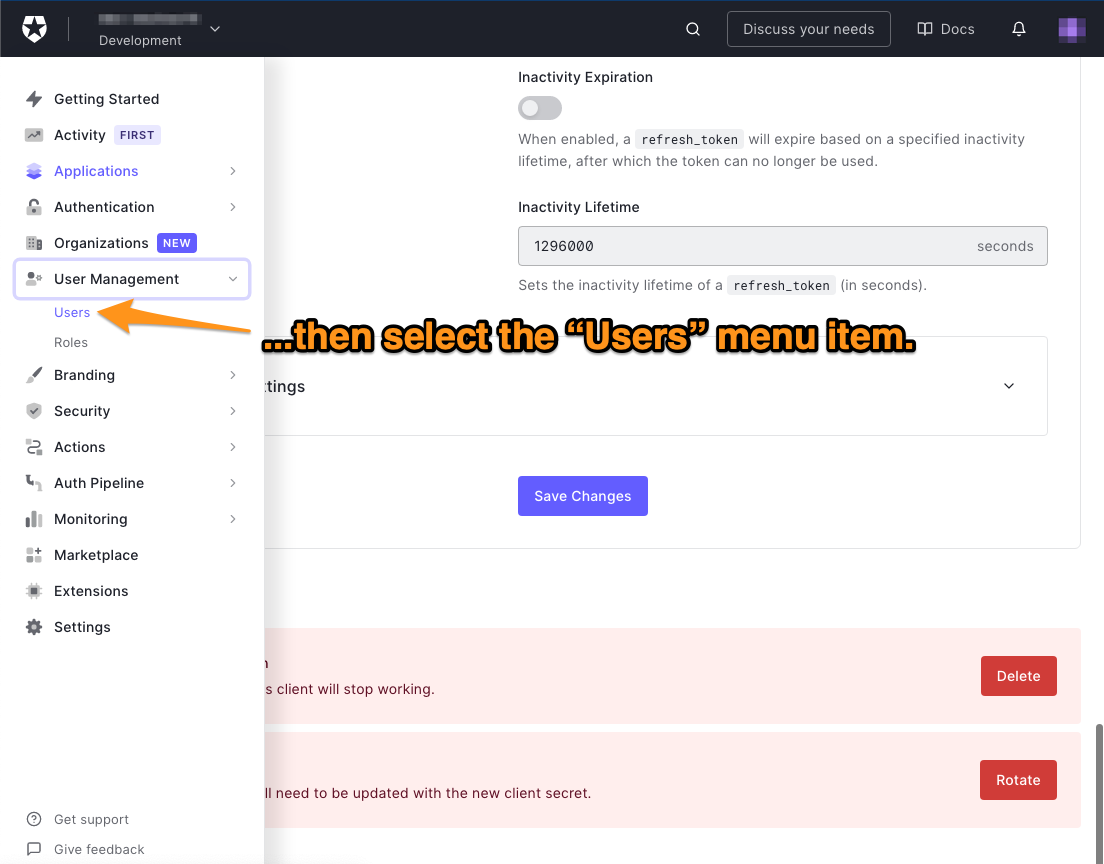
🛠 这将展开用户管理菜单。选择该菜单中的 "用户"项目。
将出现 "用户"页面。它列出了所有注册到你租户的用户。如果没有用户,你会看到 "你还没有任何用户 "的信息。
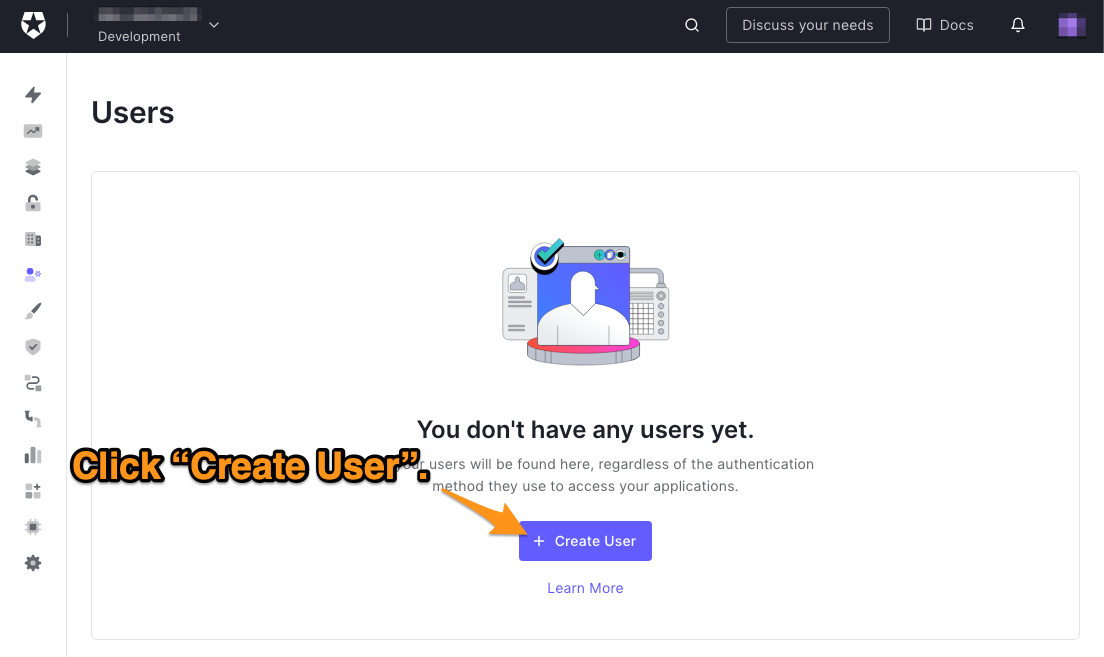
🛠 单击 "创建用户"按钮,创建一个新用户,这将使这个对话框出现。
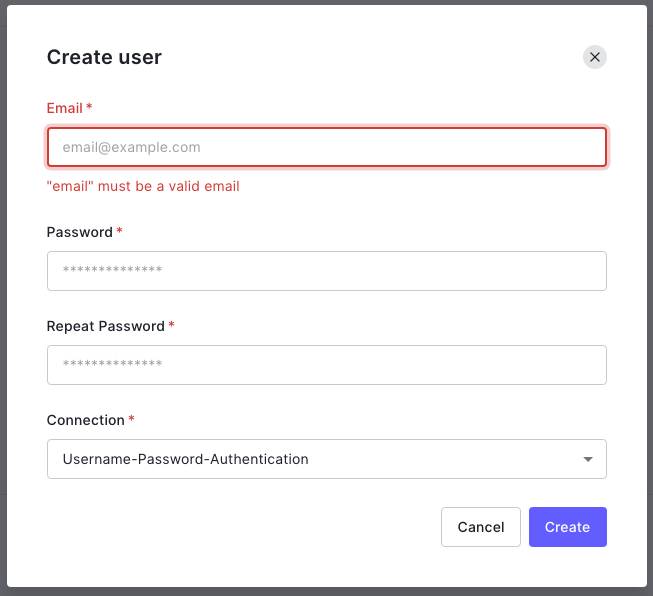
🛠 输入用户的电子邮件地址和密码。连接的唯一选项将是用户名-密码-认证,所以保持原样。记下这个电子邮件地址和密码--你将用它们来登录应用程序。
🛠 点击创建按钮来创建用户。该用户的详细信息页面将出现。
这就解决了你在Auth0仪表板上需要做的所有设置。现在是建立应用程序的时候了!
设置应用程序
安装Auth0 SDK
Auth0 Android SDK使Android应用程序能够使用Auth0的API,包括Authentication API,你将用它来实现应用程序中的登录和注销。
要安装该SDK,你需要执行两项任务。
- 对应用的Gradle文件进行修改,以整合Auth0。当你编辑该文件时,你也要启用视图绑定。
- 在项目的清单中给予应用程序访问互联网的权限。
将Auth0 SDK添加为项目的依赖项
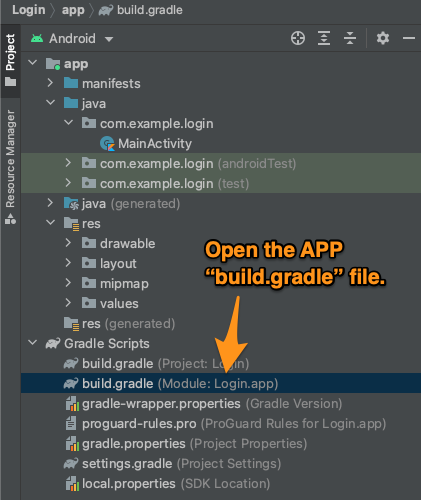
🛠 打开 build.gradle为应用程序- 它是项目结构菜单中的文件,其名称中有模块和应用程序的字样。
🛠在文件的defaultConfig 块中添加以下一行。
manifestPlaceholders = [auth0Domain: "@string/com_auth0_domain", auth0Scheme: "@string/com_auth0_scheme"]
以下是添加该行后,defaultConfig 块应该是的样子。
defaultConfig {
    applicationId {APPLICATION_ID_GOES_HERE}
    minSdk 21
    targetSdk 31
    versionCode 1
    versionName "1.0"
    manifestPlaceholders = [auth0Domain: "@string/com_auth0_domain", auth0Scheme: "@string/com_auth0_scheme"]

    testInstrumentationRunner "androidx.test.runner.AndroidJUnitRunner"
}
🛠 将这行添加到dependencies 块中,在所有其他以关键字implementation 开始的行之后。
implementation 'com.auth0.android:auth0:2.0.0'
这一行告诉Gradle在应用程序中包含Auth0的Android库的2.0.0版本。
下面是你添加了这一行后,dependencies 块应该是什么样子。
dependencies {
    implementation 'androidx.core:core-ktx:1.6.0'
    implementation 'androidx.appcompat:appcompat:1.3.1'
    implementation 'com.google.android.material:material:1.4.0'
    implementation 'androidx.constraintlayout:constraintlayout:2.1.0'
    implementation 'com.auth0.android:auth0:2.0.0'
    testImplementation 'junit:junit:4.+'
    androidTestImplementation 'androidx.test.ext:junit:1.1.3'
    androidTestImplementation 'androidx.test.espresso:espresso-core:3.4.0'
}
启用视图绑定
在Android Studio 3.6之前,如果你想在用户界面中引用一个视图或部件,你必须使用findViewById() ,为每个视图或部件创建一个新的变量。
假设你有一个Activity ,其布局文件包含这些视图。
- 一个
TextView,其id是textview_instructions - 一个
EditText,其id是edittext_input - 一个
Button,其id是button_submit
下面是你如何在代码中创建对这些视图的引用并设置它们的text 属性。
// A quick example of findViewById() binding

// Set this activity’s content to the layout specified
// by activity_main.xml
setContentView(R.layout.activity_main)

// Get references to the TextView, EditText, and Button:
val textviewInstructions = findViewById(R.id. textview_instructions) as TextView
val edittextInput = findViewById(R.id. edittext_input) as EditText
val buttonSubmit = findViewById(R.id.button_submit) as Button

// Set the widgets' text
textviewInstructions.text = "Here are your instructions."
edittextInput = "Edit this text."
buttonSubmit = "Tap me!"
Android 3.6引入了视图绑定,它生成了一个绑定对象,持有活动中的所有视图。你不再需要为每个视图或小部件声明一个变量,因为活动中的所有视图和小部件现在都是绑定对象的属性。
// A quick example of view binding

// Bind this activity to the layout and create a binding object
// that gives us access to all its views
binding = ActivityMainBinding.inflate(layoutInflater)
setContentView(binding.root)

// Set the widgets' text
binding.textviewInstructions.text = "Here are your instructions."
binding.edittextInput = "Edit this text."
binding.buttonSubmit = "Tap me!"
请注意,系统会自动将布局文件中使用snake_case 的控件名称转换成binding 的属性名称,这些名称使用camelCase 。button_submit 例如,在布局文件中id 的控件有一个相应的binding 属性,名为buttonSubmit 。
现在你已经了解了视图绑定,让我们来启用它。
🛠 在应用程序的android 块中添加这个buildFeatures 块。 build.gradle文件中的 块。
buildFeatures {
    viewBinding true
}
下面是你添加了buildFeatures 块后,android 块应该是什么样子。
android {
    compileSdk 31

    defaultConfig {
        applicationId "com.example.myapplicationx"
        minSdk 21
        targetSdk 31
        versionCode 1
        versionName "1.0"
        manifestPlaceholders = [auth0Domain: "@string/com_auth0_domain", auth0Scheme: "@string/com_auth0_scheme"]

        testInstrumentationRunner "androidx.test.runner.AndroidJUnitRunner"
    }

    buildTypes {
        release {
            minifyEnabled false
            proguardFiles getDefaultProguardFile('proguard-android-optimize.txt'), 'proguard-rules.pro'
        }
    }
    compileOptions {
        sourceCompatibility JavaVersion.VERSION_1_8
        targetCompatibility JavaVersion.VERSION_1_8
    }
    kotlinOptions {
        jvmTarget = '1.8'
    }
    buildFeatures {
        viewBinding true
    }
}
将项目与更新的Gradle文件进行同步
在对Gradle文件进行这些修改后,你需要将项目与你定义的新构建配置同步。Android Studio会通知你,它检测到了对Gradle文件的修改,并向你提供了将项目与更新后的文件同步的选项。
🛠 点击Android Studio窗口顶部附近通知中出现的立即同步链接。

给予应用程序访问互联网的权限
🛠 打开Android清单文件。 AndroidManifest.xml位于 app/manifests文件夹中,并添加下面的XML元素作为 <manifest>元素的子元素。
<uses-permission android:name="android.permission.INTERNET" />
这一行授予你的应用程序执行网络操作的权限,这将使它能够联系Auth0并利用其认证API。
以下是添加了XML元素后的情况 AndroidManifest.xml添加完XML元素后,应该是这样的。
<!-- AndroidManifest.xml -->

<?xml version="1.0" encoding="utf-8"?>
<manifest xmlns:android="http://schemas.android.com/apk/res/android"
    package="com.example.login">

    <uses-permission android:name="android.permission.INTERNET" />

    <application
        android:allowBackup="true"
        android:icon="@mipmap/ic_launcher"
        android:label="@string/app_name"
        android:roundIcon="@mipmap/ic_launcher_round"
        android:supportsRtl="true"
        android:theme="@style/Theme.Login">
        <activity
            android:name=".MainActivity"
            android:exported="true">
            <intent-filter>
                <action android:name="android.intent.action.MAIN" />

                <category android:name="android.intent.category.LAUNCHER" />
            </intent-filter>
        </activity>
    </application>

</manifest>
更新项目的字符串资源文件
我们将遵循安卓推荐的做法,把应用程序使用的所有字符串字头放在字符串资源文件中。
默认情况下,新的安卓项目有一个文件,位于 /app/res/values/名为 strings.xml.虽然资源文件可以包含任何类型的资源,但惯例是使用 strings.xml只用于字符串。让我们把非敏感的字符串放入该文件。
🛠 打开 strings.xml.它应该包含以下内容。
<!-- strings.xml -->

<resources>
    <string name="app_name">{APP_NAME}</string>
</resources>
而不是 {APP_NAME},你会看到你在第一次创建项目时给你的应用程序指定的名字。
🛠 用下面的内容替换 strings.xml的内容,改为以下内容。
<!-- strings.xml -->

<?xml version="1.0" encoding="utf-8"?>
<resources>

    <string name="app_name">{APP_NAME}</string>

    <!--
    Auth0 identifiers and settings
    ==============================
    -->

    <!-- Identifiers -->
    <string name="com_auth0_scheme">app</string>

    <!-- Settings -->
    <string name="login_scopes">openid profile email read:current_user update:current_user_metadata</string>
    <string name="login_audience">https://%1$s/api/v2/</string>


    <!--
    Main activity
    =============
    -->

    <!-- Title -->
    <string name="initial_title">Welcome to the app!</string>
    <string name="logged_in_title">You\'re logged in.</string>
    <string name="logged_out_title">You\'re logged out.</string>

    <!-- "Log in" and "Log out" buttons -->
    <string name="button_login">Log in</string>
    <string name="button_logout">Log out</string>

    <!-- User profile -->
    <string name="user_profile">
        Name: %1$s\n
        Email: %2$s
    </string>

    <!-- Metadata -->
    <string name="textview_metadata_heading">Metadata</string>
    <string name="textview_metadata_info">Use the text box and buttons below to get and set the \'country\' field in the user\'s metadata.</string>

    <!-- "Get" and "Set" buttons -->
    <string name="button_get">Get</string>
    <string name="button_set">Set</string>

    <!-- SnackBar messages-->
    <string name="login_success_message">Successfully logged in! %1$s</string>
    <string name="login_failure_message">Failed to log in. %1$s</string>
    <string name="general_failure_with_exception_code">Failed - exception code: %1$s</string>
    <string name="general_success_message">Success!</string>

</resources>
🛠 在上面的XML中做如下替换。
- 替换为
{APP_NAME}替换为你的应用程序的名称。
为Auth0凭证创建一个单独的字符串资源文件
仍然有两个字符串需要我们存储在资源文件中:应用程序将使用的Auth0域和客户端ID。
不同于你存储在 strings.xml中存储的值不同,这些值是你想保密的,不希望被 "泄露"。处理这个问题的一个常见方法是将像这样的 "秘密 "值存储在一个单独的资源文件中,这样你就可以限制对它们的访问。让我们为我们的 "秘密 "Auth0值创建一个新的字符串资源文件。
🛠 在Android Studio的项目窗格中,右键单击values 文件夹。在出现的菜单中,选择新建,这将导致出现一个子菜单。从该子菜单中选择价值资源文件。
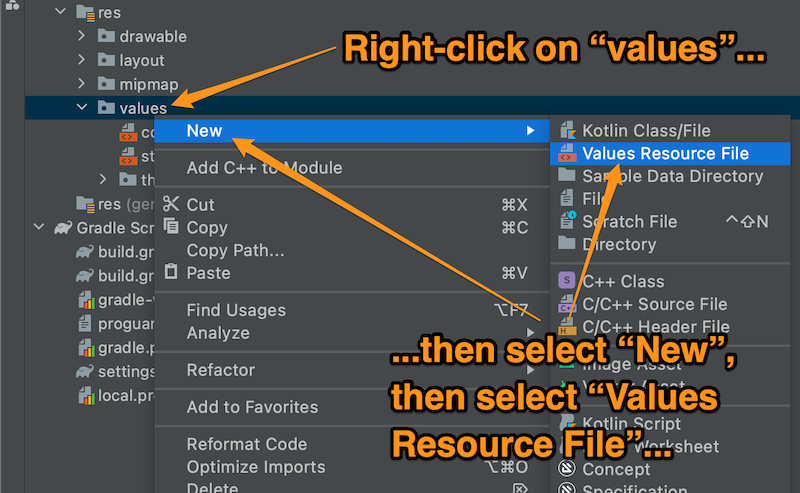
🛠 将出现 "新资源文件"窗口。在文件名中输入 auth0.xml在**文件名:**字段中,单击 "确定"按钮,以该名称创建一个新的资源文件。

🛠 打开新创建的文件,在其中输入以下内容 auth0.xml文件,并在其中输入以下内容。
<!-- auth0.xml -->

<?xml version="1.0" encoding="utf-8"?>
<resources>

    <!--
    Secret Auth0 identifiers and settings
    =====================================
    These values are required to connect to Auth0 for authorization,
    which is why we're storing them in their own string resource file.

    DO NOT CHECK THIS FILE INTO A PUBLIC REPOSITORY!
    -->

    <string name="com_auth0_domain">{DOMAIN}</string>
    <string name="com_auth0_client_id">{CLIENT_ID}</string>

</resources>
🛠 在上面的XML中进行以下替换。
- 替换为
{DOMAIN}替换为你的应用程序的域名,该域名是你从Auth0仪表板的设置页面复制的。 - 替换为
{CLIENT_ID}替换为你的应用程序的客户端ID,该ID是你从Auth0仪表板的设置页面复制的。
定义应用程序的用户界面
现在是定义应用程序的用户界面的时候了。这是一个单屏幕应用程序,所以一切都发生在Main Activity文件中,该文件的布局定义于 activity_main.xml文件中定义,该文件的布局位于 app/res/layout文件夹中。
🛠 打开 activity_main.xml,切换到代码视图,将 <androidx.constraintlayout.widget.ConstraintLayout>标签的子节点,替换为以下内容。
<!-- activity_main.xml -->

<?xml version="1.0" encoding="utf-8"?>
<androidx.constraintlayout.widget.ConstraintLayout xmlns:android="http://schemas.android.com/apk/res/android"
    xmlns:app="http://schemas.android.com/apk/res-auto"
    xmlns:tools="http://schemas.android.com/tools"
    android:layout_width="match_parent"
    android:layout_height="match_parent"
    tools:context=".MainActivity">

    <ScrollView xmlns:android="http://schemas.android.com/apk/res/android"
        android:layout_width="fill_parent"
        android:layout_height="fill_parent"
        tools:ignore="MissingConstraints">

        <LinearLayout xmlns:android="http://schemas.android.com/apk/res/android"
            android:orientation="vertical"
            android:layout_width="match_parent"
            android:layout_height="match_parent"
            android:gravity="center">

            <TextView
                android:id="@+id/textview_title"
                android:layout_width="wrap_content"
                android:layout_height="wrap_content"
                android:layout_marginTop="100dp"
                android:text="@string/initial_title"
                android:textSize="26sp"
                app:layout_constraintEnd_toEndOf="parent"
                app:layout_constraintStart_toStartOf="parent"
                app:layout_constraintTop_toTopOf="parent" />

            <Button
                android:id="@+id/button_login"
                android:layout_width="200dp"
                android:layout_height="wrap_content"
                android:layout_marginTop="36dp"
                android:text="@string/button_login"
                app:layout_constraintEnd_toEndOf="@+id/textview_title"
                app:layout_constraintStart_toStartOf="@+id/textview_title"
                app:layout_constraintTop_toBottomOf="@+id/textview_title" />

            <Button
                android:id="@+id/button_logout"
                android:layout_width="200dp"
                android:layout_height="wrap_content"
                android:text="@string/button_logout"
                android:enabled="false"
                app:layout_constraintEnd_toEndOf="@+id/textview_title"
                app:layout_constraintStart_toStartOf="@+id/textview_title"
                app:layout_constraintTop_toBottomOf="@+id/button_login" />

            <TextView
                android:id="@+id/textview_user_profile"
                android:layout_width="wrap_content"
                android:layout_height="wrap_content"
                app:layout_constraintEnd_toEndOf="parent"
                app:layout_constraintStart_toStartOf="parent"
                app:layout_constraintTop_toBottomOf="@id/button_logout"
                android:layout_margin="18dp"/>

            <LinearLayout
                android:id="@+id/linearlayout_metadata"
                android:visibility="invisible"
                android:layout_width="wrap_content"
                android:layout_height="wrap_content"
                android:orientation="vertical"
                android:gravity="center"
                android:layout_marginTop="16dp"
                app:layout_constraintEnd_toEndOf="parent"
                app:layout_constraintStart_toStartOf="parent"
                app:layout_constraintTop_toBottomOf="@id/textview_user_profile">

                <TextView
                    android:id="@+id/textview_metadata_heading"
                    android:layout_width="wrap_content"
                    android:layout_height="wrap_content"
                    android:textStyle="bold"
                    android:text="@string/textview_metadata_heading"/>

                <TextView
                    android:id="@+id/textview_metadata_info"
                    android:layout_width="match_parent"
                    android:layout_height="50dp"
                    android:layout_margin="8dp"
                    android:textAlignment="center"
                    android:text="@string/textview_metadata_info"
                    android:textSize="12sp" />

                <EditText
                    android:id="@+id/edittext_country"
                    android:layout_width="match_parent"
                    android:layout_height="wrap_content"
                    android:hint="Enter country" />

                <LinearLayout
                    android:layout_width="wrap_content"
                    android:layout_height="wrap_content"
                    android:orientation="horizontal"
                    android:gravity="center">

                    <Button
                        android:id="@+id/button_get"
                        android:layout_width="100dp"
                        android:layout_height="wrap_content"
                        android:text="@string/button_get"
                        android:layout_marginRight="8dp"/>

                    <Button
                        android:id="@+id/button_set"
                        android:layout_width="100dp"
                        android:layout_height="wrap_content"
                        android:text="@string/button_set"
                        android:layout_marginLeft="8dp"/>

                </LinearLayout>

            </LinearLayout>

        </LinearLayout>

    </ScrollView>

</androidx.constraintlayout.widget.ConstraintLayout>
上面的这个XML定义了:
- A
ScrollView封装了整个用户界面。当设备屏幕的高度不足以一次显示整个活动时,它允许用户向上和向下滚动。 - A
LinearLayout包含在ScrollView。一个ScrollView只能包含一个子节点,所以我们用LinearLayout来封装ScrollView中的所有视图。 textview_title:ATextView来显示应用程序启动时的问候语和之后用户的登录/退出状态。button_login和 : 用户点击的button_logoutButton用户通过点击来登录和退出。textview_user_profile:一个TextView,显示登录用户的姓名和电子邮件。layout_metadata:一个LinearLayout,封装了所有与元数据相关的控件。textview_metadata_heading:一个TextView,显示元数据部分的标题。textview_metadata_country:一个TextView,用于说明编辑用户的国家。edittext_country:一个EditText用于显示和编辑用户的国家。button_get和 : 用于获取和设置用户国家的 s。button_setButton
下面是所产生的布局的 "蓝图视图"。我给布局中的控件标注了它们的ids。

在练习的这一点上,你已经完成了所有的设置。你已经用Auth0注册了这个应用程序,并设置了应用程序的构建文件和用户界面。在下一步,你将编写应用程序的代码
