

作为一名开发人员,你可能每天都与CLI互动,以安装库、运行应用程序、检查你的代码等等。因此,你意识到CLI在自动化方面的潜力,以及执行一些任务是多么简单。但这并不是CLI应用的唯一用例,在有些情况下,我们甚至可能无法访问可视化环境,终端是我们唯一的选择,在这种情况下,CLI应用是必须的。
在构建CLI时,也许你需要与私有的API进行交互,或者你可能想验证访问应用程序的用户。无论哪种情况,你都需要在你的应用程序中添加认证。但问题是,怎样做才是最好的?
这就是今天这篇文章的重点。我们将探讨CLI应用程序的认证方法及其使用情况,并使用Python和Auth0建立我们自己的hello to me CLI。
授权流程
当为我们的CLI应用程序选择最佳的认证流程时,我们必须首先考虑其使用情况。
当涉及到CLI时,有三种选择,今天,我们将专注于设备授权流,这是最安全的方式,由于Auth0,它也很容易与通用登录的全部功能集成,我们将在这篇文章的后面看到它的作用。
设备流如何工作
通过设备流,应用程序不是直接验证用户,而是向用户提供指示,让其访问一个网站,并在那里授权设备(在我们的例子中,是CLI)。
近年来,随着智能电视和其他物联网设备的引入,这种流程越来越受欢迎,例如,你的电视会要求你去手机上的YouTube应用程序,并确认一个代码来访问你的用户资料。
如果你想了解流程的细节,我建议阅读设备流程指南。
示例应用程序
正如我们提到的,我们将使用Python建立一个hello to me CLI应用程序。该CLI将使用设备流对用户进行认证,在完成认证过程后,将提取有关用户的信息并显示在屏幕上。
让我们从创建我们项目的目录开始。
mkdir awesome-cli
cd awesome-cli
接下来,我们创建并激活虚拟环境,我将使用Python的集成VENV,但你也可以使用pipenv ,conda ,或其他的。
python3 -m venv venv
source venv/bin/activate
接下来,我们需要安装一些依赖项。下面是列表和设置它们的命令: -Typer。Typer是一个用于构建CLI应用程序的库。-auth0-python。Auth0的Python SDK,我们将用它来验证我们的令牌。-requests。用于进行HTTP调用。
pip install auth0-python requests typer
最后,让我们构建应用程序的骨架并运行它。
touch main.py
接下来,打开该文件 main.py并粘贴以下代码。
import time

from auth0.v3.authentication.token_verifier import TokenVerifier, AsymmetricSignatureVerifier
import jwt
import requests
import typer

app = typer.Typer()

@app.command()
def say_hi():
    print(f"Hello world!")

if __name__ == "__main__":
    app()
最后,要运行它。
python main.py
如果一切顺利,你应该在终端看到 Hello world!如果一切顺利的话,你应该在你的终端上看到
因为我们只添加了一个命令,所以我们可以运行该文件,
Typer,就会自动执行。如果你有一个以上的命令,你必须提供想要的命令来运行它,做法如下python main.py say-hi.
设置一个Auth0 CLI应用程序
现在你有了基本的CLI项目,我们可以开始着手添加认证。
第1步:注册一个Auth0账户
如果你还没有,你可以注册一个免费的Auth0账户。
第2步:在Auth0注册应用程序
- 进入Auth0仪表板,选择应用程序>应用程序,然后点击创建应用程序。
- 输入你的应用程序名称(例如,Awesome CLI),选择Native,然后点击Create。
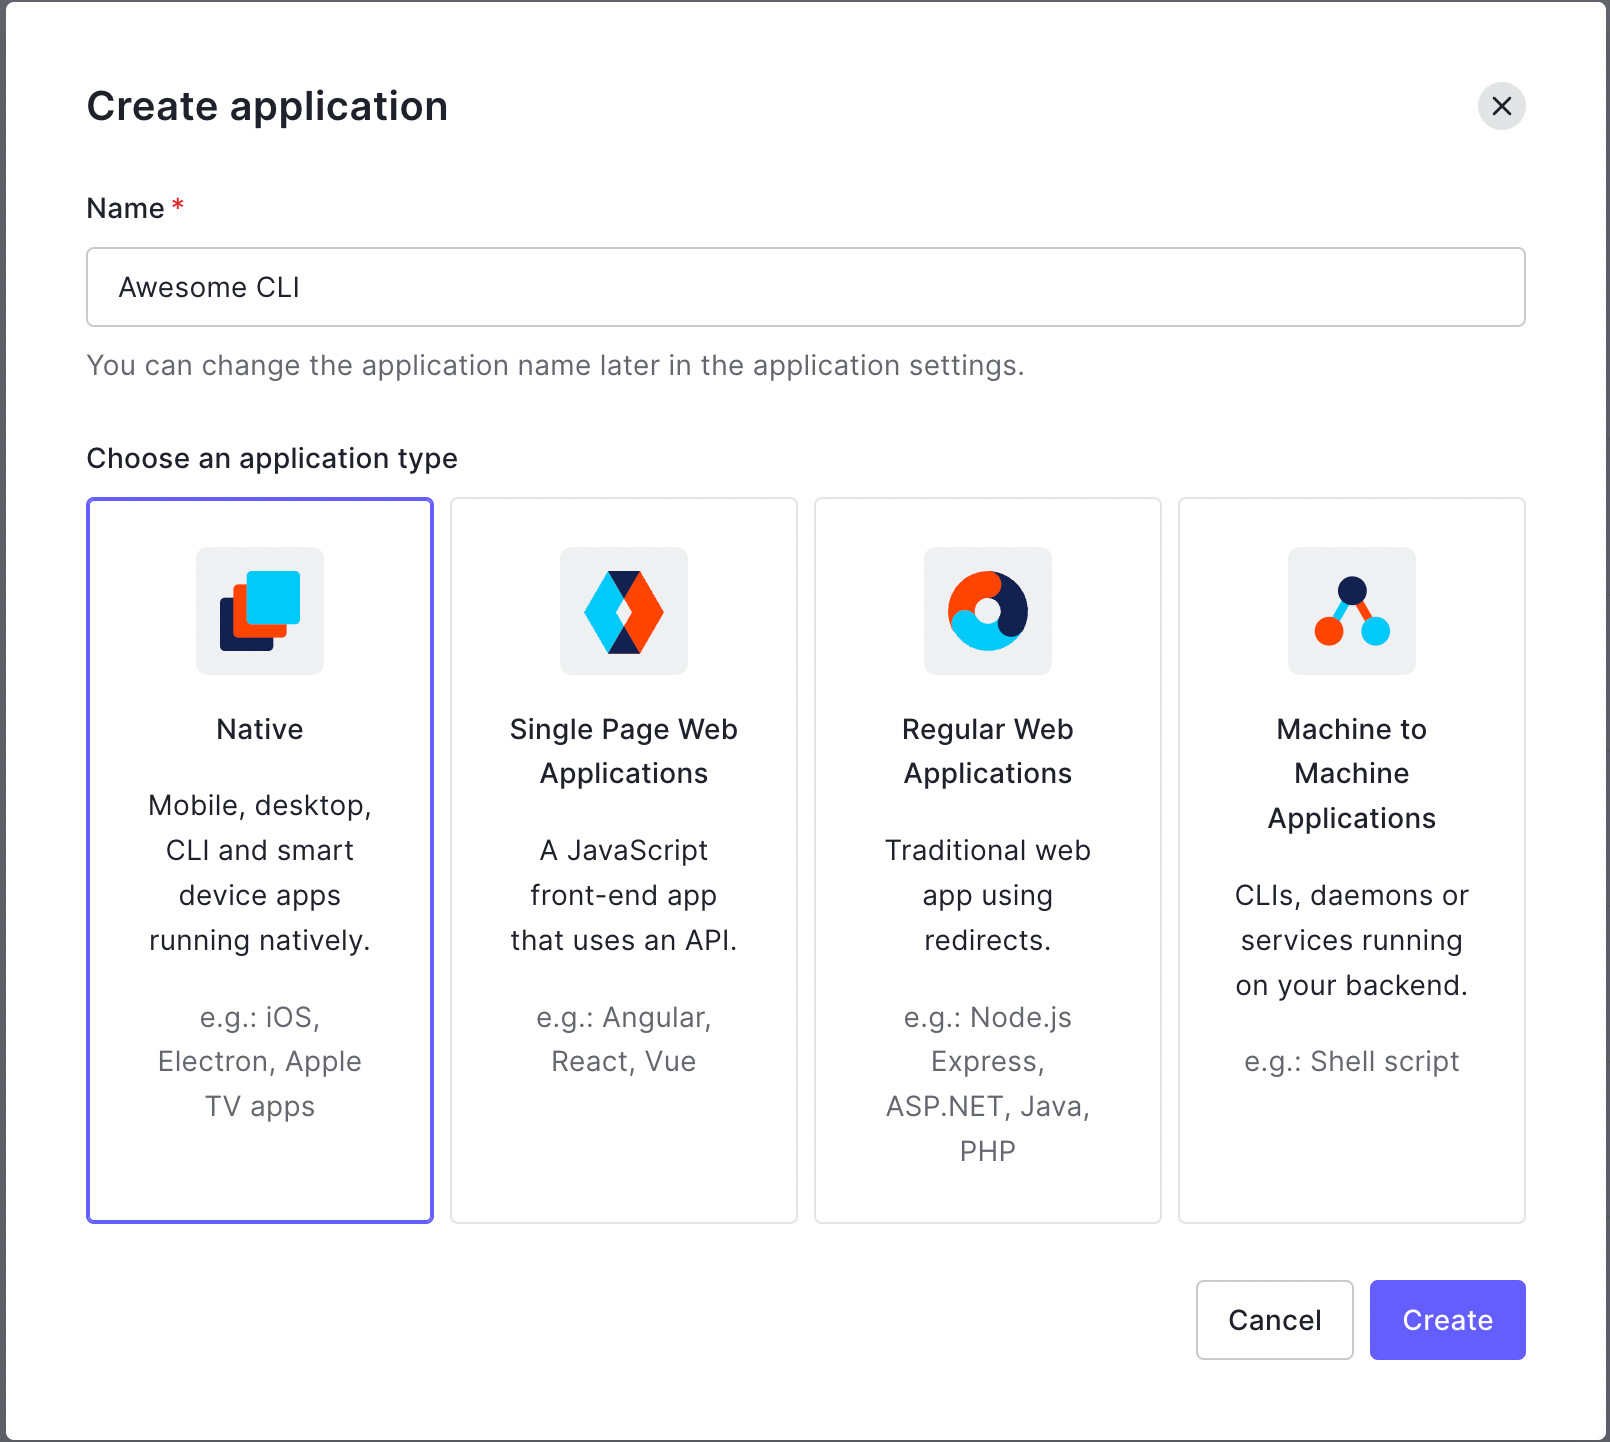
- 应用程序的快速启动页面出现后,点击设置标签。
- 一旦出现,在底部附近滚动到名为 "高级设置"的部分,并单击雪佛龙展开它。
- 接下来,点击OAuth标签,确保OIDC Conformant处于 "开启 "状态。如果你刚刚创建了这个应用程序,它应该是默认打开的。

- 选择 "授权类型"选项卡,并检查设备代码。默认情况下,它是不被选中的。
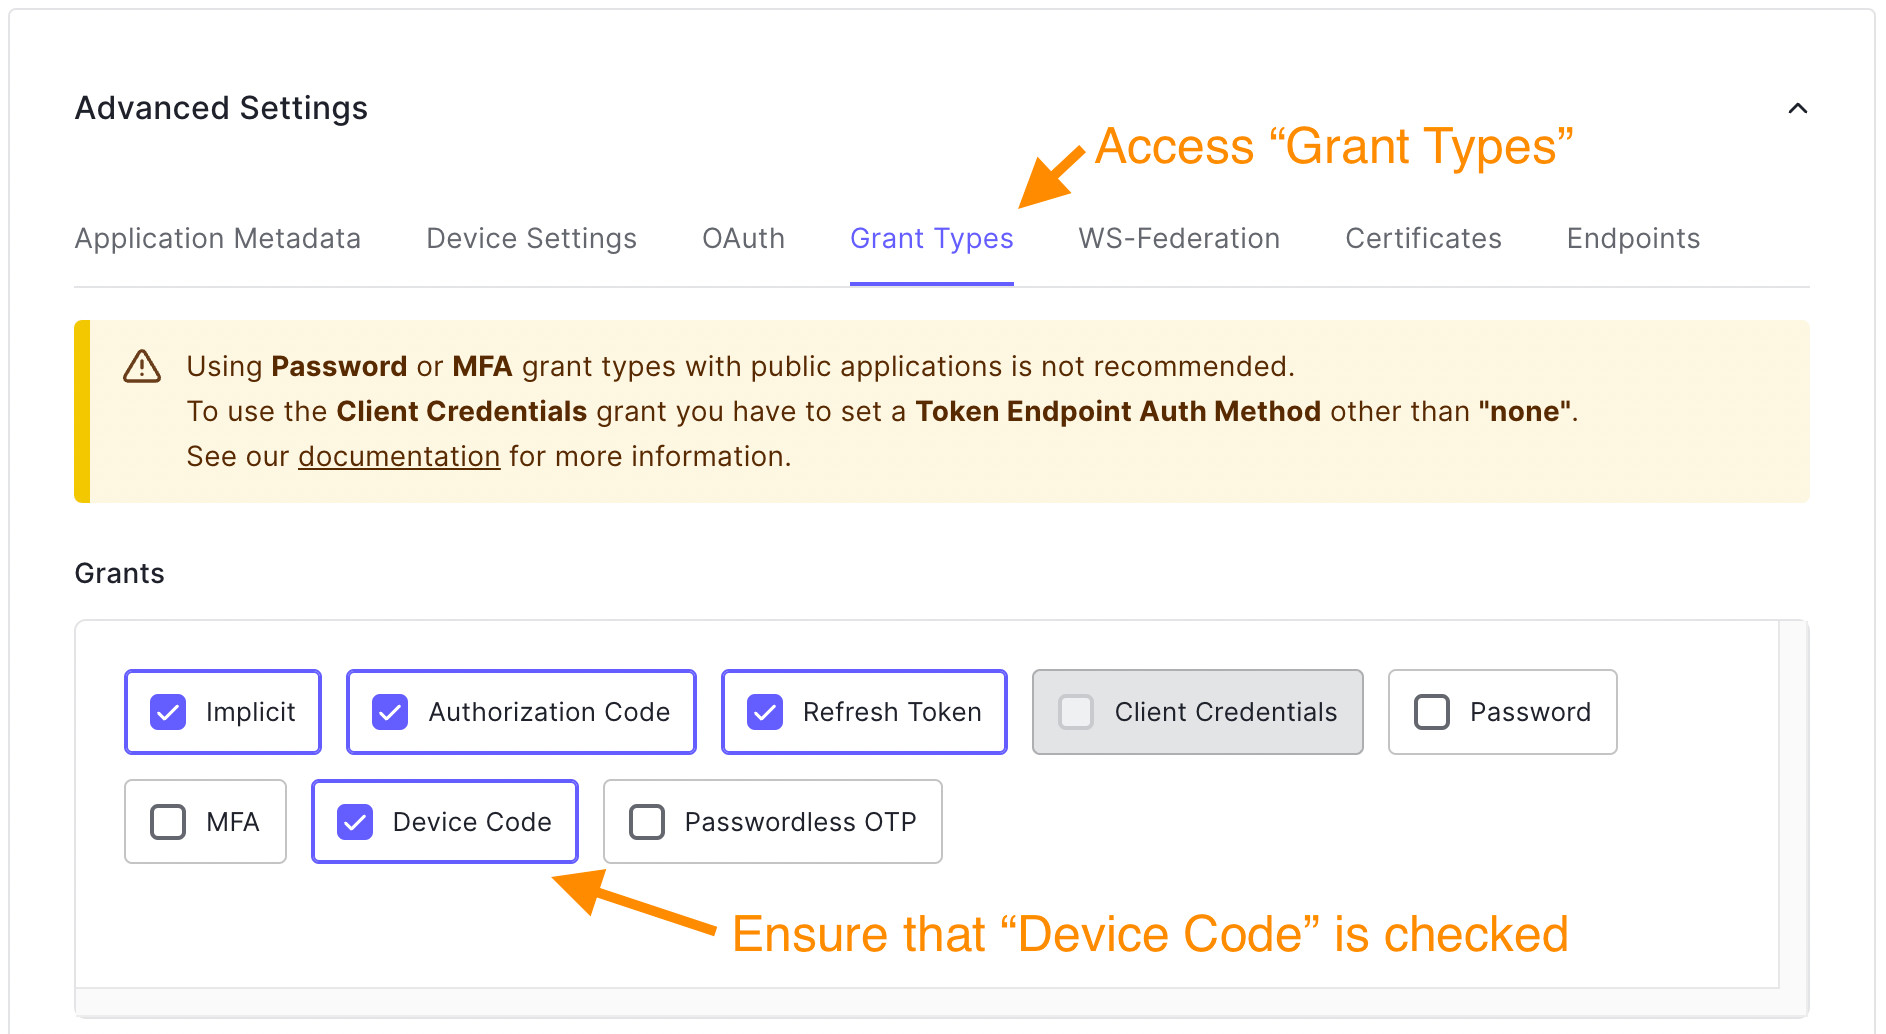
- 最后,单击 "保存更改"按钮。
Auth0为随机生成的代码提供了默认设置,但如果你需要定制它们,你可以在设备用户代码设置中定义新的模式。
用Python实现授权流
正如我们提到的,设备代码流需要一系列的步骤。在我们的案例中,我们将按照以下逻辑顺序实现它们。
- 请求设备代码
- 请求令牌
- 接收令牌
请求设备代码
在这一步中,我们将使用Auth0的API来启动一个设备授权流,并为我们提供认证和验证设备所需的设置URL和用户代码。
我们必须从Auth0仪表板上获取数据以调用所需的API,所以让我们获取它们并将它们设置为像这样的python变量。
# main.py

...
import typer

# New code 👇
AUTH0_DOMAIN = 'your-domain.auth0.com'
AUTH0_CLIENT_ID = 'your-client-id'
ALGORITHMS = ['RS256']
# New code 👆

app = typer.Typer()
...
要获取Auth0域和客户ID,请访问你的Auth0应用程序的仪表板的 设置标签下。这两个值将在屏幕上出现。请将它们复制并粘贴到相应的变量中。

接下来,让我们创建一个新的 login()函数并添加我们的代码。
# main.py

...
import typer

app = typer.Typer()

# New code 👇
def login():
    """
    Runs the device authorization flow and stores the user object in memory
    """
    device_code_payload = {
        'client_id': AUTH0_CLIENT_ID,
        'scope': 'openid profile'
    }
    device_code_response = requests.post('https://{}/oauth/device/code'.format(AUTH0_DOMAIN), data=device_code_payload)

    if device_code_response.status_code != 200:
        print('Error generating the device code')
        raise typer.Exit(code=1)

    print('Device code successful')
    device_code_data = device_code_response.json()
    print('1. On your computer or mobile device navigate to: ', device_code_data['verification_uri_complete'])
    print('2. Enter the following code: ', device_code_data['user_code'])
# New code 👆

@app.command()
def say_hi():
    print(f"Hello world!")

if __name__ == "__main__":
    app()
调用Auth0的设备代码API后,我们得到一个JSON对象的响应,除其他属性外,还包含。
verification_uri:用户需要访问的URL来验证设备。user_code :用户应该在verification_uri ,输入代码来授权设备。verification_uri_complete :用户可以访问这个URL来授权设备,而不用手动输入用户代码。根据你的情况,你可能更喜欢这种方式,而不是verification_uri 。interval :应用程序应该轮询令牌URL以请求令牌的时间间隔(以秒为单位)--在下一节中会有更多内容。
我们在屏幕上向用户显示这些信息。在更高级的UI中,如智能电视,你会发现二维码或其他技巧来促进用户互动。
注意:当我们调用API时,我们发送一个特定的有效载荷。在我们的案例中,我们指定了范围,设置为
openid profile,因此我们可以收到一个id_token。在其他场景中,你也许需要调用API,你需要一个访问令牌,因此你也应该提供一个audience。查看关于用Device Flow调用API的指南,了解更多信息。
请求令牌
接下来,有两件事并行发生。当用户访问URL并完成认证流程时,CLI将不断与Auth0的API检查该流程的状态。
因为认证流程发生在应用程序的范围之外,甚至可能发生在与我们的代码不同的设备上,所以我们没有办法知道用户何时完成了请求。为了克服这种情况,我们将每隔几秒钟轮询一次API的当前状态,直到发生以下情况之一。
- 用户放弃了应用程序。
- 我们收到一个取消的消息。
- 来自API的成功。
现在你可能想知道:我们应该多长时间查询一次API?Auth0在我们启动流程时,通过我们之前讨论的属性interval ,为我们提供了这些信息。
让我们用代码来做这件事。
# main.py

...
def login():
    """
    Runs the device authorization flow and stores the user object in memory
    """
    device_code_payload = {
        'client_id': AUTH0_CLIENT_ID,
        'scope': 'openid profile'
    }
    device_code_response = requests.post('https://{}/oauth/device/code'.format(AUTH0_DOMAIN), data=device_code_payload)

    if device_code_response.status_code != 200:
        print('Error generating the device code')
        raise typer.Exit(code=1)

    print('Device code successful')
    device_code_data = device_code_response.json()
    print('1. On your computer or mobile device navigate to: ', device_code_data['verification_uri_complete'])
    print('2. Enter the following code: ', device_code_data['user_code'])

    # New code 👇
    token_payload = {
        'grant_type': 'urn:ietf:params:oauth:grant-type:device_code',
        'device_code': device_code_data['device_code'],
        'client_id': AUTH0_CLIENT_ID
    }

    authenticated = False
    while not authenticated:
        print('Checking if the user completed the flow...')
        token_response = requests.post('https://{}/oauth/token'.format(AUTH0_DOMAIN), data=token_payload)

        token_data = token_response.json()
        if token_response.status_code == 200:
            print('Authenticated!')
            print('- Id Token: {}...'.format(token_data['id_token'][:10]))
            authenticated = True
        elif token_data['error'] not in ('authorization_pending', 'slow_down'):
            print(token_data['error_description'])
            raise typer.Exit(code=1)
        else:
            time.sleep(device_code_data['interval'])
    # New code 👆
...
在等待用户认证时,我们使用token端点。
一旦用户通过认证,API将以一个 200状态代码,并向我们提供所要求的令牌信息。在我们的例子中,由于我们只要求openid ,我们将收到一个id_token ,但如果在流程启动时指定,并且应用程序配置允许,我们也可以检索access_token 和refresh_token 。
当用户没有被认证时,我们将不断地收到 4xx错误响应。我们必须更详细地研究这些响应,因为有些意味着我们仍在等待,而有些则表明我们要终止认证序列。
认证待定。在等待用户采取行动的时候,你会看到这个错误(如下图所示)。继续使用本教程上一步中检索到的建议间隔进行轮询。
{
    "error": "authorization_pending",
    "error_description": "..."
}
放慢速度。你的轮询速度太快了。放慢速度,使用本教程上一步中建议的间隔时间。为了避免由于网络延迟而收到这个错误(如下图所示),你应该在收到最后一个轮询请求的响应后开始计算每个间隔。
{
    "error": "slow_down",
    "error_description": "..."
}
过期的令牌。用户没有足够快地授权设备,所以device_code ,已经过期。你的应用程序应该通知用户该流量已经过期,并提示他们重新启动该流量。
{
    "error": "expired_token",
    "error_description": "..."
}
访问被拒绝。最后,如果访问被拒绝,你会收到。
{
    "error": "access_denied",
    "error_description": "..."
}
如果认证流因各种原因而中断,就会发生这种情况,包括:。
接收令牌
当用户授权设备并完成认证流程时,我们可以成功地检索到令牌。不过,除了在屏幕上显示几个字符外,我们还没有对它们做任何处理。
在令牌API的响应中,我们得到了一个HTTP 200响应,其有效载荷包含access_token,id_token,token_type, 和expires_in 的值。
在我们存储或使用任何这些令牌之前,我们需要验证它们。在我们的应用程序中,我们将验证我们需要的id_token ,但你也可以验证access_tokens 。阅读更多关于验证访问令牌和Auth0 Python SDK的信息。
我们将首先定义一个验证令牌函数。
# main.py

...
app = typer.Typer()

# New code 👇
current_user = None

def validate_token(id_token):
    """
    Verify the token and its precedence

    :param id_token:
    """
    jwks_url = 'https://{}/.well-known/jwks.json'.format(AUTH0_DOMAIN)
    issuer = 'https://{}/'.format(AUTH0_DOMAIN)
    sv = AsymmetricSignatureVerifier(jwks_url)
    tv = TokenVerifier(signature_verifier=sv, issuer=issuer, audience=AUTH0_CLIENT_ID)
    tv.verify(id_token)
# New code 👆

def login():
...
为了验证令牌,我们使用Auth0 Python SDK。
我们还创建了一个全局变量,current_user ,接下来我们将在把令牌验证整合到我们的登录函数中时使用它。
...
def login():
            ...
        print('Authenticated!')
            print('- Id Token: {}...'.format(token_data['id_token'][:10]))

            # New code 👇
            validate_token(token_data['id_token'])
            global current_user
            current_user = jwt.decode(token_data['id_token'], algorithms=ALGORITHMS, options={"verify_signature": False})
            # New code 👆

            authenticated = True
            ...
当我们检测到用户成功登录时,我们验证id_token ,从中解码用户数据,并将其存储在全局变量current_user 。
最后但同样重要的是,我们需要将我们的登录函数与应用程序连接起来。
...
@app.command()
def say_hi():
    # New code 👇
    if current_user is None:
        login()
    print(f"Welcome {current_user['name']}!")
    # New code 👆

if __name__ == "__main__":
    app()
你成功了!现在你有了一个可以工作的应用程序,但为了防止它有太多的代码片段无法遵循,这里是完整的代码。
import time

from auth0.v3.authentication.token_verifier import TokenVerifier, AsymmetricSignatureVerifier
import jwt
import requests
import typer

AUTH0_DOMAIN = 'your-domain.auth0.com'
AUTH0_CLIENT_ID = 'your-client-id'
ALGORITHMS = ['RS256']

app = typer.Typer()

current_user = None

def validate_token(id_token):
    """
    Verify the token and its precedence

    :param id_token:
    """
    jwks_url = 'https://{}/.well-known/jwks.json'.format(AUTH0_DOMAIN)
    issuer = 'https://{}/'.format(AUTH0_DOMAIN)
    sv = AsymmetricSignatureVerifier(jwks_url)
    tv = TokenVerifier(signature_verifier=sv, issuer=issuer, audience=AUTH0_CLIENT_ID)
    tv.verify(id_token)

def login():
    """
    Runs the device authorization flow and stores the user object in memory
    """
    device_code_payload = {
        'client_id': AUTH0_CLIENT_ID,
        'scope': 'openid profile'
    }
    device_code_response = requests.post('https://{}/oauth/device/code'.format(AUTH0_DOMAIN), data=device_code_payload)

    if device_code_response.status_code != 200:
        print('Error generating the device code')
        raise typer.Exit(code=1)

    print('Device code successful')
    device_code_data = device_code_response.json()
    print('1. On your computer or mobile device navigate to: ', device_code_data['verification_uri_complete'])
    print('2. Enter the following code: ', device_code_data['user_code'])

    token_payload = {
        'grant_type': 'urn:ietf:params:oauth:grant-type:device_code',
        'device_code': device_code_data['device_code'],
        'client_id': AUTH0_CLIENT_ID
    }

    authenticated = False
    while not authenticated:
        print('Checking if the user completed the flow...')
        token_response = requests.post('https://{}/oauth/token'.format(AUTH0_DOMAIN), data=token_payload)

        token_data = token_response.json()
        if token_response.status_code == 200:
            print('Authenticated!')
            print('- Id Token: {}...'.format(token_data['id_token'][:10]))

            validate_token(token_data['id_token'])
            global current_user
            current_user = jwt.decode(token_data['id_token'], algorithms=ALGORITHMS, options={"verify_signature": False})
            # New code 👆

            authenticated = True
        elif token_data['error'] not in ('authorization_pending', 'slow_down'):
            print(token_data['error_description'])
            raise typer.Exit(code=1)
        else:
            time.sleep(device_code_data['interval'])

@app.command()
def say_hi():
    if current_user is None:
        login()
    print(f"Welcome {current_user['name']}!")

if __name__ == "__main__":
    app()
应用程序演示
让我们现在尝试一下这个应用程序,按照所有的步骤操作,直到我们看到 "欢迎 "信息。
首先,我们运行该应用程序。
python main.py
当应用程序启动时,它运行 login()函数,并请求一个设备代码。几乎立刻,我们就在屏幕上收到了登录的指示,我们看到CLI在间隔地轮询令牌API。
(venv) ➜ awesome-cli python main.py
Device code successful
1. On your computer or mobile device navigate to: https://dev2-bajcmartinez.eu.auth0.com/activate?user_code=RPSW-HMCW
2. Enter the following code: RPSW-HMCW
Checking if the user completed the flow...
当我们在浏览器或其他设备上访问该链接时,我们会看到Auth0通用登录页面,设备代码已经预装。我们必须看一下代码,确保它与CLI上呈现的代码相同。一旦我们确认了这一点,我们就点击继续。
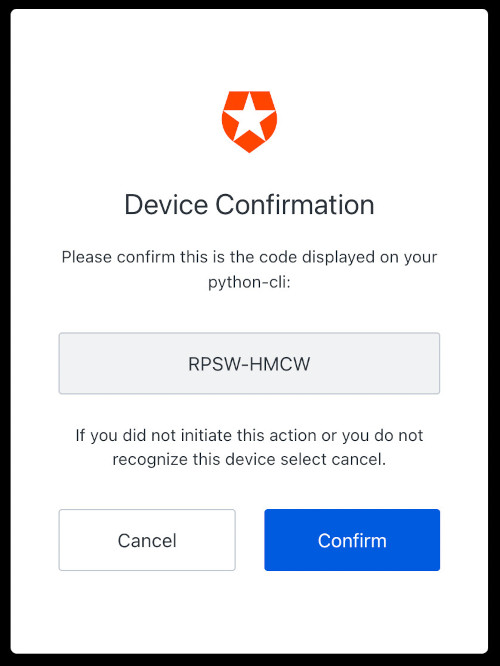
如果你已经熟悉Auth0通用登录,你可能知道下面这个屏幕。这是你可以使用证书、社交登录、MFA等注册或登录的地方。
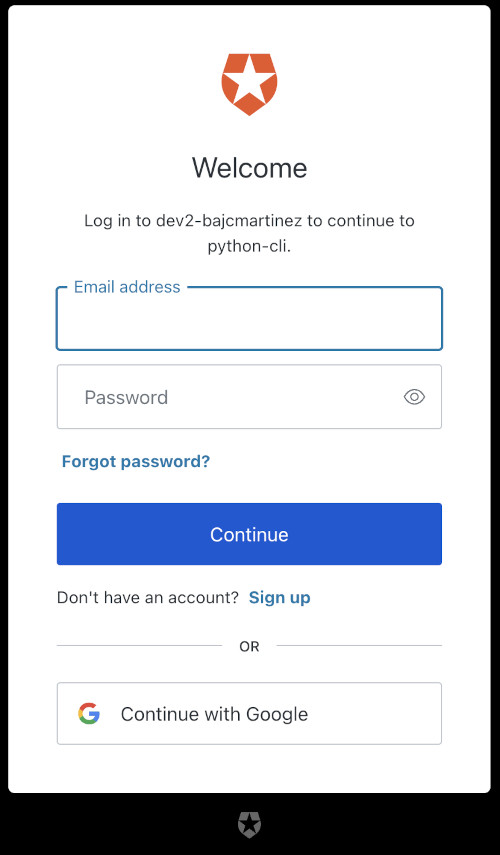
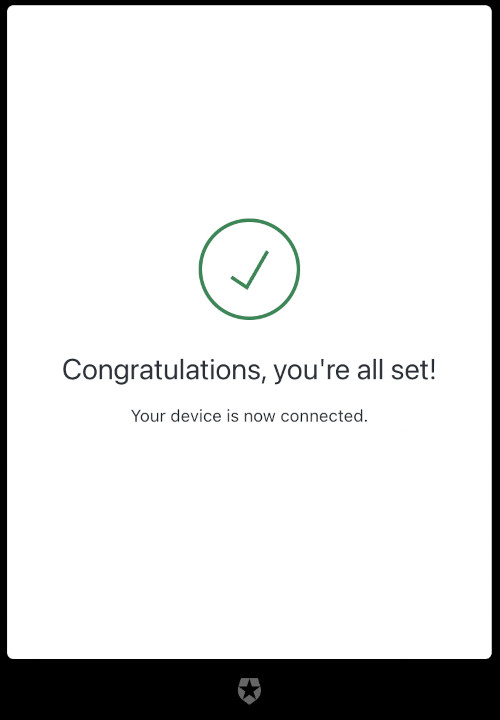
要么注册一个新用户,要么登录后继续。一旦你这样做,你会看到确认页面,你的设备现在已经连接。
现在你可以关闭该窗口,回到CLI,在那里你会看到你的欢迎信息。
(venv) ➜ awesome-cli python main.py
Device code successful
1. On your computer or mobile device navigate to: https://dev2-bajcmartinez.eu.auth0.com/activate?user_code=RPSW-HMCW
2. Enter the following code: RPSW-HMCW
Checking if the user completed the flow...
Checking if the user completed the flow...
Checking if the user completed the flow...
Checking if the user completed the flow...
Authenticated!
- Id Token: eyJhbGciOi...
Welcome Juan!
下一步是什么?
祝贺你!今天,你学会了使用 "设备授权"。今天,你学会了用Python和Auth0使用设备授权流来验证用户进入CLI应用程序。
但这仅仅是个开始,还有很多东西要学。
