

前提
这篇文章写的时候代码还比较粗糙,在Windows端可能无法使用,会有路径问题,最新版本已经将代码重构,解决了很多问题,不过主要思想变化不是很大,想要查看代码的可以前往仓库
起因
趁着学习 Vscode 插件开发的机会,我将之前使用 Electron 技术构建的 Subversion小助手 再重构一遍,由于 Electron 构建出的包体积太大,优化过后仍然有 85M 左右,同时我自己平时开发项目也比较喜欢用 Vscode 进行,能够统一起来自然是最好不过的了。
项目地址
GitHub - cloudhao1999/biangengdan
开始
先来看一下插件的最终效果:
首先是配置页面,该插件允许用户配置一个前置的路径前缀,用于路径拼接与文件夹的生成
点击左侧的 + 图标即可进入插件的主页面,主页面由上往下分别是 变更单列表,新增变更,修改变更,删除变更
支持选择你想要提交的变更文件,点击 + 号,插件会根据类型自动添加到对应的变更分组中,也可以点击 x 号清空
支持分组批量复制变更路径,支持导出变更单文件到指定文件目录

好处
第一点就是体积小,打包出来的大小仅仅 5kb ,第二点是与你的开发环境深度集成,能够不打扰你的工作,第三点是更新快捷,可以将插件发布到微软的插件市场,别人用你插件只需要打开 Vscode 编辑器,在插件市场搜索即可安装,更新也只需要通过插件市场,不用当心出了 BUG 修复完后给别人安装麻烦的事情。
脚手架安装
首先安装 yeoman 脚手架工具,以及 vscode 官方提供的脚手架工具:
npm install -g yo generator-code
接下来执行以下命令交互式创建插件项目:
yo code
按照提示进行操作即可
页面布局
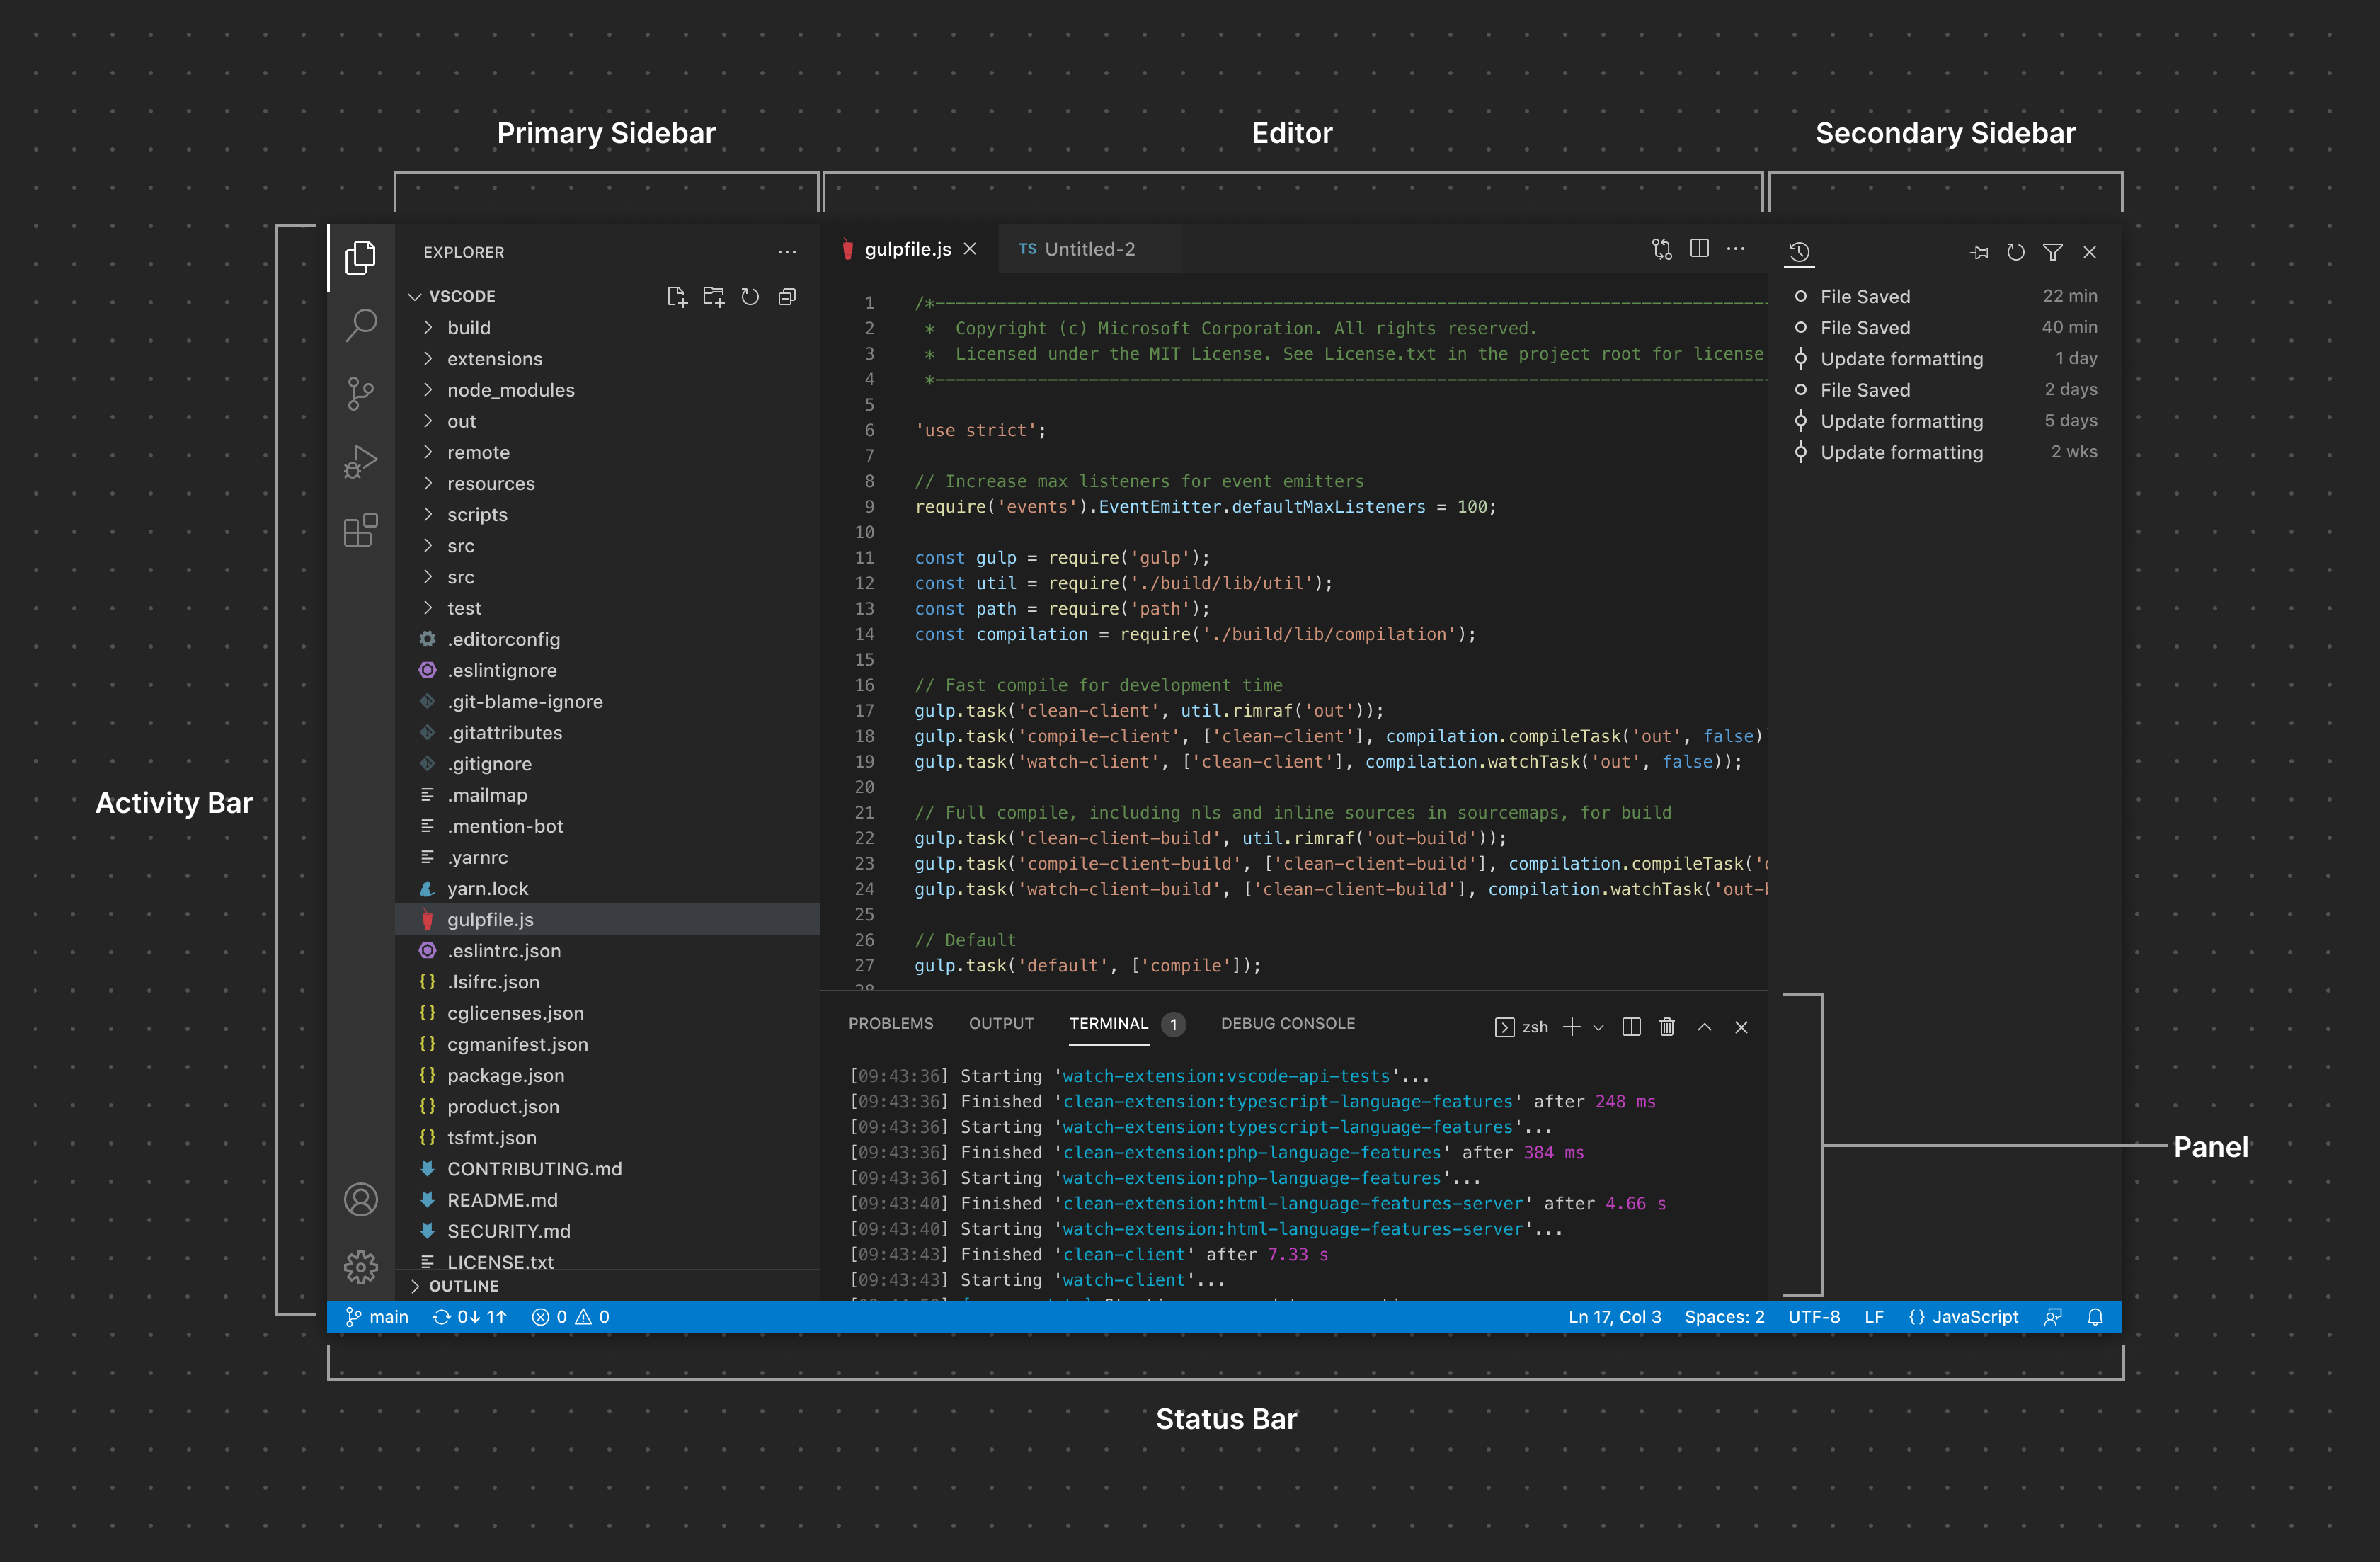
首先来看第一个点,以下这些红线圈出来的都是 Vscode 提供的操作元素,它们也散落在不同的地方,由不同字段控制
我们先从最左边的白色 + 按钮开始,借官方文档的一张图,它是 Activity Bar,在 package.json 中可以进行配置
contributes 代表你所注册该插件的一系列配置,包括插件视图的位置,执行的命令等,activitybar 需要你配置 id、title、icon 信息
"contributes": {
    "viewsContainers": {
      "activitybar": [
        {
          "id": "biangengdan-explorer",
          "title": "变更单视图",
          "icon": "resources/add.svg"
        }
      ]
    },
    // 省略其它配置
}
来看这下面的界面,红色画圈的部分叫做 view,点击 activitybar 所展示的区域,要像实现图中的效果,我们需要进行以下的配置
我们在 views 下指定视图是在哪一个 activitybar 下展现,biangengdan-explorer 就是之前定义 activitybar 的 id,支持配置的字段有一个 when 值得注意,在这里我希望我的插件能够在不支持 SVN 管理的项目下不出现,就可以通过 when 字段进行配置,顾名思义,when 的作用就是控制视图什么时候显示
"contributes": {
	// 上面的配置省略
	"views": {
      "biangengdan-explorer": [
        {
          "id": "biangengdan",
          "name": "项目变更",
          "when": "config.svn.enabled && svnOpenRepositoryCount != 0"
        },
        {
          "id": "biangengdanAdd",
          "name": "新增变更",
          "when": "config.svn.enabled && svnOpenRepositoryCount != 0"
        },
        {
          "id": "biangengdanModify",
          "name": "修改变更",
          "when": "config.svn.enabled && svnOpenRepositoryCount != 0"
        },
        {
          "id": "biangengdanDelete",
          "name": "删除变更",
          "when": "config.svn.enabled && svnOpenRepositoryCount != 0"
        }
      ]
    }
}
树形视图的展示
有了最基础的视图,接下来我们将要使用 Vscode 提供的 TreeDataProvider 来构造列表了,也就是下面的列表
微软官方有专门的章节来介绍如何使用,Tree View API | Visual Studio Code Extension API,简要的阐述一下,大概分为三步,第一步:构造属于你自己的 TreeItem 实体类
文件的路径在 src/core/index.ts,我们基于 Vscode 提供的 TreeItem 类构造了一个我们自己独特的 BianGengDan,有几个属性值得说一下
import * as vscode from "vscode";

export default class BianGengDan extends vscode.TreeItem {
    constructor(
        public readonly label: string,
        private status: string,
        public fullPathName: string,
        public readonly collapsibleState: vscode.TreeItemCollapsibleState
    ) {
        super(label, collapsibleState);
        this.tooltip = `${this.status}: ${this.fullPathName}`;
        this.description = this.fullPathName;
        this.resourceUri = vscode.Uri.file(this.label);
    }
}
图中所指出来的就是不同字段所代表的不同位置,可以代码和图片对照着看
接下来就是最重要的 TreeDataProvider 树状列表的实现,如果你看了官方文档的实例就会发现,我们所要做的就是继承 vscode.TreeDataProvider 类并实现它的方法,泛型中传入的类型是上一个步骤我们自定义的类型。代码位置在 src/core/tree.ts ,我们需要实现 getTreeItem getChildren refresh 方法,他们代表着数据的展示和更新,具体代码可以查看仓库,简要的讲解一下,我们使用 getSubVersionTree 方法,配合 Node 提供的 child_process ,执行 svn status -q 命令,获取本地暂存的变更列表,转化成我们自定义的类型 BianGengDan,然后返回给 Vscode 让它展示
import * as vscode from "vscode";
import * as cp from "child_process";
import BianGengDan from ".";

export class BianGengDanProvider implements vscode.TreeDataProvider<BianGengDan> {
    constructor(private workspaceRoot: string) { }

    getTreeItem(element: BianGengDan): vscode.TreeItem {
        return element;
    }

    getChildren(): Thenable<BianGengDan[]> {
        return new Promise<BianGengDan[]>((resolve, reject) => {
            if (!this.workspaceRoot) {
                vscode.window.showInformationMessage('No changes in empty workspace');
                return Promise.resolve([]);
            }

            this.getSubVersionTree().then((outPutString) => {
                if (outPutString) {
                    resolve(this.toTreeFile(outPutString));
                } else {
                    reject([]);
                }
            });
        });
    }

    private _onDidChangeTreeData: vscode.EventEmitter<
        BianGengDan | undefined
    > = new vscode.EventEmitter<BianGengDan | undefined>();

    readonly onDidChangeTreeData: vscode.Event<BianGengDan | undefined> = this
        ._onDidChangeTreeData.event;

    refresh(): void {
        this._onDidChangeTreeData.fire(undefined);
    }


    private getSubVersionTree(): Thenable<string | null> {
        return new Promise((c, e) => {
            const res = cp.execSync(`svn status -q`, { cwd: this.workspaceRoot });
            c(res.toString());
        });
    }


    private toTreeFile(res: string) {
        const list = res.split('\n');
        return list.filter(i => i.trim() !== '').map((item) => {
            const status = item[0];
            const fullPathName = item.replace(/\s+/, '$').split('$')[1];
            const filePathArr = fullPathName.split('/');
            const filePathName = filePathArr[filePathArr.length - 1];
            console.log('filePathName', filePathName);
            return new BianGengDan(filePathName, status, fullPathName, vscode.TreeItemCollapsibleState.None);
        });
    }
}
自定义的渲染器实现了,我们现在需要进行注册操作,来到 src/extension.ts 中,原先初始化项目时,里面提供了 activate 方法,我们在里面来注册我们的视图,第一步获取项目根目录,使用在 src/util/config.ts 中定义的 getRootPath 方法
export function getRootPath(): string {
    const rootPath =
        vscode.workspace.workspaceFolders && vscode.workspace.workspaceFolders.length > 0
            ? vscode.workspace.workspaceFolders[0].uri.fsPath
            : undefined;
    return rootPath!;
}
第二步:初始化 BianGengDanProvider,第三步:使用 vscode.window.registerTreeDataProvider 来注册视图,这时候就可以看见视图出现了
import * as vscode from 'vscode';
import { BianGengDanProvider } from './core/tree';
import { getRootPath } from './util/config';


export function activate(context: vscode.ExtensionContext) {

	const rootPath = getRootPath();

	const bianGengDanProvider = new BianGengDanProvider(rootPath!);

	vscode.window.registerTreeDataProvider(
		'biangengdan',
		bianGengDanProvider
	);
}

export function deactivate() {

}
注册刷新事件
往先前的 package.json 中继续添加配置信息,在这里我们注册了一个 command ,我们可以使用 ${iconName} 来引用 Vscode 给我们预先定义好的图标,随后在 menus 字段下声明这个按钮应该出现在哪里,可以参考网上的这张图
"contributes": {
	"commands": [
      {
        "command": "biangengdan.refreshEntry",
        "title": "刷新变更历史",
        "icon": "$(refresh)"
      }
    ],
	"menus": {
      "view/title": [
        {
          "command": "biangengdan.refreshEntry",
          "when": "view == biangengdan",
          "group": "navigation"
        }
      ]
    }
}
在 activate 方法中继续添加下列代码,注册我们刚刚配置的 'biangengdan.refreshEntry' 事件
context.subscriptions.push(
	vscode.commands.registerCommand('biangengdan.refreshEntry', () =>
		bianGengDanProvider.refresh()
	),
);
实现添加功能
往先前的 package.json 中继续添加配置信息
"contributes": {
	"commands": [
      {
        "command": "biangengdan.addEntry",
        "title": "添加到变更单",
        "icon": "$(add)"
      }
    ],
	"menus": {
      "view/item/context": [
        {
          "command": "biangengdan.addEntry",
          "when": "view == biangengdan",
          "group": "inline"
        }
      ]
    }
}
在 activate 方法中继续添加下列代码,这里用到了 bianGengDanAddProvider ,他是其余三个树状视图的实现,和我们上面讲到的 bianGengDanProvider 十分相似,我在 src/core/subtree.ts 中定义了它,相比于之前的bianGengDanProvider ,它多了 add clear copy delete export 方法,用于接下来的不同功能,同时他还需要引入一个配置项prefixPath,我在 src/util/config.ts 中实现了 getConfiguration 方法
"contributes": {
	"configuration": {
      "title": "变更单配置",
      "properties": {
        "biangengdan.prefixPath": {
          "type": "string",
          "default": "/web/front-analy-web/",
          "description": "svn项目路径前缀"
        }
      }
    },
}
// `src/util/config.ts`

import * as vscode from 'vscode';

export function getConfiguration<T extends any>(property: string): T {
    return vscode.workspace.getConfiguration('biangengdan').get(property)!;
};
// `src/core/subtree.ts`

import * as path from "path";
import * as fs from "fs";
import * as vscode from "vscode";
import BianGengDan from ".";
import { getConfiguration, getRootPath } from "../util/config";

export class BianGengDanSubtreeProvider implements vscode.TreeDataProvider<BianGengDan> {
    constructor(private itemList?: BianGengDan[]) { }

    getTreeItem(element: BianGengDan): vscode.TreeItem {
        return element;
    }

    getChildren(): Thenable<BianGengDan[]> {
        return new Promise<BianGengDan[]>((resolve, reject) => {
            return resolve(this.itemList ?? []);
        });
    }

    add(item?: BianGengDan) {
        this.itemList?.push(item!);
    }

    clear() {
        this.itemList = [];
    }

    copy() {
        const textArr = this.itemList!.map(x => `${getConfiguration('prefixPath') + x.fullPathName}`.replace(/\\\\/g, "/").replace(/\\r/g, ""));
        vscode.env.clipboard.writeText(textArr.join("\r\n"));
    }

    delete(item?: BianGengDan) {
        this.itemList?.splice(this.itemList.indexOf(item!), 1);
    }

    export(toUri: string) {
        this.itemList?.forEach((item) => {
            const dest = path.join(toUri,'new',`${getConfiguration('prefixPath')}${item.fullPathName}`);
            let from = path.join(getRootPath(),'./', item.fullPathName);
            if (fs.existsSync(from)) {
              fs.cp(from, dest, { recursive: true }, (err: any) => {});
            }
            console.log('*********from*********', from);
            console.log('*********dest*********', dest);
          });
    }

    private _onDidChangeTreeData: vscode.EventEmitter<
        BianGengDan | undefined
    > = new vscode.EventEmitter<BianGengDan | undefined>();

    readonly onDidChangeTreeData: vscode.Event<BianGengDan | undefined> = this
        ._onDidChangeTreeData.event;

    refresh(): void {
        this._onDidChangeTreeData.fire(undefined);
    }

}
// acticity 方法

export function activate(context: vscode.ExtensionContext) {

	const rootPath = getRootPath();

	const bianGengDanProvider = new BianGengDanProvider(rootPath!);
	const bianGengDanAddProvider = new BianGengDanSubtreeProvider([]);
	const bianGengDanModifyProvider = new BianGengDanSubtreeProvider([]);
	const bianGengDanDeleteProvider = new BianGengDanSubtreeProvider([]);

	vscode.window.registerTreeDataProvider(
		'biangengdan',
		bianGengDanProvider
	);

	vscode.window.registerTreeDataProvider(
		'biangengdanAdd',
		bianGengDanAddProvider
	);

	vscode.window.registerTreeDataProvider(
		'biangengdanModify',
		bianGengDanModifyProvider
	);

	vscode.window.registerTreeDataProvider(
		'biangengdanDelete',
		bianGengDanDeleteProvider
	);


	context.subscriptions.push(
		vscode.commands.registerCommand('biangengdan.refreshEntry', () =>
			bianGengDanProvider.refresh()
		),
		vscode.commands.registerCommand('biangengdan.addEntry', (...args) => {
			console.log('addEntry arguments value', args[0]);
			const status = args[0].status;

			if (status === 'A') {
				bianGengDanAddProvider.add(args[0]);
				bianGengDanAddProvider.refresh();
			} else if (status === 'M') {
				bianGengDanModifyProvider.add(args[0]);
				bianGengDanModifyProvider.refresh();
			} else if (status === 'D') {
				bianGengDanDeleteProvider.add(args[0]);
				bianGengDanDeleteProvider.refresh();
			}
		}
		)
	);
}
删除和清空操作
往先前的 package.json 中继续添加配置信息,步骤与上面类似,看代码即可明白
"contributes": {
	"commands": [
      {
        "command": "biangengdan.clearAddEntry",
        "title": "清空记录",
        "icon": "$(clear-all)"
      },
      {
        "command": "biangengdan.clearModifyEntry",
        "title": "清空记录",
        "icon": "$(clear-all)"
      },
      {
        "command": "biangengdan.clearDeleteEntry",
        "title": "清空记录",
        "icon": "$(clear-all)"
      },
      {
        "command": "biangengdan.deleteEntry",
        "title": "删除记录",
        "icon": "$(trash)"
      }
    ],
	"menus": {
      "view/title": [
        {
          "command": "biangengdan.clearAddEntry",
          "when": "view == biangengdanAdd",
          "group": "navigation"
        },
        {
          "command": "biangengdan.clearModifyEntry",
          "when": "view == biangengdanModify",
          "group": "navigation"
        },
        {
          "command": "biangengdan.clearDeleteEntry",
          "when": "view == biangengdanDelete",
          "group": "navigation"
        },
      ],
      "view/item/context": [
        {
          "command": "biangengdan.deleteEntry",
          "when": "view == biangengdanAdd || view == biangengdanModify || view == biangengdanDelete",
          "group": "inline"
        }
      ]
    }
}
注册对应的 command 事件
export function activate(context: vscode.ExtensionContext) {

	context.subscriptions.push(
		vscode.commands.registerCommand('biangengdan.clearAddEntry', () => {
			bianGengDanAddProvider.clear();
			bianGengDanAddProvider.refresh();
		}
		),
		vscode.commands.registerCommand('biangengdan.clearModifyEntry', () => {
			bianGengDanModifyProvider.clear();
			bianGengDanModifyProvider.refresh();
		}
		),
		vscode.commands.registerCommand('biangengdan.clearDeleteEntry', () => {
			bianGengDanDeleteProvider.clear();
			bianGengDanDeleteProvider.refresh();
		}
		),
		vscode.commands.registerCommand('biangengdan.deleteEntry', (...args) => {
			const status = args[0].status;

			if (status === 'A') {
				bianGengDanAddProvider.delete(args[0]);
				bianGengDanAddProvider.refresh();
			} else if (status === 'M') {
				bianGengDanModifyProvider.delete(args[0]);
				bianGengDanModifyProvider.refresh();
			} else if (status === 'D') {
				bianGengDanDeleteProvider.delete(args[0]);
				bianGengDanDeleteProvider.refresh();
			}
		}
		),
	);
}
复制操作
往先前的 package.json 中继续添加配置信息,步骤同上
"contributes": {
	"commands": [
      {
        "command": "biangengdan.copyAddEntry",
        "title": "复制记录",
        "icon": "$(file-code)"
      },
      {
        "command": "biangengdan.copyModifyEntry",
        "title": "复制记录",
        "icon": "$(file-code)"
      },
      {
        "command": "biangengdan.copyDeleteEntry",
        "title": "复制记录",
        "icon": "$(file-code)"
      },
    ],
	"menus": {
      "view/title": [
        {
          "command": "biangengdan.copyAddEntry",
          "when": "view == biangengdanAdd",
          "group": "navigation"
        },
        {
          "command": "biangengdan.copyModifyEntry",
          "when": "view == biangengdanModify",
          "group": "navigation"
        },
        {
          "command": "biangengdan.copyDeleteEntry",
          "when": "view == biangengdanDelete",
          "group": "navigation"
        }
      ]
    }
}
添加监听事件,调用 bianGengDanModifyProvider 的 copy 方法,使用了 vscode.env.clipboard.writeText API来实现剪贴板复制的功能,具体可以查看 src/core/subtree.ts 中的 copy 实现
export function activate(context: vscode.ExtensionContext) {

	context.subscriptions.push(
		vscode.commands.registerCommand('biangengdan.copyAddEntry', () =>
			bianGengDanAddProvider.copy()

		),
		vscode.commands.registerCommand('biangengdan.copyModifyEntry', () =>
			bianGengDanModifyProvider.copy()
		),
		vscode.commands.registerCommand('biangengdan.copyDeleteEntry', () =>
			bianGengDanDeleteProvider.copy()
		),
	);
}
文件导出操作
往先前的 package.json 中继续添加配置信息
"contributes": {
	"commands": [
      {
        "command": "biangengdan.exportEntry",
        "title": "生成New文件",
        "icon": "$(files)"
      },
    ],
	"menus": {
      "view/title": [
        {
          "command": "biangengdan.exportEntry",
          "when": "view == biangengdan",
          "group": "navigation"
        },
      ]
    }
}
使用 vscode.window.showOpenDialog 方法调出文件选择框,选择好的文件夹会以回调的形式返回,接着调用 bianGengDanAddProvider.export 方法处理即可
export function activate(context: vscode.ExtensionContext) {

	context.subscriptions.push(
		vscode.commands.registerCommand('biangengdan.exportEntry', () => {
			const options: vscode.OpenDialogOptions = {
				canSelectMany: false,
				canSelectFolders: true,
				canSelectFiles: false,
				openLabel: 'Open',
			};

			vscode.window.showOpenDialog(options).then(fileUri => {
				if (fileUri && fileUri[0]) {
					console.log('Selected file: ' + fileUri[0].fsPath);
					const toUri = fileUri[0].fsPath + '/';
					bianGengDanAddProvider.export(toUri);
					bianGengDanModifyProvider.export(toUri);
				}
			});

		}
		)
	);
}
实现点击列表项打开文本
首先注册一个 biangengdan.openFile 打开文件的命令
"contributes": {
	"commands": [
      {
        "command": "biangengdan.openFile",
        "title": "打开文件"
      },
    ]
}
然后往 commonds 中添加
const commands = [
	{ command: "biangengdan.openFile", callback: [openFile] },
];
需要修改一下之前的基础类,添加一个属性 command,commond 对应上面注册的就行,arguments 输入你想要传递的参数即可,可以用数组的形式
import * as vscode from "vscode";

// 变更单基础类
export default class BianGengDan extends vscode.TreeItem {
    constructor(
        public readonly label: string,
        private status: string,
        public fullPathName: string,
        public readonly collapsibleState: vscode.TreeItemCollapsibleState
    ) {
        super(label, collapsibleState);
        this.tooltip = `${this.status}: ${this.fullPathName}`;
        this.description = this.fullPathName;
        this.resourceUri = vscode.Uri.file(this.label);
        this.command = {
            command: "biangengdan.openFile",
            title: this.label,
            arguments: [this.fullPathName]
        };
    }
}
之前的注册事件方法太复杂了,很多重复的代码,所以我后来又重构了下,可以看最新的变更,现在是配置形式的
context.subscriptions.push(
		...emits.map((item) => {
			return item.event(item.fn);
		}),
		...commands.map((item) => {
			return vscode.commands.registerCommand(item.command, (...args) => {
				item.callback.forEach((fn: (args: any[]) => void) => {
					fn(args);
				});
			});
		}),
	);
openFile 方法放在 src/core/file.ts,注意 vscode.workspace.openTextDocument 里需要提供完整的路径参数,否则会找不到,返回的 doc 对象再调用 vscode.window.showTextDocument 方法打开
import * as vscode from "vscode";
import * as path from "path";
import { getRootPath } from "../util/config";

// 打开文件
export function openFile(args: any[]) {
    const uri = vscode.Uri.file(path.join(getRootPath(), args[0]));
    vscode.workspace.openTextDocument(uri).then(doc => {
        vscode.window.showTextDocument(doc);
    });
}
自定义 TreeView Decoration
实现这种效果,根据不同的类型右侧的文字不同且带高亮
使用 FileDecorationProvider,我们新建一个类去继承它,实现 provideFileDecoration 方法,返回值一般是一个对象,由 badge、tooltip、color 组成
import * as path from "path";
import * as vscode from "vscode";
import { FileDecorationProvider } from "vscode";
import { getRootPath } from "../util/config";
import { BianGengDanProvider } from "./tree";

export class BianGengDanDecorationProvider implements FileDecorationProvider {
	disposables: vscode.Disposable[];
	constructor(private provider: BianGengDanProvider) {
		this.disposables = [];
		this.disposables.push(vscode.window.registerFileDecorationProvider(this));
	}

	async provideFileDecoration(uri: vscode.Uri): Promise<vscode.FileDecoration | undefined> {
		const treeItem = await this.provider.getChildren();
		const status = treeItem.find((item) => {
			let from = path.join(getRootPath(),'./', item.fullPathName);
			return from.includes(uri.fsPath.replace(/\\/g, '\\'));
		})?.getStatus();
		if (status) {
			return {
				badge: status,
				tooltip: status,
				color: this.switchColor(status),
			};
		} else {
			return undefined;
		}
	}

	switchColor(status: string | undefined) {
		if (status === 'M') {
			return new vscode.ThemeColor("gitDecoration.modifiedResourceForeground");
		} else if (status === 'A') {
			return new vscode.ThemeColor("gitDecoration.addedResourceForeground");
		} else if (status === 'D') {
			return new vscode.ThemeColor("gitDecoration.deletedResourceForeground");
		}
	}


	dispose() {
		this.disposables.forEach((d) => d.dispose());
	}
}
在 extension.ts 引入,我需要根据 url 对象和之前的树状数据判断高亮,就需要在 BianGengDanDecorationProvider 构造函数中传入 bianGengDanProvider 实例对象,具体代码可以查阅仓库
// 省略部分代码

const decoration = [new BianGengDanDecorationProvider(bianGengDanProvider)];

context.subscriptions.push(
		...decoration,
	);
结尾
简单的插件开发起来其实不难,主要是文档的 API 不太好找,这里我收集了一些有用的链接分享给大家,包括项目创建后的代码结构,开发完后如何打包上传插件市场都可以在下面的链接中找到:
如何开发一款vscode插件 - 掘金
VS Code插件创作中文开发文档
Product Icon Reference | Visual Studio Code Extension API
GitHub - cloudhao1999/biangengdan
