

最近有一些新的需求,公司要自己开发一套组件库,根据公司的业务来定制化开发,而且希望给公司的其他子系统也用上,所以就想到来开发一个npm包,让开发者能像使用element-plus那样使用。
所以今天就把自己使用vite+vue3开发一个组件库,并发布到npm上的一些工作记录一下。
package.json
{
"name": "xxx", //项目名称
"version": "1.0.0", // 项目包的版本号
//接下来是五个和项目包描述相关的配置
"description": "描述整个项目的一些具体情况",
"keywords": ["xxx","xxx"], // 一些关键字,增加项目包的曝光度
"author": "CUGGZ <xxxxx@xx.com> (https://juejin.cn/user/3544481220801815)",// 项目作者
// 第二种写法
"author": {
"name": "CUGGZ",
"email": "<xxxxx@xx.com>",
"url":"https://juejin.cn/user/3544481220801815"
},
"contributors":[
"CUGGZ <xxxxx@xx.com> (https://juejin.cn/user/3544481220801815)",
"CUGGZ <xxxxx@xx.com> (https://juejin.cn/user/3544481220801815)",
"CUGGZ <xxxxx@xx.com> (https://juejin.cn/user/3544481220801815)"
],
// 第二种写法
"contributors":[
{
"name": "CUGGZ",
"email": "<xxxxx@xx.com>",
"url":"https://juejin.cn/user/3544481220801815"
},
{
"name": "CUGGZ",
"email": "<xxxxx@xx.com>",
"url":"https://juejin.cn/user/3544481220801815"
},
{
"name": "CUGGZ",
"email": "<xxxxx@xx.com>",
"url":"https://juejin.cn/user/3544481220801815"
},
],
"homepage": "www.xxx.com",//项目主页的地址
"dependencies": {
// 项目依赖包,生产环境也需要
},
"devDependencies": {
// 项目依赖包,生产环境不需要
},
"script": { // 内置脚本入口
"dev": "vite",
"build": "vite build"
},
// 文件以及目录
"main": "xxx.js" // 默认是index.js 当项目发布为包时,我们导入的包就是main字段所指的文件
"module": "xxx.mjs", // ESM规则文件入口 .msj是es规则 .js是common.js规则
"exports": {
// 导出的对应关系
"./lib/style.css": "./lib/style.css",
".": {
"import": "./xxxx/xxx.mjs",
"require": "./xxxx/xxx.umd.js"
}
}
}
刚刚简单的介绍了一些关于package.json的配置项,这些配置项在我后面打包的时候会用得上。
既然要开发vue的组件库,那就需要一个vue的框架,这里我用VUE官网上的方式搭建项目:
npm init vue@latest
使用脚手架,(脚手架的步骤,这里不再展开说,最后项目的名称我们叫做vue-component-swaggerhui);
我们对目前脚手架生成的目录结构进行一下改造,具体的改造是把src 改名为 examples,新增一个packages文件夹,这个文件夹用来放我们开发的组件。
由于我们把src文件夹的名字改成了examples,所以index.html中js的文件引入也应该对应的修改:
<!DOCTYPE html>
<html lang="en">
<head>
<meta charset="UTF-8" />
<link rel="icon" href="/favicon.ico" />
<meta name="viewport" content="width=device-width, initial-scale=1.0" />
<title>Vite App</title>
</head>
<body>
<div id="app"></div>
<script type="module" src="/examples/main.js"></script>
</body>
</html>
在packages文件夹下面创建Button文件夹,这个文件夹包含一个index.js文件和src文件夹,src文件夹里面放我们的index.vue和相关css文件。现在我们来编写相关组件
// package/Button/src/index.vue
<template>
<div class="x-button">
<button :style="[buttonStyle,buttonSize]" @click="clickTo">
<slot>default</slot>
</button>
</div>
</template>
<script setup lang="ts">
import {defineProps,computed, defineEmits} from "vue"
interface Props {
size: string;
type: string;
}
const $emits = defineEmits<
{
(e: "clickTo"):void
}
>()
const $props = withDefaults(defineProps<Props>(),{
size: "normal",
type: "default",
})
const clickTo = () => {
$emits("clickTo")
}
const buttonStyle = computed(() => {
switch($props.type) {
case "primary": return {
color: "#fff",
background: "#409eff",
};
case "success": return {
color: "#fff",
background: "#40ff89",
};
case "warnning": return {
color: "#fff",
background: "#fcff40",
};
case "error": return {
color: "#fff",
background: "#ff6340",
};
default: return {
color: "#333",
background: "#fff",
border: "1px solid #e7e7e7"
}
}
})
const buttonSize = computed(() => {
switch ($props.size) {
case "large": return {
height: "40px",
"line-height": "40px",
};
case "small": return {
height: "20px",
"line-height": "20px",
};
default: return {
height: "30px",
"line-height": "30px",
}
}
})
</script>
<style scoped lang="less">
.x-button {
button {
border: none;
border-radius: 4px;
padding: 0 10px;
}
}
</style>
接下来我们需要对这个组件进行一些处理,使它具备能被app.use()使用的能力
// // package/Button/index.js
import Button from "./src/Button/index.vue"
Button.install = (App) => {
App.component(Button,__name,Button)
}
export default Button
现在Button组件已经处理好了,你可以将Button组件引入到example里面的app.vue组件中看一下是否可以运行,如果可以看到效果,则说明组件开发没有问题。
因为将来packages里面会有很多组件,我们不可能一个一个去挂载到全局,所以我们把所有的组件通过一个文件进行挂载,这就是packages里面的index.js的作用。
import Button from "./Button/src/index.vue";
// 按需导入组件
export {
Button
}
const components = [Button]
const insatll = (App) => {
components.forEach(component => {
App.component(component.__name,component)
})
}
// 全局导入所有组件
export default {
install
}
这时组件的导出我们就准备好了。如果你刚刚在本地测试组件没问题后,我们就应该进行打包了,因为我们要上传一个包到npm上,所以需要执行npm run build,但是在执行这个命令前我们还需要对package.json进行一些配置。
{
"name": "vue3-component-swaggerhui", // 包名称
"private": false,
"version": "1.0.0", // 版本号
"keywords": ["button","hui","vue","component"], // 关键字
"scripts": {
"dev": "vite",
"build": "vite build",
"preview": "vite preview"
},
// 导出的一些文件配置
"files": ["lib"],
"main": "lib/vue3-component-swaggerhui.umd.js",
"module": "lib/vue3-component-swaggerhui.mjs",
"exports": {
"./lib/style.css":"./lib/style.css",
".":{
"import" : "./lib/vue3-component-swaggerhui.mjs",
"require": "./lib/vue3-component-swaggerhui.umd.js"
}
},
"dependencies": {
"vue": "^3.2.25"
},
"devDependencies": {
"@vitejs/plugin-vue": "^2.3.3",
"vite": "^2.9.9"
}
}
接下来改写vite.config.js
import { defineConfig } from 'vite';
import vue from '@vitejs/plugin-vue';
const { resolve } = require('path');
export default defineConfig({
plugins: [vue()],
build: {
outDir: 'lib',
lib: {
entry: resolve(__dirname, 'packages/index.js'),
name: 'vue3ComponentSwaggerhui',
fileName: 'vue3-component-swaggerhui',
},
rollupOptions: {
// 确保外部化处理那些你不想打包进库的依赖
external: ['vue'],
output: {
// 在 UMD 构建模式下为这些外部化的依赖提供一个全局变量
globals: {
vue: 'Vue',
},
},
},
},
});
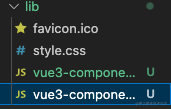
这时候我们执行npm run build进行打包,这时候就会得到一个lib文件夹,这个文件夹就是我们打包出来的包文件。
这个时候我们需要准备一个npm的账号,这里可以去npm网站上注册一个账号,记住用户名,邮箱,以及密码,后面我们会使用。
在进行下一步操作前请先切花镜像源,因为在发布的时候这一步会导致报错,在终端输入
npm config set registry https://registry.npmjs.org/
打开在vscode中,在项目下打开终端,输入mpm login进行登录,这时候会需要你输入用户名,密码,邮箱并且会收到邮箱验证码,如果验证通过则表示登录成功。
npm login
username: xxx,
password: 你的登录密码
Email: 你的邮箱
Logged in as linshen on https://registry.npmjs.org/.
如果出现上面这段代码,则代表你登录成功。
好了,所有的工作已经准备好了,这个时候我们只需要执行npm publish
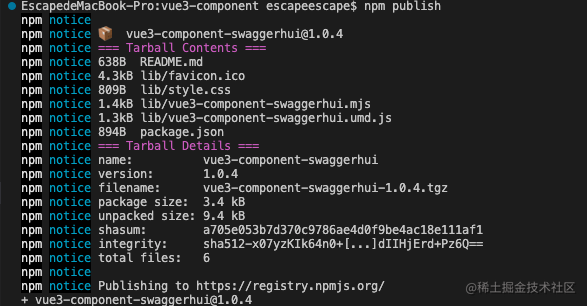
看到这个就证明你的包已经发布上去了,这时候你只需要将你刚刚测试的组件的引入去掉,在终端执行
npm i vue3-component-swaggerhui
然后在examples里面的main.js里面引入
import { createApp } from 'vue'
import { createPinia } from 'pinia'
import App from './App.vue'
import router from './router'
import Vue3Component from "vue3-component-swaggerhui"
import "vue3-component-swaggerhui/lib/style.css"
const app = createApp(App)
app.use(createPinia())
app.use(router)
app.use(Vue3Component)
app.mount('#app')
这时候你重新npm run dev,如果页面能正常显示则说明你的包已经发布成功。
这只是我在需求前期的一个准备工作,这个是一个简单的例子,当你的项目越来越大的时候你可能还需要对你的包体积进行一些压缩等工作,这就需要你进行vite的配置操作。
