

在所有的编程练习中,如果没有一个方便的调试器,就很难走得更远更深。Python中的内置调试器,pdb ,是一个成熟的、有能力的调试器,如果你知道如何使用它,它可以帮助我们很多。在本教程中,我们将看到pdb 能为你做什么,以及它的一些替代方法。
在本教程中,你将学习。
- 调试器能做什么
- 如何控制一个调试器
- Python的pdb的局限性和它的替代品
让我们开始吧。
教程概述
本教程分为四部分,分别是
- 运行调试器的概念
- 使用调试器的演练
- Visual Studio代码中的调试器
- 在运行中的Python程序上使用GDB
运行调试器的概念
调试器的目的是为你提供一个慢动作按钮来控制程序的流程。它还允许你在某个时间点冻结程序并检查其状态。
在调试器下最简单的操作是对代码进行步进。也就是每次运行一行代码,在进入下一步之前等待你的确认。我们之所以要以走走停停的方式运行程序,是为了让我们检查逻辑和数值或验证算法。
对于一个较大的程序来说,我们可能不想从头开始一步步走完代码,因为可能要花很长时间才能走到我们感兴趣的那一行。因此,调试器也提供了断点功能,当达到特定的代码行时就会启动。从这一点开始,我们可以逐行浏览。
使用调试器的演练
让我们通过一个例子来看看我们如何使用调试器。下面是在一个动画中显示粒子群优化的Python代码。
import numpy as np
import matplotlib.pyplot as plt
from matplotlib.animation import FuncAnimation

def f(x,y):
    "Objective function"
    return (x-3.14)**2 + (y-2.72)**2 + np.sin(3*x+1.41) + np.sin(4*y-1.73)

# Compute and plot the function in 3D within [0,5]x[0,5]
x, y = np.array(np.meshgrid(np.linspace(0,5,100), np.linspace(0,5,100)))
z = f(x, y)

# Find the global minimum
x_min = x.ravel()[z.argmin()]
y_min = y.ravel()[z.argmin()]

# Hyper-parameter of the algorithm
c1 = c2 = 0.1
w = 0.8

# Create particles
n_particles = 20
np.random.seed(100)
X = np.random.rand(2, n_particles) * 5
V = np.random.randn(2, n_particles) * 0.1

# Initialize data
pbest = X
pbest_obj = f(X[0], X[1])
gbest = pbest[:, pbest_obj.argmin()]
gbest_obj = pbest_obj.min()

def update():
    "Function to do one iteration of particle swarm optimization"
    global V, X, pbest, pbest_obj, gbest, gbest_obj
    # Update params
    r1, r2 = np.random.rand(2)
    V = w * V + c1*r1*(pbest - X) + c2*r2*(gbest.reshape(-1,1)-X)
    X = X + V
    obj = f(X[0], X[1])
    pbest[:, (pbest_obj >= obj)] = X[:, (pbest_obj >= obj)]
    pbest_obj = np.array([pbest_obj, obj]).min(axis=0)
    gbest = pbest[:, pbest_obj.argmin()]
    gbest_obj = pbest_obj.min()

# Set up base figure: The contour map
fig, ax = plt.subplots(figsize=(8,6))
fig.set_tight_layout(True)
img = ax.imshow(z, extent=[0, 5, 0, 5], origin='lower', cmap='viridis', alpha=0.5)
fig.colorbar(img, ax=ax)
ax.plot([x_min], [y_min], marker='x', markersize=5, color="white")
contours = ax.contour(x, y, z, 10, colors='black', alpha=0.4)
ax.clabel(contours, inline=True, fontsize=8, fmt="%.0f")
pbest_plot = ax.scatter(pbest[0], pbest[1], marker='o', color='black', alpha=0.5)
p_plot = ax.scatter(X[0], X[1], marker='o', color='blue', alpha=0.5)
p_arrow = ax.quiver(X[0], X[1], V[0], V[1], color='blue', width=0.005, angles='xy', scale_units='xy', scale=1)
gbest_plot = plt.scatter([gbest[0]], [gbest[1]], marker='*', s=100, color='black', alpha=0.4)
ax.set_xlim([0,5])
ax.set_ylim([0,5])

def animate(i):
    "Steps of PSO: algorithm update and show in plot"
    title = 'Iteration {:02d}'.format(i)
    # Update params
    update()
    # Set picture
    ax.set_title(title)
    pbest_plot.set_offsets(pbest.T)
    p_plot.set_offsets(X.T)
    p_arrow.set_offsets(X.T)
    p_arrow.set_UVC(V[0], V[1])
    gbest_plot.set_offsets(gbest.reshape(1,-1))
    return ax, pbest_plot, p_plot, p_arrow, gbest_plot

anim = FuncAnimation(fig, animate, frames=list(range(1,50)), interval=500, blit=False, repeat=True)
anim.save("PSO.gif", dpi=120, writer="imagemagick")

print("PSO found best solution at f({})={}".format(gbest, gbest_obj))
print("Global optimal at f({})={}".format([x_min,y_min], f(x_min,y_min)))
粒子群优化是通过多次执行update() 函数来完成的。每运行一次,我们就更接近目标函数的最优解。我们使用matplotlib的FuncAnimation() ,而不是用循环来运行update() 。所以我们可以捕捉到每次迭代时粒子的位置。
假设这个程序被保存为pso.py ,要在命令行中运行这个程序,只需输入。
python pso.py
然后解决方案将被打印到屏幕上,动画将被保存为PSO.gif 。但是如果我们想用Python调试器来运行它,我们在命令行中输入以下内容。
python -m pdb pso.py
-m pdb 部分是加载pdb 模块并让该模块为你执行文件pso.py 。当你运行这个命令时,你会看到如下的pdb 提示。
> /Users/mlm/pso.py(1)<module>()
-> import numpy as np
(Pdb)
在提示符下,你可以输入调试器的命令。为了显示支持的命令列表,我们可以使用h 。而要显示特定命令的细节(如list ),我们可以使用h list 。
> /Users/mlm/pso.py(1)<module>()
-> import numpy as np
(Pdb) h

Documented commands (type help <topic>):
========================================
EOF    c          d        h         list      q        rv       undisplay
a      cl         debug    help      ll        quit     s        unt
alias  clear      disable  ignore    longlist  r        source   until
args   commands   display  interact  n         restart  step     up
b      condition  down     j         next      return   tbreak   w
break  cont       enable   jump      p         retval   u        whatis
bt     continue   exit     l         pp        run      unalias  where

Miscellaneous help topics:
==========================
exec  pdb

(Pdb)
在调试器会话的开始,我们从程序的第一行开始。通常一个Python程序会从几行开始,import 。我们可以使用n 来移动到下一行,或者s 来进入一个函数。
> /Users/mlm/pso.py(1)<module>()
-> import numpy as np
(Pdb) n
> /Users/mlm/pso.py(2)<module>()
-> import matplotlib.pyplot as plt
(Pdb) n
> /Users/mlm/pso.py(3)<module>()
-> from matplotlib.animation import FuncAnimation
(Pdb) n
> /Users/mlm/pso.py(5)<module>()
-> def f(x,y):
(Pdb) n
> /Users/mlm/pso.py(10)<module>()
-> x, y = np.array(np.meshgrid(np.linspace(0,5,100), np.linspace(0,5,100)))
(Pdb) n
> /Users/mlm/pso.py(11)<module>()
-> z = f(x, y)
(Pdb) s
--Call--
> /Users/mlm/pso.py(5)f()
-> def f(x,y):
(Pdb) s
> /Users/mlm/pso.py(7)f()
-> return (x-3.14)**2 + (y-2.72)**2 + np.sin(3*x+1.41) + np.sin(4*y-1.73)
(Pdb) s
--Return--
> /Users/mlm/pso.py(7)f()->array([[17.25... 7.46457344]])
-> return (x-3.14)**2 + (y-2.72)**2 + np.sin(3*x+1.41) + np.sin(4*y-1.73)
(Pdb) s
> /Users/mlm/pso.py(14)<module>()
-> x_min = x.ravel()[z.argmin()]
(Pdb)
在pdb ,这行代码将被打印在提示符之前。通常情况下,n 命令是我们所喜欢的,因为它执行该行代码并在同一水平上移动流程,而不需要深入钻研。当我们处于一个调用函数的行时(如上面程序的第11行,运行z = f(x, y) ),我们可以使用s ,进入该函数。在上面的例子中,我们首先步入f() 函数,然后再一步执行计算,最后收集函数的返回值,把它还给调用该函数的那一行。我们看到,对于一个简单如一行的函数,需要有多个s 命令,因为从语句中找到函数,调用函数,返回各需要一个步骤。我们还可以看到,在函数的主体中,我们像函数一样调用了np.sin() ,但调试器的s 命令并没有进入其中。这是因为np.sin() 函数不是用Python实现的,而是用C实现的。pdb 不支持编译的代码。
如果程序很长,多次使用n 命令来移动到我们感兴趣的地方是相当无聊的。我们可以使用带有行号的until 命令来让调试器运行程序,直到到达该行。
> /Users/mlm/pso.py(1)<module>()
-> import numpy as np
(Pdb) until 11
> /Users/mlm/pso.py(11)<module>()
-> z = f(x, y)
(Pdb) s
--Call--
> /Users/mlm/pso.py(5)f()
-> def f(x,y):
(Pdb) s
> /Users/mlm/pso.py(7)f()
-> return (x-3.14)**2 + (y-2.72)**2 + np.sin(3*x+1.41) + np.sin(4*y-1.73)
(Pdb) s
--Return--
> /Users/mlm/pso.py(7)f()->array([[17.25... 7.46457344]])
-> return (x-3.14)**2 + (y-2.72)**2 + np.sin(3*x+1.41) + np.sin(4*y-1.73)
(Pdb) s
> /Users/mlm/pso.py(14)<module>()
-> x_min = x.ravel()[z.argmin()]
(Pdb)
类似于until 的命令是return ,它将执行当前的函数,直到它即将返回的那一点。你可以把它看作是until ,行号等于当前函数的最后一行。until 命令是一次性的,意味着它将只把你带到那一行。如果你想在运行时停在某一行,我们可以在该行上建立一个断点。例如,如果我们对优化算法的每一次迭代如何移动解决方案感兴趣,我们可以在应用更新后设置一个断点。
> /Users/mlm/pso.py(1)<module>()
-> import numpy as np
(Pdb) b 40
Breakpoint 1 at /Users/mlm/pso.py:40
(Pdb) c
> /Users/mlm/pso.py(40)update()
-> obj = f(X[0], X[1])
(Pdb) bt
  /usr/local/Cellar/python@3.9/3.9.9/Frameworks/Python.framework/Versions/3.9/lib/python3.9/bdb.py(580)run()
-> exec(cmd, globals, locals)
  <string>(1)<module>()
  /Users/mlm/pso.py(76)<module>()
-> anim.save("PSO.gif", dpi=120, writer="imagemagick")
  /usr/local/lib/python3.9/site-packages/matplotlib/animation.py(1078)save()
-> anim._init_draw()  # Clear the initial frame
  /usr/local/lib/python3.9/site-packages/matplotlib/animation.py(1698)_init_draw()
-> self._draw_frame(frame_data)
  /usr/local/lib/python3.9/site-packages/matplotlib/animation.py(1720)_draw_frame()
-> self._drawn_artists = self._func(framedata, *self._args)
  /Users/mlm/pso.py(65)animate()
-> update()
> /Users/mlm/pso.py(40)update()
-> obj = f(X[0], X[1])
(Pdb) p r1
0.8054505373292797
(Pdb) p r2
0.7543489945823536
(Pdb) p X
array([[2.77550474, 1.60073607, 2.14133019, 4.11466522, 0.2445649 ,
        0.65149396, 3.24520628, 4.08804798, 0.89696478, 2.82703884,
        4.42055413, 1.03681404, 0.95318658, 0.60737118, 1.17702652,
        4.67551174, 3.95781321, 0.95077669, 4.08220292, 1.33330594],
       [2.07985611, 4.53702225, 3.81359193, 1.83427181, 0.87867832,
        1.8423856 , 0.11392109, 1.2635162 , 3.84974582, 0.27397365,
        2.86219806, 3.05406841, 0.64253831, 1.85730719, 0.26090638,
        4.28053621, 4.71648133, 0.44101305, 4.14882396, 2.74620598]])
(Pdb) n
> /Users/mlm/pso.py(41)update()
-> pbest[:, (pbest_obj >= obj)] = X[:, (pbest_obj >= obj)]
(Pdb) n
> /Users/mlm/pso.py(42)update()
-> pbest_obj = np.array([pbest_obj, obj]).min(axis=0)
(Pdb) n
> /Users/mlm/pso.py(43)update()
-> gbest = pbest[:, pbest_obj.argmin()]
(Pdb) n
> /Users/mlm/pso.py(44)update()
-> gbest_obj = pbest_obj.min()
(Pdb)
在我们用b 命令设置了一个断点后,我们可以让调试器运行我们的程序,直到断点被击中。c 命令的意思是继续运行,直到满足一个触发点。在任何时候,我们都可以使用bt 命令来显示回溯,检查我们是如何到达这里的。我们还可以使用p 命令来打印变量(或表达式),以检查它们所持有的数值。
事实上,我们可以在断点处设置一个条件,这样只有当条件得到满足时才会停止。下面将施加一个条件,即第一个随机数(r1)大于0.5。
(Pdb) b 40, r1 > 0.5
Breakpoint 1 at /Users/mlm/pso.py:40
(Pdb) c
> /Users/mlm/pso.py(40)update()
-> obj = f(X[0], X[1])
(Pdb) p r1, r2
(0.8054505373292797, 0.7543489945823536)
(Pdb) c
> /Users/mlm/pso.py(40)update()
-> obj = f(X[0], X[1])
(Pdb) p r1, r2
(0.5404045753007164, 0.2967937508800147)
(Pdb)
事实上,我们也可以在调试时尝试对变量进行操作。
(Pdb) l
 35  	    global V, X, pbest, pbest_obj, gbest, gbest_obj
 36  	    # Update params
 37  	    r1, r2 = np.random.rand(2)
 38  	    V = w * V + c1*r1*(pbest - X) + c2*r2*(gbest.reshape(-1,1)-X)
 39  	    X = X + V
 40 B->	    obj = f(X[0], X[1])
 41  	    pbest[:, (pbest_obj >= obj)] = X[:, (pbest_obj >= obj)]
 42  	    pbest_obj = np.array([pbest_obj, obj]).min(axis=0)
 43  	    gbest = pbest[:, pbest_obj.argmin()]
 44  	    gbest_obj = pbest_obj.min()
 45
(Pdb) p V
array([[ 0.03742722,  0.20930531,  0.06273426, -0.1710678 ,  0.33629384,
         0.19506555, -0.10238065, -0.12707257,  0.28042122, -0.03250191,
        -0.14004886,  0.13224399,  0.16083673,  0.21198813,  0.17530208,
        -0.27665503, -0.15344393,  0.20079061, -0.10057509,  0.09128536],
       [-0.05034548, -0.27986224, -0.30725954,  0.11214169,  0.0934514 ,
         0.00335978,  0.20517519,  0.06308483, -0.22007053,  0.26176423,
        -0.12617228, -0.05676629,  0.18296986, -0.01669114,  0.18934933,
        -0.27623121, -0.32482898,  0.213894  , -0.34427909, -0.12058168]])
(Pdb) p r1, r2
(0.5404045753007164, 0.2967937508800147)
(Pdb) r1 = 0.2
(Pdb) p r1, r2
(0.2, 0.2967937508800147)
(Pdb) j 38
> /Users/mlm/pso.py(38)update()
-> V = w * V + c1*r1*(pbest - X) + c2*r2*(gbest.reshape(-1,1)-X)
(Pdb) n
> /Users/mlm/pso.py(39)update()
-> X = X + V
(Pdb) p V
array([[ 0.02680837,  0.16594979,  0.06350735, -0.15577623,  0.30737655,
         0.19911613, -0.08242418, -0.12513798,  0.24939995, -0.02217463,
        -0.13474876,  0.14466204,  0.16661846,  0.21194543,  0.16952298,
        -0.24462505, -0.138997  ,  0.19377154, -0.10699911,  0.10631063],
       [-0.03606147, -0.25128615, -0.26362411,  0.08163408,  0.09842085,
         0.00765688,  0.19771385,  0.06597805, -0.20564599,  0.23113388,
        -0.0956787 , -0.07044121,  0.16637064, -0.00639259,  0.18245734,
        -0.25698717, -0.30336147,  0.19354112, -0.29904698, -0.08810355]])
(Pdb)
在上面,我们使用l 命令来列出当前语句周围的代码(由箭头-> 确定)。在列表中,我们还可以看到断点(用B 标记)被设置在第40行。由于我们可以看到V 和r1 的当前值,我们可以将r1 从0.54修改为0.2,并通过使用j (跳转)再次运行V 上的语句到38行。而我们看到在我们用n 命令执行语句后,V 的值被改变了。
如果我们使用断点,发现了一些意外的情况,有可能是由调用堆栈的不同层次的问题引起的。调试器会允许你浏览到不同的层次。
(Pdb) bt
  /usr/local/Cellar/python@3.9/3.9.9/Frameworks/Python.framework/Versions/3.9/lib/python3.9/bdb.py(580)run()
-> exec(cmd, globals, locals)
  <string>(1)<module>()
  /Users/mlm/pso.py(76)<module>()
-> anim.save("PSO.gif", dpi=120, writer="imagemagick")
  /usr/local/lib/python3.9/site-packages/matplotlib/animation.py(1091)save()
-> anim._draw_next_frame(d, blit=False)
  /usr/local/lib/python3.9/site-packages/matplotlib/animation.py(1126)_draw_next_frame()
-> self._draw_frame(framedata)
  /usr/local/lib/python3.9/site-packages/matplotlib/animation.py(1720)_draw_frame()
-> self._drawn_artists = self._func(framedata, *self._args)
  /Users/mlm/pso.py(65)animate()
-> update()
> /Users/mlm/pso.py(39)update()
-> X = X + V
(Pdb) up
> /Users/mlm/pso.py(65)animate()
-> update()
(Pdb) bt
  /usr/local/Cellar/python@3.9/3.9.9/Frameworks/Python.framework/Versions/3.9/lib/python3.9/bdb.py(580)run()
-> exec(cmd, globals, locals)
  <string>(1)<module>()
  /Users/mlm/pso.py(76)<module>()
-> anim.save("PSO.gif", dpi=120, writer="imagemagick")
  /usr/local/lib/python3.9/site-packages/matplotlib/animation.py(1091)save()
-> anim._draw_next_frame(d, blit=False)
  /usr/local/lib/python3.9/site-packages/matplotlib/animation.py(1126)_draw_next_frame()
-> self._draw_frame(framedata)
  /usr/local/lib/python3.9/site-packages/matplotlib/animation.py(1720)_draw_frame()
-> self._drawn_artists = self._func(framedata, *self._args)
> /Users/mlm/pso.py(65)animate()
-> update()
  /Users/mlm/pso.py(39)update()
-> X = X + V
(Pdb) l
 60
 61     def animate(i):
 62         "Steps of PSO: algorithm update and show in plot"
 63         title = 'Iteration {:02d}'.format(i)
 64         # Update params
 65  ->     update()
 66         # Set picture
 67         ax.set_title(title)
 68         pbest_plot.set_offsets(pbest.T)
 69         p_plot.set_offsets(X.T)
 70         p_arrow.set_offsets(X.T)
(Pdb) p title
'Iteration 02'
(Pdb)
在上面的例子中,第一个bt 命令给出了我们在底层框架时的调用栈,也就是调用栈的最深处。我们可以看到,我们即将执行语句X = X + V 。然后,up 命令将我们的焦点移到了调用栈的上一层,也就是运行update() 函数的那一行(正如我们在前面的> )。由于我们的焦点改变了,list命令l 将打印不同的代码片段,而p 命令可以检查不同范围内的变量。
以上涵盖了调试器中大多数有用的命令。如果我们想终止调试器(也就是终止程序),我们可以使用q 命令退出,或者如果你的终端支持的话,可以点击Ctrl-D。
Visual Studio Code中的调试器
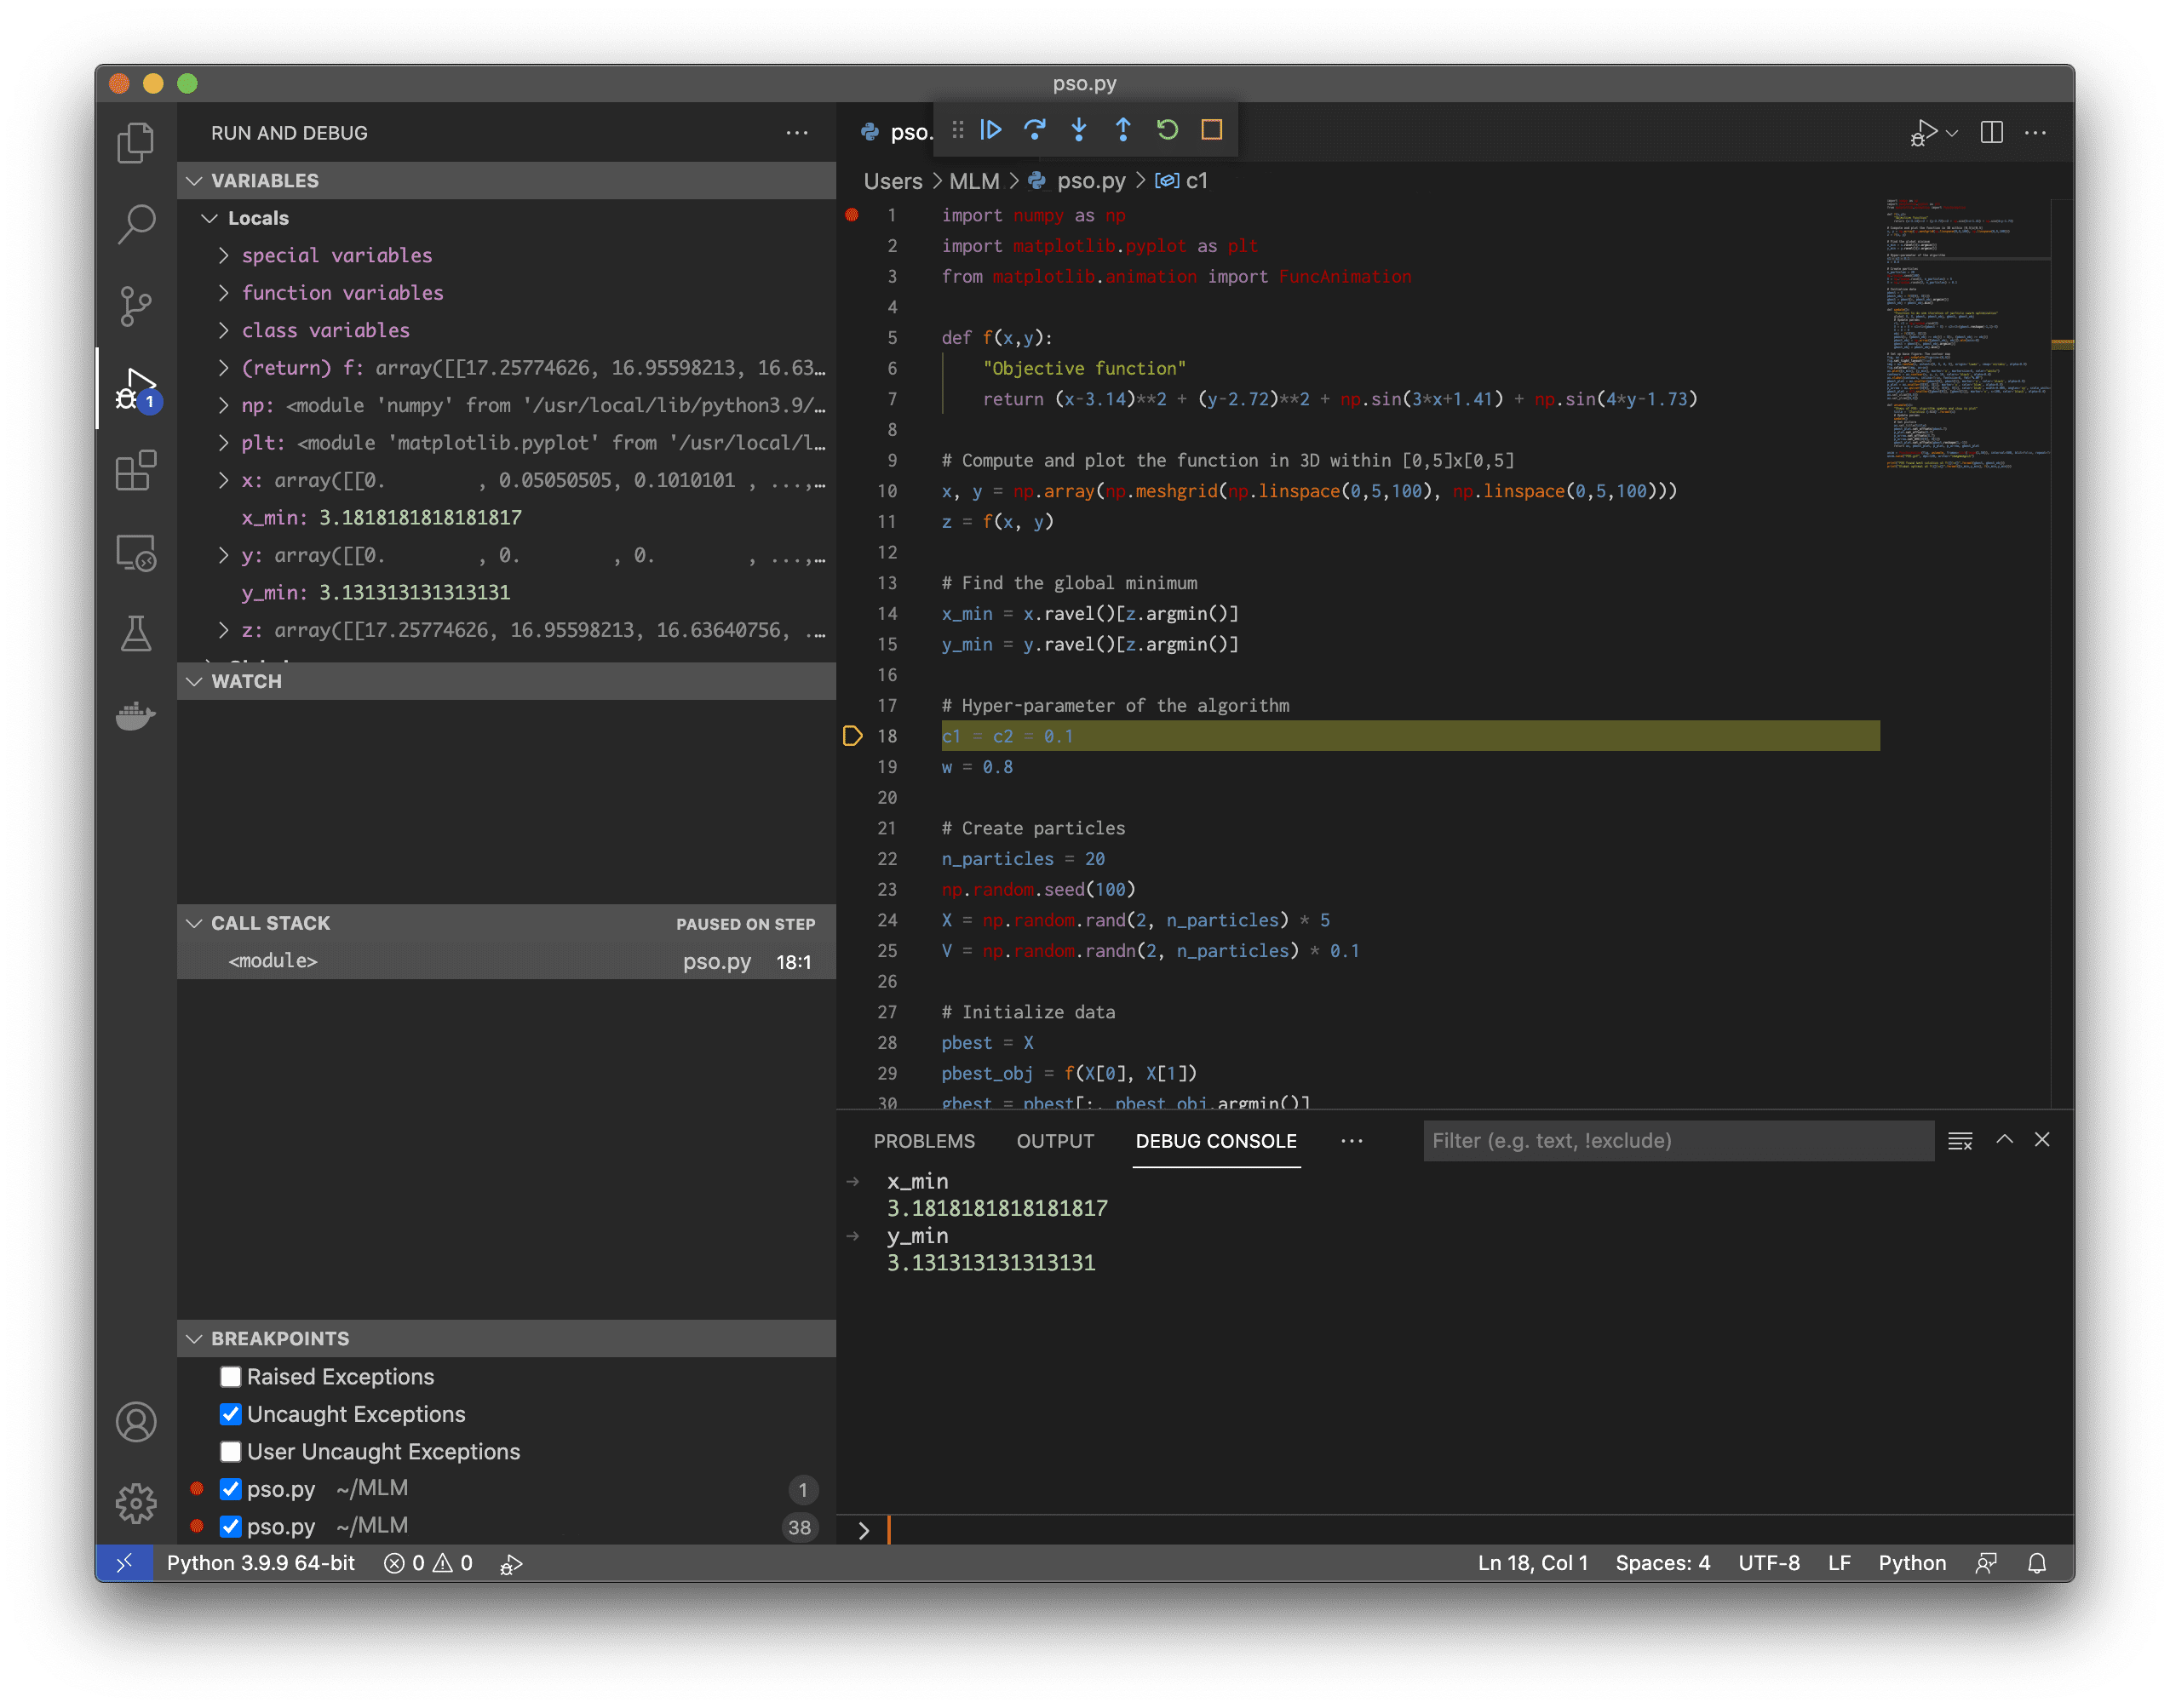
如果你不太愿意在命令行中运行调试器,你可以依靠你的IDE中的调试器。几乎所有的IDE都会为你提供一些调试工具。以Visual Studio Code为例,你可以在 "运行 "菜单中启动调试器。
下面的屏幕显示了Visual Studio Code在调试阶段的情况。中间顶部的按钮分别对应于pdb 命令continue,next,step,return,restart, 和quit 。通过点击行号可以创建一个断点,这时会出现一个红点来标识该断点。使用IDE的好处是,在每个调试步骤中都会立即显示变量。我们还可以观察快车并显示调用栈。这些都在下面屏幕的左边。
在一个运行中的Python程序上使用GDB
来自Python的pdb ,只适合于从头开始运行的程序。如果我们有一个已经在运行但被卡住的程序,我们不能用pdb来钩住它以检查发生了什么。然而,来自GDB的Python扩展可以做到这一点。
为了演示,让我们考虑一个GUI应用程序。它将等待用户的操作,然后程序才会结束。因此,它是一个完美的例子,可以看到我们如何使用gdb 来钩住一个正在运行的进程。下面的代码是一个使用PyQt5的 "hello world "程序,它只是创建了一个空窗口并等待用户关闭它。
import sys
from PyQt5.QtWidgets import QApplication, QWidget, QMainWindow

class Frame(QMainWindow):
        def __init__(self):
                super().__init__()
                self.initUI()
        def initUI(self):
                self.setWindowTitle("Simple title")
                self.resize(800,600)

def main():
        app = QApplication(sys.argv)
        frame = Frame()
        frame.show()
        sys.exit(app.exec_())

if __name__ == '__main__':
        main()
让我们把这个程序保存为simpleqt.py ,并在Linux的X窗口环境下使用下面的方法运行它。
python simpleqt.py &
最后& ,使其在后台运行。现在我们可以用ps 命令来检查它的进程ID。
ps a | grep python
...
   3997 pts/1    Sl     0:00 python simpleqt.py
...
ps 命令会在第一栏告诉你进程ID。如果你安装了带有python扩展的gdb ,我们可以运行
gdb python 3997
它将把你带到GDB的提示符下。
GNU gdb (Debian 10.1-1.7) 10.1.90.20210103-git
Copyright (C) 2021 Free Software Foundation, Inc.
License GPLv3+: GNU GPL version 3 or later <http://gnu.org/licenses/gpl.html>
This is free software: you are free to change and redistribute it.
There is NO WARRANTY, to the extent permitted by law.
Type "show copying" and "show warranty" for details.
This GDB was configured as "x86_64-linux-gnu".
Type "show configuration" for configuration details.
For bug reporting instructions, please see:
<https://www.gnu.org/software/gdb/bugs/>.
Find the GDB manual and other documentation resources online at:
    <http://www.gnu.org/software/gdb/documentation/>.

For help, type "help".
Type "apropos word" to search for commands related to "word"...
Reading symbols from python...
Reading symbols from /usr/lib/debug/.build-id/f9/02f8a561c3abdb9c8d8c859d4243bd8c3f928f.debug...
Attaching to program: /usr/local/bin/python, process 3997
[New LWP 3998]
[New LWP 3999]
[New LWP 4001]
[New LWP 4002]
[New LWP 4003]
[New LWP 4004]
[Thread debugging using libthread_db enabled]
Using host libthread_db library "/lib/x86_64-linux-gnu/libthread_db.so.1".
0x00007fb11b1c93ff in __GI___poll (fds=0x7fb110007220, nfds=3, timeout=-1) at ../sysdeps/unix/sysv/linux/poll.c:29
29      ../sysdeps/unix/sysv/linux/poll.c: No such file or directory.
(gdb) py-bt
Traceback (most recent call first):
  <built-in method exec_ of QApplication object at remote 0x7fb115f64c10>
  File "/mnt/data/simpleqt.py", line 16, in main
    sys.exit(app.exec_())
  File "/mnt/data/simpleqt.py", line 19, in <module>
    main()
(gdb) py-list
  11
  12    def main():
  13            app = QApplication(sys.argv)
  14            frame = Frame()
  15            frame.show()
 >16            sys.exit(app.exec_())
  17
  18    if __name__ == '__main__':
  19            main()
(gdb)
GDB应该是一个用于编译程序的调试器(通常来自C或C++)。Python扩展允许你检查由Python解释器(由C语言编写)运行的代码(用Python编写)。在处理Python代码方面,它的功能不如Python的pdb ,但当你想需要钩住一个正在运行的进程时,它很有用。
GDB下支持的命令有:py-list,py-bt,py-up,py-down, 和py-print 。它们与pdb 中的相同命令相当,没有py- 的前缀。
如果你的Python代码使用了一个从C语言编译的库(比如numpy),并且想研究它是如何运行的,那么GDB就很有用。通过检查运行时的调用堆栈,了解你的程序被冻结的原因也很有用。然而,你可能很少需要使用GDB来调试你的机器学习项目。
摘要
在本教程中,你发现了 Python 的特性pdb
具体来说,你学到了
pdb能做什么以及如何使用它- 脚本的限制和替代方案
pdb
