笔记来源::sparkles:尚硅谷Spring注解驱动教程(雷丰阳源码级讲解)
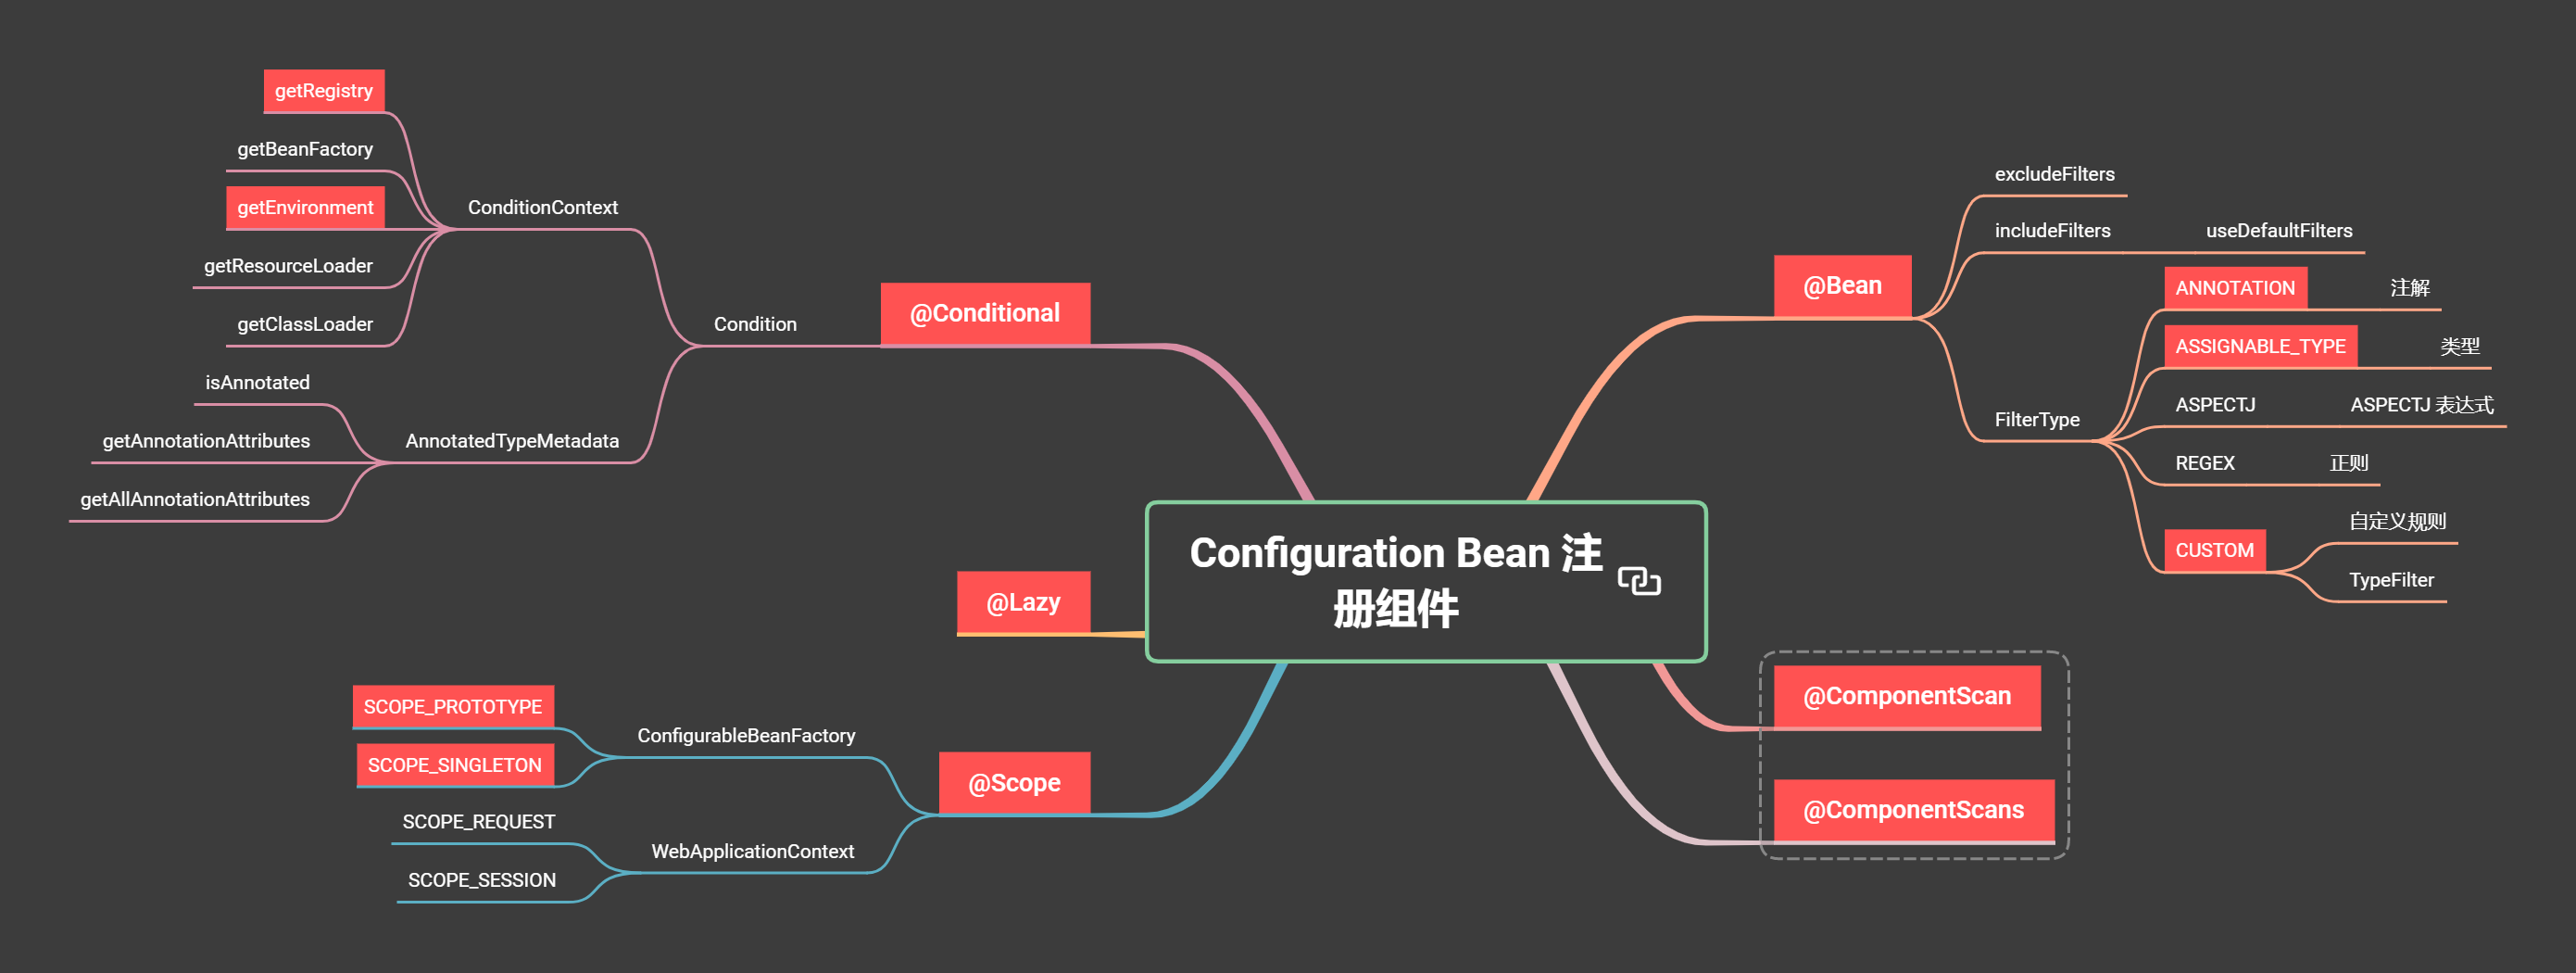
Configuration Bean 注册组件
1、准备工作
pom
引入 spring-context 依赖
<dependencies>
    <!-- 核心依赖 -->
    <dependency>
        <groupId>org.springframework</groupId>
        <artifactId>spring-context</artifactId>
        <version>4.3.12.RELEASE</version>
    </dependency>
    <!-- 测试用 -->
    <dependency>
        <groupId>junit</groupId>
        <artifactId>junit</artifactId>
        <version>4.13.2</version>
        <scope>test</scope>
    </dependency>
</dependencies>
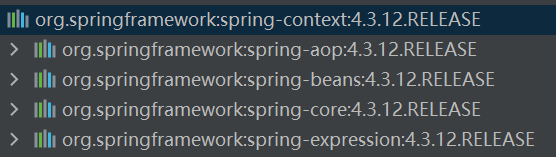
Q:为什么只需要一个 spring-context?
A:查看 spring-context 的 pom 文件就一目了然了
查看 spring-context-4.3.12.RELEASE.pom 文件内容,其中引入 Spring 核心依赖 spring-aop、spring-beans、spring-core、spring-expression,所以引入 spring-context 一个依赖足矣
<dependency>
    <groupId>org.springframework</groupId>
    <artifactId>spring-aop</artifactId>
    <version>4.3.12.RELEASE</version>
    <scope>compile</scope>
</dependency>
<dependency>
    <groupId>org.springframework</groupId>
    <artifactId>spring-beans</artifactId>
    <version>4.3.12.RELEASE</version>
    <scope>compile</scope>
</dependency>
<dependency>
    <groupId>org.springframework</groupId>
    <artifactId>spring-core</artifactId>
    <version>4.3.12.RELEASE</version>
    <scope>compile</scope>
</dependency>
<dependency>
    <groupId>org.springframework</groupId>
    <artifactId>spring-expression</artifactId>
    <version>4.3.12.RELEASE</version>
    <scope>compile</scope>
</dependency>
当然,也可以通过 maven 依赖关系看出
实体类
public class Person
{
    private String name;
    private Integer age;

    public Person() {
    }

    public Person(String name, Integer age) {
        this.name = name;
        this.age = age;
    }

    public String getName() {
        return name;
    }

    public void setName(String name) {
        this.name = name;
    }

    public Integer getAge() {
        return age;
    }

    public void setAge(Integer age) {
        this.age = age;
    }

    @Override
    public String toString() {
        return "Person{" + "name='" + name + '\'' + ", age='" + age + '\'' + '}';
    }
}
2、@Bean 注解
xml 方式
<bean id="person" class="com.vectorx.springannotation.entity.Person">
    <property name="name" value="zhangsan"></property>
    <property name="age" value="18"></property>
</bean>
注解方式
// 标识为一个配置类
@Configuration
public class SpringConfig
{
	/**
     * 相当于 beans.xml 配置文件的 <bean> 标签,可以进行类和属性的注入
     * value 指定 bean 的 id,不写则默认将方法名作为 bean 的 id
     */
    @Bean(value = "person")
    public Person person01(){
        return new Person("zhangsan", 18);
    }
}
注解作用
@Configuration将修饰的类标识为一个配置类,相当于 Spring 配置文件@Bean将修饰的方法标识为一个 bean,进行类型注入,纳入到 Spring 的 IOC 容器中进行管理。value属性标识 bean 的 id,不指定value时默认将方法名作为 bean 的 id;方法内部可以进行类的实例化,对属性进行装配
测试 1
public class SpringAnnotationTest
{
    private ApplicationContext context;

    @Before
    public void initContext(){
        context = new AnnotationConfigApplicationContext(SpringConfig.class);
    }

    @Test
    public void testBean() {
        Person person1 = (Person) context.getBean("person");
        System.out.println(person1);
        Person person2 = context.getBean(Person.class);
        System.out.println(person2);
        Person person3 = context.getBean("person", Person.class);
        System.out.println(person3);
        System.out.println("===============");
        String[] names = context.getBeanNamesForType(Person.class);
        for (String name : names) {
            System.out.println(name);
        }
    }
}
- 使用
AnnotationConfigApplicationContext可以读取配置类 - 通过
getBean()方法获取到配置类中注入的类。其方法有多个重载方法,主要可以通过 bean 的类型、id 作为参数来获得对应 bean 的实例对象,也可以通过指定需要的类型和 id 搭配更精准地获取所需的 bean - 通过
getBeanNamesForType可以获取指定类型的所有 bean 的 id 名,返回类型是一个 String 类型数组
测试结果
Person{name='zhangsan', age='18'}
Person{name='zhangsan', age='18'}
Person{name='zhangsan', age='18'}
===============
person
但是如果配置类中多次注入同一个类型,getBean 的重载方法 getBean(Class<T> requiredType) 就会执行报错了,测试如下
测试 2
@Configuration
public class SpringConfig
{
    @Bean(value = "person")
    public Person person01(){
        return new Person("zhangsan", 18);
    }

    @Bean(value = "person2")
    public Person person02(){
        return new Person("zhangsan", 18);
    }
}
测试结果
Person{name='zhangsan', age='18'}

org.springframework.beans.factory.NoUniqueBeanDefinitionException: No qualifying bean of type 'com.vectorx.springannotation.entity.Person' available: expected single matching bean but found 2: person,person2
    at org.springframework.beans.factory.support.DefaultListableBeanFactory.resolveNamedBean(DefaultListableBeanFactory.java:1041)
    at org.springframework.beans.factory.support.DefaultListableBeanFactory.getBean(DefaultListableBeanFactory.java:345)
    at org.springframework.beans.factory.support.DefaultListableBeanFactory.getBean(DefaultListableBeanFactory.java:340)
    at org.springframework.context.support.AbstractApplicationContext.getBean(AbstractApplicationContext.java:1090)
    at com.vectorx.springannotation.SpringAnnotationTest.testBean(SpringAnnotationTest.java:23) <27 internal lines>
很明显,expected single matching bean but found 2 期望匹配 1 个但却找到了 2 个同一类型的 bean ,所以使用 getBean 方法时需要注意使用场景,选择不同的重载方法防止出现不必要的异常问题
3、@ComponentScan 注解
@ComponentScan 注解可以指定要扫描的包,与配置文件中 <context:component-scan> 标签作用一致
xml 方式
<context:component-scan base-package="com.vectorx.springannotation"></context:component-scan>
注解方式
// 自动扫描包
@ComponentScan(value = "com.vectorx.springannotation")
@Configuration
public class SpringConfig
{
    //...
}
Controller、Service、Dao 类
@Controller
public class BookController {}
@Service
public class BookService {}
@Repository
public class BookDao {}
测试方法
@Test
public void testComponentScan(){
    String[] names = context.getBeanDefinitionNames();
    for (String name : names) {
        System.out.println(name);
    }
}
getBeanDefinitionNames() 方法可以获取 Spring 的 IOC 容器中定义的 bean 的 id 名
测试结果
org.springframework.context.annotation.internalConfigurationAnnotationProcessor
org.springframework.context.annotation.internalAutowiredAnnotationProcessor
org.springframework.context.annotation.internalRequiredAnnotationProcessor
org.springframework.context.annotation.internalCommonAnnotationProcessor
org.springframework.context.event.internalEventListenerProcessor
org.springframework.context.event.internalEventListenerFactory
springConfig
bookController
bookDao
bookService
person
除了 Spring IOC 容器中自己要装配的组件外,还有我们的配置类 SpringConfig,以及刚刚定义的 Controller、Service、Dao 类和 Person 类
excludeFilters
xml 方式
<context:component-scan base-package="com.vectorx.springannotation">
    <context:exclude-filter type="annotation" expression="org.springframework.stereotype.Controller"/>
    <context:exclude-filter type="annotation" expression="org.springframework.stereotype.Service"/>
</context:component-scan>
注解方式
@ComponentScan(value = "com.vectorx.springannotation", excludeFilters = {
        @ComponentScan.Filter(type = FilterType.ANNOTATION, classes = {Controller.class, Service.class})
})
@Configuration
public class SpringConfig
{
    //...
}
测试结果
org.springframework.context.annotation.internalConfigurationAnnotationProcessor
org.springframework.context.annotation.internalAutowiredAnnotationProcessor
org.springframework.context.annotation.internalRequiredAnnotationProcessor
org.springframework.context.annotation.internalCommonAnnotationProcessor
org.springframework.context.event.internalEventListenerProcessor
org.springframework.context.event.internalEventListenerFactory
springConfig
bookDao
person
可以看到,bookController 和 bookService 已经不在 Spring 的 IOC 容器中了
includeFilters
》》》错误示范
xml 方式
<context:component-scan base-package="com.vectorx.springannotation">
    <context:include-filter type="annotation" expression="org.springframework.stereotype.Controller"/>
    <context:include-filter type="annotation" expression="org.springframework.stereotype.Service"/>
</context:component-scan>
注解方式
@ComponentScan(value = "com.vectorx.springannotation", includeFilters = {
        @ComponentScan.Filter(type = FilterType.ANNOTATION, classes = {Controller.class, Service.class})
})
@Configuration
public class SpringConfig
{
    //...
}
测试结果
org.springframework.context.annotation.internalConfigurationAnnotationProcessor
org.springframework.context.annotation.internalAutowiredAnnotationProcessor
org.springframework.context.annotation.internalRequiredAnnotationProcessor
org.springframework.context.annotation.internalCommonAnnotationProcessor
org.springframework.context.event.internalEventListenerProcessor
org.springframework.context.event.internalEventListenerFactory
springConfig
bookController
bookDao
bookService
person
Q:发现并没有生效,这是为什么呢?
A:因为还有一个
use-default-filters属性要搭配include-filter属性进行使用。因为use-default-filters默认的过滤策略为true,即不做任何过滤,所以只使用include-filter是没有任何效果的
》》》正确示范
xml 方式
<context:component-scan base-package="com.vectorx.springannotation" use-default-filters="false">
    <context:include-filter type="annotation" expression="org.springframework.stereotype.Controller"/>
    <context:include-filter type="annotation" expression="org.springframework.stereotype.Service"/>
</context:component-scan>
注解方式
@ComponentScan(value = "com.vectorx.springannotation", useDefaultFilters = false, includeFilters = {
    @ComponentScan.Filter(type = FilterType.ANNOTATION, classes = {Controller.class, Service.class})
})
@Configuration
public class SpringConfig
{
    //...
}
测试结果
org.springframework.context.annotation.internalConfigurationAnnotationProcessor
org.springframework.context.annotation.internalAutowiredAnnotationProcessor
org.springframework.context.annotation.internalRequiredAnnotationProcessor
org.springframework.context.annotation.internalCommonAnnotationProcessor
org.springframework.context.event.internalEventListenerProcessor
org.springframework.context.event.internalEventListenerFactory
springConfig
bookController
bookService
person
可以发现,bookDao 被过滤掉了。同时我们也注意到 Spring IOC 自己的组件没有被过滤,SpringConfig 配置类也没有被过滤
Q:Spring IOC 自己的组件没有被过滤:毕竟是 IOC 容器中基础的、必要的组件,不被过滤能够理解;SpringConfig 配置类也没有被过滤:配置类不会被过滤掉也能理解,过滤掉还得了?person 也没有被过滤掉,这是为什么呢?
A:因为自动扫描包只会扫描
@Controller、@Service、@Repository、@Component。这个从 2、@Bean 注解 一节中就能够想到(那时还没有使用包扫描照样能获取到 bean 对象)
@ComponentScans
另外,如果阅读 @ComponentScan 注解源码可以发现其被 @Repeatable 修饰,说明可以重复写多次
@Retention(RetentionPolicy.RUNTIME)
@Target({ElementType.TYPE})
@Documented
@Repeatable(ComponentScans.class)
public @interface ComponentScan {...}
如下
@ComponentScan(value = "com.vectorx.springannotation", useDefaultFilters = false, includeFilters = {
    @ComponentScan.Filter(type = FilterType.ANNOTATION, classes = {Controller.class})
})
@ComponentScan(value = "com.vectorx.springannotation", useDefaultFilters = false, includeFilters = {
    @ComponentScan.Filter(type = FilterType.ANNOTATION, classes = {Service.class})
})
不过这个是 jdk8 之后才支持的写法,如果是之前的版本,可以使用 @ComponentScans 注解可以达到同样的效果
@ComponentScans(value = {
    @ComponentScan(value = "com.vectorx.springannotation", useDefaultFilters = false, includeFilters = {
        @ComponentScan.Filter(type = FilterType.ANNOTATION, classes = {Controller.class})
    }),
    @ComponentScan(value = "com.vectorx.springannotation", useDefaultFilters = false, includeFilters = {
        @ComponentScan.Filter(type = FilterType.ANNOTATION, classes = {Service.class})
    })
})
FilterType
上面的例子中,我们学习了对扫描包通过排除或包含的方式进行了过滤
excludeFilters=Filter[]:指定扫描的时候排除哪些组件includeFilters=Filter[]:指定扫描的时候包含哪些组件
同时我们使用了 FilterType.ANNOTATION 即按照注解的方式对扫描的包进行了过滤。这里简单介绍下每种过滤方式
FilterType.ANNOTATION:按照注解过滤FilterType.ASSIGNABLE_TYPE:按照指定类型过滤FilterType.ASPECTJ:使用 ASPECTJ 表达式过滤FilterType.REGEX:使用正则过滤FilterType.CUSTOM:使用自定义规则过滤
其中 FilterType.ANNOTATION 和 FilterType.ASSIGNABLE_TYPE 最常用到,而对于 FilterType.ASPECTJ 和 FilterType.REGEX 稍作了解即可。因为我们已经使用过 FilterType.ANNOTATION 了,所以这里着重学习下 FilterType.ASSIGNABLE_TYPE(按照类型过滤)和 FilterType.CUSTOM(自定义规则)这两种过滤类型
按照类型过滤
@ComponentScan(value = "com.vectorx.springannotation", useDefaultFilters = false, includeFilters = {
    @ComponentScan.Filter(type = FilterType.ASSIGNABLE_TYPE, classes = {BookService.class})
})
测试结果
org.springframework.context.annotation.internalConfigurationAnnotationProcessor
org.springframework.context.annotation.internalAutowiredAnnotationProcessor
org.springframework.context.annotation.internalRequiredAnnotationProcessor
org.springframework.context.annotation.internalCommonAnnotationProcessor
org.springframework.context.event.internalEventListenerProcessor
org.springframework.context.event.internalEventListenerFactory
springConfig
bookService
person
自定义规则
自定义规则比较特殊,需要我们自定义实现类。如何自定义实现类呢?我们先看下 FilterType 的官方源码注释是如何说明的
public enum FilterType {
    ANNOTATION,
    ASSIGNABLE_TYPE,
    ASPECTJ,
    REGEX,
    /** Filter candidates using a given custom
	 * {@link org.springframework.core.type.filter.TypeFilter} implementation.
	 */
    CUSTOM
}
注释告诉我们说需要对 TypeFilter 进行实现,话不多说直接上代码
- 定义一个
MyTypeFilter实现TypeFilter
public class MyTypeFilter implements TypeFilter
{
    @Override
    public boolean match(MetadataReader metadataReader, MetadataReaderFactory metadataReaderFactory)
            throws IOException {
        return false;
    }
}
- 注解中使用我们刚刚定义好的自定义规则类
@ComponentScan(value = "com.vectorx.springannotation", useDefaultFilters = false, includeFilters = {
    @ComponentScan.Filter(type = FilterType.CUSTOM, classes = {MyTypeFilter.class})
})
先测试一波,看看效果
org.springframework.context.annotation.internalConfigurationAnnotationProcessor
org.springframework.context.annotation.internalAutowiredAnnotationProcessor
org.springframework.context.annotation.internalRequiredAnnotationProcessor
org.springframework.context.annotation.internalCommonAnnotationProcessor
org.springframework.context.event.internalEventListenerProcessor
org.springframework.context.event.internalEventListenerFactory
springConfig
person
可以看到,默认的自定义实现(即 return false)时,包下所有类全部会过滤掉。接下来我们把注意力着重放在 自定义规则方法 上,该如何实现呢?
不知道如何实现没关系,先看下 TypeFilter 接口的源码注释
public interface TypeFilter {

	/**
	 * Determine whether this filter matches for the class described by
	 * the given metadata.
	 * @param metadataReader the metadata reader for the target class
	 * @param metadataReaderFactory a factory for obtaining metadata readers
	 * for other classes (such as superclasses and interfaces)
	 * @return whether this filter matches
	 * @throws IOException in case of I/O failure when reading metadata
	 */
	boolean match(MetadataReader metadataReader, MetadataReaderFactory metadataReaderFactory)
			throws IOException;

}
主要看这两句话,说明了 metadataReader 和 metadataReaderFactory 两个参数的作用
@param metadataReader the metadata reader for the target class
@param metadataReaderFactory a factory for obtaining metadata readers for other classes (such as superclasses and interfaces)
翻译过来就是
metadataReader:目标类的元数据读取器metadataReaderFactory:为其他类(如超类和接口)获取元数据读取器的工厂
如何理解呢?
metadataReader:读取器,可以获取当前正在扫描的类的信息metadataReaderFactory:读取器的工厂,可以获取其他类的信息
既然如此,我们就先来着重看下 metadataReader 中能获取到哪些相关信息
public class MyTypeFilter implements TypeFilter
{
    @Override
    public boolean match(MetadataReader metadataReader, MetadataReaderFactory metadataReaderFactory)
            throws IOException {
        // 获取当前正在扫描的类的注解信息
        AnnotationMetadata annotationMetadata = metadataReader.getAnnotationMetadata();
        // 获取当前正在扫描的类的信息
        ClassMetadata classMetadata = metadataReader.getClassMetadata();
        // 获取当前正在扫描的类的资源信息(如类的路径)
        Resource resource = metadataReader.getResource();

        // 主要看下当前类的相关信息
        String className = classMetadata.getClassName();
        System.out.println(className);
        return false;
    }
}
测试结果
com.vectorx.springannotation.SpringAnnotationTest
com.vectorx.springannotation.controller.BookController
com.vectorx.springannotation.dao.BookDao
com.vectorx.springannotation.entity.Person
com.vectorx.springannotation.filter.MyTypeFilter
com.vectorx.springannotation.service.BookService
到这里是不是就一目了然了,既然 return false 是会被过滤掉的,那只要符合自定义规则时 return true 不就可以了嘛
public class MyTypeFilter implements TypeFilter
{
    @Override
    public boolean match(MetadataReader metadataReader, MetadataReaderFactory metadataReaderFactory)
            throws IOException {
        String className = classMetadata.getClassName();
        if (className.contains("er")) {
            return true;
        }
        return false;
    }
}
测试结果
org.springframework.context.annotation.internalConfigurationAnnotationProcessor
org.springframework.context.annotation.internalAutowiredAnnotationProcessor
org.springframework.context.annotation.internalRequiredAnnotationProcessor
org.springframework.context.annotation.internalCommonAnnotationProcessor
org.springframework.context.event.internalEventListenerProcessor
org.springframework.context.event.internalEventListenerFactory
springConfig
bookController
person
myTypeFilter
bookService
可以看到 bookController、myTypeFilter、bookService 包含 er 所以这几个都被打印了出来,而 bookDao 不满足条件所以没被打印
注意:
TypeFilter实现类中并不是说,“返回false就会被排除,返回true就会被包含”(并非如此)只是因为我们使用了
includeFilters属性,所以返回true的类都会作为includeFilters属性的值因此,如果我们使用
excludeFilters属性,结果则会刚好相反
使用 excludeFilters 属性自定义规则
@ComponentScan(value = "com.vectorx.springannotation", excludeFilters = {
    @ComponentScan.Filter(type = FilterType.CUSTOM, classes = {MyTypeFilter.class})
})
测试结果
org.springframework.context.annotation.internalConfigurationAnnotationProcessor
org.springframework.context.annotation.internalAutowiredAnnotationProcessor
org.springframework.context.annotation.internalRequiredAnnotationProcessor
org.springframework.context.annotation.internalCommonAnnotationProcessor
org.springframework.context.event.internalEventListenerProcessor
org.springframework.context.event.internalEventListenerFactory
springConfig
bookDao
person
可以看到, bookController、myTypeFilter、bookService 包含 er 所以这几个都被过滤了,而 bookDao 不满足条件所以被打印出来了
4、@Scope 注解
测试
配置类
@Configuration
public class SpringConfig2
{
    @Bean("person")
    public Person person(){
        return new Person("lisi", 25);
    }
}
测试类
public class SpringAnnotationTest2
{
    private ApplicationContext context;

    @Before
    public void initContext(){
        context = new AnnotationConfigApplicationContext(SpringConfig2.class);
    }

    @Test
    public void testBean() {
        Person person1 = context.getBean("person", Person.class);
        Person person2 = context.getBean("person", Person.class);
        System.out.println(person1 == person2);
    }
}
测试结果
true
如果添加 @Scope 注解
@Configuration
public class SpringConfig2
{
    @Scope
    @Bean("person")
    public Person person(){
        return new Person("lisi", 25);
    }
}
测试结果
true
如果为 @Scope 注解指定 SCOPE_SINGLETON 的属性值
@Configuration
public class SpringConfig2
{
    @Scope(ConfigurableBeanFactory.SCOPE_SINGLETON)
    //@Scope(value = ConfigurableBeanFactory.SCOPE_SINGLETON)
    //@Scope(scopeName = ConfigurableBeanFactory.SCOPE_SINGLETON)
    @Bean("person")
    public Person person(){
        return new Person("lisi", 25);
    }
}
测试结果
true
可以发现,默认情况下,以下三种情况是等价的
- 不加
@Scope注解 - 加上
@Scope注解但不添加任何属性 - 加上
@Scope注解并添加value或scopeName属性,值为SCOPE_SINGLETON
我们看下 @Scope 注解源码,其中重点关注 scopeName 上的注释
@Target({ElementType.TYPE, ElementType.METHOD})
@Retention(RetentionPolicy.RUNTIME)
@Documented
public @interface Scope {
    @AliasFor("scopeName")
    String value() default "";

    /**
	 * Specifies the name of the scope to use for the annotated component/bean.
	 * <p>Defaults to an empty string ({@code ""}) which implies
	 * {@link ConfigurableBeanFactory#SCOPE_SINGLETON SCOPE_SINGLETON}.
	 * @since 4.2
	 * @see ConfigurableBeanFactory#SCOPE_PROTOTYPE
	 * @see ConfigurableBeanFactory#SCOPE_SINGLETON
	 * @see org.springframework.web.context.WebApplicationContext#SCOPE_REQUEST
	 * @see org.springframework.web.context.WebApplicationContext#SCOPE_SESSION
	 * @see #value
	 */
    @AliasFor("value")
    String scopeName() default "";

    ScopedProxyMode proxyMode() default ScopedProxyMode.DEFAULT;
}
其中说明了 value 或 scopeName 默认值 "",实际上就是 SCOPE_SINGLETON。并且可以看到我们可以为其指定四种值
ConfigurableBeanFactory#SCOPE_PROTOTYPEConfigurableBeanFactory#SCOPE_SINGLETONorg.springframework.web.context.WebApplicationContext#SCOPE_REQUESTorg.springframework.web.context.WebApplicationContext#SCOPE_SESSION
而这些值其实就是对应类中的常量值
-
prototype:多实例的。IOC 容器启动并不会去调用方法创建对象放在容器中,每次获取时才会调用方法创建对象 -
singleton:单实例的(默认值)。IOC 容器启动会调用方法创建对象放到 IOC 容器中。以后每次获取就是直接从容器(map.get())中拿, -
request:同一次请求创建一个实例 -
session:同一个 session 创建一个实刷
这与我们使用 xml 方式在 beans.xml 配置文件中配置 scope 属性是一致的
<bean id="person" class="com.vectorx.springannotation.entity.Person" scope="singleton">
    <property name="name" value="lisi"></property>
    <property name="age" value="25"></property>
</bean>
如果我们使用 prototype 即多实例范围
@Configuration
public class SpringConfig2
{
    @Scope(ConfigurableBeanFactory.SCOPE_PROTOTYPE)
    @Bean("person")
    public Person person(){
        return new Person("lisi", 25);
    }
}
测试结果
false
那么如何印证下面两句话呢?
-
prototype:多实例的。IOC 容器启动并不会去调用方法创建对象放在容器中,每次获取时才会调用方法创建对象 -
singleton:单实例的(默认值)。IOC 容器启动会调用方法创建对象放到 IOC 容器中。以后每次获取就是直接从容器(map.get())中拿,
我们可以分别添加打印语句看下输出的先后情况
测试 1
配置类:配置 singleton 单实例
@Configuration
public class SpringConfig2
{
    @Scope(ConfigurableBeanFactory.SCOPE_SINGLETON)
    @Bean("person")
    public Person person(){
        System.out.println("给 IOC 容器中添加 Person ...");
        return new Person("lisi", 25);
    }
}
测试类
public class SpringAnnotationTest2
{
    private ApplicationContext context;

    @Before
    public void initContext(){
        context = new AnnotationConfigApplicationContext(SpringConfig2.class);
        System.out.println("IOC 容器创建完成...");
    }

    @Test
    public void testBean() {
        Person person1 = context.getBean("person", Person.class);
        Person person2 = context.getBean("person", Person.class);
        System.out.println(person1 == person2); // true
    }
}
测试结果
给 IOC 容器中添加 Person ...
IOC 容器创建完成...
true
测试 2
配置类:配置 prototype 多实例
@Configuration
public class SpringConfig2
{
    @Scope(ConfigurableBeanFactory.SCOPE_PROTOTYPE)
    @Bean("person")
    public Person person(){
        System.out.println("给 IOC 容器中添加 Person ...");
        return new Person("lisi", 25);
    }
}
测试类不变
测试结果
IOC 容器创建完成...
给 IOC 容器中添加 Person ...
给 IOC 容器中添加 Person ...
false
可以明显看到,单实例 和 多实例 两种情况的创建对象的先后顺序的不同
5、@Lazy 注解
@Lazy 注解,顾名思义就是对创建对象的操作进行懒加载,而这个也是针对单实例而言的
思考:为什么是针对单实例而言的,道理很容易理解。多实例每次都是从容器中获取实例时,都是创建新的对象,所以没有什么懒加载可言。而目前我们通过测试发现,单实例默认情况下在 IOC 容器创建之前就创建好实例对象了。如果我们既想要单实例对象又不想在 IOC 容器创建之前创建对象实例,那应该怎么办呢?这时候
@Lazy注解就应用而生了
我们对配置类略作修改,测试类不动
@Configuration
public class SpringConfig2
{
    @Lazy
    @Scope(ConfigurableBeanFactory.SCOPE_SINGLETON)
    @Bean("person")
    public Person person(){
        System.out.println("给 IOC 容器中添加 Person ...");
        return new Person("lisi", 25);
    }
}
测试结果
IOC 容器创建完成...
给 IOC 容器中添加 Person ...
true
与之前没有 @Lazy 注解时的测试结果对比,效果一目了然
6、@Conditional 注解
@Conditional 注解的作用就是:按照一定的条件进行判断,满足条件时才给容器中注册 bean
怎么使用 @Conditional 注解呢?还是从阅读源代码出发
Conditional
@Target({ElementType.TYPE, ElementType.METHOD})
@Retention(RetentionPolicy.RUNTIME)
@Documented
public @interface Conditional {

	/**
	 * All {@link Condition}s that must {@linkplain Condition#matches match}
	 * in order for the component to be registered.
	 */
	Class<? extends Condition>[] value();

}
从源码中可以得知,@Conditional 注解可以作用在类或方法上,其值为一个 Class[] 即 Class 类型的数组,而 Class 类型必须是 Condition 的子类,那 Condition 又是什么呢?继续看源码
Condition
public interface Condition {

	/**
	 * Determine if the condition matches.
	 * @param context the condition context
	 * @param metadata metadata of the {@link org.springframework.core.type.AnnotationMetadata class}
	 * or {@link org.springframework.core.type.MethodMetadata method} being checked.
	 * @return {@code true} if the condition matches and the component can be registered
	 * or {@code false} to veto registration.
	 */
	boolean matches(ConditionContext context, AnnotatedTypeMetadata metadata);

}
Condition 是一个接口,就是说我们需要定义一个类来实现 Condition 接口。接口中方法的注释也写得很清楚,matches 能够判断条件匹配与否,返回值是一个布尔类型,匹配成功返回 true,否则返回 false。我们着重看 context 和 metadata 两个方法入参就好了
ConditionContext:条件上下文AnnotatedTypeMetadata:注解类型信息
从方法注释中,我们可以获取的信息有限。继续阅读 ConditionContext 和 AnnotatedTypeMetadata 源码,看看其中到底有何玄机
ConditionContext
public interface ConditionContext {

	/**
	 * Return the {@link BeanDefinitionRegistry} that will hold the bean definition
	 * should the condition match, or {@code null} if the registry is not available.
	 */
	BeanDefinitionRegistry getRegistry();

	/**
	 * Return the {@link ConfigurableListableBeanFactory} that will hold the bean
	 * definition should the condition match, or {@code null} if the bean factory
	 * is not available.
	 */
	ConfigurableListableBeanFactory getBeanFactory();

	/**
	 * Return the {@link Environment} for which the current application is running,
	 * or {@code null} if no environment is available.
	 */
	Environment getEnvironment();

	/**
	 * Return the {@link ResourceLoader} currently being used, or {@code null} if
	 * the resource loader cannot be obtained.
	 */
	ResourceLoader getResourceLoader();

	/**
	 * Return the {@link ClassLoader} that should be used to load additional classes,
	 * or {@code null} if the default classloader should be used.
	 */
	ClassLoader getClassLoader();

}
getRegistry():获取 Bean 定义的注册类getBeanFactory():获取 BeanFactory 工厂类getEnvironment():获取当前正在运行的系统信息类getResourceLoader():获取资源加载器getClassLoader():获取类加载器
AnnotatedTypeMetadata
public interface AnnotatedTypeMetadata {

	/**
	 * Determine whether the underlying element has an annotation or meta-annotation
	 * of the given type defined.
	 * <p>If this method returns {@code true}, then
	 * {@link #getAnnotationAttributes} will return a non-null Map.
	 * @param annotationName the fully qualified class name of the annotation
	 * type to look for
	 * @return whether a matching annotation is defined
	 */
	boolean isAnnotated(String annotationName);

	/**
	 * Retrieve the attributes of the annotation of the given type, if any (i.e. if
	 * defined on the underlying element, as direct annotation or meta-annotation),
	 * also taking attribute overrides on composed annotations into account.
	 * @param annotationName the fully qualified class name of the annotation
	 * type to look for
	 * @return a Map of attributes, with the attribute name as key (e.g. "value")
	 * and the defined attribute value as Map value. This return value will be
	 * {@code null} if no matching annotation is defined.
	 */
	Map<String, Object> getAnnotationAttributes(String annotationName);

	/**
	 * Retrieve the attributes of the annotation of the given type, if any (i.e. if
	 * defined on the underlying element, as direct annotation or meta-annotation),
	 * also taking attribute overrides on composed annotations into account.
	 * @param annotationName the fully qualified class name of the annotation
	 * type to look for
	 * @param classValuesAsString whether to convert class references to String
	 * class names for exposure as values in the returned Map, instead of Class
	 * references which might potentially have to be loaded first
	 * @return a Map of attributes, with the attribute name as key (e.g. "value")
	 * and the defined attribute value as Map value. This return value will be
	 * {@code null} if no matching annotation is defined.
	 */
	Map<String, Object> getAnnotationAttributes(String annotationName, boolean classValuesAsString);

	/**
	 * Retrieve all attributes of all annotations of the given type, if any (i.e. if
	 * defined on the underlying element, as direct annotation or meta-annotation).
	 * Note that this variant does <i>not</i> take attribute overrides into account.
	 * @param annotationName the fully qualified class name of the annotation
	 * type to look for
	 * @return a MultiMap of attributes, with the attribute name as key (e.g. "value")
	 * and a list of the defined attribute values as Map value. This return value will
	 * be {@code null} if no matching annotation is defined.
	 * @see #getAllAnnotationAttributes(String, boolean)
	 */
	MultiValueMap<String, Object> getAllAnnotationAttributes(String annotationName);

	/**
	 * Retrieve all attributes of all annotations of the given type, if any (i.e. if
	 * defined on the underlying element, as direct annotation or meta-annotation).
	 * Note that this variant does <i>not</i> take attribute overrides into account.
	 * @param annotationName the fully qualified class name of the annotation
	 * type to look for
	 * @param classValuesAsString  whether to convert class references to String
	 * @return a MultiMap of attributes, with the attribute name as key (e.g. "value")
	 * and a list of the defined attribute values as Map value. This return value will
	 * be {@code null} if no matching annotation is defined.
	 * @see #getAllAnnotationAttributes(String)
	 */
	MultiValueMap<String, Object> getAllAnnotationAttributes(String annotationName, boolean classValuesAsString);

}
isAnnotated:判断元素上是否定义了指定类型的注解getAnnotationAttributes:获取指定类型的注解的属性getAllAnnotationAttributes:获取指定类型的所有注解的所有属性
通过对源码的阅读,如果我们要实现下列功能就轻而易举了:根据操作系统的不同,注册不同的 Person 类
WindowsCondition
public class WindowsCondition implements Condition
{
    @Override
    public boolean matches(ConditionContext context, AnnotatedTypeMetadata metadata) {
        Environment environment = context.getEnvironment();
        // 判断是否是 Windows 系统
        String osName = environment.getProperty("os.name");
        return osName.toLowerCase().contains("windows");
    }
}
LinuxCondition
public class LinuxCondition implements Condition
{
    @Override
    public boolean matches(ConditionContext context, AnnotatedTypeMetadata metadata) {
        Environment environment = context.getEnvironment();
        // 判断是否是 Linux 系统
        String osName = environment.getProperty("os.name");
        return osName.toLowerCase().contains("linux");
    }
}
配置类
@Configuration
public class SpringConfig3
{
    @Bean("person")
    public Person person() {
        return new Person("wangwu", 26);
    }

    @Conditional({WindowsCondition.class})
    @Bean("bill")
    public Person person01() {
        return new Person("Bill Gates", 67);
    }

    @Conditional({LinuxCondition.class})
    @Bean("linus")
    public Person person02() {
        return new Person("Linus", 53);
    }
}
测试类
public class SpringAnnotationTest3
{
    private ApplicationContext context;

    @Before
    public void initContext() {
        context = new AnnotationConfigApplicationContext(SpringConfig3.class);
    }

    @Test
    public void testBean() {
        Environment environment = context.getEnvironment();
        String osName = environment.getProperty("os.name");
        System.out.println("os.name=" + osName);
        System.out.println("==============");
        String[] names = context.getBeanNamesForType(Person.class);
        for (String name : names) {
            System.out.println(name);
        }
        System.out.println("==============");
        Map<String, Person> beans = context.getBeansOfType(Person.class);
        for (Map.Entry<String, Person> entry : beans.entrySet()) {
            System.out.println(entry.getKey() + ": " + entry.getValue());
        }
    }
}
测试结果
os.name=Windows 10
==============
person
bill
==============
person: Person{name='wangwu', age='26'}
bill: Person{name='Bill Gates', age='67'}
添加 VM options
-Dos.name=linux
测试结果
os.name=linux
==============
person
linus
==============
person: Person{name='wangwu', age='26'}
linus: Person{name='Linus', age='53'}
总结
本节重点掌握几个注解:@Bean、@ComponentScan、@Scope、@Lazy、@Conditional 的作用和使用
附上导图,仅供参考