一、React-Router-v6的学习
1、下载
npm install react-router-dom
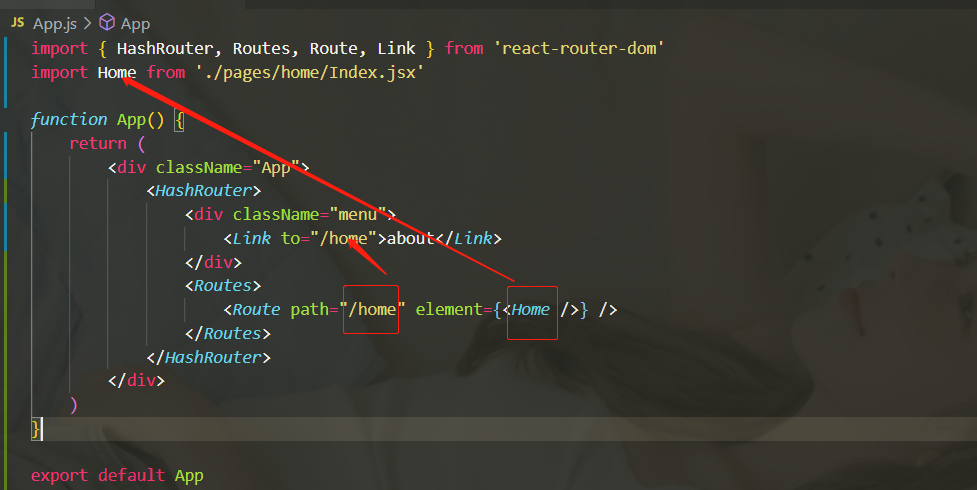
2、在App.js中引入界面和React-Router的方法
import { BrowserRouter, Routes, Route, Link } from 'react-router-dom'
import Home from './pages/home/Index.jsx'
import Mine from './pages/mine/Mine.jsx'
function App() {
return (
<div className="App">
<BrowserRouter>
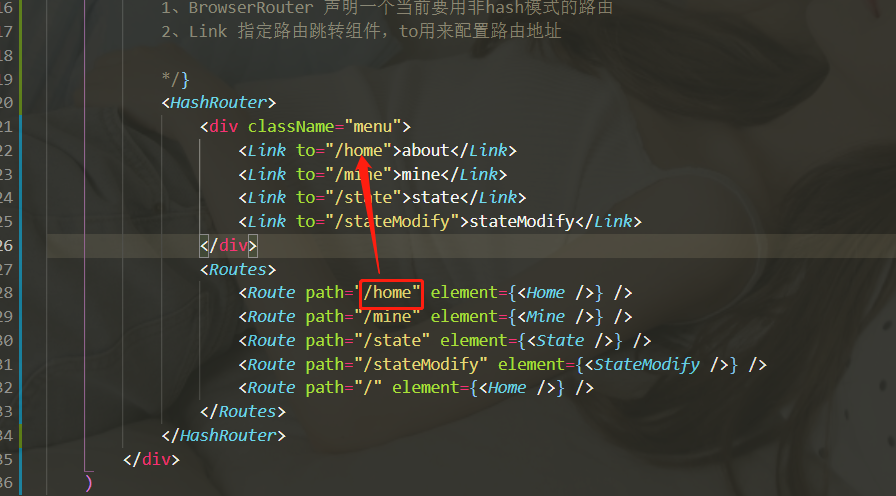
<div className="menu">
<Link to="/home">about</Link>
<Link to="/mine">mine</Link>
</div>
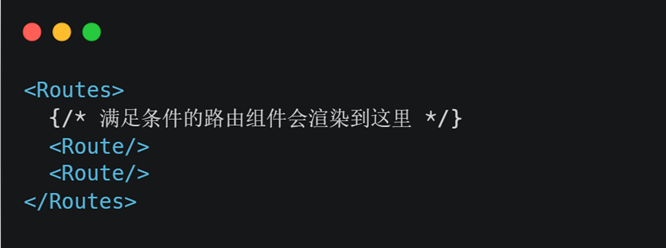
<Routes>
<Route path="/home" element={<Home />} />
<Route path="/mine" element={<Mine />} />
<Route path="/" element={<Home />} />
</Routes>
</BrowserRouter>
</div>
)
}
export default App
注:① BrowserRouter 声明一个当前要用非hash模式的路由;
② Link 指定路由跳转组件,to用来配置路由地址;
③ Routes路由出口,路由对应的组件,会在这里 进行渲染;
④ Route 指定路径和组件的对应关系,有几个理由,就写几个,path代表路径,element代表组件;
3、路由的核心组件
1)路由的两种模式(HashRouter、BrowserRouter)
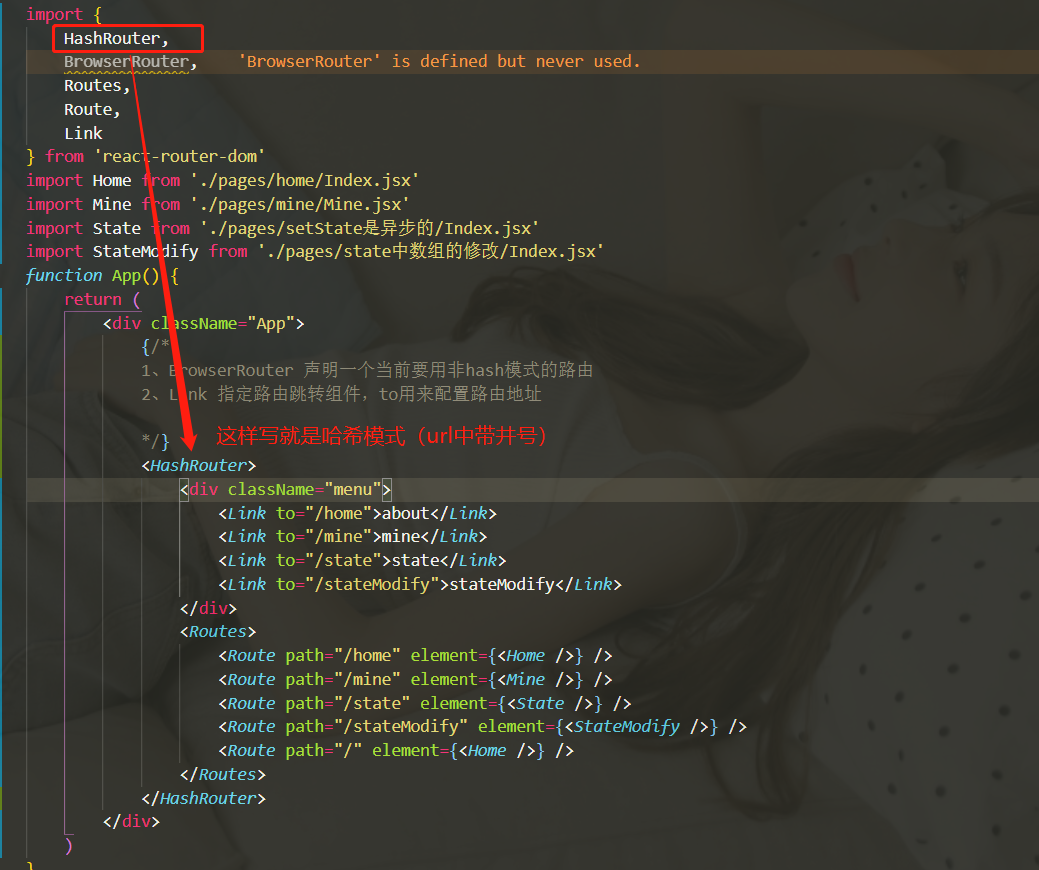
① HashRouter(哈希模式) 带 # 号
② BrowserRouter 不带 # 号(使用了H5的history.pushState API来实现)
2)Link的使用
作用 :用于指定导航链接,完成路由跳转
语法说明: 组件通过to属性指定路由地址,最终会渲染为a链接元素
3)Routes
提供一个路由出口,满足条件的路由组件会渲染到组件内部,定义path和组件的对应关系
4)Route
作用 :用于指定导航链接,完成路由匹配(也就是定义url)
语法说明: path属性指定匹配的路径地址,element属性指定要渲染的组件
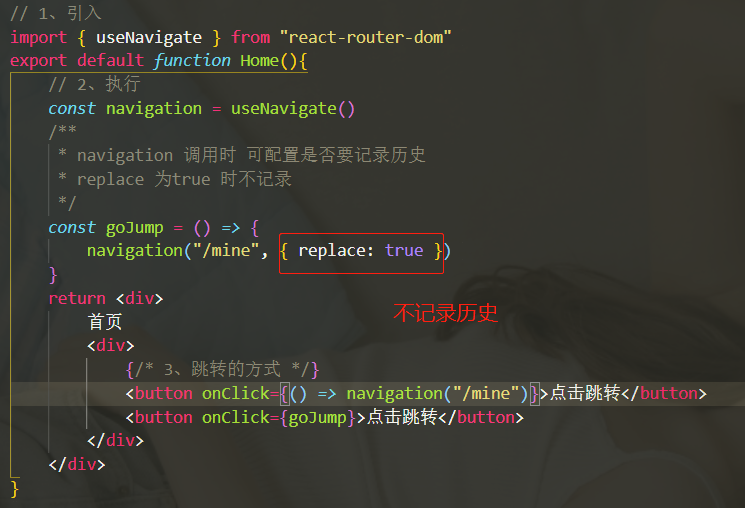
4、编程式导航
1)在App.js中引入组件并定义url
2)在组件 或 页面中使用
// 1、引入
import { useNavigate } from "react-router-dom"
export default function Home(){
	// 2、执行
	const navigation = useNavigate()
	const goJump = () => {
		navigation("/mine")
	}
	return <div>
		首页
		<div>
			{/* 3、跳转的方式 */}
			<button onClick={() => navigation("/mine")}>点击跳转</button>
			<button onClick={goJump}>点击跳转</button>
		</div>
	</div>
}
3)传参
① searchParams传参
a、传参
// 1、引入
import { useNavigate } from "react-router-dom"
export default function Home(){
	// 2、执行
	const navigation = useNavigate()
	/**
	 * navigation 调用时 可配置是否要记录历史
	 * replace 为true 时不记录
	 */
	const goJump = () => {
		navigation("/mine?id=11111&name=拉斯", { replace: true })
	}
	return <div>
		首页
		<div>
			{/* 3、跳转的方式 */}
			{/* <button onClick={() => navigation("/mine")}>点击跳转</button> */}
			<button onClick={goJump}>点击跳转</button>
		</div>
	</div>
}
b、取参
import { useSearchParams } from "react-router-dom"
export default function Mine(){
	// 获取路由传参
	const [ params ] = useSearchParams();
	const id = params.get("id")
	const name = params.get("name")
	return (
		<div>
			<p>我的</p>
			<p>id为{ id }</p>
			<p>name为{ name }</p>
		</div>
	)
}
② params传参
a、在路由url中加入参数键
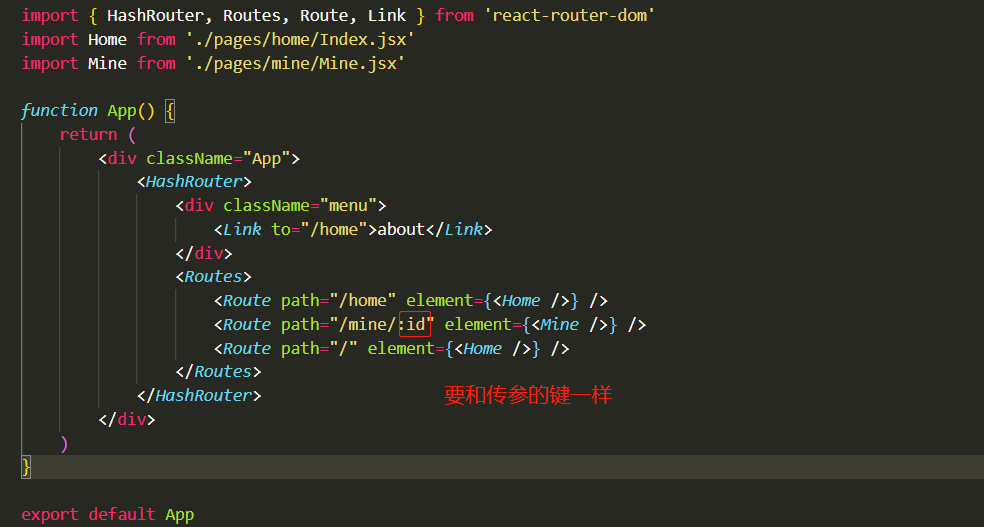
b、在A页面传参
// 1、引入
import { useNavigate } from "react-router-dom"
export default function Home(){
	// 2、执行
	const navigation = useNavigate()
	/**
	 * navigation 调用时 可配置是否要记录历史
	 * replace 为true 时不记录
	 */
	const goJump = () => {
		navigation("/mine/11111", { replace: true })
	}
	return <div>
		首页
		<div>
			{/* 3、跳转的方式 */}
			<button onClick={goJump}>点击跳转</button>
		</div>
	</div>
}
c、在B页面取参
import { useParams } from "react-router-dom"
export default function Mine(){
	// 获取路由传参
	const params = useParams()
	return (
		<div>
			<p>我的</p>
			<p>id为{ params.id }</p>
		</div>
	)
}
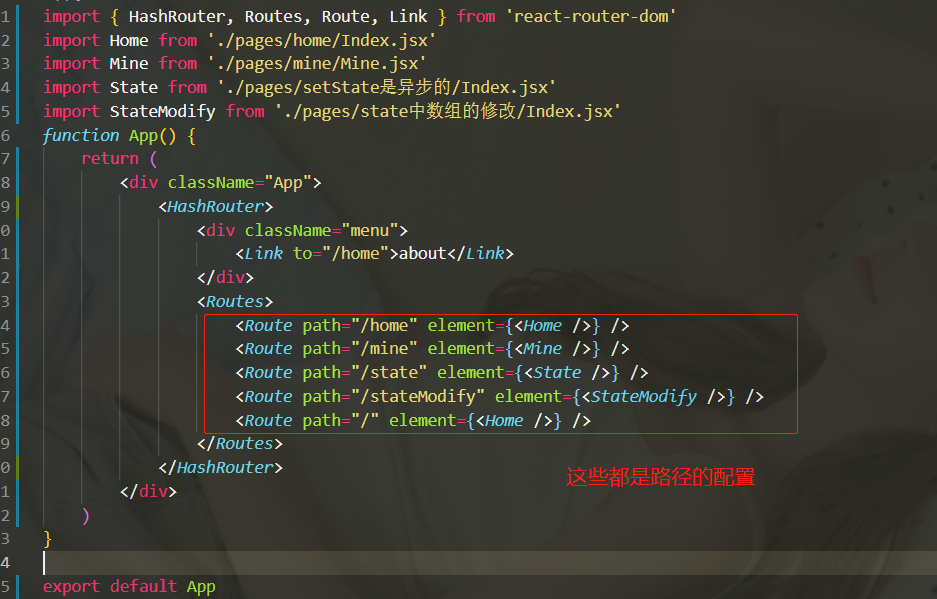
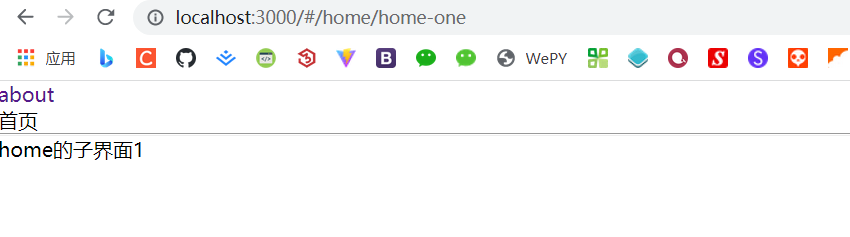
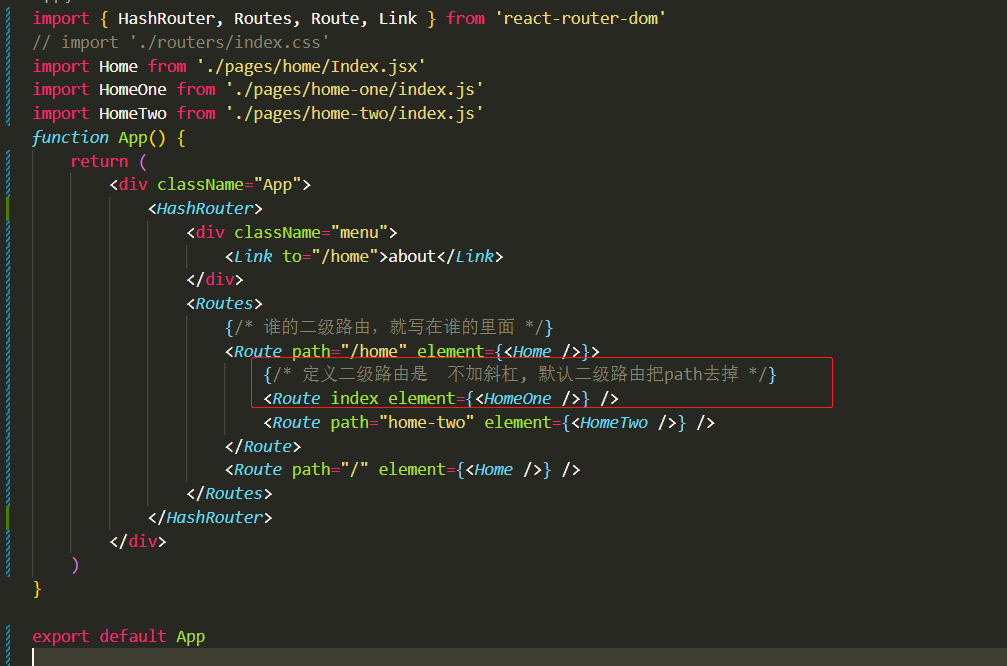
5、二级路由
1)在App.js中配置二级路由
import { HashRouter, Routes, Route, Link } from 'react-router-dom'
import Home from './pages/home/Index.jsx'
import HomeOne from './pages/home-one/index.js'
import HomeTwo from './pages/home-two/index.js'
function App() {
	return (
		<div className="App">
			<HashRouter>
				<div className="menu">
					<Link to="/home">about</Link>
				</div>
				<Routes>
					{/* 谁的二级路由,就写在谁的里面 */}
					<Route path="/home" element={<Home />}>
						{/* 定义二级路由是  不加斜杠 */}
						<Route path="home-one" element={<HomeOne />} />
						<Route path="home-two" element={<HomeTwo />} />
					</Route>
					<Route path="/" element={<Home />} />
				</Routes>
			</HashRouter>
		</div>
	)
}
export default App
2)在一级路页面的写法
// 1、引入
import { Outlet } from "react-router-dom"
export default function Home(){
	return <div>
		首页
		<div>
			<hr />
			{/* home下有二级路由,所以在这写二级路由的出口 */}
			<Outlet />
		</div>
	</div>
}
3)二级路由中的界面
function HomeOne() {
	return <div>home的子界面1</div>
}
export default HomeOne
4)默认选中的二级路由
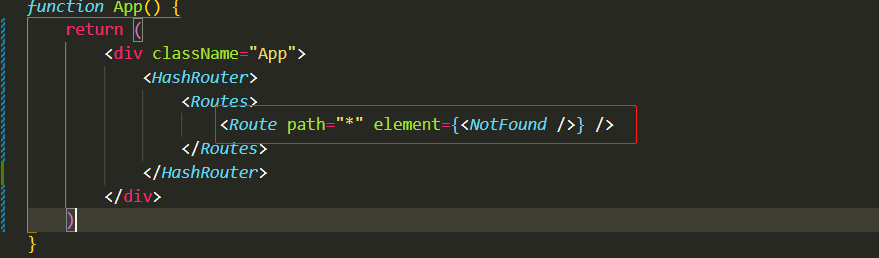
6、404页面配置
1)pages下新建一个404.js文件
function NoFound() {
	return (
		<div>
			<h1>404</h1>
		</div>
	)
}
export default NoFound
2)在路由配置文件中的写法
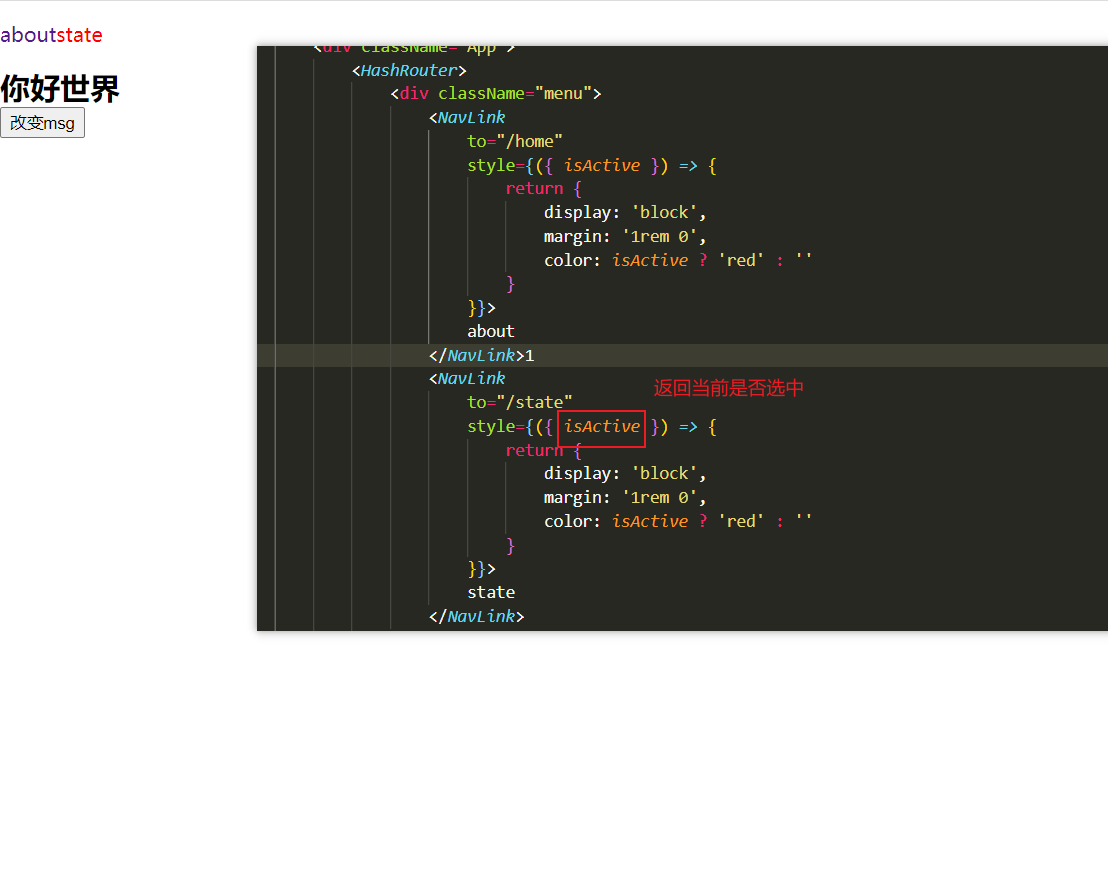
7、匹配当前选中项,要把Link替换成 NavLink
二、hook的学习
注:hook只能在函数式组件中使用;
1、useState的使用
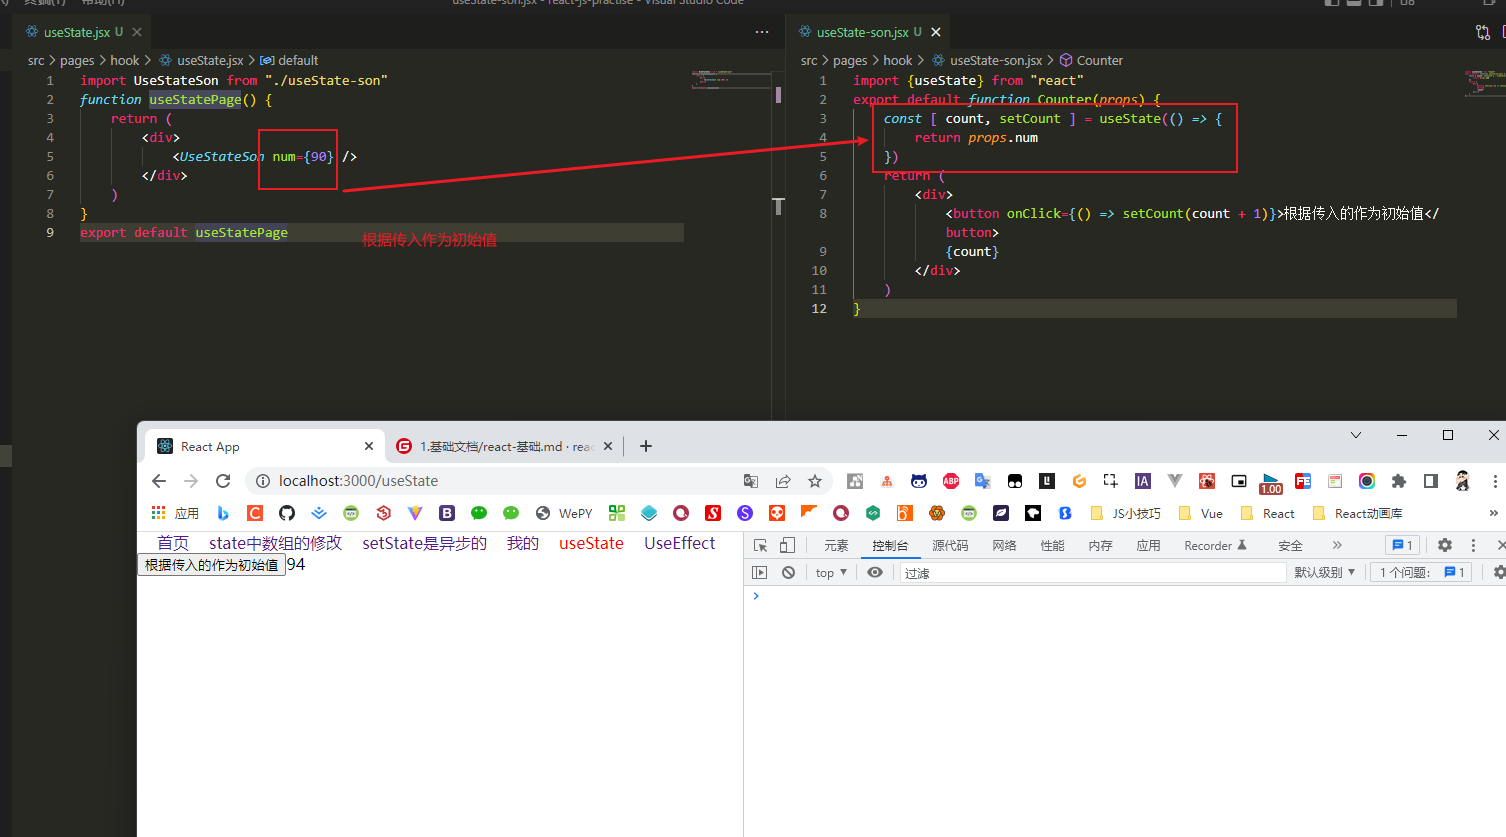
1)简单使用
① useState的参数式初始值
② useState返回的时一个数组,可以结构出来,但是结构类型时固定的
a、第一个元素是 值
b、第二个元素,是一个函数,是用来修改初始值的(基于原值计算,得到新值)
c、num、setNum是一对的 是绑定在一起的,setNum只能修改num,不能修改别的
import { useState } from "react";
function App() {
    const [num, setNum] = useState(0)
    return (
        <div>
            <button onClick={() => setNum(num + 1)}>{num}</button>
        </div>
    )
}
export default App
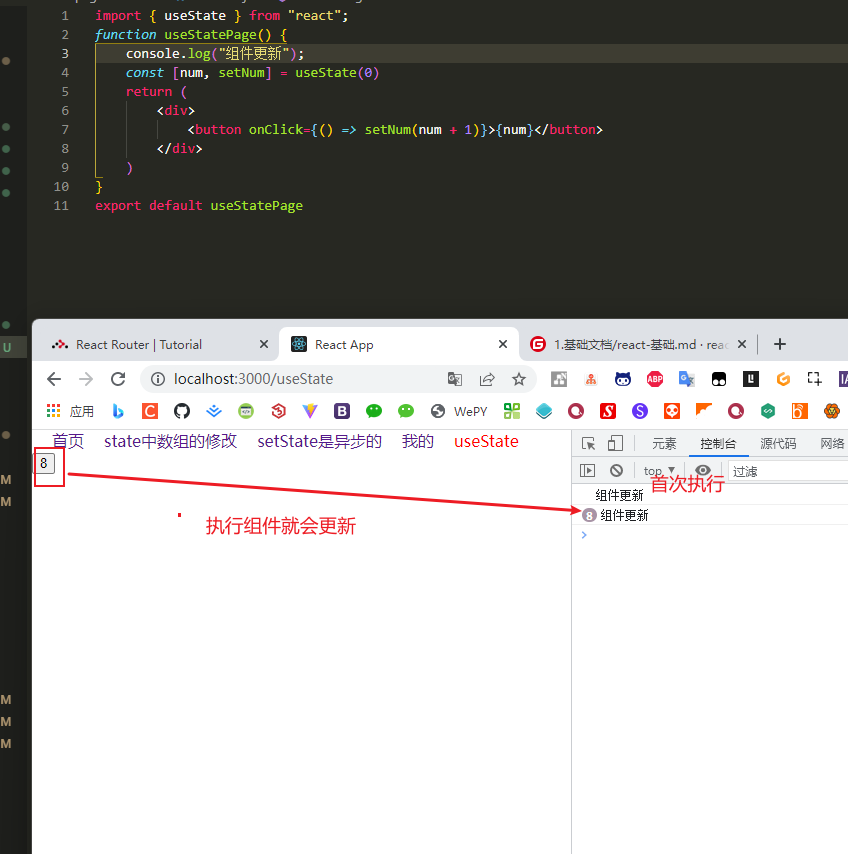
2)useState下组件的更新过程
① 首次渲染,组件内部代码会执行,同时useState也会执行,这个时候 会进行初始值的赋值
② 调用第二个元素(setNum),整App都会重新执行
③ 第二次渲染之后,得到的num值,就是1了,模板会重新渲染,因为react会有一个数据状态记录
3)使用规则
① useState 函数可以执行多次,每次执行互相独立,每调用一次为函数组件提供一个状态
② 不能嵌套在if/for/其它函数中(react按照hooks的调用顺序识别每一个hook)
import { useState } from "react";
function App() {
    console.log("组件更新");
    /**
     * 不能按照斜面这样写(因为这个 和 react内部的运行机制有关)
     */
    if(true) {
        const [num, setNum] = useState(0)
    }
    return (
        <div>
            <button onClick={() => setNum(num + 1)}>{num}</button>
        </div>
    )
}
export default App
4)回调函数的参数
2、useEffect
注:是为了处理函数组件的副作用产生的
函数中除了主作用的,都是副作用(理解成 一个函数只做一件事)
useEffect 是在DOM渲染之后执行
1)基本使用
import { useState, useEffect } from 'react'
export default function App() {
	const [count, setCount] = useState(0)
	/**
	 * 1、做组件更新,副作用函数 会一直更新
	 * 2、useEffect里面第一个参数,是一个回调函数
	 */
	useEffect(() => {
		document.title = '清理副作用' + count
	})
	return (
		<div>
			<button onClick={() => setCount(count + 1)}>{count}</button>
		</div>
	)
}
注:常见的副作用:
① 数据请求
② 手动修改dom
③ localstorage等数据存储
2)执行时机
① 默认无依赖项
会在组件初始化的时候 执行一次,数据更新,他会再次执行
② 第二个参数(添加为空数组)
会在组件渲染的时候,执行一次,但是 数据变化,就不再执行
③ 给第二个参数中加入执行依赖项
import { useState, useEffect } from 'react'
export default function UseEffectPager() {
	const [count, setCount] = useState(0)
	/**
	 * 1、做组件更新,副作用函数 会一直更新
	 * 2、useEffect里面第一个参数,是一个回调函数
	 */
	useEffect(() => {
		document.title = '清理副作用' + count
		// count 改变 上面的就会执行
	}, [count])
	return (
		<div>
			<button onClick={() => setCount(count + 1)}>{count}</button>
		</div>
	)
}
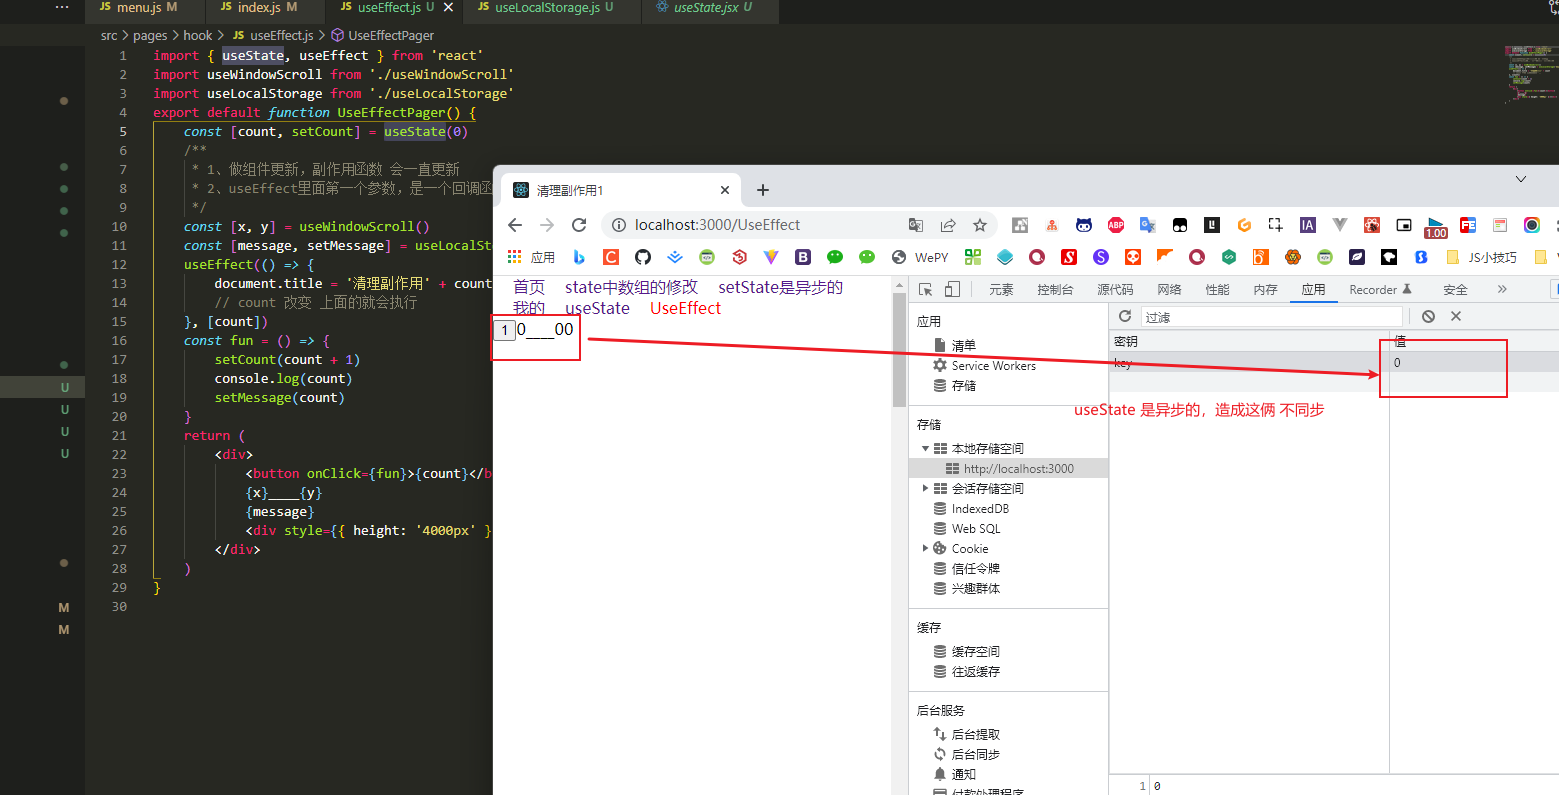
注:在useEffect里面使用了,就应该出现在依赖项数组中
3)清理useEffect的副作用
给useEffect里面写一个定时器,当你销毁组件的时候,这个定时器 并没有销毁
import { useState, useEffect } from 'react'
function Com() {
	useEffect(() => {
		let time = setInterval(() => {
			console.log('定时器')
		}, 1000)
		// 如果 不这样写,这个计时器 就算组件销毁了,他也会以一直执行
        // 这个函数 也就是做一个销毁操作
		return () => {
			clearInterval(time)
		}
	}, [])
	return <div>组件</div>
}

export default function UseEffectSideEffect() {
	const [show, setShow] = useState(true)
	return (
		<div>
			<button onClick={() => setShow(!show)}>组件显示隐藏</button>
			{show ? <Com /> : null}
		</div>
	)
}
3、useRef
1)使用步骤:
导入 useRef 函数
执行 useRef 函数并传入null,返回值为一个对象 内部有一个current属性存放拿到的dom对象(组件实例)
通过ref 绑定 要获取的元素或者组件
useRef 实在DOM渲染之前执行
2)获取页面元素
import { useRef, useEffect } from 'react'
export default function UseRefDom() {
	const dom = useRef(null)
	/**
	 * 获取元素:
	 * 变量.current
	 */
	useEffect(() => {
		console.log(dom.current)
	})
	return <div ref={dom}>元素</div>
}
3)获取组件
注:函数组件不可以使用useRef
可调用组件中的方法
import React, { useRef, useEffect } from 'react'
// 这个Com相当于 一个组件
class Com extends React.Component {
	fun = () => {
		console.log('方法')
	}
	render() {
		return <div>组件</div>
	}
}
export default function UseRefDom() {
	const dom = useRef(null)
	const com = useRef(null)
	/**
	 * 获取元素:
	 * 变量.current
	 */

	useEffect(() => {
		console.log(dom.current)
		com.current.fun()
	})
	return (
		<div>
			<Com ref={com} />
			<p ref={dom}>元素</p>
		</div>
	)
}
4、useContext
import { createContext, useContext } from 'react'
// 1、创建对象(不在同一个文件的时候,可以使用 export导出,在使用import导入)
const Context = createContext()

function ComB() {
    // B组件中也可以使用
	return (
		<div>
			<p>组件B</p>
			<ComC />
		</div>
	)
}
function ComC() {
	// 3、在孙子组件中使用
	const num = useContext(Context)
	return (
		<>
			<p>组件C</p>
			{num}
		</>
	)
}

export default function ComA() {
	return (
		/**
		 * 2、在顶层组件传值:
		 * 使用value传
		 */
		<Context.Provider value={33}>
			<ComB />
		</Context.Provider>
	)
}
注:传入的数据是响应式的。
5、useCallback
防止因为组件重新渲染,导致方法被重新创建 ,起到缓存作用; 只有第二个参数 变化了,才重新声明一次
注:只要方法执行了,他就会 重新创建一遍组件里面的所有内容
import { useCallback } from 'react'
export default function UseCallback() {
	/**
	 * 只有name改变后, 这个函数才会重新声明一次
	 * 如果传入空数组, 那么就是第一次创建后就被缓存, 如果name后期改变了,拿到的还是老的name。
	 * 如果不传第二个参数,每次都会重新声明一次,拿到的就是最新的name.
	 */
	const fun = useCallback(() => {
		console.log(name)
	}, [name])
	return (
		<div>
			<p onClick={fun}>UseCallback {i}</p>
		</div>
	)
}
注:与自己状态无关的时候,还用缓存的函数,与自己有关的时候 就更新函数
6、useMemo
注:useMemo 会执行传入的第一个函数
类似于vue中的计算属性
import React, { useState, useEffect, useMemo } from 'react'
import axios from 'axios'

export default function UseMemo() {
	const [mytext, setmytext] = useState('')
	const [cinemaList, setcinemaList] = useState([])

	useEffect(() => {
		console.log(11)
		axios({
			url: 'https://m.maizuo.com/gateway?cityId=110100&ticketFlag=1&k=7406159',
			method: 'get',
			headers: {
				'X-Client-Info':
					'{"a":"3000","ch":"1002","v":"5.0.4","e":"16395416565231270166529","bc":"110100"}',

				'X-Host': 'mall.film-ticket.cinema.list'
			}
		}).then((res) => {
			console.log(res)
			setcinemaList(res.data.data.cinemas)
		})
	}, [])
	/**
	 * useMemo 可以把第一个参数(函数) 的执行结果返回给 getCinemaList
	 */
	const getCinemaList = useMemo(
		() =>
			cinemaList.filter((item) =>
				item.name.toUpperCase().includes(mytext.toUpperCase())
			),

        // 下面这俩改变,useMemo就会执行
		[cinemaList, mytext]
	)

	return (
		<div>
			<input
				value={mytext}
				onChange={(evt) => {
					setmytext(evt.target.value)
				}}
			/>
			{getCinemaList.map((item) => (
				<dl key={item.cinemaId}>
					<dt>{item.name}</dt>
				</dl>
			))}
		</div>
	)
}

7、useReducer和useContext(减少组件层级)
1)基础使用

import { useReducer } from 'react'
/**
 * dispatch触发的方法
 * @param {*} prevState 得到一个老值
 * @param {*} action 下面dispatch传入的值
 * 一定要有返回值
 */
const reducer = (prevState, action) => {
	// 不能对原状态进行修改(这块也是一个深拷贝)
	let newPrevState = {...prevState}
	switch (action.type) {
		case 'reduce':
			console.log('reduce');
			newPrevState.count--
			return newPrevState
		case 'add':
			console.log('add');
			newPrevState.count++
			return newPrevState
			// 没匹配到返回老的状态
		default:
			console.error('超出边界')
			return prevState || newPrevState.count
	}
}
// 起始状态
const intialState = {
	count: 0
}
export default function ReduceComponentLevel() {
	/**
	 * 1、useReducer里面有两个参数
	 * 函数 :在外部管理状态
	 * 函数:初始值
	 * 返回值:
	 * 第一个是值(state)
	 * 第二个是更新值(dispatch)
	 */
	const [state, dispatch] = useReducer(reducer, intialState)
	return (
		<div>
			<p>减少组件层级</p>
			<button onClick={() => {
				// 他会触发reducer那个方法
                dispatch({ type: 'reduce' })
            }}> - </button>
			<p>{state.count}</p>
			<button onClick={() =>{
				dispatch({ type: 'add' })
			}}> + </button>
		</div>
	)
}
2)跨组件通讯
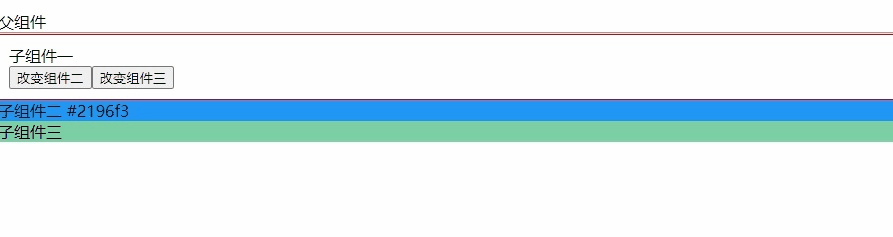
需求:在组件1中修改组件2、组件3的颜色
① 创建一个createContext对象,方便在不同的文件里面引入(以util.js为例)
import { createContext } from 'react'
export const Context = createContext()

export const intialState = {
    a:'#2196f3',
    b:'#7bcfa4'
}
export function reducer(prevState,action){
    console.log(prevState,action);
    let newPrevState = {...prevState}
    switch(action.type){
        case 'change-two':
            newPrevState.a = action.value
            // 注意 这块返回的是对象
            return newPrevState
        case 'change-three':
            newPrevState.b = action.value
            return newPrevState
        default:
            return prevState
    }
}
② 父组件
import { useReducer } from 'react'
// 也可把方法 写在这
import { Context, intialState, reducer } from './utils'
import Children1 from './child1'
import Children2 from './child2'
import Children3 from './child3'
export default function ReduceComponentLevel() {
	/**
	 * 1、useReducer 只能写一个,然后把变量和方法 给里面穿
	 * 只能在hooks中使用
	 */
	const [state, dispatch] = useReducer(reducer, intialState)
	return (
		<div>
			<p>父组件</p>
			<hr />
			{/* 使用createContext给组件传方法和变量 */}
			<Context.Provider value={{ state, dispatch }}>
				<Children1 />
				<Children2 />
				<Children3 />
			</Context.Provider>
		</div>
	)
}
③ 组件一
import { useContext } from 'react'
import { Context } from './utils'
export default function Children1(){
    const { dispatch } = useContext(Context)
    return (
        <div style={{border: '1px solid red', padding: '10px'}}>
            <p>子组件一</p>
            <button onClick={() => { dispatch({ type: 'change-two', value: '#d3db22' }) }}>改变组件二</button>
            <button onClick={() => { dispatch({ type: 'change-three', value: "#22dbcf" }) }}>改变组件三</button>
        </div>
    )
}
④ 组件二
import { useContext } from 'react'
import { Context } from './utils'
export default function Children2(){
    const { state } = useContext(Context)
    return (
        <div>
            <p style={{backgroundColor: state.a}}>子组件二 {state.a}</p>
        </div>
    )
}
⑤ 组件三
import { useContext } from 'react'
import { Context } from './utils'
export default function Children3(){
    const { state } = useContext(Context)
    return (
        <div>
            <p style={{backgroundColor: state.b}}>子组件三</p>
        </div>
    )
}
8、案例
1)获取滚动条距离
/**
 * 获取滚动条距离
 */
import { useState } from 'react'
export default function useWindowScroll() {
	const [x, setX] = useState(0)
	const [y, setY] = useState(0)

	window.addEventListener('scroll', () => {
		const top = document.documentElement.scrollTop
		setX(top)
		const left = document.documentElement.scrollLeft
		setY(left)
	})
	return [x, y]
}
2)同步修改本地数据
import { useState, useEffect } from 'react'
/**
 * 设置localStorage
 * @param {*} key localStorage键
 * @param {*} defaultValue localStorage值
 * @returns
 */
export default function useLocalStorage(key, defaultValue) {
	const [message, setMessage] = useState(defaultValue)
	/**
	 * message或者key变化 都会存
	 */
	useEffect(() => {
		window.localStorage.setItem(key, message)
	}, [key, message])
	/**
	 * message 是值
	 * setMessage 在外面设置值
	 */
	return [message, setMessage]
}
3)页面初次渲染,进行数据请求
import { useEffect } from 'react'
export default function Axios() {
	useEffect(() => {
		console.log(1222)
		fetch(
			'https://mock.mengxuegu.com/mock/60434bccf340b05bceda3906/practise-nuxtjs/test'
		)
			.then((res) => res.json())
			.then((res) => {
				console.log(res)
			})
	})
	return <div>数据请求</div>
}
三、组件间通讯
1、父子组件通讯
1)父组件
import FatherAndSonCom from './fatherAndSon-com'
export default function FatherAndSon() {
return (
<div>
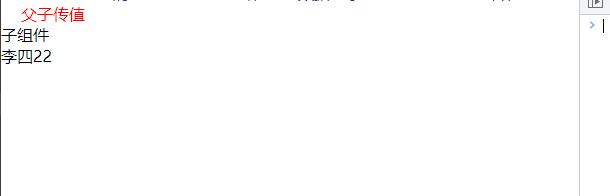
<FatherAndSonCom {...{ name: '李四', age: 22 }} />
<FatherAndSonCom name={'lisi'} age={21} />
</div>
)
}
2)子组件
export default function FatherAndSonCom(props) {
	const { name, age } = props
	return (
		<div>
			<p>子组件</p>
			{name}
			{age}
		</div>
	)
}
数字、字符串、布尔值、数组、对象、函数、JSX(也就是组件)
例:下面函数、JSX(也就是组件)的传递:
父组件:
import FatherAndSonCom from './componentts/fatherAndSon-com'
export default function FatherAndSon() {
	const fun = () => {
		console.log('传入的函数')
	}
	return (
		<div>
			<FatherAndSonCom
				{...{ name: '李四', age: 22 }}
				fun={fun}
				child={<span>传入的组件</span>}
			/>
		</div>
	)
}
子组件:
// 可以在参数处 进行结构赋值
export default function FatherAndSonCom(props) {
	console.log(props)
	const { name, age, fun, child } = props

	return (
		<div>
			<p>子组件</p>
			{name}
			{age}
			<br />
			<button onClick={fun}>触发父的函数</button>
			<br />
			{child}
		</div>
	)
}
2、子传父
1)子组件
export default function ReverseSon({ fun }) {
	return (
		<div>
			<p onClick={() => fun('逆向出传值')}>子组件</p>
		</div>
	)
}
2)父组件(接受)
import ReverseSon from './componentts/reverseSon'
export default function ReverseFather() {
	const fun = (val) => {
		console.log(val)
	}
	return (
		<div>
			<p>父组件</p>
			<ReverseSon fun={fun} />
		</div>
	)
}
3、兄弟组件通讯
/**
 * 真实项目中分开书写
 */
import { useState } from 'react'
// a组件
function A({ str }) {
	return <div>A组件{str}</div>
}
// b组件
function B({ fun }) {
	return <div onClick={() => fun('兄弟通讯')}>B组件</div>
}
// a、b的父组件
export default function Brother() {
	const [str, setStr] = useState('')
	const fun = (str) => {
		console.log(str)
		setStr(str)
	}
	return (
		<>
			<p>父组件</p>
			<br />
			<A str={str} />
			<B fun={fun} />
		</>
	)
}
4、跨组件通信(Context)
注:从父组件开始,可以传递到任意的子层级(忽略嵌套深度)
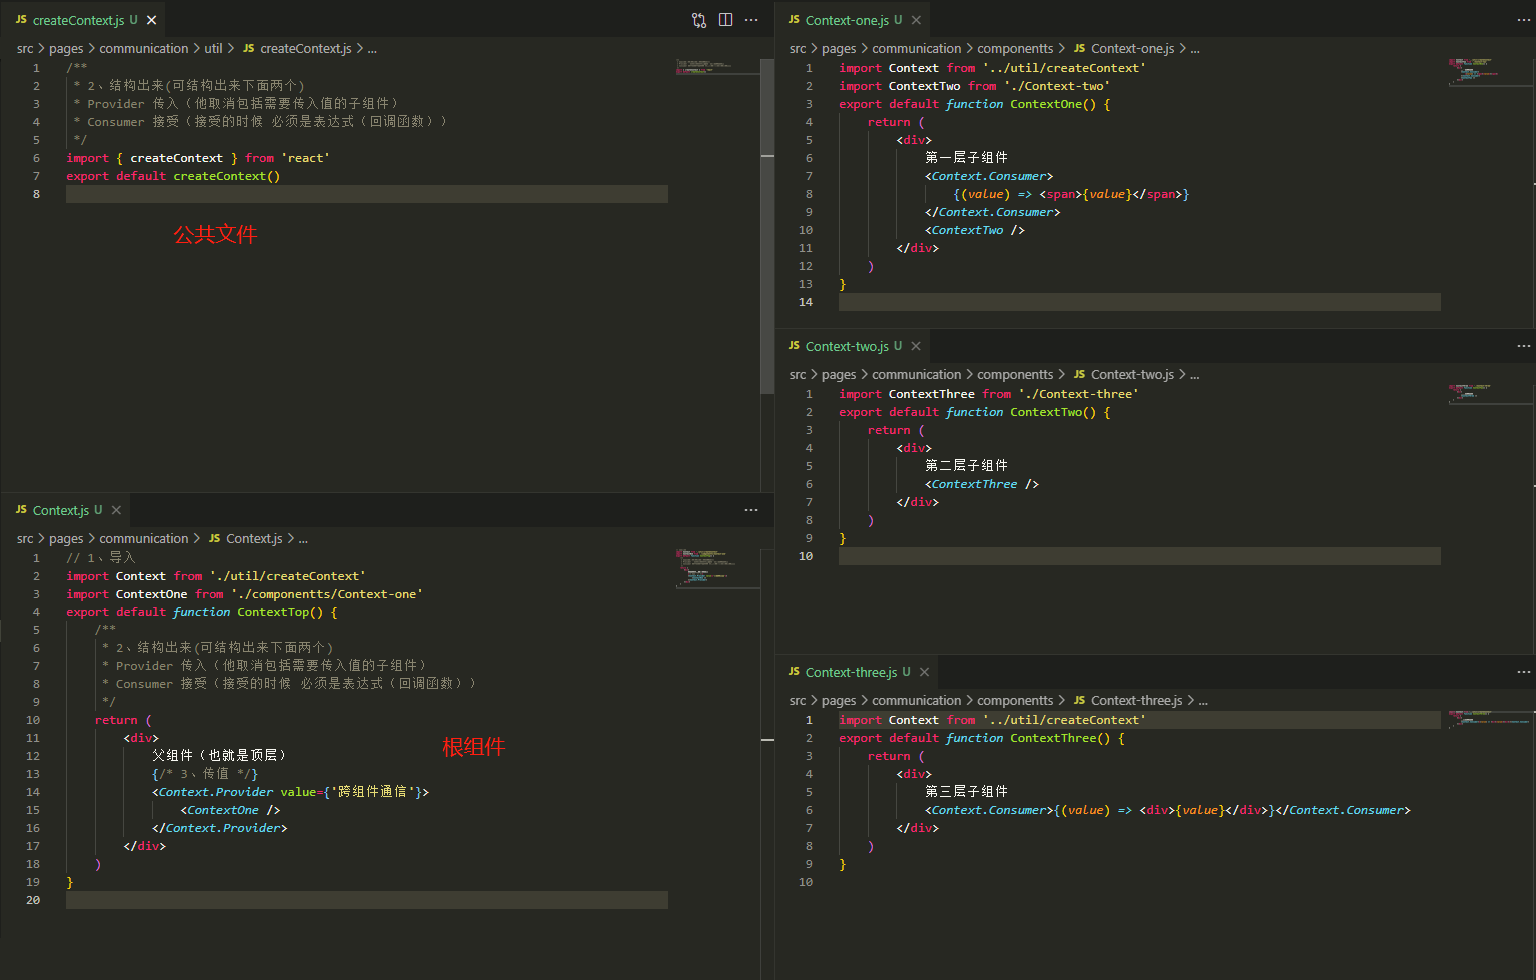
1)创建一个公共文件(context.js),来创建createContext(后面的数据共享,都是基于它)
/**
 * 2、结构出来(可结构出来下面两个)
 * Provider 传入(他取消包括需要传入值的子组件)
 * Consumer 接受(接受的时候 必须是表达式(回调函数))
 */
import { createContext } from 'react'
export default createContext()
2)创建根组件
// 1、导入
import Context from './context.js'
import ContextOne from './Context-one'
export default function ContextTop() {
	return (
		<div>
			父组件(也就是顶层)
			{/* 3、传值 */}
			<Context.Provider value={'跨组件通信'}>
				<ContextOne />
			</Context.Provider>
		</div>
	)
}
3)在组件中使用(可在深层中使用)
import Context from './context.js'
export default function ContextOne() {
	return (
		<div>
			第一层子组件
			<Context.Consumer>
				{(value) => <span>{value}</span>}
			</Context.Consumer>
		</div>
	)
}
例:
5、 props校验
文档:zh-hans.reactjs.org/docs/typech…
1)安装第三方依赖
npm i --save prop-types
2)使用
① 父组件
import PropsSon from './componentts/props-son'
export default function Props() {
	return (
		<div>
			<p>props校验</p>
			<PropsSon list={[1, 3, 5, 6]} />
		</div>
	)
}
②子组件
// 1、引入
import PropTypes from 'prop-types'
export default function PropsSon({ list }) {
	console.log(list)
	return (
		<div>
			<p>props校验</p>
		</div>
	)
}
/**
 * 2、定义传入参数的类型
 */
PropsSon.propTypes = {
	list: PropTypes.array
}
3)四种常见结构:
常见类型:array、bool、func、number、object、string
React元素类型:element
必填项:isRequired
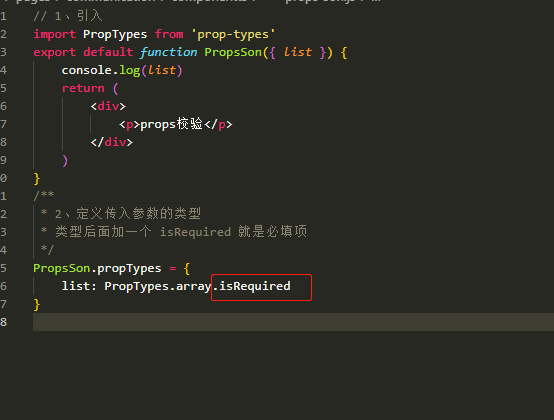
特定的结构对象:shape({})
// 特定结构的对象
传入的参数名: PropTypes.shape({
	color: PropTypes.string,
	fontSize: PropTypes.number
})
6、props默认值
① defaultProps
/**
 * 子组件
 */
export default function PropsSon({ num }) {
	console.log(num)
	return (
		<div>
			<p>{num}</p>
		</div>
	)
}
/**
 * 2、定义传入参数的类型
 * 类型后面加一个 isRequired 就是必填项
 */
PropsSon.defaultProps = {
	num: 22
}
② 函数参数,默认值(推荐)
export default function PropsSon({ num = 2 }) {
	console.log(num)
	return (
		<div>
			<p>{num}</p>
		</div>
	)
}
注:当上面两个都使用的时候,以defaultProps 传值为准。
四、Redux
注:他是js的状态管理,可以用于任何框架
文档:cn.redux.js.org/ (推荐)
www.codebaoku.com/it-js/it-js… www.redux.org.cn/
1、下载
npm install --save redux react-redux redux-devtools-extension redux-thunk
redux 状态管理
react-redux 就是redux将组件分为了ui组件和容器组件两类,自然我们平常写方法,页面啥的就叫ui组件,redux提供的叫容器组件,这俩组件构成了父子组件,大家记住我这说的话,下面会用到
redux-devtools-extension这个特别长的是redux官方提供的可以查看状态的ui插件,让我们在很多组件的情况下,也能知道每个组件的数据情况,非常贴心
redux-thunk这个插件可以让redux拥有使用异步操作的能力,本身redux是不支持异步操作的0
2、基础使用
1)创建一个状态管理文件(src——> redux ——> index.js)
/**
 * 1、引入redux
 */
 import { createStore } from 'redux'
/**
 * 在这定义初始值
 */
const reducer = (prevState = { count: 0 }, action) => {
    let nweCount = {...prevState}
    switch (action.type) {
        case 'add':
            nweCount.count++
            return nweCount
        case 'remove':
            nweCount.count--
            return nweCount
        default:
            return nweCount
    }
}

const store = createStore(reducer)

export default store
2)在页面中使用
注: 下面的方法 可以在不同的页面中进行操作或取值
import { useState } from 'react'
import store  from "../../redux/index.js"
export default function ReduxTest1(){
    const [num, setNum] = useState(store.getState().count || 0 )
    const add = () => {
        store.dispatch({
            type: 'add'
        })
    }
    const reduce = () => {
        store.dispatch({
            type: 'remove'
        })

    }
    // 通知
    store.subscribe(()=>{
        console.log("更新了 就会触发", store.getState().count);
        setNum(store.getState().count);
    })
    return (
        <div>
            <p>计算器</p>
            <button onClick={add}>加</button>
            <p>{ num }</p>
            <button onClick={reduce}>减</button>
        </div>
    )
}

3、reducer的使用
注:也即是 redux模块化
1)在src下创建redux文件夹:
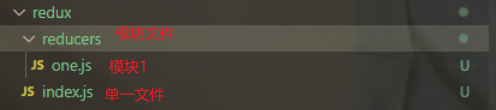
2)模块下的内容redux ——> reducers ——> one.js
/**
 * 在这定义初始值
 */
 const OneReducer = (prevState = { count: 0 }, action) => {
    let nweCount = {...prevState}
    switch (action.type) {
        case 'add':
            nweCount.count++
            return nweCount
        case 'remove':
            nweCount.count--
            return nweCount
        default:
            return nweCount
    }
}
export default OneReducer
3)redux下index.js的内容
/**
 * 1、引入redux
 * combineReducers 是合并reducers 下的内容
 * 可合并多个
 */
 import { createStore, combineReducers } from 'redux'
import OneReducer from './reducers/one.js'
const reducer = combineReducers({
    //获取的时候,要根据这边的命名获取
    OneReducer
})

const store = createStore(reducer)

export default store
4)在页面中使用
import { useState } from 'react'
import store  from "@/redux/index.js"
export default function ReduxTest1(){
    const [num, setNum] = useState(store.getState().OneReducer.count || 0 )
    const add = () => {
        store.dispatch({
            type: 'add'
        })
    }
    const reduce = () => {
        // dispatch 之后,所有的 Redux 都会执行一次
        store.dispatch({
            type: 'remove'
        })

    }
    store.subscribe(()=>{
        console.log("更新了 就会触发", store.getState().OneReducer.count);
        setNum(store.getState().OneReducer.count);
    })
    return (
        <div>
            <p>计算器</p>
            <button onClick={add}>加</button>
            <p>{ num }</p>
            <button onClick={reduce}>减</button>
        </div>
    )
}
4、redux-thunk(中间键的使用)
注:下面的写法是错的,因为异步了
1)给redux中加入中间键
/**
 * 1、引入redux
 * combineReducers 是合并reducer 的
 * applyMiddleware 使用中间件
 */
import { createStore, combineReducers, applyMiddleware } from 'redux'
// 2、引入redux-thunk
import reduxThunk from 'redux-thunk'
import OneReducer from './reducers/one.js'
import ListReducer from './reducers/list.js'
const reducer = combineReducers({
    //获取的时候,要根据这边的命名获取
    OneReducer,
    ListReducer
})
// 3、创建store
const store = createStore(reducer, applyMiddleware(reduxThunk))

export default store
2)创建action,在redux——> action ——> request-list.js
注:这块也可以使用 npm i redux-promise --save
import axios from 'axios'
export default function requestList(){
    // 这个里面 需要返回一个函数(因为外面会传递进来)
    // redux-thunk 会自己执行 一个方法
    return (dispatch) => {
        axios.get('https://mock.mengxuegu.com/mock/60434bccf340b05bceda3906/practise-nuxtjs/list').then(res => {
            console.log(res);
            dispatch({
                type: 'changeList',
                payload: res.data.list
            })
        })
    }
}
3)使用
import { useEffect, useState } from 'react'
import store from '@/redux/index.js'
import requestList from "@/redux/action/request-list.js"
export default function ReduxTest1Details() {
	const [list, setList] = useState(store.getState().ListReducer.list)
	useEffect(() => {
		if(store.getState().ListReducer.list.length === 0) {
			// 4、调用action
			store.dispatch(requestList())
		}else {
			console.log("store.getState().ListReducer.list 缓存");
		}
		// 5、订阅(订阅 每次 都会走)subscribe会返回一个函数
		const  stopSubscribe = store.subscribe(() => {
			console.log(store.getState().ListReducer.list);
			setList(store.getState().ListReducer.list)
		})
		// 6、在离开的时候,取消订阅
		return () => {
			stopSubscribe()
		}
    }, [])
	return (
		<div>
			<p>列表</p>
			{
				list.map((item, index) => {
					return <div key={index}>{item.title}</div>
				})
			}
		</div>
	)
}
5、插件安装
插件安装:
Redux DevTools:github.com/reduxjs/rea…
import { compose } from 'redux'
const composeEnhancers = window.__REDUX_DEVTOOLS_EXTENSION_COMPOSE__ || compose;
/**
 * 如果使用了 redux-promise,写法如下:
 * const store = createStore(reducer,composeEnhancers(applyMiddleware(reduxThunk,reduxPromise)));
 */
const store = createStore(reducer, composeEnhancers(applyMiddleware(reduxThunk)));
五、 react-redux
1、下载
npm i react-redux --save
2、使用
注:这样使用 不存在异步 和 取消订阅
1)在src——> index.js中引入
import React from 'react'
/**
 * 1、使用 Provider 来包裹页面入口文件
 */
import { Provider } from 'react-redux'
import { createRoot } from 'react-dom/client'
// 2、在这 引入redux,因为 react-redux 是基于 redux 使用的
import store from '@/redux/index'
import './index.css'
import App from './App'
createRoot(document.getElementById('root')).render(
    // 3、包裹加 传入
    <Provider store={store} >
        <App />
    </Provider>
)
注:@/redux 下的文件:
2)在界面或者 组件中使用
// 4、引入connect函数
import { connect } from 'react-redux'
function ReactRedux(props) {
    console.log(props)
    return (
        <div>
            <p>react-redux</p>
        </div>
    )
}

/**
 * connect 的第一个参数,必须是有返回值的函数,这 函数 有个形参,可以获取到redux里面定义的内容
 *
 */
export default connect((state) => {
    return {
        a:1,
        b:2,
        state
    }
})(ReactRedux)
3)修改值
// 4、引入connect函数
import { connect } from 'react-redux'
import { add, remove } from '@/redux/action/calculation'
function ReactRedux(props) {
    const plus = () => {
        props.add()
    }
    const reduce = () => {
        props.remove()
    }
    return (
        <div>
            <p>react-redux</p>
            <div>
            <p>计算器</p>
            <button onClick={plus}>加</button>
            <p>{ props.state.OneReducer.count }</p>
            <button onClick={reduce}>减</button>
        </div>
        </div>
    )
}

/**
 * connect 的第一个参数,必须是有返回值的函数,这 函数 有个形参,可以获取到redux里面定义的内容
 * connect 的第er个参数:
 * 是给孩子(ReactRedux)用的回调函数
 *
 */
export default connect((state) => {
    return {
        a:1,
        b:2,
        state
    }
},{ add, remove })(ReactRedux)
4)传参
注:@/redux/action/calculation.js里面的写法:
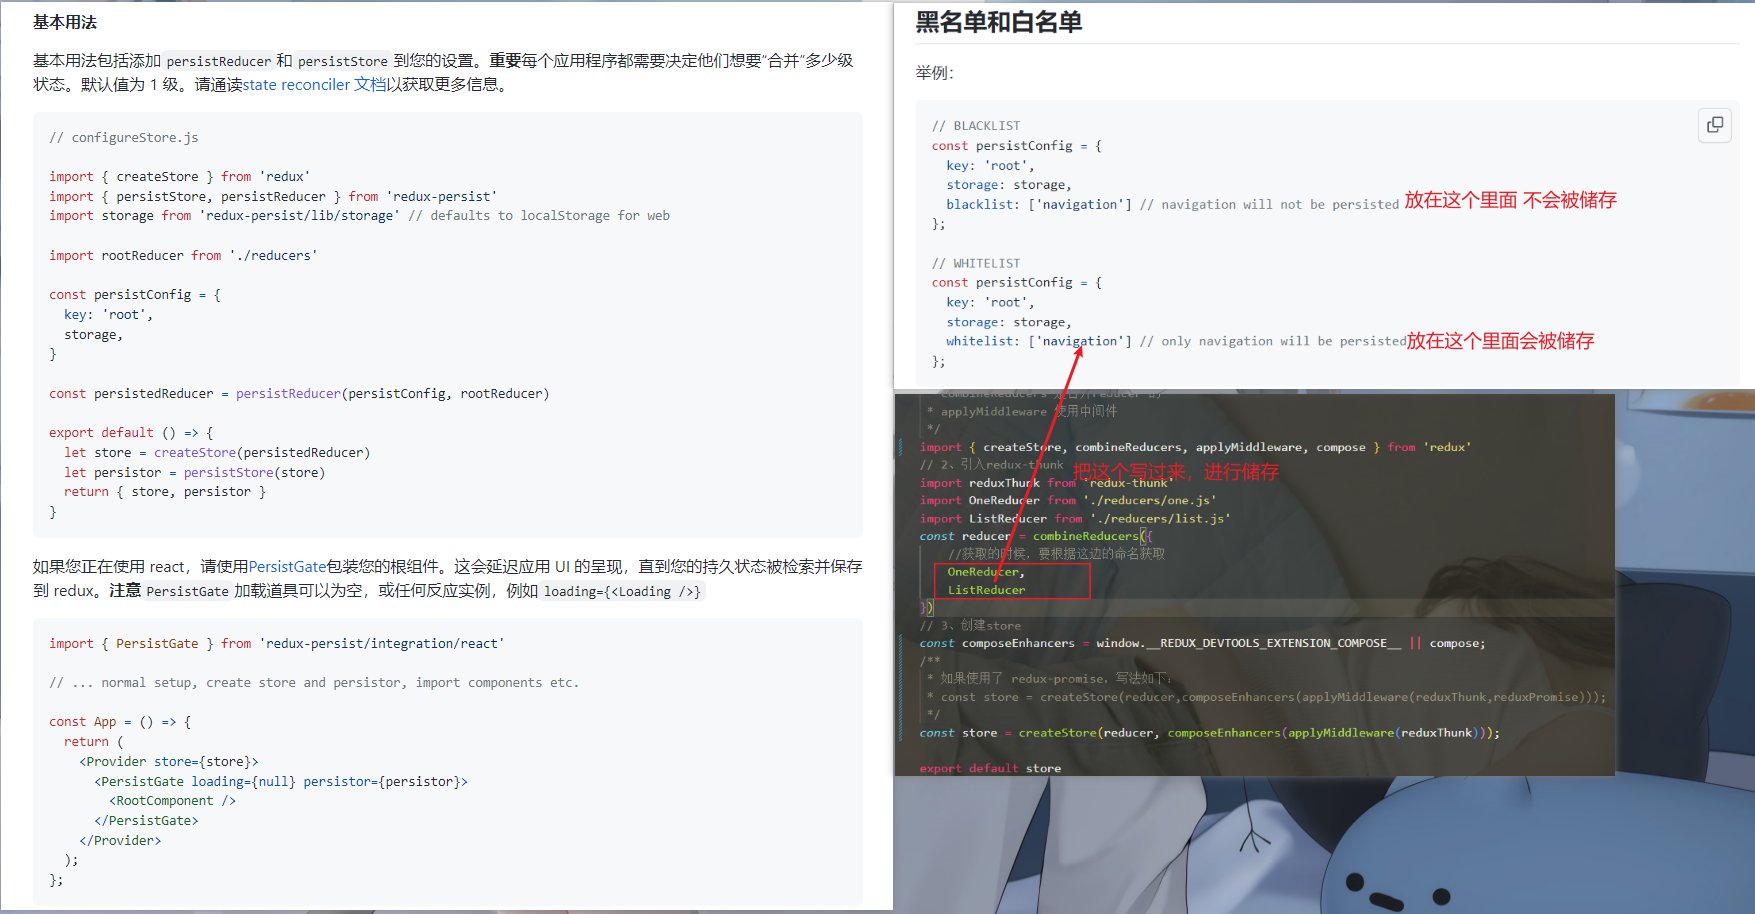
3、 Redux 持久化
npm i redux-persist