

一起养成写作习惯!这是我参与「掘金日新计划 · 4 月更文挑战」的第6天,点击查看活动详情。
1. 认识线程
1.1 什么是线程
一个线程就是一个 "执行流". 每个线程之间都可以按照顺讯执行自己的代码. 多个线程之间 "同时" 执行着多份代码。
还是回到我们之前的银行的例子中。之前我们主要描述的是个人业务,即一个人完全处理自己的业务。我们进一步设想如下场景:
一家公司要去银行办理业务,既要进行财务转账,又要进行福利发放,还得进行缴社保。
如果只有张三一个会计就会忙不过来,耗费的时间特别长。为了让业务更快的办理好,张三又找来两位同事李四、王五一起来帮助他,三个人分别负责一个事情,分别申请一个号码进行排队,自此就有了三个执行流共同完成任务,但本质上他们都是为了办理一家公司的业务。
此时,我们就把这种情况称为多线程,将一个大任务分解成不同小任务,交给不同执行流就分别排队执行。其中李四、王五都是张三叫来的,所以张三一般被称为主线程(Main Thread) 。
1.2 为什么会有线程
a. 首先, "并发编程" 成为 "刚需".
- 单核 CPU 的发展遇到了瓶颈. 要想提高算力, 就需要多核 CPU. 而并发编程能更充分利用多核 CPU资源.
- 有些任务场景需要 "等待 IO", 为了让等待 IO 的时间能够去做一些其他的工作, 也需要用到并发编程.
b. 其次, 虽然多进程也能实现 并发编程, 但是线程比进程更轻量.
- 创建线程比创建进程更快.
- 销毁线程比销毁进程更快.
- 调度线程比调度进程更快.
c.最后, 线程虽然比进程轻量, 但是人们还不满足, 于是又有了 "线程池"(ThreadPool) 和 "协程"(Coroutine) .
1.3 进程和线程的区别
- 进程是包含线程的, 每个进程至少有一个线程存在,即主线程。
- 进程和进程之间不共享内存空间.,同一个进程的线程之间共享同一个内存空间。
- 进程是系统分配资源的最小单位,线程是系统调度的最小单位。
2. 多线程 VS 单线程性能
public class ThreadDemo2 {
    // 总执行次数
    private final static int COUNT = 10;

    public static void main(String[] args) throws InterruptedException {

        // 记录开始执行时间
        long start = System.currentTimeMillis();

        // 使用单线程执行
        singleThread();

        // 记录结束执行时间
        long end = System.currentTimeMillis();
        System.out.println("单线程执行时间:" + (end - start));

        // 使用多线程执行
        multiThread();

        // 记录执行结束时间
        long end2 = System.currentTimeMillis();
        System.out.println("多线程执行时间:" + (end2 - end));
    }

    private static void multiThread() throws InterruptedException {
        // 新线程
        Thread thread = new Thread(() -> {
            for (int i = 0; i < COUNT / 2; i++) {
                try {
                    Thread.sleep(1000);
                    System.out.println("新线程:" + LocalDateTime.now());
                } catch (InterruptedException e) {
                    e.printStackTrace();
                }
            }
        });
        // 开始执行线程
        thread.start();
        // 主线程也进行任务执行
        for (int i = 0; i < COUNT / 2; i++) {
            Thread.sleep(1000);
            System.out.println("主线程:" + LocalDateTime.now());
        }
        // 等待新线程执行完之后
        thread.join();
    }

    private static void singleThread() {
        for (int i = 0; i < COUNT; i++) {
            try {
                // 每次执行方法时间为1s
                Thread.sleep(1000);
            } catch (InterruptedException e) {
                e.printStackTrace();
            }
        }
    }
}
运行结果:
结论 :两个线程同时执行比一个线程效率要高一倍,效率大大提高了,这就是多线程的优势。
3. 线程的创建方式
3.1 创建方式1:继承Thread
public class ThreadDemo3 {
    public static void main(String[] args) {
        // 获得当前线程
        Thread mainThread = Thread.currentThread();
        System.out.println("线程名称:" + mainThread.getName());
        // 新线程
        Thread thread = new MyThread();
        // 开启线程
        thread.start();
    }

    private static class MyThread extends Thread {
        @Override
        public void run() {
            System.out.println("这是一个新线程");
            Thread thread = Thread.currentThread();
            System.out.println("线程名称:" + thread.getName());
            // 让线程休眠一小时
            try {
                Thread.sleep(60 * 60 * 1000);
            } catch (InterruptedException e) {
                e.printStackTrace();
            }
        }
    }
}
运行结果:
3.1.1使用 jconsole 观察线程:
因为 Java 是单继承,继承了 Thread 就不能继承其他类了,然而Java 可以实现多个接口,于是有了下⼀种放式。
3.1.2 启动线程:start 方法
之前我们已经看到了如何通过覆写 run 方法创建⼀个线程对象,但线程对象被创建出来并不意味着线程就开始运行了。
- 覆写 run 方法是提供给线程要做的事情的指令清单。
- 线程对象可以认为是把 李四、王五叫过来了。
- 而调用 start() 方法,就是喊⼀声:”行动起来!“,线程才真正独立去执行了。
调用 start 方法, 才真的在操作系统的底层创建出⼀个线程 。start 方法 run 方法的区别:juejin.cn/post/706475…
3.2 创建方式2:实现 Runnable/及变种
public class ThreadDemo4 {
    public static void main(String[] args) {
        // 创建 Runnable
        MyThread2 myThread2 = new MyThread2();
        // 创建一个线程
        Thread thread = new Thread(myThread2);
        // 启动线程
        thread.start();
    }

    private static class MyThread2 implements Runnable {
        @Override
        public void run() {
            Thread thread = Thread.currentThread();
            System.out.println("线程执行:" + thread.getName());
        }
    }
}
运行结果:
3.2.1 变种方法 1:匿名 Runnable 方式
public class ThreadDemo5 {
    public static void main(String[] args) {
        // 匿名内部类
        Thread thread = new Thread(new Runnable() {
            @Override
            public void run() {
                // 业务代码
                Thread t = Thread.currentThread();
                System.out.println("执行任务:" + t.getName());
            }
        });
        // 启动线程
        thread.start();
    }
}
运行结果:
3.2.2 变种方法 2:匿名方式创建子对象
public class ThreadDemo7 {
    public static void main(String[] args) {
        // 创建线程并初始化
        Thread thread = new Thread() {
            @Override
            public void run() {
                Thread t = Thread.currentThread();
                System.out.println("任务执行:" + t.getName());
            }
        };
        // 开启线程
        thread.start();

    }
}
运行结果:
3.2.3 变种方法 3:使用 Lambda 匿名 Runnable 方式 (支持 JDK 1.8+ 版本,推荐使用)
public class ThreadDemo6 {
    public static void main(String[] args) {
        // 创建线程
        Thread thread = new Thread(() -> {
            // 具体业务
            Thread t = Thread.currentThread();
            System.out.println("任务执行:" + t.getName());
        });
        // 执行线程
        thread.start();
    }
}
运行结果:
3.3 创建方式3:带返回值的 Callable
public class ThreadDemo8 {
    public static void main(String[] args) throws ExecutionException, InterruptedException {
        // 创建 Callable 实例
        MyCallable myCallable = new MyCallable();
        // 用于接收 Callable 结果的对象
        FutureTask<Integer> futureTask = new FutureTask<>(myCallable);
        // 创建新线程
        Thread thread = new Thread(futureTask);
        // 启动线程
        thread.start();
        // 接收新线程执行的结果
        int result = futureTask.get();
        System.out.println(Thread.currentThread().getName() + "新线程返回的结果为:" + result);
    }

    private static class MyCallable implements Callable<Integer> {
        @Override
        public Integer call() {
            // 生成随机数0~9
            int randomNum = new Random().nextInt(10);
            System.out.println(Thread.currentThread().getName() + "随机数" + randomNum);
            return randomNum;
        }
    }
}
运行结果:
也可通过匿名 Callable 实现:
public class ThreadDemo9 {
    public static void main(String[] args) throws ExecutionException, InterruptedException {
        // FutureTask 用于获取线程的执行结果
        FutureTask<String> futureTask = new FutureTask<>(new Callable<String>() {
            @Override
            public String call() throws Exception {
                // 新线程执行的任务代码
                String[] strings = new String[]{"Java", "MySQL", "Python"};
                // 随机返回一个字符串
                String result = strings[new Random().nextInt(3)];
                System.out.println(Thread.currentThread().getName() + "字符串:" + result);
                return result;
            }
        });
        // 创建新线程
        Thread thread = new Thread(futureTask);
        // 启动线程
        thread.start();
        String result = futureTask.get();
        System.out.println(Thread.currentThread().getName() + "新线程的返回值:" + result);
    }
}
运行结果:
3.4 小结
创建线程有 3 大类实现方式、7 种实现方法,如果是 JDK 1.8 以上版本,在不需要获得线程执行结果的情况下,推荐使用 Lambda 方式来创建线程,因为它的写法足够简洁;如果想要获取线程执行结果,可使用 FutureTask + Callable 的方式来实现。
\
4. 线程常见构造方法
具体使用:
Thread t1 = new Thread();
Thread t2 = new Thread(new MyRunnable());
Thread t3 = new Thread("这是我的名字");
Thread t4 = new Thread(new MyRunnable(), "这是我的名字");
线程分组的使用:
public class ThreadDemo12 {
    public static void main(String[] args) {
        // 创建一个线程分组(百米赛跑)
        ThreadGroup threadGroup = new ThreadGroup("thread-group");
        // 定义一个公共的线程任务
        Runnable runTask = new Runnable() {
            @Override
            public void run() {
                // 生成一个1-3的随机数
                int randomNum = (1 + new Random().nextInt(3));
                // 跑了n秒后到达终点
                try {
                    Thread.sleep(1000 * randomNum);
                } catch (InterruptedException e) {
                    e.printStackTrace();
                }
                // 得到执行此线程的方法
                Thread thread = Thread.currentThread();
                System.out.println(thread.getName() + "选手到达终点:" + randomNum + "s");
            }
        };
        // 线程(运动员)
        Thread t1 = new Thread(threadGroup, runTask);
        Thread t2 = new Thread(threadGroup, runTask);
        Thread t3 = new Thread(threadGroup, runTask);

        // 启动线程(开跑)
        t1.start();
        t2.start();
        t3.start();

        // 所有人到达终点后宣布成绩
        while (threadGroup.activeCount() > 0) {
        }
        System.out.println("宣布比赛成绩");
    }
}
5. 线程常用属性
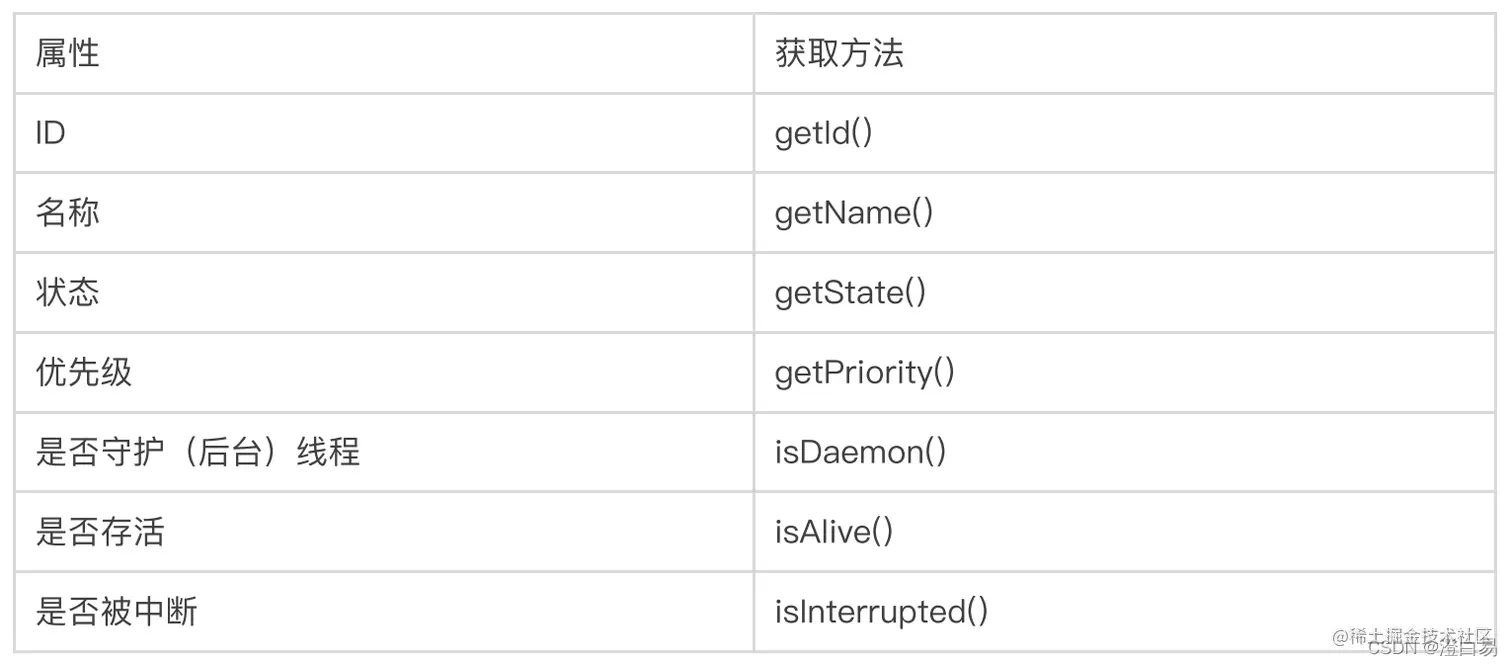

- ID 是线程的唯⼀标识,不同线程不会重复。
- 名称 是各种调试⼯具用到。
- 状态 表示线程当前所处的⼀个情况。
- 优先级 高的线程理论上来说更容易被调度到。
- 关于守护线程(后台线程),需要记住⼀点:JVM会在⼀个进程的所有非后台线程结束后,才会结束运行。
- 是否存活,即简单的理解为 run 方法是否运行结束了。
- 线程的中断问题,下面我们进⼀步说明。
5.1 优先级
优先级是 int 类型值,线程优先级1-10,最小优先级是1,最大优先级是10,默认优先级是5。
示例代码:
public class ThreadDemoByPriority2 {
    private final static int MAX_COUNT = 1000;

    public static void main(String[] args) {
        Thread t1 = new Thread(() -> {
            Thread t = Thread.currentThread();
            int priority = t.getPriority();
            for (int i = 0; i < MAX_COUNT; i++) {
                System.out.println(t.getName() + "线程优先级:" + priority);
            }
        }, "线程1");
        // 设置线程优先级(10)
        t1.setPriority(Thread.MAX_PRIORITY);

        Thread t2 = new Thread(() -> {
            Thread t = Thread.currentThread();
            int priority = t.getPriority();
            for (int i = 0; i < MAX_COUNT; i++) {
                System.out.println(t.getName() + "线程优先级:" + priority);
            }
        }, "线程2");
        // 设置线程优先级(5)
        t2.setPriority(Thread.NORM_PRIORITY);

        Thread t3 = new Thread(() -> {
            Thread t = Thread.currentThread();
            int priority = t.getPriority();
            for (int i = 0; i < MAX_COUNT; i++) {
                System.out.println(t.getName() + "线程优先级:" + priority);
            }
        }, "线程3");
        // 设置线程优先级(1)
        t3.setPriority(Thread.MIN_PRIORITY);

        // 同时启动线程
        t3.start();
        t2.start();
        t1.start();
    }
}
运行结果:
结论 : 同时启动多个线程,多个线程设置了不同的优先级,并不是一定是优先级高的执行完了再执行优先级低的,而是优先级高的线程获取到CPU时间片的概率更大,更容易被调度到。
5.2 守护线程
5.2.1 线程中的分类:
- 用户线程:主线程main默认是用户线程。
- 守护线程(后台线程):为用户线程服务的,用户线程全部结束之后,守护线程会跟随结束。
5.2.2 守护线程应用
JVM 中的垃圾回收器就是典型的守护线程,程序运行的时候它也运行,当满足条件是进行垃圾回收,当所有线程执行完任务终止时它也会随着退出。
守护线程示例:
public class ThreadDemoByDaemon {
    public static void main(String[] args) throws InterruptedException {
        // 得到当前的线程
        Thread thread = Thread.currentThread();
        System.out.println(thread.getName() + "是否是守护线程:" + thread.isDaemon());

        Thread t1 = new Thread(() -> {
            Thread thread1 = Thread.currentThread();
            System.out.println(thread1.getName() + "是否是守护线程:" + thread1.isDaemon());
            // 创建子线程
            Thread tt1 = new Thread(() -> {
                Thread thread2 = Thread.currentThread();
                System.out.println(thread2.getName() + "是否是守护线程:" + thread2.isDaemon());
            }, "子线程的子线程");
            tt1.start();

        }, "子线程");

        // 手动设置为守护线程
        t1.setDaemon(true);
        // 启动线程
        t1.start();

        Thread.sleep(1000);
    }
}
执行结果:
结论 :
- main线程默认是非守护线程(用户线程)。
- 在默认情况下,在用户线程中创建的子线程也是用户线程。
- 在守护线程中创建的子线程也是守护线程。
注意 : 线程的类型不能在线程启动后再进行设置,会发生报错。
5.2.3 用户线程 VS 守护线程
    /**
     * 守护线程
     */
    private static void daemonThread() {
        Thread thread = new Thread(() -> {
            for (int i = 0; i < 10; i++) {
                System.out.println("守护线程执行:" + i);
                try {
                    Thread.sleep(1000);
                } catch (InterruptedException e) {
                    e.printStackTrace();
                }
            }
        });
        // 设置为守护线程
        thread.setDaemon(true);
        thread.start();
    }
运行结果:
    /**
     * 用户线程
     */
    private static void userThread() {
        Thread thread = new Thread(() -> {
            for (int i = 0; i < 10; i++) {
                System.out.println("用户线程执行:" + i);
                try {
                    Thread.sleep(500);
                } catch (InterruptedException e) {
                    e.printStackTrace();
                }
            }
        });
        thread.start();
    }
运行结果:
结论 :
- JVM 会等待所有用户线程执行完之后再退出。
- JVM 不会等待所有守护线程执行完之后再退出。
5.3 是否存活
public class ThreadDemoByAlive {
    public static void main(String[] args) {
        Thread thread = new Thread(() -> {
            for (int i = 0; i < 10; i++) {
                try {
                    Thread.sleep(500);
                } catch (InterruptedException e) {
                    e.printStackTrace();
                }
            }
            System.out.println("1.线程执行完了");
        });
        thread.start();
        while (thread.isAlive()) {
        }
        System.out.println("2.确认执行完了");
    }
}
运行结果:
结论 :isAlive() 方法会判断该线程是否执行完毕,执行完毕才会执行下面代码。
