

一、React组件
1、无状态组件和有状态组件
- 函数组件又叫做无状态组件,类组件又叫做有状态组件
- 状态(state)即数据
- 函数组件没有自己的状态,只负责数据展示(静态的)
- 类组件有自己的状态,负责更新UI,让页面能够跟用户进行交互(动态)
比如:计数器中的值从 0开始,点击按钮,对值进行加1操作,计数器中的值就是 状态。
2、组件中的props特点
-
可以给组件传递任意类型的数据
-
props是只读的对象,只能读取属性的值,无法修改对象
-
注意:使用类组件时,如果写了构造函数,应该将props传递给super(),否则,无法在构造函数中获取到props。
class Hello extends React.Component {
  constructor() {
    super();
    console.log(this.props); // 这里拿不到props,想要拿到,需要在构造函数和super中写入props参数
  }
  // render中的 this.props能够拿到
  render() {
    return (
      <div>
        <span>姓名:{this.props.name}</span>
        <span>年龄:{this.props.age}</span>
      </div>
    );
  }
}

ReactDOM.render(
  <Hello name="zhangsan" age={19} />,
  document.getElementById("root")
);
3、组件之间通讯的三种方式
3.1、父组件传递数据给子组件
- 父组件中要提供传递的state数据
- 在父组件中,给子组件标签添加属性,值为state中的数据
- 子组件中通过props接收父组件中传递的数据
// 父组件
class Parent extends React.Component {
  state = {
    ParentName: "张"
  };
  render() {
    return (
      <div>
        父组件姓名:{this.state.ParentName}
        <Children1 name={this.state.ParentName} />
      </div>
    );
  }
}

// 子组件

class Children1 extends React.Component {
  render() {
    console.log(this.props);
    return <div>子组件接收到父组件的数据:{this.props.name}</div>;
  }
}
ReactDOM.render(<Parent />, document.getElementById("root"));
3.2、子组件传递数据给父组件
思路:利用回调函数,父组件提供回调函数,子组件调用回调函数,并且把将要传递的数据作为回调函数的参数进行传递。
- 父组件提供一个回调函数(用于接收数据)
- 在父组件中,给子组件标签中添加属性,值为父组件中的回调函数(this.回调函数名)
- 在子组件中声明一个函数,然后在子组件的函数中,通过该props调用父组件的回调函数
- 将子组件的数据作为参数传递给父组件的回调函数
- 在子组件中触发点击事件(或者其它事件),执行子组件中声明的函数
class Parent2 extends React.Component {
  state = {
    childName: " "
  };
  // 父组件提供一个回调函数(用于接收数据)
  ParentHandle = data => {
    console.log(data);
    this.setState({
      childName: data
    });
  };
  render() {
    return (
      <div>
        子组件传过来的值:{this.state.childName}
        <Children2 fn={this.ParentHandle} />
      </div>
    );
  }
}

class Children2 extends React.Component {
  state = {
    childName: "张三丰"
  };
  childHandle = () => {
    // 子组件通过该props调用回调函数
    // 将子组件的数据作为参数传递给回调函数
    this.props.fn(this.state.childName);
  };
  render() {
    return (
      <div>
        {/* 在子组件中触发点击事件(或者其它事件),执行子组件中声明的函数 */}
        <button onClick={this.childHandle}>点击我,把名字传递给父组件</button>
      </div>
    );
  }
}
ReactDOM.render(<Parent2 />, document.getElementById("root"));
3.3、兄弟组件之间的通讯
思想:把状态提升到兄弟组件最近的父组件中,让状态变成共享状态。(状态提升)
- 将共享状态提升到最近的公共父组件中,由公共父组件管理这个状态
- 公共父组件要提供共享状态
- 公共父组件要提供操作共享状态的方法
- 兄弟组件中只要通过props接收状态或者调用操作状态的方法
class Parent3 extends React.Component {
  // 公共父组件要提供共享状态
  state = {
    count: 0
  };
  // 公共父组件要提供操作共享状态的方法
  parentHandle = () => {
    this.setState({
      count: this.state.count + 1
    });
  };
  render() {
    return (
      <div>
        <Child1 childCount={this.state.count} />
        <Child2 childFn={this.parentHandle} />
      </div>
    );
  }
}

class Child1 extends React.Component {
  render() {
    // 兄弟组件中只要通过props接收状态
    return <h1>当前计数器的值:{this.props.childCount}</h1>;
  }
}

class Child2 extends React.Component {
  render() {
    return (
      // 兄弟组件中只要通过props调用操作状态的方法
      <button
        onClick={() => {
          this.props.childFn();
        }}
      >
        加1
      </button>
    );
  }
}

ReactDOM.render(<Parent3 />, document.getElementById("root"));
4、Context
Context 提供了一种在组件之间共享此类值的方式,而不必显式地通过组件树的逐层传递 props,(能够跨组件传递数据,解决了组件嵌套很深,传递数据繁琐的问题)
// Context (跨组件传递数据,解决嵌套层级较深的组件传值)

// 使用React.createContext 创建 Provider对象和 Consumer对象
// Provider对象:用来提供数据
// Consumer对象:用来消费数据
const { Provider, Consumer } = React.createContext();

class App extends React.Component {
  render() {
    return (
      <Provider value="color">
        <div>
          <Node />
        </div>
      </Provider>
    );
  }
}
class Node extends React.Component {
  render() {
    return (
      <div>
        <SubNode />
      </div>
    );
  }
}
class SubNode extends React.Component {
  render() {
    return (
      <div>
        <Child />
      </div>
    );
  }
}
class Child extends React.Component {
  render() {
    return <Consumer>{data => <div>{data}</div>}</Consumer>;
  }
}
ReactDOM.render(<App />, document.getElementById("root"));
5.1 children属性
- children属性:表示组件标签的子节点。当组件标签有子节点时,props就会有该属性
- children属性与普通的props一样,值可以是任意值(文本、React元素、组件、函数)
children作为文本节点
class App extends React.Component {
  render() {
    return (
      <div>
        <Node>我是子节点</Node>
      </div>
    );
  }
}

class Node extends React.Component {
  render() {
    console.log(this.props);
    return (
      <div>
        组件中的文本内容是
        {this.props.children}
      </div>
    );
  }
}

ReactDOM.render(<App />, document.getElementById("root"));
children作为组件
// children 作为组件
class App extends React.Component {
  render() {
    console.log(this.props);
    return <div>{this.props.children}</div>;
  }
}

class Node extends React.Component {
  render() {
    return <div>我是Node组件</div>;
  }
}

ReactDOM.render(
  <App>
    <Node />
  </App>,
  document.getElementById("root")
);
children作为函数
// children作为函数
class App extends React.Component {
  render() {
    console.log(this.props);
    return <div>{this.props.children()}</div>;
  }
}

const handle = () => {
  console.log("hello");
};

ReactDOM.render(<App>{handle}</App>, document.getElementById("root"));
5.2 props 校验
前提:
- 对于组件来说,props是外来的,无法保证组件使用者传入什么格式的数据
- 如果传入的数据格式不对,可能会导致组件内部报错
- 关键问题:组件的使用者不知道明确的错误原因
解决办法:
props 校验:允许在创建组件的时候,就制定 props 的类型、格式等
作用:捕获使用组件时因 props 导致的错误,给出明确的错误提示信息,增加组件的健壮性。
步骤:
- 安装 prop-types包,
yarn add prop-types或npm i prop-types - 导入 prop-types包
import PropTypes from "prop-types"; - 使用组件名.propTypes = {} 来给组件的props添加校验规则
- 校验规则通过PropTypes对象来指定
函数形式
// 函数形式
const App = props => {
  const arr = props.colors;
  const lis = arr.map((item, index) => <li key={index}>{item}</li>);
  return (
    <div>
      <ul>{lis}</ul>;
    </div>
  );
};
// 注意:这里的 propTypes 中的开头的p是小写的。
App.propTypes = {
  // 意:这里的PropTypes 的 P 是大写的,是引入上面的。
  colors: PropTypes.array
};
ReactDOM.render(
  <App colors={["red", "pink"]} />,
  document.getElementById("root")
);
组件形式
// Props 校验
// 1、安装和导入 prop-types包
// 2、使用组件名.propTypes = {} 来给组件的props添加校验规则
// 3、校验规则通过PropTypes对象来指定

import PropTypes from "prop-types";

class App extends React.Component {
  //   state = {
  //     arr: this.props.colors
  //   };
  render() {
    const arr = this.props.colors;
    return (
      <div>
        <ul>
          {/* {this.state.arr.map((item, index) => (
            <li key={index}>{item}</li>
          ))} */}
          {arr.map((item, index) => (
            <li key={index}>{item}</li>
          ))}
        </ul>
      </div>
    );
  }
}
// 注意:这里的PropTypes,跟函数形式不太一样。
App.defaultProps = {
  colors: PropTypes.array
};

ReactDOM.render(
  <App colors={["red", "pink"]} />,
  document.getElementById("root")
);
5.3 props的默认值
使用场景:比如:分页功能,用来显示条数
// props的默认值
const App = (props) => {
  return (
    <div>
      <h1>props的默认值是:{props.PageSize}</h1>
    </div>
  );
};
App.defaultProps = {
  PageSize: 30,
};
ReactDOM.render(<App />, document.getElementById("root"));
二、React组件的生命周期
组件的生命周期:组件从被创建到挂载到页面中运行,再到组件不用时卸载的整个过程。
生命周期的每个阶段总是伴随着一些方法的调用,这些方法就是生命周期的钩子函数。
钩子函数的作用:为开发人员在不同阶段操作组件提供了时机。
只有类组件才有生命周期,函数组件没有生命周期。
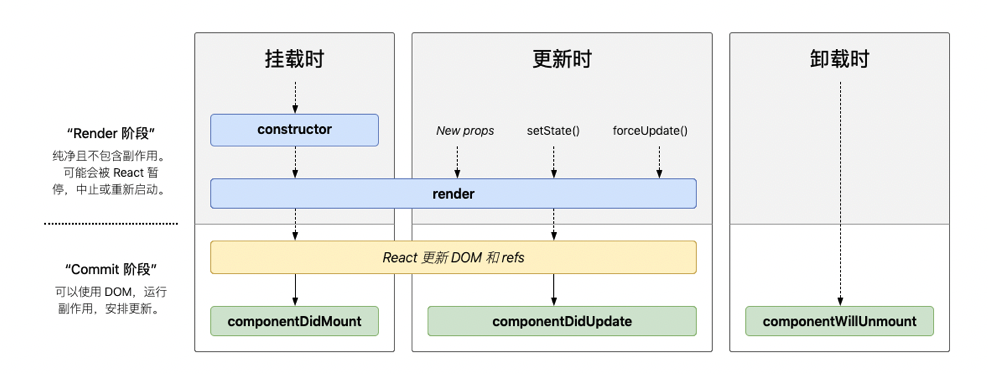
1、挂载阶段的钩子函数
| 钩子函数 | 触发时机 | 作用 |
|---|---|---|
| constructor | 创建组件时,最先执行 | 1、初始化state 2、为事件处理程序绑定this |
| render | 每次组件渲染都会触发 | 1、渲染UI< 2、注意:在render钩子函数中,不能调用setState() 因为setSate(),能够更新state,也能更新UI,只要调用setSate(),就会调用render更新UI,如果再render中再调用setSate()这样就会出现递归更新,导致报错) |
| componentDidMount | 组件挂载(完成DOM渲染)后执行 | 1、发送网络请求 2、DOM操作 |
2、更新阶段的钩子函数
| 执行时机 |
|---|
| 1、组件接收到新的props会触发render,更新UI |
| 2、调用setSate()会触发render,更新UI |
| 3、调用forceUpdate()会强制触发render,更新UI |
以上任意一种变化,组件都会重新渲染
| 钩子函数 | 触发时机 | 作用 |
|---|---|---|
| render | 每次组件渲染都会触发 | 1、渲染UI |
| componentDidUpdate | 组件更新(完成DOM渲染)后执行 | 1、发送网络请求 2、DOM操作 3、注意:如果要调用setState()必须放在一个if条件中,因为在此钩子中调用 setState()也会递归更新 |
componentDidUpdate(prevProps){
	console.log(prevProps)
	console.log(this.props)
}
if(prevProps.name !=== this.props.name){
	this.setState({})
}
3、卸载阶段的钩子函数
| 钩子函数 | 触发时机 | 作用 |
|---|---|---|
| componentWillUnmount | 组件卸载(从页面消失) | 执行清理,比如清理定时器 |
三、React组件复用
React组件复用:把多个组件中部分功能相似或者相同的状态或者逻辑进行复用。(复用:state和操作state的方法)。
复用的方式:
- render props模式
- 高阶组件(HOC)
1、render props模式
// 组件的复用
// render props模式
class Mouse extends React.Component {
  state = {
    x: 0,
    y: 0,
  };
  handleMouseMove = (event) => {
    this.setState({
      x: event.clientX,
      y: event.clientY,
    });
  };
  // 监听鼠标的移动事件
  componentDidMount() {
    window.addEventListener("mouseover", this.handleMouseMove);
  }
  render() {
    // return null;
    return this.props.render(this.state);
  }
}

class App extends React.Component {
  render() {
    return (
      <div>
        <h1>render props 模式</h1>
        <Mouse
          render={(mouse) => {
            return (
              <div>
                鼠标的位置{mouse.x} {mouse.y}
              </div>
            );
          }}
        />

 				<Mouse
          render={(mouse) => {
            return (
              <div>
                <img
                  src={logo}
                  alt=""
                  style={{
                    position: "absolute",
                    left: mouse.x - 96,
                    top: mouse.y - 96,
                  }}
                />
              </div>
            );
          }}
        />

      </div>
    );
  }
}
ReactDOM.render(<App />, document.getElementById("root"));
用children替代render(推荐)
import logo from "./assets/logo192.png";
// 组件的生命周期

// class App extends React.Component {
//   constructor() {
//     super();
//   }

// }
// Props 校验
// 1、安装和导入 prop-types包
// 2、使用组件名.propTypes = {} 来给组件的props添加校验规则
// 3、校验规则通过PropTypes对象来指定

import PropTypes from "prop-types";
// 组件的复用
// render props模式
class Mouse extends React.Component {
  state = {
    x: 0,
    y: 0,
  };
  handleMouseMove = (event) => {
    this.setState({
      x: event.clientX,
      y: event.clientY,
    });
  };
  // 监听鼠标的移动事件
  componentDidMount() {
    window.addEventListener("mouseover", this.handleMouseMove);
  }
  componentWillUnmount() {
    window.removeEventListener("mouseover", this.handleMouseMove);
  }
  render() {
    // return null;
    // return this.props.render(this.state);
    return this.props.children(this.state);
  }
}
Mouse.propTypes = {
  children: PropTypes.func.isRequired,
};

class App extends React.Component {
  render() {
    return (
      <div>
        <h1>render props 模式</h1>
        {/* <Mouse
          render={(mouse) => {
            return (
              <div>
                鼠标的位置{mouse.x} {mouse.y}
              </div>
            );
          }}
        /> */}

        {/* <Mouse
          render={(mouse) => {
            return (
              <div>
                <img
                  src={logo}
                  alt=""
                  style={{
                    position: "absolute",
                    left: mouse.x - 96,
                    top: mouse.y - 96,
                  }}
                />
              </div>
            );
          }}
        /> */}

        <Mouse>
          {(mouse) => {
            return (
              <div>
                鼠标的位置{mouse.x} {mouse.y}
              </div>
            );
          }}
        </Mouse>
        <Mouse>
          {(mouse) => {
            return (
              <div>
                <img
                  src={logo}
                  alt=""
                  style={{
                    position: "absolute",
                    left: mouse.x - 96,
                    top: mouse.y - 96,
                  }}
                />
              </div>
            );
          }}
        </Mouse>
      </div>
    );
  }
}
ReactDOM.render(<App />, document.getElementById("root"));
2、高阶组件(HOC)
目的:实现状态逻辑复用
高阶组件(HOC,Higher-Order Components)是一个函数,接收一个要包装的组件,返回一个增强后的组件
高阶组件内部创建一个类组件,在这个类组件中,提供复用的状态逻辑代码,通过props将复用的状态传递给被包装组件WrappedComponent
const EnhancedComponent = higherOrderComponent(WrappedComponent);
高阶组件的使用步骤
1、创建一个函数,名称以hoc开头
2、指定函数参数,参数应该以大写字母开头(作为要渲染的组件)
3、在函数内部创建一个类组件,提供复用的状态逻辑代码,并返回该类组件。
4、在该组件中,渲染参数组件,同时将状态通过props传递给参数组件
5、调用高阶组件,传入要增强的组件,通过返回值拿到增强后的组件,并将其渲染到页面中
// 高阶组件
// 1、创建一个函数,名称以hoc开头
// 2、指定函数参数,参数应该以大写字母开头(作为要渲染的组件)
const hocMouse = (WrappedComponent) => {
  // 3、在函数内部创建一个类组件,提供复用的状态逻辑代码,并返回该类组件。
  class Mouse extends React.Component {
    // 鼠标状态
    state = {
      x: 0,
      y: 0,
    };
    handleMouseMove = (e) => {
      this.setState({
        x: e.clientX,
        y: e.clientY,
      });
    };
    // 控制鼠标状态的逻辑
    componentDidMount() {
      window.addEventListener("mousemove", this.handleMouseMove);
    }
    // 解绑事件
    componentWillUnmount() {
      window.removeEventListener("mousemove", this.handleMouseMove);
    }
    render() {
      return (
        <div>
         {/* 4、在该组件中,渲染参数组件,同时将状态通过props传递给参数组件 */}
          <WrappedComponent {...this.state}></WrappedComponent>
        </div>
      );
    }
  }
  // 返回类组件
  return Mouse;
};
// 测试高阶组件
const PagePosition = (props) => {
  return (
    <div>
      鼠标当前位置:x:{props.x},y:{props.y}
    </div>
  );
};
// 图片定位
const PageCatPosition = (props) => (
  <img
    src={logo}
    alt=""
    style={{
      position: "absolute",
      left: props.x - 96,
      top: props.y - 96,
    }}
  />
);
// 5、调用高阶组件,传入要增强的组件,通过返回值拿到增强后的组件,并将其渲染到页面中
const MousePage = hocMouse(PagePosition);
const PageCat = hocMouse(PageCatPosition);

class App extends React.Component {
  render() {
    return (
      <div>
        <h1>高阶组件的运用</h1>
        {/* 渲染增强后的组件 */}
        <MousePage></MousePage>
        <PageCat></PageCat>
      </div>
    );
  }
}
ReactDOM.render(<App />, document.getElementById("root"));
高阶组件传递props
在改动代码:
<WrappedComponent {...this.state} {...this.props}></WrappedComponent>增加
{...this.props}
const hocMouse = (WrappedComponent) => {
  // 在内部创建类组件,在类组件中提供复用状态逻辑
  class Mouse extends React.Component {
    // 鼠标状态
    state = {
      x: 0,
      y: 0,
    };
    handleMouseMove = (e) => {
      this.setState({
        x: e.clientX,
        y: e.clientY,
      });
    };
    // 控制鼠标状态的逻辑
    componentDidMount() {
      window.addEventListener("mousemove", this.handleMouseMove);
    }
    // 解绑事件
    componentWillUnmount() {
      window.removeEventListener("mousemove", this.handleMouseMove);
    }
    render() {
      console.log(this.props);
      return (
        <div>
          <WrappedComponent {...this.state} {...this.props}></WrappedComponent>
        </div>
      );
    }
  }
  Mouse.displayName = `hocMouse${getDisplayName(WrappedComponent)}`;
  // 返回类组件
  return Mouse;
};

const getDisplayName = (WrappedComponent) => {
  return WrappedComponent.displayName || WrappedComponent.name || "Component";
};
// 测试高阶组件
const PagePosition = (props) => {
  console.log(props);
  return (
    <div>
      鼠标当前位置:x:{props.x},y:{props.y}
    </div>
  );
};
// 图片定位
const PageCatPosition = (props) => (
  <img
    src={logo}
    alt=""
    style={{
      position: "absolute",
      left: props.x - 96,
      top: props.y - 96,
    }}
  />
);
const MousePage = hocMouse(PagePosition);
const PageCat = hocMouse(PageCatPosition);
class App extends React.Component {
  render() {
    return (
      <div>
        <h1>高阶组件的运用</h1>
        {/* 渲染增强后的组件 */}
        <MousePage a="1"></MousePage>
        <PageCat></PageCat>
      </div>
    );
  }
}
ReactDOM.render(<App />, document.getElementById("root"));
四、React原理
1、setState() 说明
-
setState() 是异步更新数据的
-
可以多次调用setState(),但是只会触发一次render(重新渲染)
class App extends React.Component {
  state = {
    num: 0,
  };
  handleAdd = () => {
    // 异步,多次调用this.setState,里面的num不能累加
    this.setState({
      num: this.state.num + 1,
    });
    this.setState({
      num: this.state.num + 1,
    });
    console.log(this.state.num);
  };
  render() {
    return (
      <div>
        <h2>当前的值为:{this.state.num}</h2>
        <button onClick={this.handleAdd}>+1</button>
      </div>
    );
  }
}
ReactDOM.render(<App />, document.getElementById("root"));
- 推荐语法
class App extends React.Component {
  state = {
    num: 0,
  };
  handleAdd = () => {
    // 推荐使用该语法:该语法也是异步的,但是多次调用this.setState,里面的num是累加的。
    // state:表示最新的state
    // props: 表示最新的props
    this.setState((state, props) => {
      return {
        num: state.num + 1,
      };
    });
    this.setState((state, props) => {
      return {
        num: state.num + 1,
      };
    });
    console.log(this.state.num);
  };
  render() {
    return (
      <div>
        <h2>当前的值为:{this.state.num}</h2>
        <button onClick={this.handleAdd}>+1</button>
      </div>
    );
  }
}
ReactDOM.render(<App />, document.getElementById("root"));
- setState() 的第二个参数
setState({},callback)
class App extends React.Component {
  state = {
    num: 0,
  };
  handleAdd = () => {
    // 推荐使用该语法:该语法也是异步的,但是多次调用this.setState,里面的num是累加的。
    // state:表示最新的state
    // props: 表示最新的props
    this.setState(
      (state, props) => {
        return {
          num: state.num + 1,
        };
      },
      () => {
        console.log(this.state.num); // 这里的num 跟页面中num值是同步的。
      }
    );

    console.log(this.state.num); // 0
  };
  // componentDidUpdate钩子函数的执行,提前于  this.setState执行
  componentDidUpdate() {
    console.log("componentDidUpdate", this.state.num); // 这里的num 跟页面中num值是同步的。
  }
  render() {
    return (
      <div>
        <h2>当前的值为:{this.state.num}</h2>
        <button onClick={this.handleAdd}>+1</button>
      </div>
    );
  }
}
ReactDOM.render(<App />, document.getElementById("root"));
结论:
- componentDidUpdate钩子函数的执行,提前于 this.setState执行,this.setState的第二个参数的执行效果跟componentDidUpdate钩子函数的执行效果都是一样的。
2、组件更新机制
2.1 setState() 两个作用
- 修改state
- 更新UI(组件)
2.2 组件更新过程
父组件更新时,也会更新当前父组件中所有的子组件,不会影响父组件的父组件更新,也不会影响父组件的兄弟组件更新。
2.3 避免不必要的更新渲染
组件的更新机制:父组件的更新会引起子组件的更新。
上面的问题:当子组件没有任何变化时也会进行更新。
解决办法:使用钩子函数shouldComponentUpdate(nextProps, nextState)
使用shouldComponentUpdate()可以让React知道当前状态或属性的改变是否不影响组件的输出,通过返回值决定该组件是否重新渲染,默认返回ture表示重新渲染,返回false时不会重新渲染,而且该方法并不会在初始化渲染或当使用forceUpdate()时被调用。
使用 shouldComponentUpdate(nextProps, nextState) 中的 nextState,避免不必要的更新渲染
class App extends React.Component {
  state = {
    num: 0,
  };
  handleAdd = () => {
    this.setState(() => {
      return {
        num: Math.floor(Math.random() * 3),
      };
    });
  };
  shouldComponentUpdate(nextProps, nextState) {
    // nextState : 最新状态
    // this.state: 当前状态
    console.log("nextState", nextState, "this.state", this.state);
    /* if (nextState.num == this.state.num) {
      return false;
    }
    return true; */
    // 以上简写成
    return nextState.num !== this.state.num;
  }
  render() {
    console.log("重新渲染");
    return (
      <div>
        <h2>当前的值为{this.state.num}</h2>
        <button onClick={this.handleAdd}>加1</button>
      </div>
    );
  }
}
ReactDOM.render(<App />, document.getElementById("root"));
触发时机:更新阶段的钩子函数,组件重新渲染前执行(shouldComponentUpdate --> render)
使用 shouldComponentUpdate(nextProps, nextState) 中的 nextProps,避免不必要的更新渲染
class App extends React.Component {
  state = {
    num: 0,
  };
  handleAdd = () => {
    this.setState(() => {
      return {
        num: Math.floor(Math.random() * 3),
      };
    });
  };
  render() {
    return (
      <div>
        <NumData num={this.state.num}></NumData>
        <button onClick={this.handleAdd}>加1</button>
      </div>
    );
  }
}
class NumData extends React.Component {
  shouldComponentUpdate(nextProps) {
    console.log("nextProps", nextProps, "this.props", this.props);
    return nextProps.num !== this.props.num;
  }
  render() {
    console.log("重新渲染");
    return <h2>当前的值为{this.props.num}</h2>;
  }
}
ReactDOM.render(<App />, document.getElementById("root"));
2.4 纯组件(PureComponent)
PureComponent中自动实现了shouldComponentUpdate钩子函数,更加方便
PureComponent原理:纯组件内部通过分别对比props、state的值,来决定是否重新渲染组件
class App extends React.PureComponent {
  state = {
    num: 0,
  };
  handleAdd = () => {
    this.setState(() => {
      return {
        num: Math.floor(Math.random() * 3),
      };
    });
  };

  render() {
    console.log("重新渲染");
    return (
      <div>
        <h2>当前的值为{this.state.num}</h2>
        <button onClick={this.handleAdd}>加1</button>
      </div>
    );
  }
}
ReactDOM.render(<App />, document.getElementById("root"));
class App extends React.Component {
  state = {
    num: 0,
  };
  handleAdd = () => {
    this.setState(() => {
      return {
        num: Math.floor(Math.random() * 3),
      };
    });
  };

  render() {
    console.log("重新渲染");
    return (
      <div>
        <NumData num={this.state.num}></NumData>
        <button onClick={this.handleAdd}>加1</button>
      </div>
    );
  }
}
class NumData extends React.PureComponent {
  render() {
    return <h2>当前的值为{this.props.num}</h2>;
  }
}
ReactDOM.render(<App />, document.getElementById("root"));
纯组件内部对比的是 shallow compare(浅层对比),对于数值类型是可以,但是对于引用类型就会出现问题
注意:props或state属性值为引用类型时,应该创建新数据,不要直接修改原数据
class App extends React.PureComponent {
  state = {
    obj: {
      num: 0,
    },
  };
  handleAdd = () => {
    // 创建新的对象
    const newObj = { ...this.state.obj, num: Math.floor(Math.random() * 3) };
    this.setState(() => {
      return {
        obj: newObj,
      };
    });
  };

  render() {
    console.log("重新渲染");
    return (
      <div>
        <h2>当前的值为{this.state.obj.num}</h2>
        <button onClick={this.handleAdd}>加1</button>
      </div>
    );
  }
}
ReactDOM.render(<App />, document.getElementById("root"));
同时注意:也不要使用数组的push/unshift等直接修改当前数组的方法,这些都是在修改了原数组,没有创建新的数组,应该使用concat或者slice等这些返回新数组的方法。
this.setState({
list:[...this.state.list,{newData}]
})
五、React路由
路由是一套映射规则,在React中,是URL路径与组件的对应关系,其实就是配置路径与组件的配对,让用户从一个视图,导航到另外一个视图中
1、基本用法
// 引入React路由
import { BrowserRouter as Router, Route, Link } from "react-router-dom";

const About = () => {
  return <div>关于页面</div>;
};

class App extends React.Component {
  render() {
    return (
      // 使用Router组件包裹整个应用,Router组件只需要使用一次即可
      <Router>
        <div>
          <h2>React路由</h2>
          {/* 指定路由入口 */}
          <Link to="/about">跳转至关于页面</Link>
          {/* 指定路由出口 */}
          <Route path="/about" component={About}></Route>
        </div>
      </Router>
    );
  }
}
ReactDOM.render(<App />, document.getElementById("root"));
2、编程式导航
class Login extends React.Component {
  handleLogin = () => {
    // 编程式导航 push跳转到某个页面
    this.props.history.push("/home");
  };
  render() {
    return (
      <div>
        <div>登录页面欢迎您</div>
        <br />
        <button onClick={this.handleLogin}>登录</button>
      </div>
    );
  }
}
const HomePage = (props) => {
  const handleBack = () => {
    // 编程式导航 go(-1)返回
    props.history.go(-1);
  };
  return (
    <div>
      <h2>首页</h2>
      <button onClick={handleBack}>退出</button>
    </div>
  );
};

const App = () => {
  return (
    <Router>
      <div>
        <h2>注册页面</h2>
        <Link to="/login">去登录</Link>
        <br />
        <br />
        <Route path="/login" component={Login} />
        <Route path="/home" component={HomePage} />
      </div>
    </Router>
  );
};
ReactDOM.render(<App />, document.getElementById("root"));
3、默认路由
const About = () => {
  return <div>关于页面</div>;
};

class App extends React.Component {
  render() {
    return (
      <Router>
        <div>
          <h2>React路由</h2>
          {/* 默认路由 */}
          <Route path="/" component={About}></Route>
        </div>
      </Router>
    );
  }
}
ReactDOM.render(<App />, document.getElementById("root"));
4、模糊匹配和精准匹配
在React中,React路由默认是模糊匹配模式,想要精准匹配如下所示,
给默认路由添加 exact属性
<Route exact path="/" component={About}></Route>
