

Kotlin协程
本质上,协程是轻量级的线程
这就是Kotlin官方对协程的定义。
但是这等于什么都没说,它究竟是什么?从一个Android开发者的眼光来看:可以把它理解为时一个线程调度API——就是一个Kotlin的语言特性,或者说编程思想。Kotlin通过它为我们封装了一套线程Api。(虽然在线程调度是它的主要使用场景,但是事实上远不止如此)。这时,可能你就要反驳了:不对啊,我用了那么多次协程,根本就没有线程啊!不要慌,我们今天就把Android中Kotlin协程的面具给扒下来。看看它到底是个什么东西。
什么是协程
阅读本小节一定要了解Kotlin高阶函数!!!! 相关推荐:
或者你干脆把高阶函数或者Lambda表达式,当做是一个匿名内部类,里面的代码块都会放在类里面的一个方法里。
在开始之前,首先回想一下Kotlin协程的使用方法:
GlobalScope.launch {
    doSomething()
}
就是这么简单。但实际上它只是个CoroutineScope(协程作用域我们下文再讲)的扩展函数,实际上最终是通过调用createCoroutineUnintercepted(R,Continuation)来实现的。调用链很简单,这里就不展开。
package kotlin.coroutines.intrinsics

public actual fun <R, T> (suspend R.() -> T).createCoroutineUnintercepted(
    receiver: R,
    completion: Continuation<T>
): Continuation<Unit> {
    val probeCompletion = probeCoroutineCreated(completion)
    return if (this is BaseContinuationImpl)
        create(receiver, probeCompletion)
    else {
        createCoroutineFromSuspendFunction(probeCompletion) {
            (this as Function2<R, Continuation<T>, Any?>).invoke(receiver, it)
        }
    }
}
但是这个方法稍微有点“复杂”,我们换一个简单的方式创建协程。使用最原始的方式创建:
public fun <T> (suspend () -> T).createCoroutine(
    completion: Continuation<T>
): Continuation<Unit> =
 SafeContinuation(createCoroutineUnintercepted(completion).intercepted(), COROUTINE_SUSPENDED)
这是一个挂起函数的扩展函数。如果你对挂起函数和扩展函数不太理解,建议你先阅读Kotlin中的高阶函数、内置高阶函数和内联和lambda表达式与Kotlin高阶函数,或者直接看官方文档。
接下来我们看如何用这个函数实现一个协程:
fun main(args: Array<String>) {
    suspend {
        println("A----------------${Thread.currentThread().name}")
    }.createCoroutine(object : Continuation<Unit> {
        override val context: CoroutineContext
            get() = EmptyCoroutineContext

        override fun resumeWith(result: Result<Unit>) {
            println("B----------------${Thread.currentThread().name}")
        }
    }).resume(Unit)
    println("C----------------${Thread.currentThread().name}")
}

out:
A----------------main
B----------------main
C----------------main
非常简单,创建一个匿名函数,调用createCoroutine方法并传入一个匿名内部类Continuation。它的代码结构很简单:
public interface Continuation<in T> {
    public val context: CoroutineContext
    public fun resumeWith(result: Result<T>)
}
这里先记住这个类,我们后面会详细讲解它;
最后,调用resume方法,协程就启动了。但是,通过ABC三个打印输出,这好像和Android中的不太一样。不过这不是本小节的重点。这里我们只关注协程的创建。
协程的创建流程
在开始看协程的创建之前,我们先来聊聊高阶函数。如果你了解高阶函数,你一定知道它的字节码实现就是匿名内部类,你直接把它当做是一个匿名内部类就好了!当然,挂起函数也是:
package kotlin.coroutines.jvm.internal

// Suspension lambdas inherit from this class
internal abstract class SuspendLambda(
    public override val arity: Int,
    completion: Continuation<Any?>?
) : ContinuationImpl(completion), FunctionBase<Any?>, SuspendFunction {
    constructor(arity: Int) : this(arity, null)

    public override fun toString(): String =
        if (completion == null)
            Reflection.renderLambdaToString(this) // this is lambda
        else
            super.toString() // this is continuation
}

// State machines for named suspend functions extend from this class
internal abstract class ContinuationImpl(
    completion: Continuation<Any?>?,
    private val _context: CoroutineContext?
) : BaseContinuationImpl(completion) {
    constructor(completion: Continuation<Any?>?) : this(completion, completion?.context)

    public override val context: CoroutineContext
        get() = _context!!

    @Transient
    private var intercepted: Continuation<Any?>? = null

    public fun intercepted(): Continuation<Any?> =
        intercepted
            ?: (context[ContinuationInterceptor]?.interceptContinuation(this) ?: this)
                .also { intercepted = it }

    protected override fun releaseIntercepted() {
        val intercepted = intercepted
        if (intercepted != null && intercepted !== this) {
            context[ContinuationInterceptor]!!.releaseInterceptedContinuation(intercepted)
        }
        this.intercepted = CompletedContinuation // just in case
    }
}
上面代码在ContinuationImpl.kt中,注意看SuspendLambda的注释Suspension lambdas inherit from this class(Lambda的挂起函数继承该类)。没错,我们的 suspend {...}就继承于此。你可以在它的toString方法里打上断点,然后运行println("${suspend {}}")就能看到断点被执行到了。而它的父类ContinuationImpl 。注释就不用翻译了吧!它们最终继承自BaseContinuationImpl。现在还没到分析它的时候,但请记住:BaseContinuationImpl 非常重要!但是请留意它们的继承关系:
也可以理解为这就是 suspend {...},毕竟它是个匿名内部类嘛。
好了,马上开始分析createCoroutine方法。它是一个扩展函数,通过上面对 suspend {...}解释,该方法可以概括为:SuspendLambda的扩展函数,接收一个Continuation实例,并返回一个Continuation。如果你不理解扩展函数,那么你可以粗暴的把它和下面的Java代码画等号:
class SuspendLambda<T> {
    Continuation createCoroutine(Continuation<T> completion) {
            return new SafeContinuation(completion);
       }
}
就是一个SuspendLambda实例调用它自己的方法创建一个新的Continuation并返回了。而这个SafeContinuation,它也继承自Continuation。
那么整个逻辑就是:ContinuationA(挂起函数)调用自己的一个方法,该方法接受一个ContinuationB(就是通过匿名内部类方式创建的completion),然后再创建一个ContinuationC(SafeContinuation)并将其返回。紧接着我们会使用resume方法启动SafeContinuation:
public inline fun <T> Continuation<T>.resume(value: T): Unit =
    resumeWith(Result.success(value))
它也是一个扩展函数,并且调用了Continuation的resumeWith方法。这个Continuation就是ContinuationC(SafeContinuation),那么它对应的实现就是SafeContinuation里的resumeWith,也就是下面SafeContinuation代码的关键代码一处了:
internal actual class SafeContinuation<in T>
internal actual constructor(
    private val delegate: Continuation<T>,
    initialResult: Any?
) : Continuation<T>, CoroutineStackFrame {
   //...
   //关键代码一
    public actual override fun resumeWith(result: Result<T>) {
        while (true) { // lock-free loop
            val cur = this.result // atomic read
            when {
                cur === UNDECIDED -> if (RESULT.compareAndSet(this, UNDECIDED, result.value)) return
                cur === COROUTINE_SUSPENDED -> if (RESULT.compareAndSet(this, COROUTINE_SUSPENDED, RESUMED)) {
                    delegate.resumeWith(result)
                    return
                }
                else -> throw IllegalStateException("Already resumed")
            }
        }
    }
    //...
}
还记得createCoroutine方法里是如何创建SafeContinuation的吗?SafeContinuation(createCoroutineUnintercepted(completion).intercepted(), COROUTINE_SUSPENDED)。这里的COROUTINE_SUSPENDED就和when表达式对应上了。SafeContinuation. resumeWith最终会调用delegate.resumeWith(result)。这个delegate,是通过createCoroutineUnintercepted(completion).intercepted()创建的,它是一个代理,也是一个Continuation。接着看createCoroutineUnintercepted,它也是一个(suspend () -> T)的扩展函数,那么实际上就相当于是SuspendLambda的扩展函数,道理和createCoroutine:
@SinceKotlin("1.3")
public actual fun <T> (suspend () -> T).createCoroutineUnintercepted(
    completion: Continuation<T>
): Continuation<Unit> {
    val probeCompletion = probeCoroutineCreated(completion)
    return if (this is BaseContinuationImpl)
        create(probeCompletion)
    else
        createCoroutineFromSuspendFunction(probeCompletion) {
            (this as Function1<Continuation<T>, Any?>).invoke(it)
        }
}
代码实现如上,需要注意的是,该方法是用expect关键字修饰的,是平台相关的。上面的代码就是具体实现。
继续看代码:首先调用了probeCoroutineCreated:
internal fun <T> probeCoroutineCreated(completion: Continuation<T>): Continuation<T> {
    return completion
代码很简单。接着看里面的判断语句(this is BaseContinuationImpl)。this就是suspend {},当然,它就是个BaseContinuationImpl。那么 create(probeCompletion)调用的就是BaseContinuationImpl里定义的了:
public open fun create(completion: Continuation<*>): Continuation<Unit> {
        throw UnsupportedOperationException("create(Continuation) has not been overridden")
    }

public open fun create(value: Any?, completion: Continuation<*>): Continuation<Unit> {
        throw UnsupportedOperationException("create(Any?;Continuation) has not been overridden")
    }
只有定义,没有实现啊!!让我们把
suspend {
     println("A----------------${Thread.currentThread().name}")
}
反编译为Java。代码太多了,截个图贴上:
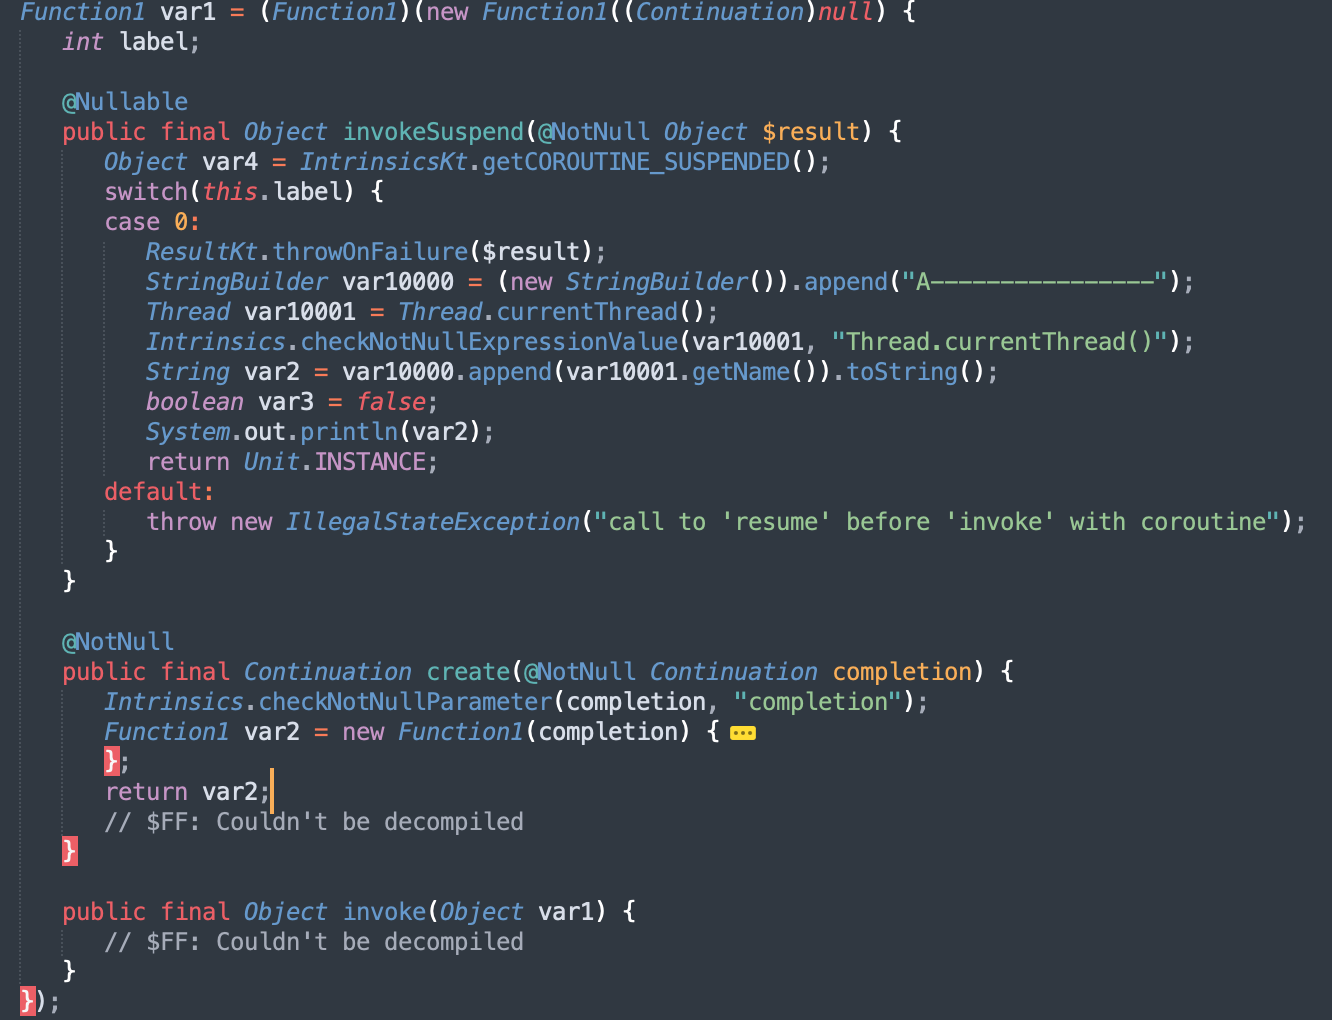
这里实现了create和invokeSuspend方法。invokeSuspend 方法里就有我们的println代码,很明显,该方法就是执行挂起函数里代码的地方。create方法也很简单,就是创建了个新的var2(Continuation实例)返回了。var2和它所在的实例一样,也是一个SuspendLambda。紧接着就是调用 var2的intercepted方法,根据上文中的继承关系,这个方法的实现在ContinuationImpl中:
public fun intercepted(): Continuation<Any?> =
        intercepted
            ?: (context[ContinuationInterceptor]?.interceptContinuation(this) ?: this)
                .also { intercepted = it }
先忽略这个context上下文,这里可以简单的理解为就是返回了this,也就是var2。那么,SafeContinuation的delegate就是它了。
如果你对上面的创建流程还是不是太清楚,我用Java代码把它描述一遍,源码详情请看:Github-KotlinEqualsJava(注意,这只是一个流程的粗略描述!!)。这里由于篇幅原因就不贴代码了。
到此,创建流程就结束了,接下来就是启动了。
协程的启动流程
启动流程上面已经提到过是通过扩展函数resume实现的
public inline fun <T> Continuation<T>.resume(value: T): Unit =
    resumeWith(Result.success(value))
最终它会调用SafeContinuation.resumeWith方法,这在前面已经见过了。
接着就是继续看SafeContinuation.resumeWith的代码了。回到delegate.resumeWith(result)。而delegate,也就是var2,本身也是个SuspendLambda。那么理所当然,它的resumeWith调用它的间接父类BaseContinuationImpl. resumeWith方法,具体实现如下:
public final override fun resumeWith(result: Result<Any?>) {
        // This loop unrolls recursion in current.resumeWith(param) to make saner and shorter stack traces on resume
        var current = this
        var param = result
        while (true) {
            probeCoroutineResumed(current)
            with(current) {
                   //注释一
                val completion = completion!!
                    try {
                        //注释二
                        val outcome = invokeSuspend(param)
                        if (outcome === COROUTINE_SUSPENDED) return
                        Result.success(outcome)
                    } catch (exception: Throwable) {
                        Result.failure(exception)
                    }
                releaseIntercepted() // this state machine instance is terminating
                //注释三
                if (completion is BaseContinuationImpl) {
                    current = completion
                    param = outcome
                } else {
             //注释四
                    completion.resumeWith(outcome)
                    return
                }
            }
        }
}
首先看注释一,这里的completion来自构造函数,实际就是经过在我们调用最开始suspend{ }.createCoroutin(Continuation)代码中的Continuation,也就是那个匿名内部类。
接着看注释二,此处执行了invokeSuspend,注意当前这个BaseContinuationImpl实力,它就是开头的suspend{ },就是那个挂起函数。而在上文中,我们提到过它反编译成Java后的代码,这次我们把invokeSuspend给贴出来:
int label;

@Nullable
public final Object invokeSuspend(@NotNull Object $result) {
    Object var4 = IntrinsicsKt.getCOROUTINE_SUSPENDED();
    switch(this.label) {
        case 0:
            ResultKt.throwOnFailure($result);
            StringBuilder var10000 = (new StringBuilder()).append("A----------------");
            Thread var10001 = Thread.currentThread();
            Intrinsics.checkNotNullExpressionValue(var10001, "Thread.currentThread()");
            String var2 = var10000.append(var10001.getName()).toString();
            boolean var3 = false;
            System.out.println(var2);
            return Unit.INSTANCE;
        default:
            throw new IllegalStateException("call to 'resume' before 'invoke' with coroutine");
        }
}
重点在switch,label只有定义没有赋值所以它为0。可以看到,invokeSuspend就是执行挂起函数里面的代码块的地方。
接下来看注释三,completion是我们创建的匿名内部类,是直接通过Continuation创建的,就是一个Continuation直接实现。并不是一个BaseContinuationImpl,所以代码会执行到注释四。
注释四处就更简单了,直接执行resumeWith方法,也就是执行了我们开头的println("B----------------${Thread.currentThread().name}")
到这一步,协程就执行完毕了。
用Java实现一个伪协程流程
如果上面的一大堆流转把你绕晕了,多看几遍源码就好了。打上断点一步一步追踪就行了。但是为了从全局了解它的运转流程。这里用Java代码演示一下协程的运转流程(伪)。 首先定义一个协程接口:
public interface CoroutineInterface {
    public void resumeWith();
}
接着定义个抽象类,用来指代挂起函数:
public abstract class SuspendAnonymous implements CoroutineInterface {
    public CoroutineInterface mCoroutineInterface;

    public SuspendAnonymous(CoroutineInterface coroutineInterface) {
        this.mCoroutineInterface = coroutineInterface;
    }

    public abstract void invokeSuspend();

    public static CoroutineInterface creatCoroutune(SuspendAnonymous suspendAnonymous){
        return new CoroutineInterface() {
            @Override
            public void resumeWith() {
                suspendAnonymous.resumeWith();
            }
        };
    }
}
最后,在main函数里运行:
public static void main(String[] args) {
     //创建匿名内部类(指代挂起函数)
        SuspendAnonymous suspendAnonymous = new SuspendAnonymous(new CoroutineInterface() {
            //创建匿名内部类,指代createCoroutine的Continuation参数
            @Override
            public void resumeWith() {
                System.out.println("B-------------");
            }
        }) {
        //(挂起函数)实现resumeWith
            @Override
            public void resumeWith() {
                invokeSuspend();
                mCoroutineInterface.resumeWith();
            }

        //(挂起函数)实现invokeSuspend
        //用来指代挂起函数代码块
            public void invokeSuspend() {
                System.out.println("A-------------");
            }
        };
        CoroutineInterface coroutineInterface = SuspendAnonymous.creatCoroutune(suspendAnonymous);
        coroutineInterface.resumeWith();
        System.out.println("C-------------");
}

out:
A-------------
B-------------
C-------------
极度精简后的流程大致就是这么个意思。Github上有详细代码
看到这里你一定会恍然大悟,就这?这不就是一个接口回调吗?搞这么复杂,那到底是怎么执行异步任务的呢?别着急,马上就开始讲协程的上下文和调度器。但在此之前先总结一下协程是什么:
概括总结协程是什么?
协程没有脱离线程,它也是运行在线程中的;它并不是一个什么新奇的东西,而是一种编程思想。可以狭隘的讲是Kotlin为了解决某个问题而提供的一整套封装好的Api,从上文中的分析就不难发现,它甚至就只是一个接口回调!。而所要解决的问题就是并发问题,让并发任务更简单(像使用同步代码一样使用并发)。
协程的上下文和调度器
前面讲了协程的创建流程、启动流转过程。也对它做了总结—— 一套封装好的线程API。但是整个创建启动流程看不到任何线程调度,输出ABC都是在同一线程内进行,甚至协程还会阻塞主流程。这跟线程、非阻塞是调用有个毛的关系。别慌,接下来的协程上下文就是用来解决这个问题的。
协程上下文是什么
官方对上下文的定义如下:
协程总是运行在一些以 CoroutineContext 类型为代表的上下文中,它们被定义在了 Kotlin 的标准库里。 协程上下文是各种不同元素的集合
作为一个Android开发者,肯定已经非常熟悉上下文了。在Android中,Context是一个抽象类,它提供了访问应用程序资源,同时提供调用应用程序级操作的方法。
协程的上下文也大致如此,它不仅可以给我提供一些额外的能力、负责为协程设置名称、协程的启动取消以及协程在哪个线程或哪些线程上执行。
如果你在Android中使用过协程,你一定对下面的代码很熟悉:
GlobalScope.launch(Dispatchers.IO + Job() + CoroutineName("name")) {}
首先可以明确的是:Dispatchers.IO + Job() + CoroutineName("name")它们都是上下文的具体实现,可能你知道“+”是用来添加上下文的,但是它们的原理是什么呢?为了减少其他代码功能对我们追踪流程的干扰,我们首先定义四个上下文: FirstContext、SecondContext、ThirdContext、FourthContext。。
这里只展示FirstContext的实现,其他的可在Github上查看。
默认情况下是使用EmptyCoroutineContext作为上下文,它直接继承自CoroutineContext。类如其名,就是个空,什么都不给提供。
一般情况下都是使用继承AbstractCoroutineContextElement的方式去自定义一个上下文:
class FirstContext : AbstractCoroutineContextElement(Key) {
   //强制复写Key,作为FirstContext的key值
    companion object Key : CoroutineContext.Key<FirstContext>
    fun first(){
        println("第一个上下文------------------")
    }
}
注意这里的companion object Key : CoroutineContext.Key<FirstContext>。编译器会强制我们实现改伴生对象。
运行一下下面代码:
fun main() {
    val coroutineContext = FirstContext() + SecondContext() + ThirdContext() + FourthContext()
    val createCoroutine = suspend {
        println("A------------")
        "B"
    }.createCoroutine(object : Continuation<String> {
        override val context: CoroutineContext
            get() = coroutineContext

        override fun resumeWith(result: Result<String>) {
            println("${result.getOrNull()}----------------")
            context[FirstContext]?.first()
            context[SecondContext]?.second()
            context[ThirdContext]?.third()
            context[FourthContext]?.fourth()
        }
    })
    createCoroutine.resume(Unit)
}

out:
A------------
B----------------
第一个上下文------------------
第二个上下文------------------
第三个上下文------------------
第四个上下文------------------
这四个上下文是怎么添加进去的呢?又是怎么通过context找到它们并调用它们对应的方法呢?它们又是怎么存储的呢?
协程上下文的数据结构
不同与Android中的上下文是一个抽象类,协程的上下文是一个接口:
public interface CoroutineContext {

    public operator fun <E : Element> get(key: Key<E>): E?


    public fun <R> fold(initial: R, operation: (R, Element) -> R): R


    public operator fun plus(context: CoroutineContext): CoroutineContext =
        if (context === EmptyCoroutineContext) this else
            context.fold(this) { acc, element ->
                val removed = acc.minusKey(element.key)
                if (removed === EmptyCoroutineContext) element else {
                    val interceptor = removed[ContinuationInterceptor]
                    if (interceptor == null) CombinedContext(removed, element) else {
                        val left = removed.minusKey(ContinuationInterceptor)
                        if (left === EmptyCoroutineContext) CombinedContext(element, interceptor) else
                            CombinedContext(CombinedContext(left, element), interceptor)
                    }
                }
            }

    public fun minusKey(key: Key<*>): CoroutineContext

    public interface Key<E : Element>


    public interface Element : CoroutineContext {

        public val key: Key<*>

        public override operator fun <E : Element> get(key: Key<E>): E? =
            @Suppress("UNCHECKED_CAST")
            if (this.key == key) this as E else null

        public override fun <R> fold(initial: R, operation: (R, Element) -> R): R =
            operation(initial, this)

        public override fun minusKey(key: Key<*>): CoroutineContext =
            if (this.key == key) EmptyCoroutineContext else this
    }
}
代码不算复杂,定义了几个方法和接口。
- plus方法:它重写了操作"+"。也就是我们的
FirstContext() + SecondContext()实际等同于FirstContext().plus(SecondContext())。 - 接口
Element,它实现了上下文CoroutineContext。 - 还定义了个接口Key,它没有任何实现,只是用来检索的。用类似
context[FirstContext]就能取出上下文靠的全是它。
我们首先看一些这个Key到底是什么,反编译FirstContext得到如下代码:
public final class FirstContext extends AbstractCoroutineContextElement {
   public static final FirstContext.Key Key = new FirstContext.Key((DefaultConstructorMarker)null);

   public FirstContext() {
      super((kotlin.coroutines.CoroutineContext.Key)Key);
   }
   public static final class Key implements kotlin.coroutines.CoroutineContext.Key {
      private Key() {
      }

      // $FF: synthetic method
      public Key(DefaultConstructorMarker $constructor_marker) {
         this();
      }
   }
}
可以看到:key就是一个静态常量对象。它属于类而不属于对象,无论你创建多少个FirstContext实例,他们的key都是同一个对象。那么借此,就能来标记一个上下文的类型了。
接下来我们就通过FirstContext() + SecondContext() + ThirdContext() + FourthContext()这端代码分析一下上下文的数据结构和实现方式。这些类的继承关系如下:AbstractCoroutineContextElement<-Element<-CoroutineContext。操作符+实际上是调用了plus方法。该方法接受一个上下文,然后返回一个新的上下文。它的具体实现在上面已经展示过了。这里我们单独把它拎出来:
public operator fun plus(context: CoroutineContext): CoroutineContext =
      //代码①
        if (context === EmptyCoroutineContext) this else
            //代码②
            context.fold(this) { acc, element ->
                   //代码③
                val removed = acc.minusKey(element.key)
                //代码④
                if (removed === EmptyCoroutineContext) element else {
                     //代码⑤
                    val interceptor = removed[ContinuationInterceptor]
                    if (interceptor == null) CombinedContext(removed, element) else {
                        val left = removed.minusKey(ContinuationInterceptor)
                        if (left === EmptyCoroutineContext) CombinedContext(element, interceptor) else
                            CombinedContext(CombinedContext(left, element), interceptor)
                    }
                }
            }
分步骤解读一下这段代码:
-
代码①:如果context为一个EmptyCoroutineContext类型的上下文,那么直接返回this,也就是不添加。eg:如果A+ EmptyCoroutineContext,那么plus直接返回this,也就是A本身。这里就出现了添加的一个规则:如果添加的为EmptyCoroutineContext,那么实际上并不执行添加操作。
-
代码②:如果context不是EmptyCoroutineContext类型的上下文,调用它的fold方法。
这里分析一下fold方法:它是一个在CoroutineContext中定义的高阶函数
public fun <R> fold(initial: R, operation: (R, Element) -> R): R。在Element中有具体实现:public override fun <R> fold(initial: R, operation: (R, Element) -> R): R = operation(initial, this)由于我们自定义的上下文都实现了Element接口,那么这里的fold就是调用了Element中的fold方法。方法也很简单。接受一个R(这里对应的就是上下文)和一个高阶函数,然后将R和this(当前上下文)作为参数调用这个高阶函数。那么如果是一个A+B的,如果走到代码②出,acc对应的就是A的实例,element对应的就是B的实例。你可能对这一个转换不太理解,这里你就要补充一下高阶函数以及this的知识。但是实际上的流程如下:
A+B:

A.plus(B) {
 this = A
 B.fold(this)
}

B.fold(A){
    this = B
    anonymous(A,this)
}

anonymous(acc A,element B) {
    doSomething()
}
其中,anonymous就对应我们fold中的匿名函数。
-
代码③:调用minusKey方法,其具体实现也在
Element中:public override fun minusKey(key: Key<*>): CoroutineContext = if (this.key == key) EmptyCoroutineContext else this对比两者的Key(也就是上文中强制实现的伴生对象),如果key相同,也就是上限文相同(eg:A+A)则直接返回EmptyCoroutineContext,否则返回this,也就是调用者。
-
代码④:如果removed为EmptyCoroutineContext,也就是两个上下文是同一类型。那么直接返回element。也就是代码②中的被添加者B。那么这里又可以总结出一条规则:如果添加的上下文类型相同,那么直接用新的替换掉老的。
-
代码⑤:这里做了一个判断,判断上下文里是否含有ContinuationInterceptor类型。
接下来出现了CombinedContext,该类是实现上下文存储的关键:
internal class CombinedContext(
    private val left: CoroutineContext,
    private val element: Element
) : CoroutineContext, Serializable {

    override fun <E : Element> get(key: Key<E>): E? {
        var cur = this
        while (true) {
            cur.element[key]?.let { return it }
            val next = cur.left
            if (next is CombinedContext) {
                cur = next
            } else {
                return next[key]
            }
        }
    }

    public override fun <R> fold(initial: R, operation: (R, Element) -> R): R =
        operation(left.fold(initial, operation), element)

    public override fun minusKey(key: Key<*>): CoroutineContext {
        element[key]?.let { return left }
        val newLeft = left.minusKey(key)
        return when {
            newLeft === left -> this
            newLeft === EmptyCoroutineContext -> element
            else -> CombinedContext(newLeft, element)
        }
    }
}
CombinedContext类同样实现了CoroutineContext接口,关键代码如上:重写了fold、get和minusKey方法。本质上这些方法和Element类里的在功能没有什么区别,关键的区别在于它里面的循环。而且它持有一个left成员变量。所有的get和minusKey都增加了不断left的遍历。看到这里大家应该就明白了。这是一个链表结构,里面的left就是我们所常用链表里的next。
那么plus方法剩下的代码就好理解了:如果上下文只有一个,那么上下文就是一个普通的上下文。但是,如果有两个以上,这些上下文会作为CombinedContext的element存储,并且借助CombinedContext实现一个链表结构。链表采用头插法实现,但是如果存在ContinuationInterceptor类型的上下文,则特殊处理,永远把它放在链表的头部。以
FirstContext() + EmptyCoroutineContext + ContinuationInterceptor() + SecondContext() + ThirdContext() + FourthContext()为例:
添加的过程大致如下:

其中方框代表CombinedContext。
这个就是添加的流程了。
接下来看一下get方法,也就是context[FirstContext]。
普通的上下文里的get方法实现很简单,就是Element里的实现:
public override operator fun <E : Element> get(key: Key<E>): E? =
            if (this.key == key) this as E else null
匹配了就返回当前对象,否则返回null。CombinedContext就比较复杂了:
override fun <E : Element> get(key: Key<E>): E? {
        var cur = this
        while (true) {
            cur.element[key]?.let { return it }
            val next = cur.left
            if (next is CombinedContext) {
                cur = next
            } else {
                return next[key]
            }
        }
    }
多了好多代码,但是逻辑也很简单,就是不断遍历链表的每一个节点寻找类型匹配的上下文。
最后,让我们看一下下面的代码:
fun main() {
    val coroutineContext =
        FirstContext() + EmptyCoroutineContext + SecondContext() + ThirdContext() + FourthContext()
    println(coroutineContext)
}

out:

[FirstContext@27bc2616, SecondContext@3941a79c, ThirdContext@506e1b77, FourthContext@4fca772d]
明明说的是头插法,为什么输出顺序和插入顺序一致呢?秘密就在CombinedContext的toString方法。
public override fun <R> fold(initial: R, operation: (R, Element) -> R): R =
        operation(left.fold(initial, operation), element)

override fun toString(): String =
        "[" + fold("") { acc, element ->
            if (acc.isEmpty()) element.toString() else "$acc, $element"
        } + "]"
代码逻辑很清晰,通过一个递归调用fold,直到最后一个left不再是CombinedContext类型,而直接走Element的fold方法时才跳出递归调用,开始返回。这就是链表倒序打印法。
总结一下:
- 上下文通过一个链表存储,采用头插法,新来的元素总是处在头部;
- 该链表对ContinuationInterceptor做了特殊处理,如果有ContinuationInterceptor类型的上下文,它永远处于链表头部。
- 链表不允许存在两个相同类型的上下文,如果插入相同类型的上下文,则使用新的替换掉老的上下文实例;
- 链表使用Key匹配类型,它是一个接口的空实现,本身是一个静态常量。只作为key值使用。类似键值对里的key。
协程如何实现线程调度
阅读本节需要你了解Handler,最好能了解Activity的启动流程,Activity生命周期的流转过程。
如果你不知道,你需要知道:Handler任务是排队依次执行的,Activity生命周期函数都是由Handler触发的。
到此你应该已经对上下文有了一定的了解。下面就来看看协程是如何利用上下文实现线程调度的。在Android的onCreate方法里运行如下代码:
override fun onCreate(savedInstanceState: Bundle?) {
        super.onCreate(savedInstanceState)
        setContentView(R.layout.activity_main_messenger)

        Log.e("Thread-before", "---------${Thread.currentThread().name}")
        GlobalScope.launch(Dispatchers.Main) {
            Log.e("Main", "---------${Thread.currentThread().name}")
        }

        GlobalScope.launch(Dispatchers.IO) {
            Log.e("IO", "---------${Thread.currentThread().name}")
        }
        Log.e("Thread-after", "---------${Thread.currentThread().name}")
}

out:
Thread-before: ---------main
Thread-after: ---------main
IO: ---------DefaultDispatcher-worker-1
Main: ---------main
Dispatchers.IO怎么改变代码运行的线程的?既然Dispatchers.Main也是在主线程里执行,为什么它在最后才输出,Dispatchers.IO实在不同线程里运行,它的输出顺序是不确定的这可以理解。但是为什么Main: ---------main总是在最后才输出?这和开头ABC的输出对不上啊?
我们依次来解答这写问题,首先看第一个,Dispatchers.IO如何切换线程?
我们首先看GlobalScope.launch是什么:
public fun CoroutineScope.launch(
   : CoroutineContext = EmptyCoroutineContext,
    start: CoroutineStart = CoroutineStart.DEFAULT,
    block: suspend CoroutineScope.() -> Unit
): Job {
    val newContext = newCoroutineContext(context)
    val coroutine = if (start.isLazy)
        LazyStandaloneCoroutine(newContext, block) else
        StandaloneCoroutine(newContext, active = true)
    coroutine.start(start, coroutine, block)
    return coroutine
}
一个CoroutineScope(协程作用域,下一节会讲到)的扩展函数,接受一个上下文context(默认为EmptyCoroutineContext),同时接受一个CoroutineStart(默认为CoroutineStart.DEFAULT)start,然后就是一个block代码块,也就是我们要运行的代码了。之后创建新的上下文,并创建一个StandaloneCoroutine类型的coroutine并启动它。其中的代码细节我们就不一一展开,这里只看coroutine.start(start, coroutine, block):
public fun <R> start(start: CoroutineStart, receiver: R, block: suspend R.() -> T) {
        initParentJob()
        start(block, receiver, this)
}
它执行了start,也就是CoroutineStart的invoke方法:
public enum class CoroutineStart {
    DEFAULT,
    LAZY,
    ATOMIC,
    UNDISPATCHED;
    @InternalCoroutinesApi
    public operator fun <T> invoke(block: suspend () -> T, completion: Continuation<T>): Unit =
        when (this) {
            DEFAULT -> block.startCoroutineCancellable(completion)
            ATOMIC -> block.startCoroutine(completion)
            UNDISPATCHED -> block.startCoroutineUndispatched(completion)
            LAZY -> Unit // will start lazily
        }
    @InternalCoroutinesApi
    public operator fun <R, T> invoke(block: suspend R.() -> T, receiver: R, completion: Continuation<T>): Unit =
        when (this) {
            DEFAULT -> block.startCoroutineCancellable(receiver, completion)
            ATOMIC -> block.startCoroutine(receiver, completion)
            UNDISPATCHED -> block.startCoroutineUndispatched(receiver, completion)
            LAZY -> Unit // will start lazily
        }
    @InternalCoroutinesApi
    public val isLazy: Boolean get() = this === LAZY
}
查看CoroutineStart的代码,有两个invoke重载,这里调用的是第二个,接受三个参数。分别是block也就是挂起函数里的代码块;receiver也就是launch方法里穿件的StandaloneCoroutine实例;completion上下文对象,它其实也是传入了StandaloneCoroutine实例(StandaloneCoroutine同时是Continuation和CoroutineContext的实现,两个接口它都有实现)。
我们关注重点,由于我们在launch里默认的start是CoroutineStart.DEFAULT。所以这里走的就是:block.startCoroutineCancellable(receiver, completion)。明显startCoroutineCancellable也是个扩展函数:
internal fun <R, T> (suspend (R) -> T).startCoroutineCancellable(
    receiver: R, completion: Continuation<T>,
    onCancellation: ((cause: Throwable) -> Unit)? = null
) =
    runSafely(completion) {
        createCoroutineUnintercepted(receiver, completion).intercepted().resumeCancellableWith(Result.success(Unit), onCancellation)
    }
出现了createCoroutineUnintercepted(receiver, completion).intercepted() ,这我们熟啊!这就是上文讲的协程创建啊。这端代码就返回了一个Continuation实例,接下来就是启动方法了:
public fun <T> Continuation<T>.resumeCancellableWith(
    result: Result<T>,
    onCancellation: ((cause: Throwable) -> Unit)? = null
): Unit = when (this) {
    is DispatchedContinuation -> resumeCancellableWith(result, onCancellation)
    else -> resumeWith(result)
}
又是扩展函数,接下来就是判断this,也就是createCoroutineUnintercepted创建的Continuation是不是DispatchedContinuation 了。还记得协程创建流程里createCoroutineUnintercepted最终执行的intercepted方法吗?
public fun intercepted(): Continuation<Any?> =
        intercepted
            ?: (context[ContinuationInterceptor]?.interceptContinuation(this) ?: this)
                .also { intercepted = it }
注意此时的context,我们已经添加了Dispatchers.IO上下文,没错,它就是一个ContinuationInterceptor ,相关代码如下:
public val IO: CoroutineDispatcher = DefaultScheduler.IO

val IO: CoroutineDispatcher = LimitingDispatcher(
        this,
        systemProp(IO_PARALLELISM_PROPERTY_NAME, 64.coerceAtLeast(AVAILABLE_PROCESSORS)),
        "Dispatchers.IO",
        TASK_PROBABLY_BLOCKING
)
这些代码并不在同一个文件内,最终LimitingDispatcher继承关系如下:LimitingDispatcher<-ExecutorCoroutineDispatcher<-CoroutineDispatcher。而的定义如下:
CoroutineDispatcher : AbstractCoroutineContextElement(ContinuationInterceptor), ContinuationInterceptor
它实现了ContinuationInterceptor接口,那么这里就会执行一些interceptContinuation方法:
public fun <T> interceptContinuation(continuation: Continuation<T>): Continuation<T>
该方法定义在ContinuationInterceptor中,看它在CoroutineDispatcher中的实现:
public final override fun <T> interceptContinuation(continuation: Continuation<T>): Continuation<T> =
        DispatchedContinuation(this, continuation)
这里创建了一个DispatchedContinuation实例,注意入参this,就是ContinuationInterceptor,而它对应的实例就是LimitingDispatcher的实例,也就是上面通过Dispatchers.IO创建的。而DispatchedContinuation的构造方法如下:
internal class DispatchedContinuation<in T>(
    @JvmField val dispatcher: CoroutineDispatcher,
    @JvmField val continuation: Continuation<T>
)
不难看出,Continuation就是前面createCoroutineUnintercepted创建的实例,而dispatcher,就是通过Dispatchers.IO创建的LimitingDispatcher。
现在回到主流程,intercepted通过interceptContinuation穿创建了一个DispatchedContinuation实例并执行了它的resumeCancellableWith方法:
inline fun resumeCancellableWith(
        result: Result<T>,
        noinline onCancellation: ((cause: Throwable) -> Unit)?
    ) {
        val state = result.toState(onCancellation)
        if (dispatcher.isDispatchNeeded(context)) {
            _state = state
            resumeMode = MODE_CANCELLABLE
            dispatcher.dispatch(context, this)
        } else {
            executeUnconfined(state, MODE_CANCELLABLE) {
                if (!resumeCancelled(state)) {
                    resumeUndispatchedWith(result)
                }
            }
        }
}
关注重点代码:dispatcher.dispatch(context, this)。调用了dispatcher的dispatch方法,前面说了dispatcher是LimitingDispatcher的实例,该方法如下:
private val queue = ConcurrentLinkedQueue<Runnable>()

override fun dispatch(context: CoroutineContext, block: Runnable) = dispatch(block, false)
private fun dispatch(block: Runnable, tailDispatch: Boolean) {
        var taskToSchedule = block
        while (true) {
            // Commit in-flight tasks slot
            val inFlight = inFlightTasks.incrementAndGet()


            if (inFlight <= parallelism) {
                dispatcher.dispatchWithContext(taskToSchedule, this, tailDispatch)
                return
            }

            queue.add(taskToSchedule)

            if (inFlightTasks.decrementAndGet() >= parallelism) {
                return
            }

            taskToSchedule = queue.poll() ?: return
        }
}
注意dispatcher.dispatch(context, this)的调用方式,Runnable形参接受了this,也就是我们的DispatchedContinuation它自己,它的继承关系如下:DispatchedContinuation<-DispatchedTask<-SchedulerTask。而SchedulerTask是Task的一个别名:
internal actual typealias SchedulerTask = Task
Task则实现了Runnable接口:
internal abstract class Task(
    @JvmField var submissionTime: Long,
    @JvmField var taskContext: TaskContext
) : Runnable {
    constructor() : this(0, NonBlockingContext)
    inline val mode: Int get() = taskContext.taskMode // TASK_XXX
}
然后,会调用dispatcher.dispatchWithContext(taskToSchedule, this, tailDispatch)。dispatcher是ExperimentalCoroutineDispatcher的实例,它在创建LimitingDispatcher的时候被赋值:
internal object DefaultScheduler : ExperimentalCoroutineDispatcher() {
    val IO: CoroutineDispatcher = LimitingDispatcher(
        this,
        systemProp(IO_PARALLELISM_PROPERTY_NAME, 64.coerceAtLeast(AVAILABLE_PROCESSORS)),
        "Dispatchers.IO",
        TASK_PROBABLY_BLOCKING
    )
}
而dispatchWithContext方法如下:
override val executor: Executor
        get() = coroutineScheduler

private var coroutineScheduler = createScheduler()

private fun createScheduler() = CoroutineScheduler(corePoolSize, maxPoolSize, idleWorkerKeepAliveNs, schedulerName)

internal fun dispatchWithContext(block: Runnable, context: TaskContext, tailDispatch: Boolean) {
        try {
            coroutineScheduler.dispatch(block, context, tailDispatch)
        } catch (e: RejectedExecutionException) {
           ...
        }
    }
其中coroutineScheduler是一个CoroutineScheduler的实例,而CoroutineScheduler和ThreadPoolExecutor一样最终继承自Executor,它就是一个线程池。详细的线程池代码就不展开分析了。但是它和ThreadPoolExecutor又一点不同,它不进维持着每个线程都可以访问的公共任务栈。同时,每个线程都有一个任务栈。一个线程不仅可以执行自己任务栈还可以去“偷”其他线程的任务栈里的任务。
而CoroutineScheduler实现了Executor定义的run方法,其调用逻辑如下:
override fun run() = runWorker()


private fun runWorker() {
    //..
    while (!isTerminated && state != WorkerState.TERMINATED) {
        val task = findTask(mayHaveLocalTasks)
        if (task != null) {
            rescanned = false
            minDelayUntilStealableTaskNs = 0L
            xecuteTask(task)
            continue
        } else {
            mayHaveLocalTasks = false
        }
               //...
    }
}


private fun executeTask(task: Task) {
        val taskMode = task.mode
        idleReset(taskMode)
        beforeTask(taskMode)
        runSafely(task)
        afterTask(taskMode)
}

fun runSafely(task: Task) {
        try {
            task.run()
        } catch (e: Throwable) {
            val thread = Thread.currentThread()
            thread.uncaughtExceptionHandler.uncaughtException(thread, e)
        } finally {
            unTrackTask()
        }
}
一旦通过 coroutineScheduler.dispatch(block, context, tailDispatch)调用线程池执行任务后,最终通过线程池的run方法,调用了我们的task,也就是我们的协程体代码块。此时,代码块里的任务就运行在线程池中了。(具体的线程池执行逻辑就不展开了,这里和ThreadPoolExecutor并没有什么本质的区别)
这就是其切换线程的办法办法。
而在Dispatchers.Main,线程调度的方式有点不同了,它最终是通过HandlerContext实现的:
internal class HandlerContext private constructor(
    private val handler: Handler,
    private val name: String?,
    private val invokeImmediately: Boolean
) : HandlerDispatcher(), Delay {

    public constructor(
        handler: Handler,
        name: String? = null
    ) : this(handler, name, false)

    @Volatile
    private var _immediate: HandlerContext? = if (invokeImmediately) this else null

    override val immediate: HandlerContext = _immediate ?:
        HandlerContext(handler, name, true).also { _immediate = it }

    override fun isDispatchNeeded(context: CoroutineContext): Boolean {
        return !invokeImmediately || Looper.myLooper() != handler.looper
    }

    override fun dispatch(context: CoroutineContext, block: Runnable) {
        handler.post(block)
    }
}
不难看出,这就是通过Handler将任务切换到主线程了。这里也就能解释下面代码的输出问题了:
override fun onCreate(savedInstanceState: Bundle?) {
        super.onCreate(savedInstanceState)
        setContentView(R.layout.activity_main_messenger)
        GlobalScope.launch(Dispatchers.Main) {
            Log.e("Main", "---------${Thread.currentThread().name}")
        }

        Log.e("Thread-after", "---------${Thread.currentThread().name}")
}
为什么Thread-after总在Main之前执行,因为GlobalScope.launch是是通过handler.post去执行协程代码块的,而我们的onCreate方法也是通过handler执行的。它们都是有ActivityThread里创建的主线程handler执行的,而handler消息队列的执行又是同步按顺序执行的。前面的任务没有执行完,后面的任务肯定无法执行。
那既然都在一个线程,那有没有办法让挂起函数里的代码先执行呢?可以,注意看HandlerContext的isDispatchNeeded方法,该方法就是用来判断是否需要进行调度的。默认情况下HandlerContext 通过AndroidDispatcherFactory创建:
override fun createDispatcher(allFactories: List<MainDispatcherFactory>) =
        HandlerContext(Looper.getMainLooper().asHandler(async = true))
invokeImmediately是false,也就是该方法返回true,要求进行调度,也就是通过handle执行。而如果我们使用下面的方式调用:
GlobalScope.launch(Dispatchers.Main.immediate) {
    Log.e("Main", "---------${Thread.currentThread().name}")
}
Log.e("Thread-after", "---------${Thread.currentThread().name}")

out:
Main: ---------main
Thread-after: ---------main
Dispatchers.Main本身返回一个HandlerContext,而HandlerContext有一个immediate变量:
override val immediate: HandlerContext = _immediate ?:
        HandlerContext(handler, name, true).also { _immediate = it }
它创建一个新的实例并返回,而这个实例创建时的invokeImmediately是true。那么此时,它就不会走调度流程了,不是用Handler,执行效果就和直接调用一样了。
Kotlin协程在Android中有三个调度器:
- Dispatchers.Default:默认的线程池,如果不指定调度器,就是使用它,适合 CPU 密集型任务(如果未设置useCoroutinesScheduler则和IO使用同一线程池,否则使用Executors.newFixedThreadPool创建线程池);
- Dispatchers.Main:在主线程中执行;
- Dispatchers.IO:在Kotlin内部的共享线程池里的线程里执行,适合 IO 任务
挂起函数挂起究竟是什么
这里思考一个问题,挂起函数的挂起究竟是什么?又是怎么恢复的呢?通过上面对上下文的讲解,大概可以概括为如下:
当一个正在运行的线程A,当遇到了suspend创建的协程,这个函数就会告知当前线程A“别管我,我自己一边玩去”。然后当前线程A继续直行接下来的任务。这时协程就挂起了。那么函数代码块就从当前线程剥离开了。但是它并没有终止,而是交给其他线程去执行。具体交给谁,就看调度器怎么安排了。
这就是函数挂起的本质,它不是把函数挂起来,而是把协程从当前的线程脱离交给其他线程去执行,最终实现兵分两路的执行效果。当然,协程所执行的线程也可以是当前线程。
似乎听起来和创建一个新的线程没有什么区别。但是,在新的线程执行任务不是协程最厉害的地方,它最厉害的是可以很方便的“切回来”,好像是在使用同步操作一样:
onCreate(){
    GlobalScope.launch(Dispatchers.Main) {
         doSomething()
            Log.e("回到主线程", "---------${Thread.currentThread().name}")
    }
    Log.e("Thread-after", "---------${Thread.currentThread().name}")
}
suspend fun doSomething() = withContext(Dispatchers.IO){
    delay(1000)
    Log.e("耗时操作", "---------${Thread.currentThread().name}")
}
out:
Thread-after: ---------main
耗时操作: ---------DefaultDispatcher-worker-1
回到主线程: ---------main
很神奇啊,怎么就切出去了,注意看doSomething的withContext(Dispatchers.IO),就是在这里把线程切出去了。suspend本身无法提供任何切换线程的能力,它还要通过withContext去执行切换线程的操作。而这个关键的作用就是告诉当前执行线程,我要切出去,你不要管我。而此时,这个协程就被挂起了,直到这个doSomething执行结束,会再通过协程使用一个Runable继续执行接下来的代码。这也是挂起函数只能在协程或者挂起函数内调用的原因——没有协程它没有把线程切回来这个能力啊!
看到这里就可以发现,suspend其实主要还是起个提示标记作用。主要的工作还是withContext和协程在做。这个关键字更像是提醒使用者这个函数可能造成阻塞,请在挂起函数或者协程里调用。
同时,协程也可以桥接阻塞和非阻塞两个世界,如上:doSomething就是一个会阻塞的函数。它会阻塞住协程体内代码块的执行无法让下面的代码执行,但是下面的Log打印又是在主线程中的,它又不能被阻塞。这时就要协程发挥作用了。
如果你想把协程里看似同步的代码使用异步执行,可以使用async异步代码块:
GlobalScope.launch(Dispatchers.Main) {
            async { doSomething() }
            Log.e("回到主线程", "---------${Thread.currentThread().name}")
}

Thread-after: ---------main
回到主线程: ---------main
耗时操作: ---------DefaultDispatcher-worker-1
因为async也是个启动协程的扩展函数:
public fun <T> CoroutineScope.async(
    context: CoroutineContext = EmptyCoroutineContext,
    start: CoroutineStart = CoroutineStart.DEFAULT,
    block: suspend CoroutineScope.() -> T
): Deferred<T> {
    val newContext = newCoroutineContext(context)
    val coroutine = if (start.isLazy)
        LazyDeferredCoroutine(newContext, block) else
        DeferredCoroutine<T>(newContext, active = true)
    coroutine.start(start, coroutine, block)
    return coroutine
}
当然,既然有提供异步的操作,也有提供同步的操作:
GlobalScope.launch(Dispatchers.Main) {
            val async = async { doSomething() }
            Log.e("回到主线程1", "---------${Thread.currentThread().name}")
            async.await()
            Log.e("回到主线程2", "---------${Thread.currentThread().name}")
}

out:
Thread-after: ---------main
回到主线程1: ---------main
耗时操作: ---------DefaultDispatcher-worker-1
回到主线程2: ---------main
这就是协程的神奇之处,它可以让你随心所欲的决定是阻塞还是非阻塞。
所以,挂起就是一个:别管我,你干你的,我搞完了就回来。而这就是体现非阻塞的地方。我去别的地方执行任务,你不用管我,继续干你当前的活。我那边搞完了就回来找你。这也是协程能将阻塞代码协程非阻塞的原因。
但是,协程是怎么知道什么时候要挂起,又是什么时候要恢复呢?
fun func() {
           GlobalScope.launch {
               println("-----------------------${Thread.currentThread().name}")
               var amg = aaaaa()
               println("after:a-----------------------${Thread.currentThread().name}")
               var bmg = bbbbb()
               println("after:b-----------------------${Thread.currentThread().name}")
               var cmg = ccccc()
               println("s$amg$bmg$cmg-----------${Thread.currentThread().name}")
           }
    }

    suspend fun aaaaa() = suspendCoroutine<String> {
        thread {
            Thread.sleep(1000)
            println("aaaaaa-------------${Thread.currentThread().name}")
            it.resume("abc")
        }
    }

   suspend fun bbbbb() = suspendCoroutine<String> {
        thread {
            Thread.sleep(1000)
            println("bbbbb-------------${Thread.currentThread().name}")
            it.resume("abc")
        }
    }

    suspend fun ccccc() = suspendCoroutine<String> {
        thread {
            Thread.sleep(1000)
            println("ccccc-------------${Thread.currentThread().name}")
            it.resume("abc")
        }
    }
查看下面代码,它的输出如下:
-----------------------DefaultDispatcher-worker-1 @coroutine#2
aaaaaa-------------Thread-2
after:a-----------------------DefaultDispatcher-worker-1 @coroutine#2
bbbbb-------------Thread-3
after:b-----------------------DefaultDispatcher-worker-1 @coroutine#2
ccccc-------------Thread-4
sabcabcabc-----------DefaultDispatcher-worker-1 @coroutine#2
协程是如何知道遇到挂起函数就阻塞,挂起函数结束后切换到当前线程继续执行呢?
在上文的上下文小节分析调度器的时候,我们讲过协程最终是通过handler.post的方式通过Runnable切换线程。而这个Runnable.run方法是在Continuation调用resumeWith后执行的。而resume本质上就是调用resumeWith方法。所以,我么可以知道,这些挂起函数,再执行完之后最终都调用了handler.post方法执行Runable将线程切换到协程上下文指定的线程。那么也就是说,上面的有三个挂起函数的协程体至少要执行三次了?那么为什么里面的输出只有一次呢?
让我们继续看一下反编译为Java的代码:
public final void func() {
      BuildersKt.runBlocking$default((CoroutineContext)null, (Function2)(new Function2((Continuation)null) {
         Object L$0;
         Object L$1;
         int label;

         @Nullable
         public final Object invokeSuspend(@NotNull Object $result) {
            String amg;
            String bmg;
            String cmg;
            StringBuilder var11;
            Object var10000;
            Thread var10001;
            label26: {
               Object var7;
               Test var12;
               label25: {
                  var7 = IntrinsicsKt.getCOROUTINE_SUSPENDED();
                  switch(this.label) {
                  case 0:
                     ResultKt.throwOnFailure($result);
                     var11 = (new StringBuilder()).append("-----------------------");
                     var10001 = Thread.currentThread();
                     Intrinsics.checkNotNullExpressionValue(var10001, "Thread.currentThread()");
                     amg = var11.append(var10001.getName()).toString();
                     boolean var8 = false;
                     System.out.println(amg);
                     var12 = Test.this;
                     this.label = 1;
                     var10000 = var12.aaaaa(this);
                     if (var10000 == var7) {
                        return var7;
                     }
                     break;
                  case 1:
                     ResultKt.throwOnFailure($result);
                     var10000 = $result;
                     break;
                  case 2:
                     amg = (String)this.L$0;
                     ResultKt.throwOnFailure($result);
                     var10000 = $result;
                     break label25;
                  case 3:
                     bmg = (String)this.L$1;
                     amg = (String)this.L$0;
                     ResultKt.throwOnFailure($result);
                     var10000 = $result;
                     break label26;
                  default:
                     throw new IllegalStateException("call to 'resume' before 'invoke' with coroutine");
                  }

                  amg = (String)var10000;
                  var11 = (new StringBuilder()).append("after:a-----------------------");
                  var10001 = Thread.currentThread();
                  Intrinsics.checkNotNullExpressionValue(var10001, "Thread.currentThread()");
                  bmg = var11.append(var10001.getName()).toString();
                  boolean var4 = false;
                  System.out.println(bmg);
                  var12 = Test.this;
                  this.L$0 = amg;
                  this.label = 2;
                  var10000 = var12.bbbbb(this);
                  if (var10000 == var7) {
                     return var7;
                  }
               }

               bmg = (String)var10000;
               var11 = (new StringBuilder()).append("after:b-----------------------");
               var10001 = Thread.currentThread();
               Intrinsics.checkNotNullExpressionValue(var10001, "Thread.currentThread()");
               cmg = var11.append(var10001.getName()).toString();
               boolean var5 = false;
               System.out.println(cmg);
               var12 = Test.this;
               this.L$0 = amg;
               this.L$1 = bmg;
               this.label = 3;
               var10000 = var12.ccccc(this);
               if (var10000 == var7) {
                  return var7;
               }
            }

            cmg = (String)var10000;
            var11 = (new StringBuilder()).append('s').append(amg).append(bmg).append(cmg).append("-----------");
            var10001 = Thread.currentThread();
            Intrinsics.checkNotNullExpressionValue(var10001, "Thread.currentThread()");
            String var10 = var11.append(var10001.getName()).toString();
            boolean var6 = false;
            System.out.println(var10);
            return Unit.INSTANCE;
         }

         @NotNull
         public final Continuation create(@Nullable Object value, @NotNull Continuation completion) {
            Intrinsics.checkNotNullParameter(completion, "completion");
            Function2 var3 = new <anonymous constructor>(completion);
            return var3;
         }

         public final Object invoke(Object var1, Object var2) {
            return ((<undefinedtype>)this.create(var1, (Continuation)var2)).invokeSuspend(Unit.INSTANCE);
         }
      }), 1, (Object)null);
   }
我们已经知道invokeSuspend方法就是我们的Runable,它确实会被回调好多次。但是每次执行的逻辑都不同。它里面定义了一个lable,初始值为0,每回调一次就加一。通过switch判断回调的次数,不同的lable对应不同的逻辑。
到这里,谜底就揭晓了。JVM会将协程体代码块变成一个Runable,然后根据挂起函数将协程体里的代码块用switch分割开来,不同的switch用来对应不同的挂起函数执行后的代码逻辑。当一个挂起函数执行结束,切换线程,调用了run方法后,就能在协程指定的线程里执行和它关联的代码逻辑。
概括起来其实很简单:同一个Runable被多个线程调用,根据不同的lable执行不同的代码逻辑。而由于这些线程是按顺序同步执行的,所以它们的回调也是同步且有序的。所以lable可以使用一个int值,根据回调次数判断是哪一个线程的回调。
协程的作用域
上面的代码中我们不断的用到了GlobalScope,这个东西。它究竟是个什么东西呢?它就是个协程作用域。而作用域又是什么?
作用域是什么
协程的作用域定义了协程的范围。
通过作用域可以实现对协程的管理。
一般的作用域,都是用来描述一个范围的。它既能提供一些额外的能力,同时也能起到一些约束作用。使用协成作用域可以明确协成之间的关系。同时,借助作用域可以管理和控制对协成的取消和异常处理。
通过作用域可以实现对协程的管理。
在Android中,所有具有生命周期的实体中都对协程作用域提供了一等的支持。详情请看官方文档:将 Kotlin 协程与生命周期感知型组件一起使用
其实这几个作用域也没什么难以理解的,它们的目的就是将协程的生命周期和协程所依赖的组件关联起来。以便及时的调整协程的状态,避免造成内存泄露。
Kotlin对协程作用域的定义很简单:
public interface CoroutineScope {
    public val coroutineContext: CoroutineContext
}
就定义了一个接口,里面持有一个待实现的协程上下文变量。这下它的作用就更明显了——作用域就是用来保存协程上下文,并将其在协程运行流中进行传递,同时,它也可以用来确定上下文的“权利范围”,约束了上下文的作用范围。
你甚至还可以狭隘的理解它就是为上下文提供了更方便调用,例如上面自定义的上下文:
context[FirstContext]?.first()
context[SecondContext]?.second()
context[ThirdContext]?.third()
context[FourthContext]?.fourth()
你可以理解为作用域就是下面的代码:
class Scop(coroutineContext: CoroutineContext){
    fun first(){
        context[FirstContext]?.first()
    }

    fun second(){
        context[SecondContext]?.second()
    }

    fun third(){
        context[ThirdContext]?.third()
    }

    fun fourth(){
        context[FourthContext]?.fourth()
    }

}
这样你就无需再通过一次get操作了。
Kotlin为我们提供了很多作用域,我们可以把它们分为以下几类:
GlobalScope就是一个全局作用域,它可用于启动顶级协程,其生命周期贯穿整个App的生命周期。不建议GlobalScope在应用中使用,它的定义如下:
public object GlobalScope : CoroutineScope {
    override val coroutineContext: CoroutineContext
        get() = EmptyCoroutineContext
}
它就持有了一个空上下文实例。
lifecycleScope:为每个Lifecycle对象定义了LifecycleScope。在此范围内启动的协程会在Lifecycle被销毁时取消。它的定义也很简单:
public val LifecycleOwner.lifecycleScope: LifecycleCoroutineScope
    get() = lifecycle.coroutineScope

public val Lifecycle.coroutineScope: LifecycleCoroutineScope
    get() {
        while (true) {
            val existing = mInternalScopeRef.get() as LifecycleCoroutineScopeImpl?
            if (existing != null) {
                return existing
            }
            val newScope = LifecycleCoroutineScopeImpl(
                this,
                SupervisorJob() + Dispatchers.Main.immediate
            )
            if (mInternalScopeRef.compareAndSet(null, newScope)) {
                newScope.register()
                return newScope
            }
        }
    }
ViewModelScope: 为应用中的每个ViewModel定义了ViewModelScope。如果 ViewModel已清除,则在此范围内启动的协程都会自动取消。
这里就不对它们的源码展开详细解读了。有兴趣的可以自己去查看一下。如果你看完这篇文章,弄懂了协程的本质,那么你一定可以很轻松的理解作用域。
总结
协程:协程没有脱离线程,它也是运行在线程中的;它并不是一个什么新奇的东西,而是一种编程思想。可以狭隘的讲是Kotlin为了解决并发问题而提供的一整套封装好的Api,让并发任务更简单(像使用同步代码一样使用并发)。
上下文:可以给我提供一些额外的能力、负责为协程设置名称、协程的启动取消以及协程在哪个线程或哪些线程上执行。它本身是一个链表,采用头插法,新来的元素总是处在头部;对ContinuationInterceptor做了特殊处理,永远处于链表头部。不允许存在两个相同类型的上下文,如果插入相同类型的上下文,则使用新的替换掉老的上下文实例。协程的线程调度就是通过上下文中的调度器实现的,最终实现方式还是借助Handler.
作用域:协程的作用域定义了协程的范围,用来保存协程上下文,并将其在协程运行流中进行传递,同时,它也可以用来确定上下文的“权利范围”,约束了上下文的作用范围。
