

简介
软件即服务(SaaS)模式中的一个关键实体是租户--也就是任何注册使用特定服务的客户。
租户这个词来自于租赁物理财产的概念。租户支付租金以占据一个空间,但他们并不拥有该财产。同样地,对于SaaS产品,客户支付费用以获得服务,但他们并不拥有提供服务的软件。
有各种租赁模式可供选择,即。
- 单租户:为每个客户部署一个应用程序的单一专用实例
- 多租户:为所有客户部署一个应用程序的实例,并在他们之间共享
- 混合租户:应用程序的一个或多个部分被部署为每个客户专用,其余部分在所有客户之间共享。
利用我在之前两篇文章(下面有链接)中所涉及的原则,我们将专注于多租户模式,并使用AWS建立一个多租户SaaS应用程序,并使用一个多租户数据库。我们将使用以下AWS资源。
- Cognito作为认证服务
- 用于GraphQL API的AppSync
- DynamoDB作为数据库
架构
无论你的经验水平如何,在查看代码库的同时试图弄清楚一个应用程序是如何工作的都是一项乏味的任务。由于人类更容易与视觉内容产生联系,我起草了以下架构图,以显示我们的待办事项应用程序将如何工作。
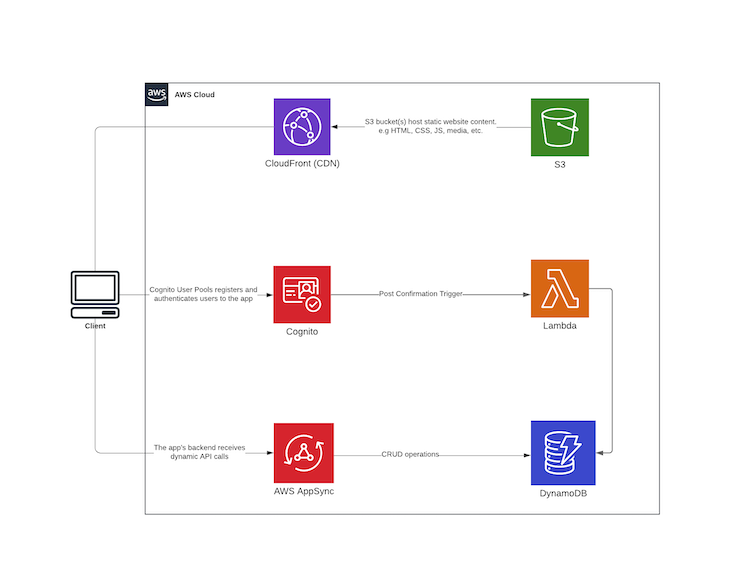
多租户待办事项应用架构图。
理论上,React客户端包含使用Amplify库执行的登录功能。一旦用户成功注册,Cognito的确认后触发器就会执行一个Lambda函数,接收一个包含新注册用户信息的有效载荷。
Lambda代码将新创建的用户保存到DynamoDB,这样我们就可以在使用Cognito进行授权的同时将所有新创建的用户资料保存在DynamoDB下。DynamoDB项将有以下结构。
Item: {
    createdAt: {
        S: "timestamp here",
    },
    updatedAt: {
        S: "timestamp here",
    },
    typeName: { S: "USER" },
    id: { S: "unique id" },
    cognitoId: { S: "cognito id gotten from the post confirmation trigger payload" },
    email: { S: "user email"},
    phoneNumber: { S: "user phone number" },
}
当新用户登录时,他们将可以访问React前端的AppSync GraphQL API,这允许对待办事项进行CRUD操作。创建的项目使用AppSync中创建的映射模板保存到DynamoDB。这些可以实现从方法请求到相应的集成请求的有效载荷的映射,以及从集成响应到相应的方法响应的映射。
数据库设计
多租户数据库的模式必须有一个或多个租户标识符列,以便可以有选择地检索任何特定租户的数据。为此,我们可以使用DynamoDB提供的单表设计,以实现我们建立多租户数据库的目标,用一个复合主键作为唯一的标识符。
DynamoDB有两种不同的主键,即分区键和复合主键(分区键和排序键)。我们将定义一个复合主键,id 作为分区键,typeName 作为排序键。
DynamoDB并不完全是处理关系型数据的首选方案,但正如Alex DeBrie在DynamoDB中建模一对多关系的文章所描述的那样。
DynamoDB有时被认为只是一个简单的键值存储,但事实并非如此。DynamoDB可以处理复杂的访问模式,从高度关系型数据模型到时间序列数据甚至地理空间数据。
在我们的案例中,有一种一对多的关系,一个User ,可以拥有许多ToDo 。
关于代码
现在我们已经涵盖了文章的理论部分,我们可以进入代码了。
正如在介绍中提到的,我们将使用我们在前两篇文章中所学到的知识,为我们的应用想出一个真实世界的例子。为了避免重复,我只包括了我们将在本文中添加的新功能,而省略了一些在以前的文章中已经涉及的部分。
项目设置
在你的首选目的地为我们的项目添加一个新文件夹,并创建一个新的无服务器项目,名为backend 。然后,在同一目录下使用Create React App引导一个React应用,并将其称为client 。这样就形成了以下的目录结构。
$ tree . -L 2 -a
.
├── backend
└── client
导航到serverless文件夹并安装这些依赖项。
$ yarn add serverless-appsync-plugin serverless-stack-output serverless-pseudo-parameters serverless-webpack
当仍在backend 文件夹内时,创建一个schema.yml 文件并添加以下模式。
type ToDo {
  id: ID
  description: String!
  completed: Boolean
  createdAt: AWSDateTime
  updatedAt: AWSDateTime
  user: User
}

type User {
  id: ID
  cognitoId: ID!
  firstName: String
  lastName: String
  email: AWSEmail
  phoneNumber: AWSPhone
  createdAt: AWSDateTime
  updatedAt: AWSDateTime
}

input ToDoUpdateInput {
  id: ID!
  description: String
  completed: Boolean
}

type Mutation {
  createTodo(input: ToDoCreateInput): ToDo
  updateTodo(input: ToDoUpdateInput): ToDo
  deleteTodo(id: ID!): ToDo
}

type Query {
  listToDos: [ToDo!]
  listUserTodos(id: ID): [ToDo!]
  getToDo(id: ID): ToDo
  profile: User!
}

schema {
  query: Query
  mutation: Mutation
}
配置和创建我们的无服务器资源
DynamoDB
在一个名为resources 的文件夹内创建一个新文件。
$ mkdir resources && touch resources/dynamo-table.yml
打开该文件并添加以下CloudFormation模板,该模板定义了我们的DynamoDB配置。
Resources:
  PrimaryDynamoDBTable:
    Type: AWS::DynamoDB::Table
    Properties:
      AttributeDefinitions:
        - AttributeName: typeName
          AttributeType: S
        - AttributeName: id
          AttributeType: S
      KeySchema: # Hash Range key
        - AttributeName: typeName
          KeyType: HASH
        - AttributeName: id
          KeyType: RANGE
      BillingMode: PAY_PER_REQUEST
      TableName: ${self:custom.resources.PRIMARY_TABLE}
      TimeToLiveSpecification:
        AttributeName: TimeToLive,
        Enabled: True
      GlobalSecondaryIndexes:
        - IndexName: GSI1
          KeySchema:
            - AttributeName: typeName
              KeyType: HASH
          Projection:
            ProjectionType: ALL
Cognito用户池
在资源文件夹内为Cognito用户池创建一个新的配置文件。
$ mkdir resources && touch resources/cognito-userpool.yml
打开该文件并添加以下CloudFormation模板,它定义了用户池配置。
Resources:
  CognitoUserPoolToDoUserPool:
    Type: AWS::Cognito::UserPool
    Properties:
      AdminCreateUserConfig:
        AllowAdminCreateUserOnly: FALSE
      AutoVerifiedAttributes:
        - email
      Policies:
        PasswordPolicy:
          MinimumLength: 7
          RequireLowercase: True
          RequireNumbers: True
          RequireSymbols: True
          RequireUppercase: True
      Schema:
        - Name: email
          AttributeDataType: String
          Mutable: false
          Required: true
        - Name: phone_number
          Mutable: true
          Required: true
      UserPoolName: ${self:service}-${self:provider.stage}-user-pool
  CognitoUserPoolClient:
    Type: "AWS::Cognito::UserPoolClient"
    Properties:
      ClientName: ${self:service}-${self:provider.stage}-user-pool-client
      GenerateSecret: false
      UserPoolId:
        Ref: CognitoUserPoolToDoUserPool
Outputs:
  UserPoolId:
    Value:
      Ref: CognitoUserPoolToDoUserPool
  UserPoolClientId:
    Value:
      Ref: CognitoUserPoolClient
映射模板
下面,我将分解在先前构建的待办事项应用中添加授权的新功能。你可以在这里查看其余的映射模板,因为它们是不言自明的。
create_todo.vtl
回顾我们的模式,待办事项有一个叫做user 的字段,它将包含拥有该事项的用户的Cognito ID。我们从identity 对象中获得id ,该对象是用户的Cognito配置文件。
创建映射模板文件。
$ mkdir mapping-templates/create_todo && touch mapping-templates/create_todo/request.vtl
添加以下代码。
$util.qr($ctx.args.input.put("createdAt", $util.time.nowISO8601()))
$util.qr($ctx.args.input.put("updatedAt", $util.time.nowISO8601()))
{
  "version" : "2017-02-28",
  "operation" : "PutItem",
  "key" : {
    "id": $util.dynamodb.toDynamoDBJson($util.autoId()),
    "typeName": $util.dynamodb.toDynamoDBJson("TODO"),
    "user" : { "S" : "${context.identity.sub}" }
  },
  "attributeValues" : $util.dynamodb.toMapValuesJson($ctx.args.input)
}
get_user_todos.vtl
创建映射模板文件。
$ mkdir mapping-templates/get_user_todos && touch mapping-templates/get_user_todos/request.vtl
添加下面的代码。
{
  "version" : "2017-02-28",
  "operation" : "GetItem",
  "key" : {
    "id" : { "S" : "${context.source.user}" },
    "typeName": $util.dynamodb.toDynamoDBJson("USER")
  },
}
list_user_todos.vtl
再一次,创建映射模板文件。
$ mkdir mapping-templates/list_user_todos && touch mapping-templates/list_user_todos/request.vtl
并添加下面的代码。
{
  "version" : "2017-02-28",
  "operation" : "Query",
  "query" : {
    "expression": "#typeName = :typeName",
    "expressionNames": {
      "#typeName": "typeName"
    },
    "expressionValues" : {
      ":typeName" : $util.dynamodb.toDynamoDBJson("TODO")
    }
  },
  "filter": {
    "expression": "#user = :user",
    "expressionNames": {
      "#user": "user"
    },
    "expressionValues": {
      ":user" : { "S" : "${context.identity.sub}" }
    }
  },
}
因为我们在User 和ToDo 项目之间有一对多的关系,为了获得所有由特定用户创建的待办事项,我们使用Query 方法获得数据库中的所有项目,然后过滤这些项目,返回包含与用户的Cognito ID相同的用户属性的待办事项。
Lambda函数
接下来,我们将设置Lambda函数,负责将一个新注册的用户保存到DynamoDB。当用户确认了他们的邮件后,Cognito的post confirmation触发器被调用时,这个函数就会被执行。
创建该文件。
$ touch handler.ts
添加以下代码。
import * as moment from "moment";
import { v4 as uuidv4 } from "uuid";
import { DynamoDB } from "aws-sdk";

const ddb = new DynamoDB({ apiVersion: "2012-10-08" });

export const cognitoPostConfirmation = async (event, context, callback) => {
  try {
    const userParams = {
      TableName: process.env.PRIMARY_TABLE, // gotten from serverless deployment
      Item: {
        createdAt: {
          S: moment().format("YYYY-MM-DDThh:mm:ssZ"),
        },
        updatedAt: {
          S: moment().format("YYYY-MM-DDThh:mm:ssZ"),
        },
        typeName: { S: "USER" },
        id: { S: uuidv4() },
        cognitoId: { S: event.request.userAttributes.sub },
        email: { S: event.request.userAttributes.email },
        phoneNumber: { S: event.request.userAttributes.phone_number },
      },
    };
    // @ts-ignore
    await ddb.putItem(userParams).promise();
    return callback(null, event);
  } catch (error) {
    return callback(error);
  }
};
添加TypeScript支持
由于我们为Lambda函数创建了一个.ts 文件,因此我们需要通过创建一个tsconfig.json 文件和一个webpack.config.js 文件来为无服务器项目添加TypeScript支持。
$ touch tsconfig.json webpack.config.js
//tsconfig.json

{
  "compilerOptions": {
    "allowSyntheticDefaultImports": true,
    "module": "commonjs",
    "removeComments": false,
    "preserveConstEnums": true,
    "sourceMap": true,
    "skipLibCheck": true,
    "resolveJsonModule": true,
    "lib": ["esnext"]
  }
}
//webpack.config.js

const slsw = require("serverless-webpack");
const nodeExternals = require("webpack-node-externals");
module.exports = {
  entry: slsw.lib.entries,
  target: "node",
  // Generate sourcemaps for proper error messages
  devtool: "source-map",
  // Since "aws-sdk" is not compatible with webpack,
  // we exclude all node dependencies
  externals: [nodeExternals()],
  mode: slsw.lib.webpack.isLocal ? "development" : "production",
  optimization: {
    // We no not want to minimize our code.
    minimize: false,
  },
  performance: {
    // Turn off size warnings for entry points
    hints: false,
  },
  resolve: {
    extensions: [".ts"],
  },
  // Run babel on all .js files and skip those in node_modules
  module: {
    rules: [
      {
        test: /\.ts(x?)$/,
        exclude: /node_modules/,
        use: [
          {
            loader: "ts-loader",
          },
        ],
      },
    ],
  },
};
部署无服务器项目
现在我们已经完成了所有资源的创建,我们将把所有东西集中起来,并按如下方式添加到serverless.yml 文件中。
service: react-amplify-multi-tenant
app: amplify-multi-tenant
frameworkVersion: "2"
provider:
  name: aws
  runtime: nodejs12.x
  lambdaHashingVersion: 20201221
  region: eu-west-1
  stage: ${opt:stage, 'dev'}
  environment:
    PRIMARY_TABLE: ${self:custom.resources.PRIMARY_TABLE}
plugins:
  - serverless-appsync-plugin
  - serverless-stack-output
  - serverless-pseudo-parameters
  - serverless-webpack
custom:
  webpack:
    webpackConfig: ./webpack.config.js # typescript support
    includeModules: true
  resources:
    PRIMARY_TABLE: ${self:service}-dynamo-table-${self:provider.stage}
    PRIMARY_BUCKET: ${self:service}-primary-bucket-${self:provider.stage}
    WEB_HOSTING_BUCKET: ${self:service}-web-hosting-bucket-${self:provider.stage}
  output:
    handler: ./scripts/output.handler
    file: ../client/src/aws-exports.json
  appSync: # appsync plugin configuration
    name: ${self:service}-appsync-${self:provider.stage}
    authenticationType: AMAZON_COGNITO_USER_POOLS
    additionalAuthenticationProviders:
      - authenticationType: API_KEY
    dataSources:
      - type: AMAZON_DYNAMODB
        name: PrimaryTable
        description: "Primary Table"
        config:
          tableName: ${self:custom.resources.PRIMARY_TABLE}
          serviceRoleArn: { Fn::GetAtt: [AppSyncDynamoDBServiceRole, Arn] }
    userPoolConfig:
      awsRegion: ${self:provider.region}
      defaultAction: ALLOW
      userPoolId: { Ref: CognitoUserPoolToDoUserPool } # name of the resource
    logConfig:
      loggingRoleArn: { Fn::GetAtt: [AppSyncLoggingServiceRole, Arn] }
      level: ALL
    mappingTemplates:
      - dataSource: PrimaryTable
        type: Mutation
        field: createTodo
        request: "create_todo/request.vtl"
        response: "common-item-response.vtl"
      - dataSource: PrimaryTable
        type: Mutation
        field: updateTodo
        request: "update_todo/request.vtl"
        response: "common-item-response.vtl"
      - dataSource: PrimaryTable
        type: Mutation
        field: deleteTodo
        request: "delete_todo/request.vtl"
        response: "common-item-response.vtl"
      - dataSource: PrimaryTable
        type: Query
        field: getToDo
        request: "get_todo/request.vtl"
        response: "common-item-response.vtl"
      - dataSource: PrimaryTable
        type: Query
        field: getUser
        request: "get_user/request.vtl"
        response: "common-item-response.vtl"
      - dataSource: PrimaryTable
        type: Query
        field: listUserTodos
        request: "list_user_todos/request.vtl"
        response: "common-items-response.vtl"
      - dataSource: PrimaryTable
        type: ToDo
        field: user
        request: "get_todo_user/request.vtl"
        response: "common-item-response.vtl"
functions:
  cognitoPostConfirmation:
    handler: handler.cognitoPostConfirmation
    events: # cognito post confirmation trigger
      - cognitoUserPool:
          pool: CognitoUserPoolToDoUserPool
          trigger: PostConfirmation
resources:
  - ${file(./resources/appsync-dynamo-role.yml)}
  - ${file(./resources/dynamo-table.yml)}
  - ${file(./resources/web-hosting-bucket.yml)}
  - ${file(./resources/cognito-userpool.yml)}
然后我们再进行部署。
$ sls deploy --stage=dev
构建前端客户端
现在,我们的后端已经全部准备就绪并部署完毕,我们将着手开发前端客户端,以展示上述逻辑是如何拼凑起来的。
我们将使用Ant Design来制作UI组件,为了验证用户密码,我们将使用一个密码验证器。我们在设置用户池的时候加入了密码要求,应该是这样的。
- 至少有八个字符
- 至少一个大写字母
- 至少一个小写字母
- 至少一个符号
- 至少一个数字
在成功验证了所有需要的用户细节后,我们将有效载荷发送到Cognito API,它将向用户的电子邮件发送一个验证码,并在UserPool 中创建一个新用户。
  const onFinish = (values: any) => {
    const { firstName, lastName, email, phoneNumber, password } = values;
    // hide loader
    toggleLoading(false);
    Auth.signUp({
      username: email,
      password,
      attributes: {
        email,
        name: `${firstName} ${lastName}`,
        phone_number: phoneNumber,
      },
    })
      .then(() => {
        notification.success({
          message: "Successfully signed up user!",
          description:
            "Account created successfully, Redirecting you in a few!",
          placement: "topRight",
          duration: 1.5,
          onClose: () => {
            updateUsername(email);
            toggleRedirect(true);
          },
        });
      })
      .catch((err) => {
        notification.error({
          message: "Error",
          description: "Error signing up user",
          placement: "topRight",
          duration: 1.5,
        });
        toggleLoading(false);
      });
  };
导航到注册路线并创建一个新的用户。
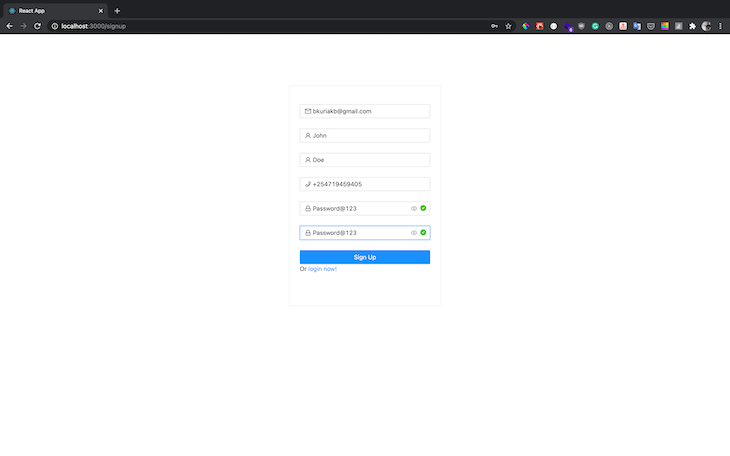
用户注册页面。
检查你的电子邮件是否有新的确认码,并按如下方式添加。
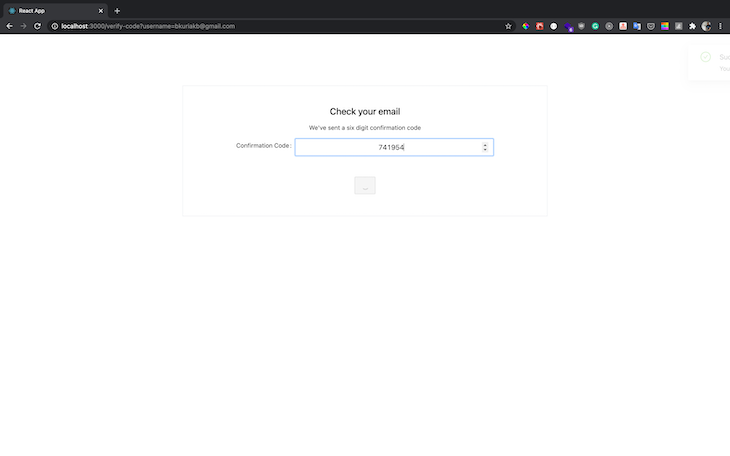
输入电子邮件确认码。
验证后,你的用户池现在应该在用户和组下有一个新用户的列表。
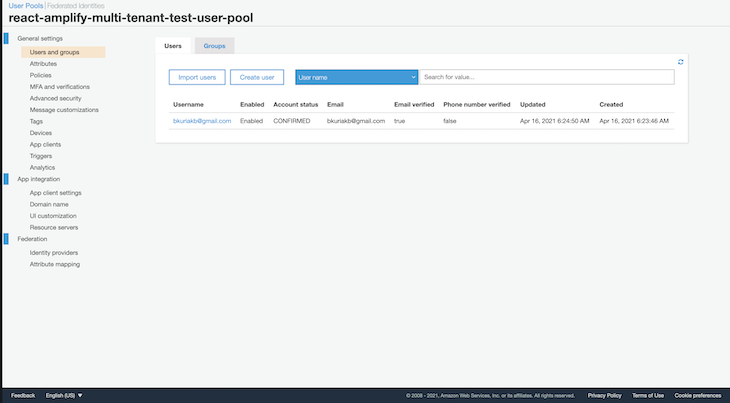
Cognito用户池。
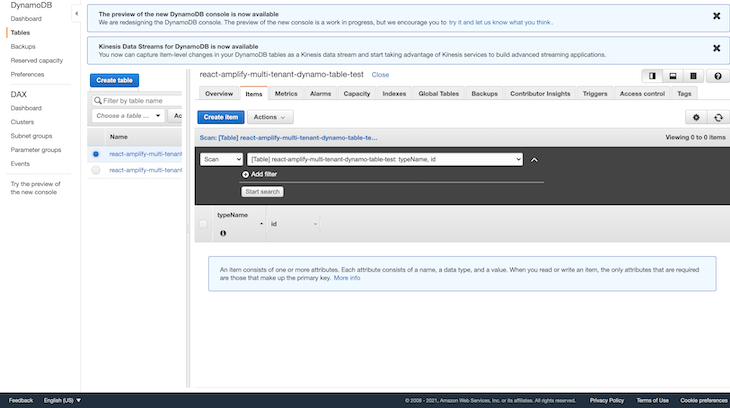
当一个新用户注册时,我们设置的确认后触发器会收到一个包含用户注册数据的有效载荷,然后我们将其作为用户记录保存到DynamoDB。打开你的AWS控制台,导航到DynamoDB,并选择新创建的表。你应该有一个新的用户记录,其中包含注册过程中的细节。
接下来,你现在可以使用新的凭证登录,之后你将被重定向到仪表板页面,在那里你可以创建、编辑和删除新的待办事项。因为这篇文章是为了演示,我们将添加一个包含所有CRUD逻辑的组件文件。
const DataList = () => {
  const [description, updateDescription] = React.useState("");
  const [updateToDoMutation] = useMutation(updateToDo);
  const [createToDoMutation] = useMutation(createToDo);
  const [deleteToDoMutation] = useMutation(deleteToDo);
  const { loading, error, data } = useQuery(listUserToDos);

  function handleCheck(event: CheckboxChangeEvent, item: ToDo) {
    updateToDoMutation({
      variables: { input: { completed, id: item.id } },
      refetchQueries: [
        {
          query: listUserToDos,
        },
      ],
    })
      .then((res) => message.success("Item updated successfully"))
      .catch((err) => {
        message.error("Error occurred while updating item");
      });
  }

  function handleSubmit(event: React.FormEvent) {
    event.preventDefault();
    createToDoMutation({
      variables: { input: { description } },
      refetchQueries: [
        {
          query: listUserToDos,
        },
      ],
    })
      .then((res) => message.success("Item created successfully"))
      .catch((err) => {
        message.error("Error occurred while creating item");
      });
  }

  function handleKeyPress(event: React.KeyboardEvent) {
    if (event.key === "Enter") {
      // user pressed enter
      createToDoMutation({
        variables: { input: { description } },
        refetchQueries: [
          {
            query: listUserToDos,
          },
        ],
      })
        .then((res) => {
          message.success("Item created successfully");
        })
        .catch((err) => {
          message.error("Error occurred while creating item");
        });
    }
  }

  function handleDelete(item: ToDo) {
    deleteToDoMutation({
      variables: { id: item.id },
      refetchQueries: [
        {
          query: listUserToDos,
        },
      ],
    })
      .then((res) => {
        message.success("Deleted successfully");
      })
      .catch((err) => {
        message.error("Error occurred while deleting item");
      });
  }

  if (loading) {
    return (
      <CenterContent>
        <LoadingOutlined style={{ fontSize: 50 }} spin />
      </CenterContent>
    );
  }

  if (error) {
    return <div>{`Error! ${error.message}`}</div>;
  }

  return (
    <ListContainer>
      <List
        header={
          <div style={{ display: "flex" }}>
            <Input
              placeholder="Enter todo name"
              value={description}
              onChange={(event) => updateDescription(event.target.value)}
              style={{ marginRight: "10px" }}
              onKeyDown={handleKeyPress}
            />
            <Button name="add" onClick={handleSubmit}>
              add
            </Button>
          </div>
        }
        bordered
        dataSource={data.listUserTodos}
        renderItem={(item: ToDo) => (
          <List.Item>
            <Checkbox
              checked={item.completed}
              onChange={(event: CheckboxChangeEvent) =>
                handleCheck(event, item)
              }
            >
              {item.description}
            </Checkbox>
            <Popconfirm
              title="Are you sure to delete this item?"
              onConfirm={() => handleDelete(item)}
              okText="Yes"
              cancelText="No"
            >
              <DeleteAction>Delete</DeleteAction>
            </Popconfirm>
          </List.Item>
        )}
      />
    </ListContainer>
  );
};
现在,添加一个新的项目。

添加新待办事项的仪表板。
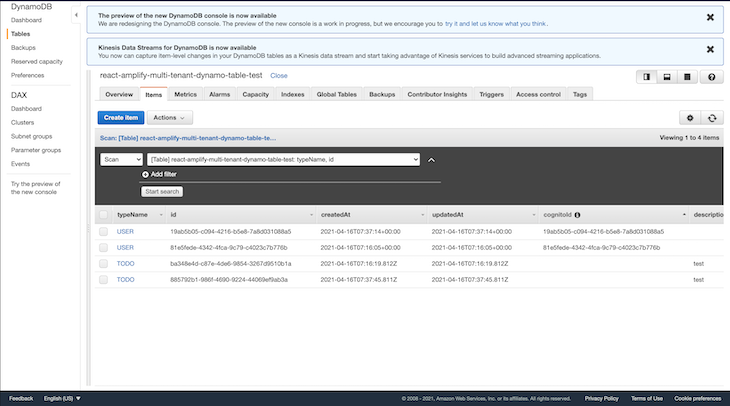
导航到DynamoDB仪表板,查看新创建的待办事项。因为我们的数据库使用的是单表设计,所以用户和待办事项记录都存储在同一个表中,如下图所示。
为了测试上述应用程序的多租户模式,请导航到你的终端,用不同的阶段名称部署一个新的实例。该部署将提供独立的新资源,有一个新的数据库和Cognito用户池。
$ sls deploy --stage=new_stage_name
总结
我希望你喜欢这篇文章,并希望你能学到一些新的东西。正如所展示的那样,构建一个多租户应用是相当具有挑战性的,因为没有一个放之四海而皆准的方法;它需要大量的预先计划和选择最适合你的解决方案。
为了保持文章的简短和可读性,我不得不省略了一些代码,但你可以在这里查看repo,如果有什么地方不符合你的期望,请提出问题,我会花时间去研究它。编码愉快
The postBuilding a multi-tenant Amplify app with a React frontendappeared first onLogRocket Blog.
