

[toc]
一、Vue2 解析
本次分析的Vue2版本为2.6。
1. 响应式原理
- 从
new Vue开始,经过了一系列调用 init、initState、initData、observe、new Obsever、defineReactive,来看下defineReactive的实现。
function defineReactive(obj, key, val) {
  const dep = new Dep();
  Object.defineProperty(obj, key, {
    get() {
      const value = val;
      // 如果存在依赖此数据的Watcher,则进行依赖搜集
      if (Dep.target) {
        dep.depend();
      }
      return value;
    },
    set(newVal) {
      if (newVal === value || (newVal !== newVal && value !== value)) {
        return
      }
      val = newVal;
      // 数据更新的时候进行派发更新
      dep.notify();
    },
  });
}
class Dep {
  static target;
  // subs 存放的 Watcher 对象集合
  subs;

  constructor() {
    this.subs = [];
  }
  addSub(sub: Watcher) {
    this.subs.push(sub);
  }
  depend() {
    if (Dep.target) {
      // 依赖收集,会调用上面的 addSub 方法
      Dep.target.addDep(this);
    }
  }
  notify() {
    const subs = this.subs.slice();
    for (let i = 0, l = subs.length; i < l; i++) {
      subs[i].update();
    }
  }
}
- 编译模板,创建 Watcher,并将
Dep.target标识为当前Watcher,来看下Watcher的实现。
class Watcher {
  constructor(vm, expOrFn) {
    // expOrFn 就是 vm._render
    this.getter = expOrFn;
    this.value = this.get();
  }
  get() {
    Dep.target = this;
    // 重新触发_render函数,生成VDom、更新Dom
    const value = this.getter.call(this.vm, this.vm);
    return value;
  }
  addDep(dep) {
    // 收集当前的Watcher为依赖
    dep.addSub(this);
  }
  update() {
    if (this.lazy) {
      this.dirty = true
    } else if (this.sync) {
      this.run()
    } else {
      queueWatcher(this)
    }
  }
  run() {
    const value = this.get();
  }
}
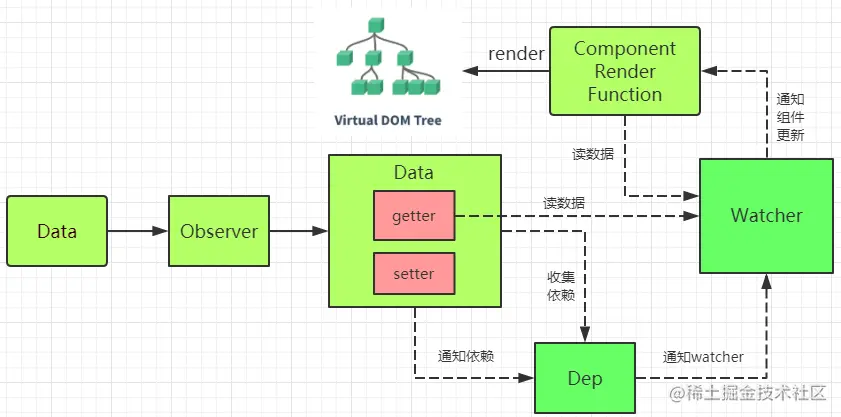
- 编译模板时,如果使用到了
Data中的数据,就会触发Data的get方法,然后调用Dep.addSub将Watcher搜集起来。 - 数据更新时,会触发
Data的set方法,然后调用 dep.notify,进而调用 watcher.update 方法,将所有使用到这个Data的Watcher加入一个异步队列。 - 最终执行 _render 方法完成页面更新
流程图如下:
2. watch原理
computed和watch内部都是利用了watcher,user watcher的过程如下:
- Vue 在 initWatch 过程中,创建
Watcher,并设置标志位 user 为true,并判断用户是否设置了immediate为true,如果是,立即执行回调; watch的对象 update 时,判断是否设置了sync为true,如果是,不加入异步队列,直接更新;Watcher更新时判断标志位user是否为true,如果是,则执行用户传入的 cb,把newVal和oldVal传入。
3. computed原理
看这个例子:
computed: {
  name() {
    return `My name is ${this.user.name}`;
  }
}
computed watcher的过程如下:
- Vue 在 initComputed 过程中,创建标志位
lazy为true的Watcher: - 因为初始化的时候
dirty=lazy=true,会调用 watcher.evaluate 方法进行一次求值 this.getter.call(vm, vm) ,此时会访问this.user.name,所以会触发其依赖收集。这时候Dep.target的值为computed watcher,依赖收集完后,this.user.name的dep中就有了computed watcher; - 然后在
watcher.evaluate中将dirty设置为false; - 如果
Dep.target存在,则调用 watcher.depend 进行一次render watcher的收集;
// 创建computed的getter的工厂函数
function createComputedGetter (key) {
  return function computedGetter () {
    const watcher = this._computedWatchers && this._computedWatchers[key]
    if (watcher) {
      if (watcher.dirty) {
        watcher.evaluate()
      }
      if (Dep.target) {
        watcher.depend()
      }
      return watcher.value
    }
  }
}
- 当
name值改变时,会触发set,然后通知computed watcher,执行 update 方法,并将dirty设置为true。 - 再次访问
computed属性时,如果dirty为false,则不会执行 watcher.evaluate 方法,直接返回之前缓存的值,如果dirty为true,则重新计算。
watch 和 computed 在实现原理上的不同:
- watch 实现是给 watch 对象的每一个 key 分配了一个 watcher,this.get() 取值,收集当前的用户 watcher,并保存下初始值。当 key 变化的时候,触发watcher.run(),保存下新值,同时执行回调函数 cb。
- computed 的实现通过给 computed 对象的每一个 key 分配了一个 lazy Watcher,默认不执行,取值的时候才执行。Object.defineProperty 在 vm 上定义了computed 的每个 key。通过 key 所依赖值收集当前的渲染 watcher,来实现依赖值变化,视图更新。通过 dirty 属性来实现缓存效果。
二、Vue3 解析
Vue3 的代码在 vue-next 仓库中,本次分析的版本是3.2。响应式部分在reactivity文件夹中,并且可独立引用。
Vue3 的响应式多了一个副作用函数,即effect函数,指的是响应式数据在发生变更的时候,要执行的函数。
1. 响应式原理
function reactive(obj: any) {
  const proxy = new Proxy(obj, {
    get(target, key, receiver) {
      track(target, key);
      let res = Reflect.get(target, key);
      return res;
    },
    set: function (target, key, value, receiver) {
      const res = Reflect.set(target, key, value, receiver);
      trigger(target, key);
      return res;
    }
  });
  return proxy;
}
- 依赖收集在 targetMap 中,其是一个
WeakMap,key是响应式对象,value是Map类型的 depsMap。depsMap的key是响应式对象的key,value是 effect 函数。
type KeyToDepMap = Map<any, Dep>
const targetMap = new WeakMap<any, KeyToDepMap>()

function trigger(target: any, key: ObjKeyType) {
  const depsMap = targetMap.get(target);
  if (!depsMap) {
    return;
  }

  let deps = depsMap.get(key);
  if (deps) {
    deps.forEach((efn: EffectFn) => efn());
  }
}

function track(target: any, key: ObjKeyType) {
  if (effectStack.length === 0) return;

  let depMap = targetMap.get(target);
  if (!depMap) {
    targetMap.set(target, (depsMap = new Map()))
  }

  let deps = depMap.get(key);
  if (!deps) {
    depMap.set(key, (deps = new Set()));
  }

  // 添加栈顶副作用作为依赖
  deps.add(getCurrentEffect());
}
- 响应式Data更新的时候会触发 trigger,然后从
targetMap中取出对应的依赖进行更新。 effect函数的创建时机包括 mountComponent、computed、watch 等。
流程图如下:
2. ref原理
ref 是一个语法糖,返回一个对象,其在get中调用track,set中调用trigger。
function ref(value) {
  const res = {
    get value() {
      track(res, 'value');
      return value;
    },
    set value(newVal) {
      value = newVal;
      trigger(res, 'value');
    }
  };

  return res;
}
3. Vue3 的computed原理
- computed 内部用
effect函数包裹传入的函数getter,并执行getter,拿到value; - 内部
effect中调用了trigger,这样computed依赖的值变化的时候,会触发此effect函数执行,也就能够触发依赖computed的effect函数也得到执行; - 构造一个对象,对象的
get方法中调用了track,进行了一次依赖收集; - 最后返回构造的对象
function computed(getter) {
  let value;
  let res;
  effect(() => {
    value = getter();
    trigger(res, 'value');
  })
  res = {
    get value() {
      track(this, 'value');
      return value;
    }
  }
  return res;
}
三、动手实现
主要是以下几个类和方法:
- Dep (addSub, notify)
- Watcher (get, update)
- Vue (init)
- observer => defineReactive
// 判断是否是对象
function isObject(data) {
  return Object.prototype.toString.call(data) === '[object Object]'
}
// 订阅器
function Dep(){
  this.subs = []
}

Dep.prototype = {
  addSub(sub) {
    this.subs.push(sub)
  },
  notify() {
    this.subs.map(sub => {
      sub.update()
    })
  }
}

Dep.target = null
// 观察者
function observer(data) {
  if (!data || !isObject(data)) {
    return
  }
  Object.keys(data).map(key => {
    defineReactive(data, key, data[key])
  })
}

function defineReactive(data, key, value) {
  const dep = new Dep()
  Object.defineProperty(data, key, {
    enumerable: true,
    configurable: true,
    get() {
      if (Dep.target) {
        dep.addSub(Dep.target)
      }
      return value
    },
    set(newVal) {
      if (value !== newVal) {

        value = newVal // 这两句的顺序很关键,必须先赋新的值,才能成功notify
        dep.notify()
      }
    }
  })

  if (value && isObject(value)) {
    observer(value)
  }
}
// 订阅者
function Watcher(vm, prop, cb) {
  this.vm = vm
  this.prop = prop
  this.cb = cb
  this.value = this.get()
}

Watcher.prototype = {
  get() {
    Dep.target = this
    const value = this.vm.$data[this.prop]
    Dep.target = null
    return value
  },
  update() {
    let value = this.value
    const newVal = this.vm.$data[this.prop]
    if (value !== newVal) {
      this.value = newVal
      this.cb(newVal)
    }
  }
}
// Vue
function Vue(options) {
  this.$data = options.data
  this.init()
}

Vue.prototype.init = function() {
  observer(this.$data)
  // this.$data = observer(this.$data) // 用Proxy实现观察者的话需替换为这行
  new Watcher(this, 'msg', (value) => { // 模拟编译过程中的监听
    console.log('-----------------', value)
  })
}
// 测试
const vm = new Vue({
  data: {
    msg: 'test'
  }
})

setTimeout(() => {
  vm.$data['msg'] = 'test2'
}, 1000)
上面是用 Object.defineProperty 实现的响应式,如果要用 Proxy 实现的话,可以用下面这个:
// Proxy 实现观察者
function observer(data) {
  if (!data || isObject(data)) return

  const dep = new Dep()

  return new Proxy(data, {
    get(target, key, receiver) {
      if (Dep.target) {
        dep.addSub(Dep.target)
      }
      return Reflect.get(target, key, receiver)
    },
    set(target, key, value, receiver) {
      if (target[key] !== value) {
        Reflect.set(target, key, value, receiver)
        dep.notify()
      }
    }
  })
}
再实现一下 watch,watch 比较简单,只需要在 Vue 的 init 方法中,对每一个 watch 声明一个 Watcher:
Vue.prototype.init = function() {
  // ...
  if (this.$options.watch) {
    const obj =  this.$options.watch;
    Object.keys(obj).map((key) => {
      const watchCb = obj[key];

      new Watcher(this, key, (value, oldVlaue) => {
        watchCb(value, oldVlaue);
      });
    });
  }
}
computed 的实现比较复杂,因为涉及到 computed 依赖的对象发生变化时,要让 computed 中的值也跟着变化。computed本质是也是一个 Watcher,所以要在 Watcher 中存储它的依赖,它的依赖其实也是一个 Watcher。
可以参考这篇文章。
四、总结
对比 Vue2 和 Vue3 的响应式实现方式的不同,可以看出
- Vue2 使用
Object.defineProperty进行数据劫持,Vue3 使用Proxy,后者优势在于可以劫持push、pop等方法,也因为在顶层对象直接劫持,可以提高性能。 - 依赖收集器的数据结构有变化,Vue2 的依赖收集在
Dep.subs中,也就是一个类的数组中,Vue3 的依赖收集在targetMap中,其是一个WeakMap。 - Vue3 的响应式结构更加简单,与其他部分耦合性小,并已经独立成包,即可以和其他框架进行结合。
五、相关资料
- 图解 Vue 响应式原理
- 搞懂computed和watch原理,减少使用场景思考时间
- Vue源码之computed和watch
- Vue.js 技术揭秘
- vue3.0响应式函数原理
- 手写Vue3 响应式(Reactivity)模块
- vue3源码分析(三)—— 响应式系统(reactivity)
- Vue3 深度解析
- watch、computed在实现原理上有什么不同
20240301 更新
为什么引入 Watcher
Vue 中定义一个 Watcher 类来表示观察订阅依赖。至于为啥引入Watcher,《深入浅出vue.js》给出了很好的解释:
当属性发生变化后,我们要通知用到数据的地方,而使用这个数据的地方有很多,而且类型还不一样,既有可能是模板,也有可能是用户写的一个watch,这时需要抽象出一个能集中处理这些情况的类。然后,我们在依赖收集阶段只收集这个封装好的类的实例进来,通知也只通知它一个,再由它负责通知其他地方。
「依赖收集的目的是:」 将观察者 Watcher 对象存放到当前闭包中的订阅者 Dep 的 subs 中。形成如下所示的这样一个关系(图参考《剖析 Vue.js 内部运行机制》)。
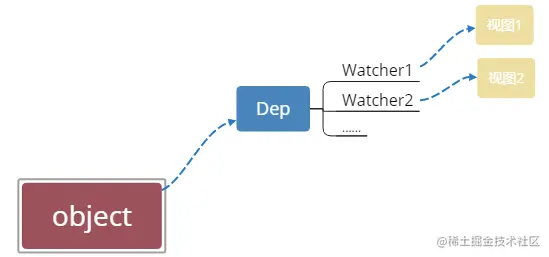
Watcher 和 Observer 的理解
Watcher 是依赖,Dep 是依赖列表,Observer 是观察者
Watcher 是靠近模版一侧,或者是自定义的 Watcher。而 Observer 是对开发者声明的 data,进行响应式劫持,get 中会把 Watcher 放到 dep.subs中, set 时会依次触发 sub 的 notify,来更新视图
data 的每一个 key,在 Observer 劫持时,都有一个独立的 Dep 对象
Watcher 只在构造函数中对 Dep.target 赋值一次 this,也就可以防止重复被收集。
「依赖的本质:」
所谓的依赖,其实就是Watcher。
至于如何收集依赖,总结起来就一句话:
在getter中收集依赖(收集Watch当如Dep中),在setter中触发依赖。先收集依赖,即把用到该数据的地方收集起来,然后等属性发生变化时,把之前收集好的依赖循环触发一遍就行了。
Dep 和 Watcher 的关系
Observer 负责将数据转换成 getter/setter 形式; Dep 负责管理数据的依赖列表;是一个发布订阅模式,上游对接 Observer,下游对接 Watcher Watcher 是实际上的数据依赖,负责将数据的变化转发到外界(渲染、回调); 首先将 data 传入 Observer 转成 getter/setter 形式;当 Watcher 实例读取数据时,会触发 getter,被收集到 Dep 仓库中;当数据更新时,触发 setter,通知 Dep 仓库中的所有 Watcher 实例更新,Watcher 实例负责通知外界
- Dep 负责收集所有相关的的订阅者 Watcher ,具体谁不用管,具体有多少也不用管,只需要根据 target 指向的计算去收集订阅其消息的 Watcher 即可,然后做好消息发布 notify 即可。
- Watcher 负责订阅 Dep ,并在订阅的时候让 Dep 进行收集,接收到 Dep 发布的消息时,做好其 update 操作即可。
