

简介
尽管Stripe只是第二大最流行的支付网关(PayPal仍然是第一大支付网关),但它在世界各地的新公司和现有公司中的使用率正在稳步上升。据报道,Stripe已经处理了价值超过2000亿美元的交易。
虽然有很多其他的支付处理器,但Stripe使处理国际交易变得很容易,特别是当你希望接受美元、英镑、欧元或任何其他国际货币支付时。
随着官方Stripe React Native SDK的发布,在你的React Native App中通过Stripe接受付款或设置订阅变得更加容易。虽然该SDK仍处于测试阶段,但我们应该深入了解该SDK所提供的功能,以及它是如何减少集成时间和增强UI/UX的。
在本教程中,我将向你展示如何使用新发布的、官方的Stripe React Native SDK来接受付款。
下面是我们要讲的内容。
- 什么是Stripe?
- Stripe的React Native SDK
- 设置一个Stripe账户
- 构建一个React Native Stripe应用
- 构建支付屏幕
要跟上这个React Native造型教程,你应该有。
- 熟悉CSS、HTML和Javascript(ES6)。
- 在你的开发机器上安装Node.js和Watchman
- 用于测试的iOS模拟器或Android模拟器
- 在你的开发机器上安装一个代码编辑器(如VS Code)。
- 对React有一个基本的了解
什么是Stripe?
Stripe是一种金融和软件服务,帮助软件开发商和电子商务公司通过其API实现无缝支付。你可以把Stripe称为软件即服务(SaaS)公司。
随着金融科技不断获得世界各地新的和现有的SaaS公司的赞助,在网上发布的三个付费服务中就有一个使用Stripe作为支付选项。深入了解如何在你的React Native应用中整合Stripe,将是减少你的iOS和Android应用中支付整合麻烦的最佳方式。
Stripe的React Native SDK
现在您已经了解了Stripe是什么,开始使用Stripe API的最好方法是阅读这里的Stripe官方文档。
但你猜怎么着?Stripe React Native SDK可以将这个过程减少60%左右。
让我们探索一下Stripe React Native SDK,看看它能提供什么。下面是v0.1.2版本的功能列表。
安全性
Stripe React Native SDK帮助您收集敏感数据,如信用卡号码,并通过将数据发送到Stripe的API而不是通过您的后端服务器来安全地接受付款。
苹果支付和其他支付方式
SDK的特点是支持多种支付方式,如银行转账、借记和重定向;信用卡;先买后付;优惠券和数字钱包。它还具有对Apple Pay的选择支持。你可以在这里阅读Stripe关于整合Apple Pay的官方文档,以及如何整合其他支付方式的文档。
适用于SCA
该SDK默认执行3D认证,符合Stripe提供的强客户认证。在这里阅读更多关于Stripe的卡片认证和3D安全的信息。
本地用户界面
Stripe React Native SDK带有本地屏幕和元素,可以在Android和iOS中安全地接受付款。
预建的支付界面(测试版
该SDK支持Stripe提供的预建支付UI。该功能处于测试阶段,支持Apple Pay、Google Pay和卡片支付UI。然而,有计划在未来建立对更多支付选项的支持。你可以在这里阅读关于Stripe支付UI的信息。
在这些教程中,我们将通过在我们的React Native App中构建和测试一个支付屏幕来探索上述的一些功能。让我们在下一节中开始吧。
设置一个Stripe账户
每个SDK都需要个人访问密钥,Stripe也不例外。为了继续这个React Native教程,我们必须创建一个Stripe账户并获得我们的个人密钥,以便接受付款。
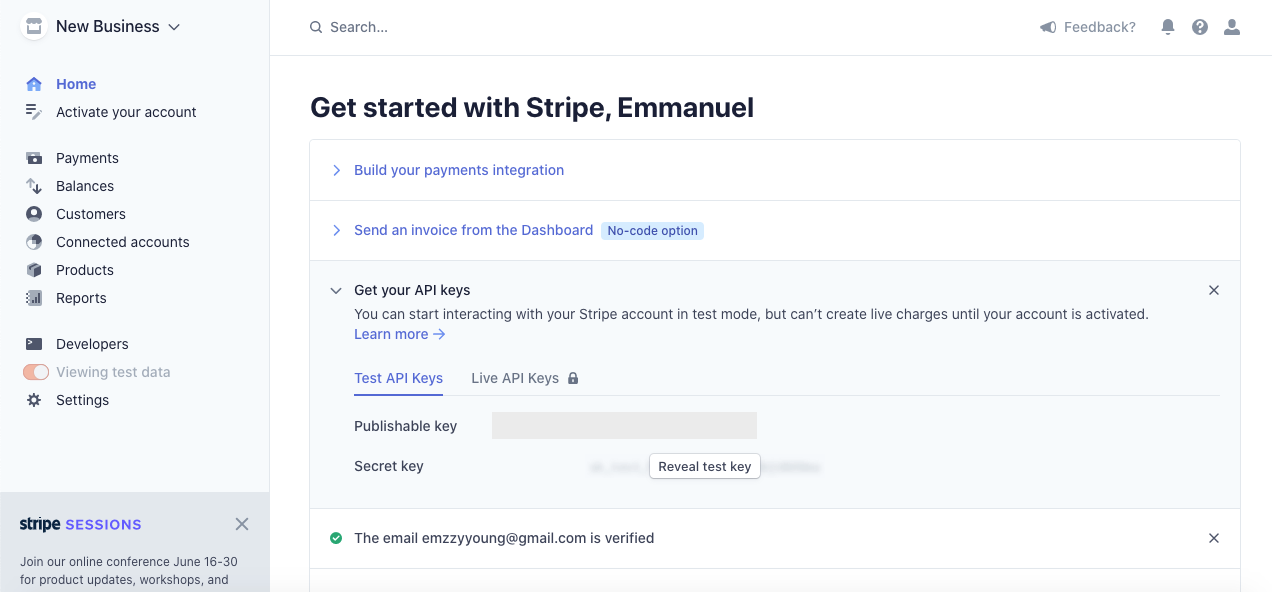
第一步是访问dashboard.stripe.com/register,创建一个账户,或登录到你现有的账户。
接下来,获得你的公钥。请务必保持您的密钥的私密性;它是您Stripe账户的访问密钥。
下面的截图显示了您可以在Stripe账户中找到您的公钥。
React Native Stripe应用程序
现在您已经创建了您的Stripe账户并获得了公钥,让我们初始化一个新的React Native应用程序并安装Stripe React Native SDK。
导航到您的开发目录,粘贴下面的命令来安装一个新的React Native应用程序。
npx react-native StripeReactNative
一旦安装完成,通过终端导航到StripeReactNative ,并粘贴下面的代码,将Stripe React Native SDK包安装到您的应用程序中。
yarn add @stripe/stripe-react-native
or
npm install @stripe/stripe-react-native
Stripe React Native SDK对Android和iOS的支持有一些要求。您可以参考这里。
安卓
- Android 5.0(API级别21)及以上
- 安卓Gradle插件4.x及以上
iOS
- 与针对iOS 11或以上版本的应用程序兼容。
在iOS中安装
在iOS中安装Stripe React Native SDK比在Android中安装要复杂一些。
StripeReactNative.xcworkspace 为了避免通过npm安装软件包后出现错误,请在XCode ,并将您的部署目标设置为iOS 11.0. ,见下面的截图为例。
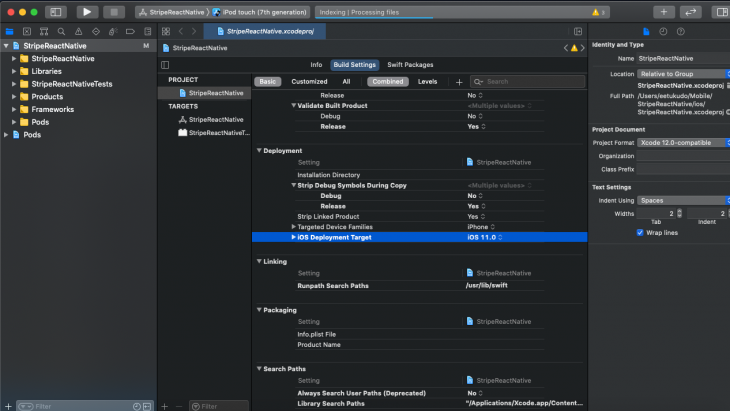
从Xcode中运行你的项目,以确保所有的变化都被应用,然后导航到iOS文件夹中。打开podfile, 更新platform :ios, '10.0' 到platform :ios, '11.0', 然后运行pod install 。这将为iOS安装Stripe的本地依赖。
接下来,让我们去掉App.js 中的默认React Native代码。用下面的代码更新App.js 文件。
/**
 * Sample React Native App
 * https://github.com/facebook/react-native
 *
 * @format
 * @flow strict-local
 */
import React from 'react';
import {
  SafeAreaView,
  StyleSheet,
} from 'react-native';


const App = ()  => {
  return (
    <SafeAreaView>
    </SafeAreaView>
  );
};
const styles = StyleSheet.create({
});
export default App;
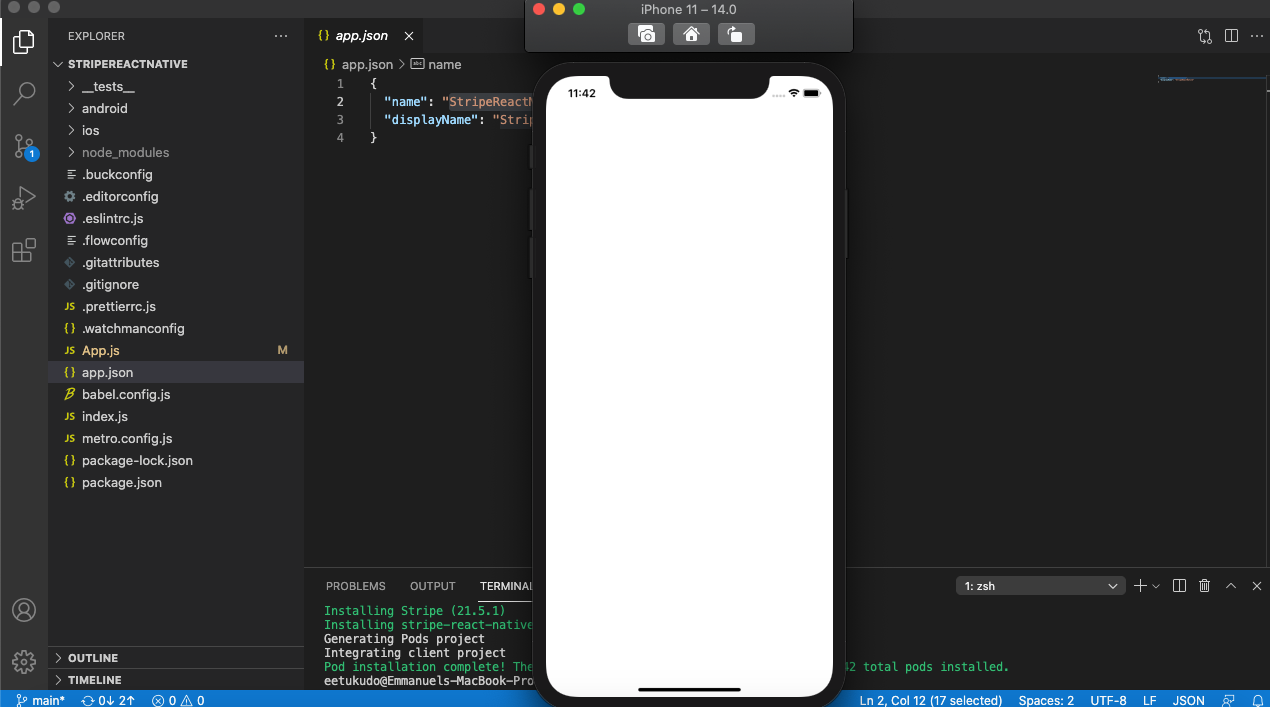
如果你运行该应用,你应该看到一个类似于下面的空白屏幕。
构建支付屏幕
现在我们已经成功安装了SDK,让我们继续构建我们的第一个支付屏幕。
构建一个卡片组件
首先,在你的React Native应用的根目录下创建一个名为screens 的新文件夹。
导航到该文件夹并创建一个新文件,名为paymentScreen.js ,然后粘贴下面的代码。
import React, {useState} from "react";
import {
    CardField,
    CardFieldInput,
    useStripe,
  } from '@stripe/stripe-react-native';

  export default PaymentScreen = () => {
    const [card, setCard] = useState(CardFieldInput.Details | null);
    const {confirmPayment, handleCardAction} = useStripe()
    return(
        <CardField
      postalCodeEnabled={true}
      placeholder={{
        number: '4242 4242 4242 4242',
      }}
      cardStyle={{
        backgroundColor: '#FFFFFF',
        textColor: '#000000',
      }}
      style={{
        width: '100%',
        height: 50,
        marginVertical: 30,
      }}
      onCardChange={(cardDetails) => {
        setCard(cardDetails);
      }}
      onFocus={(focusedField) => {
        console.log('focusField', focusedField);
      }}
    />
    )
  }
接下来,让我们把paymentScreen.js 导入到我们项目的根目录中。
打开App.js ,并更新其代码,使其看起来像下面的代码。
/**
 * Sample React Native App
 * https://github.com/facebook/react-native
 *
 * @format
 * @flow strict-local
 */
import React from 'react';
import {
  SafeAreaView,
  StyleSheet,
} from 'react-native';
import { StripeProvider } from '@stripe/stripe-react-native';
import PaymentScreen from "./screens/paymentScreen";
const App = ()  => {
  const publishableKey = "pk_test_AtN3VLAFhzbLNqf3Y9z50iNQ";
  return (
    <StripeProvider
      publishableKey={publishableKey}
    >
      <PaymentScreen />
    </StripeProvider>
  );
};
const styles = StyleSheet.create({
});
export default App;
让我们运行我们的应用程序来测试我们到目前为止所建立的东西。运行npx react-native run-ios ,为iOS运行一个构建。
你可能会遇到一个undefined symbols for architecture x86_64 的错误,但不要惊慌!要修复这个错误,请按照以下步骤进行。要解决这个错误,请按照下面的步骤进行。
LIBRARY_SEARCH_PATHS = (
remove: "\"$(TOOLCHAIN_DIR)/usr/lib/swift/$(PLATFORM_NAME)\"",
remove: "\"$(TOOLCHAIN_DIR)/usr/lib/swift-5.0/$(PLATFORM_NAME)\"",
"\"$(inherited)\"",
);
在Xcode 中打开你的项目,创建一个新的Swift文件**(文件**>新建**>文件>Swift)。将文件命名为任何东西(例如,Fix.swift ),并在Xcode的提示下选择创建一个桥接头**。
再次运行npx react-native run-ios ,错误应该被修复。如果你成功了,你的应用程序在加载后应该看起来像下面的截图。

我们刚刚创建了一个简单的卡片组件,它将卡片的详细信息直接发送到Stripe服务器进行实时验证,随后存储组件的状态。
预建UI(单步式
这个功能是在Stripe中使用信用卡详细信息接受付款的所有步骤的组合。这种集成需要一个从您的服务器与Stripe API进行通信的端点。
创建端点
为了建立一个从React Native与Stripe通信的服务器,我们需要初始化一个新的node.js 应用程序,即install express body-parser 和dotenv 。
创建一个名为server 的新文件夹,导航到该文件夹,运行npm init -y ,并按照说明创建一个新的Node应用程序。然后,运行npm i express body-parser dotenv 。
最后,在服务器文件夹的根层创建一个server.js 文件,并将下面的代码粘贴到该文件中。
require("dotenv").config();
const express = require("express");
const app = express();
const { resolve } = require("path");
const stripe = require("stripe")(process.env.secret_key); // https://stripe.com/docs/keys#obtain-api-keys
app.use(express.static("."));
app.use(express.json());
// An endpoint for your checkout
app.post("/checkout", async (req, res) => {
  // Create or retrieve the Stripe Customer object associated with your user.
  let customer = await stripe.customers.create(); // This example just creates a new Customer every time

  // Create an ephemeral key for the Customer; this allows the app to display saved payment methods and save new ones
  const ephemeralKey = await stripe.ephemeralKeys.create(
    {customer: customer.id},
    {apiVersion: '2020-08-27'}
  );

  // Create a PaymentIntent with the payment amount, currency, and customer
  const paymentIntent = await stripe.paymentIntents.create({
    amount: 973,
    currency: "usd",
    customer: customer.id
  });

  // Send the object keys to the client
  res.send({
    publishableKey: process.env.publishable_key, // https://stripe.com/docs/keys#obtain-api-keys
    paymentIntent: paymentIntent.client_secret,
    customer: customer.id,
    ephemeralKey: ephemeralKey.secret
  });
});

app.listen(process.env.PORT, () =>
  console.log(`Node server listening on port ${process.env.PORT}!`)
);
不要忘记用下面的代码创建一个.env 文件。
secret_key=Your_Secret_Key
PORT=8000
接下来,用下面的代码更新paymentScreen.js ,在应用程序中添加一个结账按钮。
import React, { useState, useEffect } from "react";
import { StyleSheet, Button, View} from 'react-native';
import {
  CardField,
  CardFieldInput,
  useStripe,
} from '@stripe/stripe-react-native';

export default PaymentScreen = () => {
  const [card, setCard] = useState(CardFieldInput.Details | null);
  const { confirmPayment, handleCardAction } = useStripe()
  const API_URL = "http://localhost:8000";
  const { initPaymentSheet, presentPaymentSheet } = useStripe();
  const [loading, setLoading] = useState(false);

  const fetchPaymentSheetParams = async () => {
    const response = await fetch(`${API_URL}/checkout`, {
      method: 'POST',
      headers: {
        'Content-Type': 'application/json',
      },
    });
    const { paymentIntent, ephemeralKey, customer } = await response.json();
    return {
      paymentIntent,
      ephemeralKey,
      customer,
    };
  };
  const initializePaymentSheet = async () => {
    const {
      paymentIntent,
      ephemeralKey,
      customer,
    } = await fetchPaymentSheetParams();
    const { error } = await initPaymentSheet({
      customerId: customer,
      customerEphemeralKeySecret: ephemeralKey,
      paymentIntentClientSecret: paymentIntent,
    });
    if (!error) {
      setLoading(true);
    }
  };
  const openPaymentSheet = async () => {
    const { error } = await presentPaymentSheet({ clientSecret });
    if (error) {
      Alert.alert(`Error code: ${error.code}`, error.message);
    } else {
      Alert.alert('Success', 'Your order is confirmed!');
    }
  };
  useEffect(() => {
    initializePaymentSheet();
  }, []);
  return (
    <View style={styles.container}>
      <CardField
        postalCodeEnabled={false}
        placeholder={{
          number: '4242 4242 4242 4242',
        }}
        cardStyle={{
          backgroundColor: '#FFFFFF',
          textColor: '#000000',
        }}
        style={{
          width: '100%',
          height: 50,
          marginVertical: 30,
        }}
        onCardChange={(cardDetails) => {
          setCard(cardDetails);
        }}
        onFocus={(focusedField) => {
          console.log('focusField', focusedField);
        }}
      />
        <Button
          style={styles.button}
          disabled={!loading}
          title="Checkout"
          color="#841584"
          onPress={openPaymentSheet}
        />
        </View>
  )
}
const styles = StyleSheet.create({
  container: {
     flex: 1,
     padding: 20,
     marginHorizontal: 10,
     marginVertical: 10,
  },
  button: {
     backgroundColor: '#00aeef',
     borderColor: 'red',
     borderWidth: 5,
     borderRadius: 15
  }
})
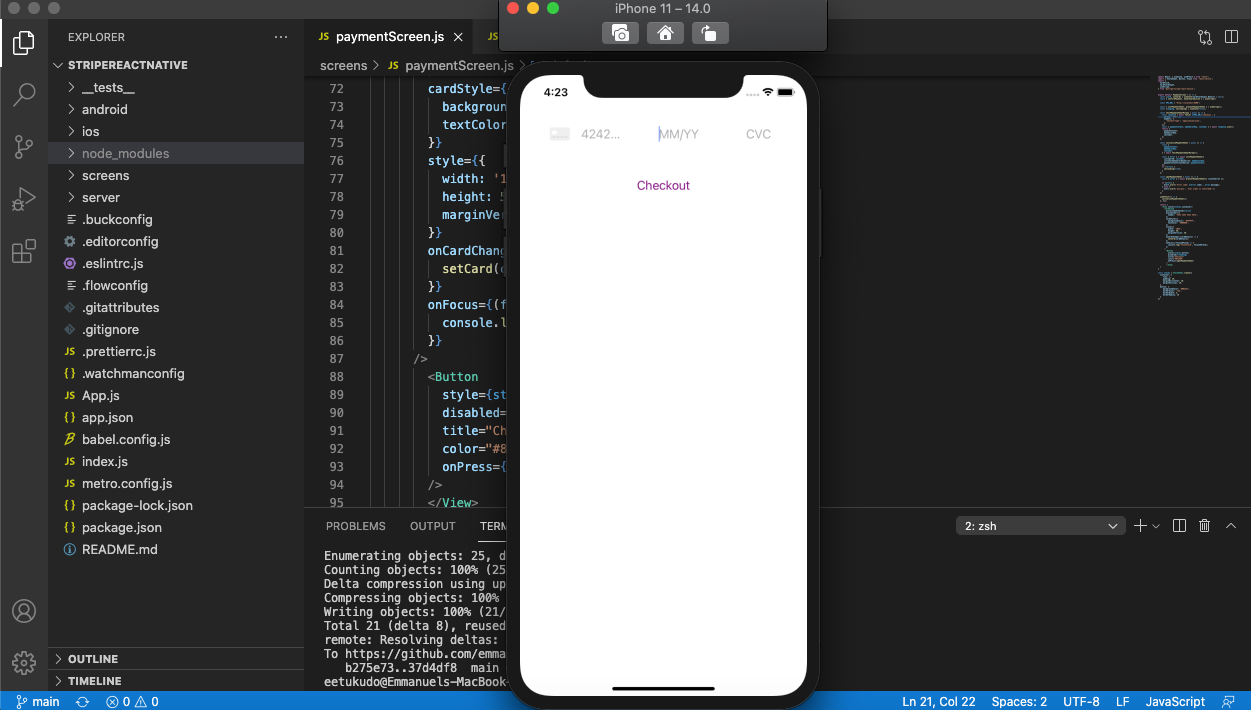
如上所示,创建一个单独的node.js 项目,并设置服务器的端口为8000。从React Native,向服务器的/checkout 端点发送请求。一旦请求成功,将使用useEffect 钩子调用initializePaymentSheet 。
在这个过程中,按钮保持禁用状态,直到从后端收到响应。请注意,只要你打算与后端服务器通信,你的后端服务器就必须启动和运行。
在这一点上,你的应用程序看起来应该与下面的截图相似。
结论
Stripe的React Native SDK非常容易实现。由于支持预制UI(包括未来支持更多预制UI的计划)和支付选项,它正在成为开发者的最爱。
The postExploring the new Stripe React Native SDKappeared first onLogRocket Blog.
