

前言
大家好,这里是 CSS 魔法使——alphardex。
粒子动画,指的是许多微粒在某个空间内做出有序或无序的运动,并且颜色大小也能按照一定规律进行改变的动画。而本文要实现的,正是一种粒子按着路径发光移动的效果
关键词解读
- 炫光:自定义着色器材质
- 路径:SVG 的 path
- 粒子:three.js 的 Points 对象
- 动画:requestAnimationFrame 里对某些变量的更新
准备工作
笔者自行封装的three.js模板:Three.js Starter
读者可以点击右下角fork一份后再开始本项目
svg的路径可以直接CV以下demo的路径(用inkscape随便画的)
正片
搭好架子
<div class="relative w-screen h-screen">
  <div class="travelling-particles w-full h-full bg-black"></div>
  <svg class="svg-particles hidden" xmlns="http://www.w3.org/2000/svg">(path数据CV到这儿)</svg>
</div>
class TravellingParticles extends Base {
  constructor(sel: string, debug: boolean) {
    super(sel, debug);
    this.perspectiveCameraParams.near = 100;
    this.perspectiveCameraParams.far = 1000;
    this.cameraPosition = new THREE.Vector3(0, 0, 600);
    this.lines = [];
    this.pointSize = 4;
    this.activePointCount = 0;
    this.params = {
      mapOffsetX: -80,
      mapOffsetY: 160,
      activePointPerLine: 100,
      opacityRate: 15,
      pointSize: 30000,
      pointSpeed: 1,
      pointColor: "#4ec0e9",
    };
  }
  // 初始化
  init() {
    this.createScene();
    this.createPerspectiveCamera();
    this.createRenderer();
    this.createEverything();
    this.createLight();
    this.createOrbitControls();
    this.addListeners();
    this.setLoop();
  }
  // 创建一切
  createEverything() {
    if (this.map) {
      this.scene.remove(this.map);
    }
    this.lines = [];
    if (this.points) {
      this.scene.remove(this.points);
      this.points = null;
    }
    this.getSvgPathsPointLineData();
    this.createPoints();
  }
}

const start = () => {
  const travellingParticles = new TravellingParticles(
    ".travelling-particles",
    true
  );
  travellingParticles.init();
};

start();
获取路径中点的数据
class TravellingParticles extends Base {
  getSvgPathsPointLineData() {
    const paths = ([
      ...document.querySelectorAll(".svg-particles path"),
    ] as unknown) as SVGPathElement[];
    paths.forEach((path) => {
      const pathLength = path.getTotalLength();
      const pointCount = Math.floor(pathLength / this.pointSize);
      const points = [];
      for (let i = 0; i < pointCount; i++) {
        // 获取点距离路径原点的距离,进而获取其坐标
        const distance = (pathLength * i) / pointCount;
        const point = path.getPointAtLength(distance);
        if (point) {
          let { x, y } = point;
          // 使点在屏幕正中央
          x -= this.params.mapOffsetX;
          y -= this.params.mapOffsetY;
          // 加点随机性
          const randX = ky.randomNumberInRange(-1.5, 1.5);
          const randY = ky.randomNumberInRange(-1.5, 1.5);
          x += randX;
          y += randY;
          points.push(new THREE.Vector3(x, y, 0));
        }
      }
      const line = {
        points,
        pointCount,
        currentPos: 0,
      } as Line;
      this.lines.push(line);
    });
  }
}
选中所有路径元素,并对它们一一处理:
- 获取路径上点的总数
- 根据点的总数能获取点距离路径原点的距离
- 利用getPointAtLength来根据这个距离计算出点的坐标
- 有了点的坐标后,就能形成一条条线了
创建点
class TravellingParticles extends Base {
  createPoints() {
    this.activePointCount = this.lines.length * this.params.activePointPerLine;
    const geometry = new THREE.BufferGeometry();
    const pointCoords = this.lines
      .map((line) => line.points.map((point) => [point.x, point.y, point.z]))
      .flat(1)
      .slice(0, this.activePointCount)
      .flat(1);
    const positions = new Float32Array(pointCoords);
    this.positions = positions;
    const opacitys = new Float32Array(positions.length).map(
      () => Math.random() / this.params.opacityRate
    );
    this.opacitys = opacitys;
    geometry.setAttribute("position", new THREE.BufferAttribute(positions, 3));
    geometry.setAttribute("aOpacity", new THREE.BufferAttribute(opacitys, 1));
    this.geometry = geometry;
    const material = new THREE.ShaderMaterial({
      vertexShader: travellingParticlesVertexShader,
      fragmentShader: travellingParticlesFragmentShader,
      side: THREE.DoubleSide,
      transparent: true,
      depthTest: true,
      depthWrite: true,
      blending: THREE.AdditiveBlending,
      uniforms: {
        uSize: {
          value: this.params.pointSize,
        },
        uColor: {
          value: new THREE.Color(this.params.pointColor),
        },
      },
    });
    this.material = material;
    const points = new THREE.Points(geometry, material);
    this.scene.add(points);
    this.points = points;
  }
}
这里主要是如何利用 three.js 来自定义形状和材质,主要是靠BufferGeometry来实现的
- 首先获取所有点的坐标,传入
position这个 attribute 内 - 生成随机的透明值,传入
aOpacity这个 attribute 内 - 创建自定义着色器材质,以实现炫光粒子的效果
- 最后创建 Points 实例,将其添加至场景中
THREE.AdditiveBlending是实现炫光效果的幕后功臣
接下来让我们来编写着色器:顶点着色器travellingParticlesVertexShader和片元着色器travellingParticlesFragmentShader
顶点着色器
决定了粒子的位置,以下的代码很通用,可以当模板用
attribute float aOpacity;

uniform float uSize;

varying float vOpacity;

void main(){
    vec4 modelPosition=modelMatrix*vec4(position,1.);
    vec4 viewPosition=viewMatrix*modelPosition;
    vec4 projectedPosition=projectionMatrix*viewPosition;
    gl_Position=projectedPosition;
    gl_PointSize*=(uSize/-viewPosition.z);

    vOpacity=aOpacity;
}
注意到透明度跟位置没关系,要把它传递给片元着色器,于是就有了vOpacity这个量来负责传递
片元着色器
决定了粒子的颜色
varying float vOpacity;

uniform vec3 uColor;

float invert(float n){
    return 1.-n;
}

void main(){
    vec2 uv=vec2(gl_PointCoord.x,invert(gl_PointCoord.y));
    vec2 cUv=2.*uv-1.;
    vec4 color=vec4(1./length(cUv));
    color*=vOpacity;
    color.rgb*=uColor;
    gl_FragColor=color;
}
以上的 color 公式计算看不懂也没关系,因为片元着色器也有很多通用的公式,这里的公式作用是形成发光圆点一般的图案,我们只需把颜色和透明度赋给它即可
动起来
创建了那么多的点,如何使它们在线上“动起来”呢?
答案是:对于每根线,遍历它们所有要动的点,增加它们的下标即可。(注意这里用到了求余符号,是用来使得运动能循环往复地进行)
但光这样还不够,必须把数据也同步到着色器上
class TravellingParticles extends Base {
  update() {
    if (this.points) {
      let activePoint = 0;
      this.lines.forEach((line) => {
        // 使线的前n个点动起来
        line.currentPos += this.params.pointSpeed;
        for (let i = 0; i < this.params.activePointPerLine; i++) {
          const currentIndex = (line.currentPos + i) % line.pointCount;
          // 将数据同步到着色器上
          const point = line.points[currentIndex];
          if (point) {
            const { x, y, z } = point;
            this.positions.set([x, y, z], activePoint * 3);
            this.opacitys.set(
              [i / (this.params.activePointPerLine * this.params.opacityRate)],
              activePoint
            );
            activePoint++;
          }
        }
      });
      this.geometry.attributes.position.needsUpdate = true;
    }
  }
}
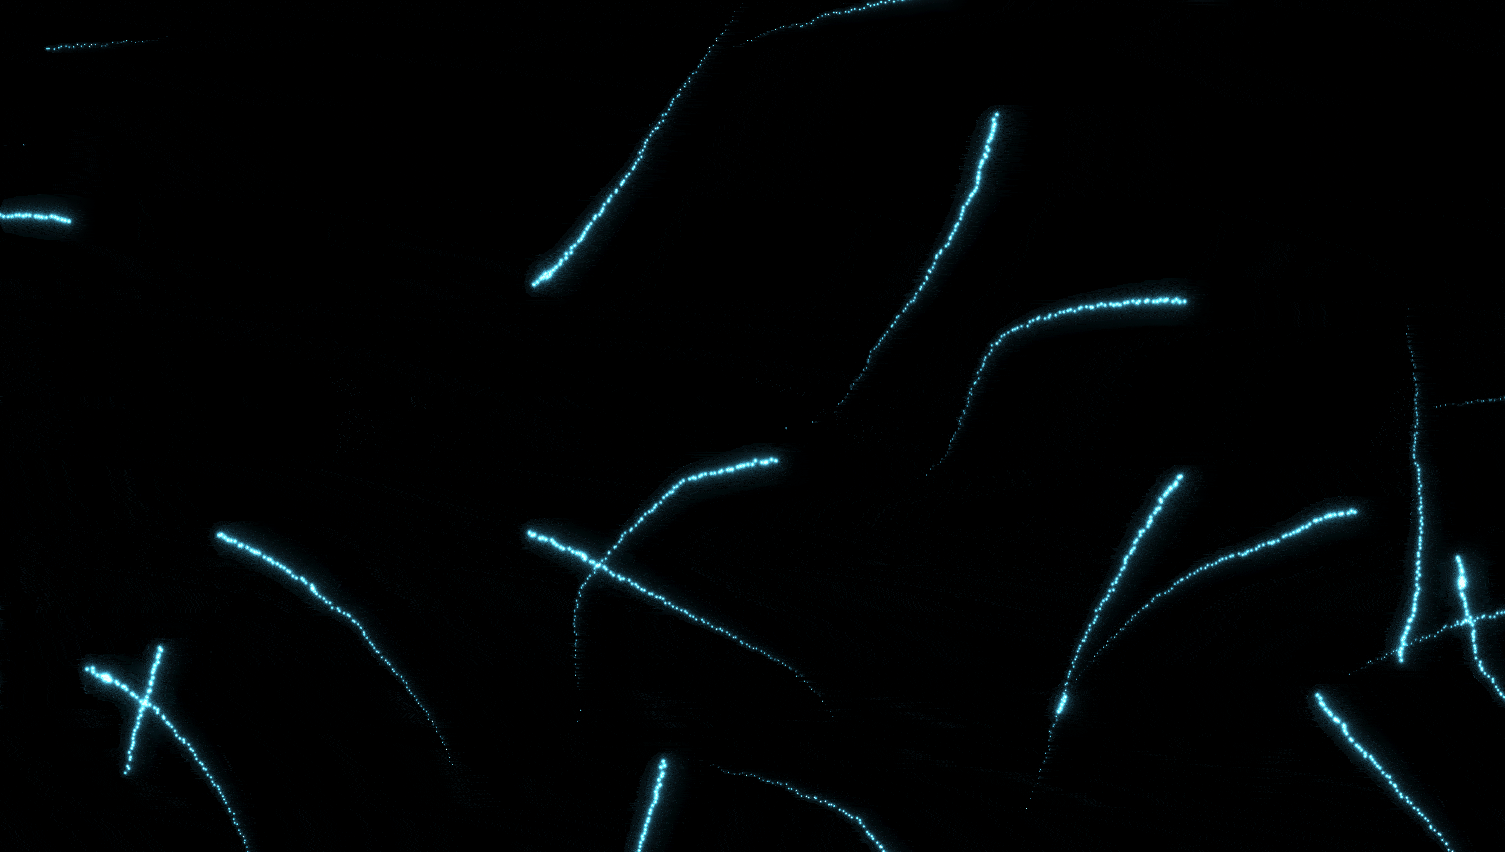
效果图
最后
three.js的自定义形状BufferGeometry配合着色器材质ShaderMaterial还能实现许多更加炫酷的效果,大家可以自行去发掘。
