

学习目标
- 掌握vue-route用法和技巧
- 掌握vue-route实现原理
- 掌握vuex理念和核心用法
- 理解vuex实现原理
知识要点
- 路由配置、导航、传参、首位
- vuex核心用法、模块化
- 混入mixins
- vue插件
- 渲染函数
动态路由
我们经常需要把某种模式匹配到的的所有路由,全部映射到一个组件中
传递路由组件参数:
{path:'/detail/:id',component:Detail,props:true}
组件以属性的方式获取
export default {props:'id'}
可以有效解耦,增加组件的通用性
路由守卫
- 全局守卫,route.js
//路由配置
{
    path:'/about',
    name:'about',
    meta:{auth:true},//需要认证
    component:()=>import ('/view/About.vue')
}
//守卫
router.beforeEach((to,from,next)=>{
    //要访问/about 且未登录需要去登录
    if(to.meta.auth&&!window.isLogin){
        if(window.confirm('请登录')){
            window.isLogin=true;
        	next()//登陆成功,继续
        }else{
        	next('/')//放弃登录,回首页
        }
    }else{
        next()//不需要登陆,继续
    }
})
权限配置
可由后台设置配置权限可访问的路由,通过异步获取路由,再利用router.addRoutes()加入到路由中
面包屑
利用$route.matched可得到路由匹配数组,按顺序解析可得到路由层次关系
watch:{
    $route(){
        //[{name:'home'},{name:'list'}]
        console.log(this.$route.matched);
        this.crumbData=this.$route.matched.map(m=>m.name)
    }
}
vue-router实现原理
- 实现插件
- url变化监听
- 路由配置解析:{'/':Home}
- 实现全局组件:router-link router-view
具体实现
import Home from './App.vue';
import Vue from 'vue'
import { render } from 'less';
class VueRoute {
  constructor(options){
    this.$options=options;
    this.routeMap={}

    //路由响应式
    this.app=new Vue({
      data:{
        current:'/'
      }
    })
  }
  init(){
    this.bindEvents();//绑定监听事件,监听url的变化
    this.createRouteMap(this.$options);//解析路由配置
    this.initComponent();//实现两个组件

  }
  bindEvents(){
    window.addEventListener('load',this.onHashChange.bind(this))
    window.addEventListener('onHashChange',this.onHashChange.bind(this))
  }
  onHashChange(){
    this.app.current=window.location.hash.slice(1)||'/'
  }
  createRouteMap(options){
    options.routes.forEach(item => {
      this.routeMap[item.path]=item.component;
    });
  }
  initComponent(){
    Vue.component('router-link',{
      props:{
        to:String
      },
      render(h){
        return h('a',{attrs:{href:'#'+this.to}},[this.$slot.default])
      }
    })

    Vue.component('router-view',{
      render:(h)=>{
        const comp=this.routeMap[this.app.current].component
        return h(comp)
      }
    })
  }
}
VueRoute.install = function (Vue) {
  Vue.minxin({
    beforeCreate() {
      if (this.$Options.router) {
        Vue.prototype.$router = this.$Options.router;
        this.$Options.router.init();
      }
    }
  })
}
Vue.use(VueRoute);

export default new VueRoute({
  routes: [{
    path: '/',
    component: Home
  }]
})
Vuex状态管理
Vuex 是一个专为 Vue.js 应用程序开发的状态管理模式。它采用集中式存储管理应用的所有组件的状态,并以相应的规则保证状态以一种可预测的方式发生变化。Vuex 也集成到 Vue 的官方调试工具 devtools extension,提供了诸如零配置的 time-travel 调试、状态快照导入导出等高级调试功能。
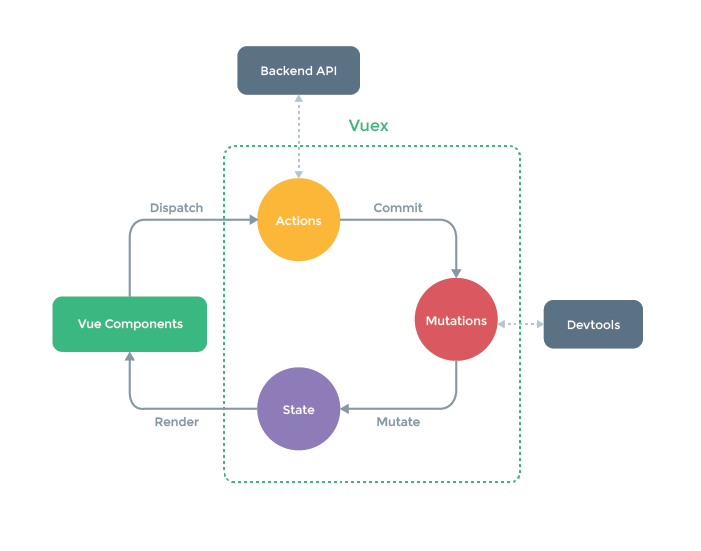
核心概念
- state 驱动应用的数据源;
- mutations 更改状态的函数;
- actions 异步操作;
- store 包含以上概念的容器
状态和状态变更
state保存数据状态,mutations用于修改状态,store.js
export default new Vuex.Store({
    state:{count:0},
    mutations:{
        increament(state,n=1){
            state.count+=n
        }
    }
})
派生状态-getters
从state派生出新的状态,类似计算属性
export default new Vuex.Store({
    state:{count:0},
    mutations:{
        increment(state,n=1){
            state.count+=n
        }
    },
    getters:{
        score(state){
            return `共扔出:${state.count}`
        }
    }
})
使用方式:
<span>{{$store.getters.score}}</span>
异步操作-actions
复杂的业务逻辑,类似于controller
actions:{
    incrementAsync(commit,dispatch){
        setTimeout(()=>{
            commit('increment',2)
        },1000)
    }
}
vuex原理解析
借用vue本身的数据响应机制使state响应化,从而使state变化立刻响应在依赖的视图中
- 实现插件
- 实现三个方法:state/mutations/actions/getters
- 创建store
- 数据的响应式
let Vue;
class Store {
  constructor(options) {
    this.state = new Vue({
      data = options.state
    })
    this.mutations = options.mutations;
    this.actions = options.actions;
  }
  commit = (type, arg) => {
    this.mutations[type](this.state, arg);

  }
  dispatch(type, arg) {
    this.actions[type]({
      commit: this.commit,
      state: this.state
    }, arg)
  }
}

function install(_Vue) {
  Vue = _Vue;
  Vue.mixin({
    beforeCreate() {
      if (this.$options.store) {
        Vue.prototype.$store = this.$option.store;

      }
    }
  })
}

export default {
  store,
  install
}
