

vue是数据驱动视图更新的框架, 所以对于vue来说组件间的数据通信非常重要;我们常用的方式莫过于通过props传值给子组件,但是vue还有其他很多不常用的通信方式,了解他们,也许在以后在写代码的时候能给你带来更多的思路和选择。
1. .sync修饰符
有些情况下,我们希望在子组件能够“直接修改”父组件的prop值,但是双向绑定会带来维护上的问题;vue提供了一种解决方案,通过语法糖.sync修饰符。
.sync修饰符在 vue1.x 的时候曾作为双向绑定功能存在,即子组件可以修改父组件中的值。但是它违反了单向数据流的设计理念,所以在 vue2.0 的时候被干掉了。但是在 vue2.3.0+ 以上版本又重新引入了。但是这次它只是作为一个编译时的语法糖存在。它会被扩展为一个自动更新父组件属性的v-on监听器。说白了就是让我们手动进行更新父组件中的值了,从而使数据改动来源更加的明显。
//Parent.vue
<template>
  <div>
    <Child :msg.sync="msg" :num.sync="num"></Child>
  </div>
</template>
<script>
import Child from "./child";
export default {
  name: "way2",
  components: {
    Child
  },
  data() {
    return {
      msg: "hello every guys",
      num: 0
    };
  }
};
</script>
我们在Child组件传值时给每个值添加一个.sync修饰,在编译时会被扩展为如下代码:
<Child :msg="msg" @update.msg="val => msg = val" :num.sync="num" @update.num="val => num = val"></Child>
因此子组件中只需要显示的触发update的更新事件:
//Child.vue
<template>
  <div>
    <div @click="clickRevert">点击更新字符串:{{ msg }}</div>
    <div>当前值:{{ num }}</div>
    <div @click="clickOpt('add')" class="opt">+</div>
    <div @click="clickOpt('sub')" class="opt">-</div>
  </div>
</template>
<script>
export default {
  props: {
    msg: {
      type: String,
      default: ""
    },
    num: {
      type: Number,
      default: 0
    }
  },
  methods: {
    clickRevert() {
      let { msg } = this;
      this.$emit("update:msg",msg.split("").reverse().join(""));
    },
    clickOpt(type = "") {
      let { num } = this;
      if (type == "add") {
        num++;
      } else {
        num--;
      }
      this.$emit("update:num", num);
    }
  }
};
</script>
这种“双向绑定”的操作是不是看着似曾相识?是的,v-model本质上也是一种语法糖,只不过它触发的不是update方法而是input方法;而且v-model没有.sync来的更加灵活,v-model只能绑定一个值。
总结:.sync修饰符优化了父子组件通信的传值方式,不需要在父组件再写多余的函数来修改赋值。
2.listeners
当需要用到从A到C的跨级通信时,我们会发现prop传值非常麻烦,会有很多冗余繁琐的转发操作;如果C中的状态改变还需要传递给A,使用事件还需要一级一级的向上传递,代码可读性就更差了。
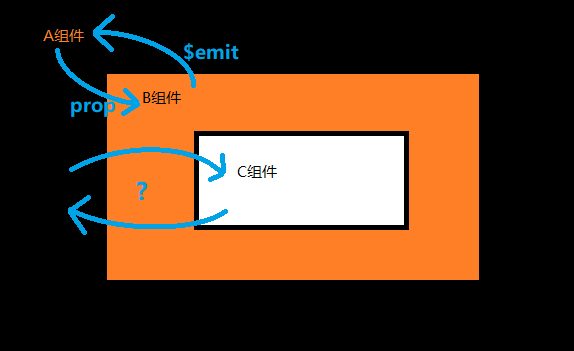
因此vue2.4+版本提供了新的方案:$attrs和$listeners,我们先来看一下官网对$attrs的描述包含了父作用域中不作为 prop 被识别 (且获取) 的特性绑定 (class 和 style 除外)。当一个组件没有声明任何 prop 时,这里会包含所有父作用域的绑定 (class 和 style 除外),并且可以通过 v-bind=”$attrs” 传入内部组件——在创建高级别的组件时非常有用。
这一大段话第一次读非常的绕口,而且晦涩难懂,不过没关系,我们直接上代码:
//Parent.vue
<template>
  <div>
    <Child
      :notUse="'not-use'"
      :childMsg="childMsg"
      :grandChildMsg="grandChildMsg"
      @onChildMsg="onChildMsg"
      @onGrandChildMsg="onGrandChildMsg"
    ></Child>
  </div>
</template>
<script>
import Child from "./child";
export default {
  data() {
    return {
      childMsg: "hello child",
      grandChildMsg: "hello grand child"
    };
  },
  components: { Child },
  methods: {
    onChildMsg(msg) {
      this.childMsg = msg;
    },
    onGrandChildMsg(msg) {
      this.grandChildMsg = msg;
    }
  }
};
</script>
我们首先定义了两个msg,一个给子组件展示,另一个给孙组件展示,首先将这两个数据传递到子组件中,同时将两个改变msg的函数传入。
//child.vue
<template>
  <div class="box">
    <div @click="clickMsg">{{ childMsg }}</div>
    <div>$attrs: {{ $attrs }}</div>
    <GrandChild v-bind="$attrs" v-on="$listeners"></GrandChild>
  </div>
</template>
<script>
import GrandChild from "./grand-child";
export default {
  props: {
    childMsg: {
      type: String
    }
  },
  methods: {
    clickMsg() {
      let { childMsg } = this;
      this.$emit(
          "onChildMsg",
          childMsg.split("").reverse().join("")
      );
    }
  },
  components: { GrandChild }
};
</script>
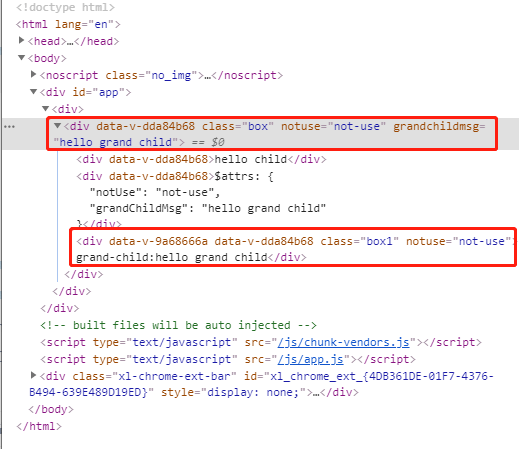
在子组件中我们通过props获取子组件所需要的参数,即childMsg;剩余的参数就被归到了$attrs对象中,我们可以在页面中展示出来,然后把它继续往孙组件中传;同时把所有的监听函数归到$listeners,也继续往下传。
//grand-child.vue
<template>
  <div class="box1" @click="clickMsg">grand-child:{{ grandChildMsg }}</div>
</template>
<script>
export default {
  props: {
    grandChildMsg: {
      type: String
    }
  },
  methods: {
    clickMsg() {
      let { grandChildMsg } = this;
      this.$emit(
        "onGrandChildMsg",
        grandChildMsg.split("").reverse().join("")
      );
    }
  }
};
</script>
在孙组件中我们继续取出所需要的数据进行展示或者操作,运行结果如下:
这样会很难看,我们可以在组件上加上inheritAttrs属性将它去掉:
export default {
    mounted(){},
    inheritAttrs: false,
}
总结:listeners很好的解决了跨一级组件传值的问题。
3.provide和inject
虽然listeners可以很方便的从父组件传值到孙组件,但是如果跨了三四级,并且想要的数据已经被上级组件取出来,这时$attrs就不能解决了。
provide/inject是vue2.2+版本新增的属性,简单来说就是父组件中通过provide来提供变量, 然后再子组件中通过inject来注入变量。这里inject注入的变量不像$attrs,只能向下一层;inject不论子组件嵌套有多深,都能获取到。
//Parent.vue
<template>
  <div>
    <Child></Child>
  </div>
</template>
<script>
import Child from "./child";
export default {
  components: { Child },
  data() {
    return {
      childmsg: "hello child",
      grandmsg: "hello grand child"
    };
  },
  provide() {
    return {
      childmsg: this.childmsg,
      grandmsg: this.grandmsg
    };
  },
  mounted() {
    setTimeout(() => {
      this.childmsg = "hello new child";
      this.grandmsg = "hello new grand child";
    }, 2000);
  },
};
</script>
我们在父组件通过provide注入了两个变量,并且在两秒之后修改变量的值,然后就在子组件和孙组件取出来。
//child.vue
<template>
  <div class="box">
    <div>child-msg:{{ childmsg }}</div>
    <div>grand-msg:{{ grandmsg }}</div>
    <GrandChild></GrandChild>
  </div>
</template>
<script>
import GrandChild from "./grand-child";
export default {
  inject: ["childmsg", "grandmsg"],
  components: { GrandChild },
};
</script>
//grand-child.vue
<template>
  <div class="box">
    <div>child-msg:{{ childmsg }}</div>
    <div>grand-msg:{{ grandmsg }}</div>
  </div>
</template>
<script>
export default {
  name: "GrandChild",
  inject: ["childmsg", "grandmsg"],
};
</script>
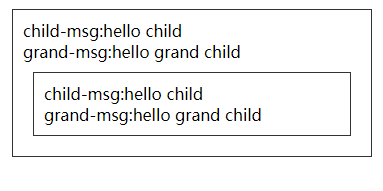
可以看到子组件和孙组件都能取出值,并且渲染出来。需要注意的是,一旦子组件注入了某个数据,在data中就不能再声明这个数据了。
同时,过了两秒后我们发现childmsg和grandmsg的值并没有按照预期的改变,也就是说子组件并没有响应修改后的值,官网的介绍是这么说的:
提示:provide 和 inject 绑定并不是可响应的。这是刻意为之的。然而,如果你传入了一个可监听的对象,那么其对象的属性还是可响应的。
vue并没有把provide和inject设计成响应式的,这是vue故意的,但是如果传入了一个可监听的对象,那么就可以响应了:
export default {
  data() {
    return {
      respondData: {
        name: "hello respond"
      }
    };
  },
  provide() {
    return {
      respondData: this.respondData
    };
  },
  mounted() {
    setTimeout(() => {
      this.respondData.name = this.respondData.name
        .split("")
        .reverse()
        .join("");
    }, 2000);
  },
}
4.EventBus
EventBus我刚开始直接翻译理解为事件车,但比较官方的翻译是事件总线。它的实质就是创建一个vue实例,通过一个空的vue实例作为桥梁实现vue组件间的通信。它是实现非父子组件通信的一种解决方案,所有的组件都可以上下平行地通知其他组件,但也就是太方便所以若使用不慎,就会造成难以维护的“灾难”。
首先创造一个空的vue对象并将其导出,他是一个不具备DOM的组件,它具有的仅仅只是它实例方法而已,因此它非常的轻便。
//main.js
import bus from "@/utils/event-bus";
Vue.prototype.$bus = bus;
将其挂载到全局,变成全局的事件总线,这样在组件中就能很方便的调用了。
//Parent.vue
<template>
  <div class="box">
    <Child1></Child1>
    <Child2></Child2>
  </div>
</template>
<script>
import Child1 from "./child1";
import Child2 from "./child2";
export default {
  components: {
    Child1,
    Child2
  }
};
</script>
我们先定义了两个子组件child1和child2,我们希望这两个组件能够直接给对方发送消息。
//child1.vue
<template>
  <div>
    <div class="send" @click="clickSend">发送消息</div>
    <template v-for="(item, index) in msgList">
      <div :key="index">{{ item }}</div>
    </template>
  </div>
</template>
<script>
export default {
  data() {
    return { msgList: [] };
  },
  mounted() {
    this.$bus.$on("getMsg1", res => {
      this.msgList.push(res);
    });
  },
  methods: {
    clickSend() {
      this.$bus.$emit("getMsg2", "hello from1:" + parseInt(Math.random() * 20));
    }
  }
};
</script>
//child2.vue
<template>
  <div>
    <div class="send" @click="clickSend">发送消息</div>
    <template v-for="(item, index) in msgList">
      <div :key="index">{{ item }}</div>
    </template>
  </div>
</template>
<script>
export default {
  data() {
    return { msgList: [] };
  },
  mounted() {
    this.$bus.$on("getMsg2", res => {
      this.msgList.push(res);
    });
  },
  methods: {
    clickSend() {
      this.$bus.$emit("getMsg1", "hello from2:" + parseInt(Math.random() * 20));
    }
  }
};
</script>
我们初始化时在child1和child2中分别注册了两个接收事件,然后点击按钮时分别触发这两个自定义的事件,并传入数据,最后两个组件分别能接收到对方发送的消息,最后效果如下:
前面也提到过,如果使用不善,EventBus会是一种灾难,到底是什么样的“灾难”了?大家都知道vue是单页应用,如果你在某一个页面刷新了之后,与之相关的EventBus会被移除,这样就导致业务走不下去。还要就是如果业务有反复操作的页面,EventBus在监听的时候就会触发很多次,也是一个非常大的隐患。这时候我们就需要好好处理EventBus在项目中的关系。通常会用到,在页面或组件销毁时,同时移除EventBus事件监听。
export default{
    destroyed(){
        $EventBus.$off('event-name')
    }
}
总结:EventBus可以用来很方便的实现兄弟组件和跨级组件的通信,但是使用不当时也会带来很多问题;所以适合逻辑并不复杂的小页面,逻辑复杂时还是建议使用vuex。
5.$refs
有时候我们需要在vue中直接来操作DOM元素,比如获取DIV的高度,或者直接调用子组件的一些函数;虽然原生的JS也能获取到,但是vue为我们提供了更方便的一个属性:$refs。如果在普通的DOM元素上使用,获取到的就是DOM元素;如果用在子组件上,获取的就是组件的实例对象。
//child.vue
<template>
  <div>初始化:{{ num }}</div>
</template>
<script>
export default {
  data() {
    return { num: 0 };
  },
  methods: {
    addNum() {
      this.num += 1;
    },
    subNum() {
      this.num -= 1;
    }
  }
};
</script>
我们首先创建一个简单的子组件,有两个函数用来增减num的值。
<template>
  <div>
    <Child ref="child"></Child>
    <div class="opt" ref="opt_add" @click="clickAddBtn">+</div>
    <div class="opt" ref="opt_sub" @click="clickSubBtn">-</div>
    <div class="opt" ref="opt_show" @click="clickShowBtn">show</div>
  </div>
</template>
<script>
import Child from "./child";
export default {
  components: { Child },
  data() {
    return {};
  },
  methods: {
    clickAddBtn() {
      this.$refs.child.addNum();
    },
    clickSubBtn() {
      this.$refs.child.subNum();
    },
    clickShowBtn() {
      console.log(this.$refs.child);
      console.log(this.$refs.child.num);
    }
  }
};
</script>
我们给子组件增加一个ref属性child,然后通过$refs.child来获取子组件的实例,通过实例来调用子组件中的函数。
