


title: Glide加载Gif的卡顿优化思路分析
date: 2020-07-26 10:08
category: NDK
tag: Glide
项目地址: GifSampleForGlide
基于Glide 4.9.0版本分析
前言
Glide图片框架是可以直接加载GIF图的,但是做一个银行合作项目的时候,由于有需要出货页面需要加载一个GIF图,但是发现在使用Glide框架加载Gif图片,明显发现有延迟.
经过查看glide加载Gif图片的源码得知:Glide在加载Gif的图片帧的时候,上一帧的渲染以及下一帧的准备是串行的,这个过程中,如果出现下一帧的准备阶段时间超过了Gif间隔播放的时长,就会造成播放卡顿.而且此过程中,StandardGifDecoder只保留上一帧的数据,每次获取当前需要绘制的帧的时候都会从BitmapPool中获取新的Bitmap(注意,这是一个新的Bitmap对象),因此加载Gif过程中,Glide至少需要两个Bitmap.这也就导致内存会消耗的过高.
下面就来研究一下Glide是如何加载Gif,以及如何进行卡顿的优化了:
Glide加载Gif原理初探

本文围绕以下关键字来介绍
- Glide
- StreamGifDecoder
- ByteBufferGifDecoder
- StandardGifDecoder
- GifDrawable
1)首先来介绍一下Gif相关的解码器
Glide的构造中可以找到Gif的相关信息.
Glide(
      @NonNull Context context,
     /*.....*/) {
    //...
    List<ImageHeaderParser> imageHeaderParsers = registry.getImageHeaderParsers();
    //..
    GifDrawableBytesTranscoder gifDrawableBytesTranscoder = new GifDrawableBytesTranscoder();

   //...
    registry
       //...
        /* GIFs */
        .append(
            Registry.BUCKET_GIF,
            InputStream.class,
            GifDrawable.class,
            new StreamGifDecoder(imageHeaderParsers, byteBufferGifDecoder, arrayPool))
        .append(Registry.BUCKET_GIF, ByteBuffer.class, GifDrawable.class, byteBufferGifDecoder)
        .append(GifDrawable.class, new GifDrawableEncoder())
        /* GIF Frames */
        // Compilation with Gradle requires the type to be specified for UnitModelLoader here.
        .append(
            GifDecoder.class, GifDecoder.class, UnitModelLoader.Factory.<GifDecoder>getInstance())
        .append(
            Registry.BUCKET_BITMAP,
            GifDecoder.class,
            Bitmap.class,
            new GifFrameResourceDecoder(bitmapPool))
       //...
        .register(GifDrawable.class, byte[].class, gifDrawableBytesTranscoder);

    ImageViewTargetFactory imageViewTargetFactory = new ImageViewTargetFactory();
    //....
}
因此第一步可以发现Glide是通过创建StreamGifDecoder来解码Gif的InputStream流.
public class StreamGifDecoder implements ResourceDecoder<InputStream, GifDrawable> {

  @Override
  public Resource<GifDrawable> decode(@NonNull InputStream source, int width, int height,
      @NonNull Options options) throws IOException {
   // 1. 用一个byte数组来接收InputStream流
    byte[] data = inputStreamToBytes(source);
    if (data == null) {
      return null;
    }
    // 2.使用ByteBuffer包装处理原始的数据流,
    //思考为什么用ByteBuffer呢?
    /**
    @link StandardGifDecoder#setData();
    // Initialize the raw data buffer.
     rawData = buffer.asReadOnlyBuffer();
     rawData.position(0);
     rawData.order(ByteOrder.LITTLE_ENDIAN); // 小端对齐.从低位到高位排序
    */
    ByteBuffer byteBuffer = ByteBuffer.wrap(data);
    return byteBufferDecoder.decode(byteBuffer, width, height, options);
  }
}
具体细节如下:
- 使用byte[] 数组接收InputStream
- 然后在通过处理之后的byte[]交给ByteBufferGifDecoder进行下一阶段的处理工作(完善对InputStream的解码工作);
public class ByteBufferGifDecoder implements ResourceDecoder<ByteBuffer, GifDrawable> {

 //...

  @Override
  public GifDrawableResource decode(@NonNull ByteBuffer source, int width, int height,
      @NonNull Options options) {
    final GifHeaderParser parser = parserPool.obtain(source);
    try {
      return decode(source, width, height, parser, options);
    } finally {
      parserPool.release(parser);
    }
  }

  @Nullable
  private GifDrawableResource decode(
      ByteBuffer byteBuffer, int width, int height, GifHeaderParser parser, Options options) {
    long startTime = LogTime.getLogTime();
    try {
      // 1.获取GIF头部信息
      final GifHeader header = parser.parseHeader();
      if (header.getNumFrames() <= 0 || header.getStatus() != GifDecoder.STATUS_OK) {
        // If we couldn't decode the GIF, we will end up with a frame count of 0.
        return null;
      }
      //2. 根据GIF的背景是否有透明通道(Alpha)来确定Bitmap的类型
      Bitmap.Config config = options.get(GifOptions.DECODE_FORMAT) == DecodeFormat.PREFER_RGB_565
          ? Bitmap.Config.RGB_565 : Bitmap.Config.ARGB_8888;

      //3.计算Bitmap的采样率
      int sampleSize = getSampleSize(header, width, height);

      //4. 获取Gif数据的StandardGifDecoder====> 由静态内部类GifDecoderFactory
      GifDecoder gifDecoder = gifDecoderFactory.build(provider, header, byteBuffer, sampleSize);
      gifDecoder.setDefaultBitmapConfig(config);
      gifDecoder.advance();

      //5.获取Gif数据的下一帧
      Bitmap firstFrame = gifDecoder.getNextFrame();
      if (firstFrame == null) {
        return null;
      }

      Transformation<Bitmap> unitTransformation = UnitTransformation.get();
      //6.由Gif数据帧构建一个GifDrawable用来播放GIF帧的动画
      GifDrawable gifDrawable =
          new GifDrawable(context, gifDecoder, unitTransformation, width, height, firstFrame);
      //7. 将GifDrawable包装成GifDrawableResource,用于维护GifDrawable的回收,以及播放动画的停止.
      return new GifDrawableResource(gifDrawable);
    } finally {
      if (Log.isLoggable(TAG, Log.VERBOSE)) {
        Log.v(TAG, "Decoded GIF from stream in " + LogTime.getElapsedMillis(startTime));
      }
    }
  }
}


@VisibleForTesting
static class GifDecoderFactory {
    GifDecoder build(GifDecoder.BitmapProvider provider, GifHeader header,
        ByteBuffer data, int sampleSize) {
     //获取一个标准的Gif解码器,用于读取Gif帧并且将其绘制为Bitmap,供外界使用
      return new StandardGifDecoder(provider, header, data, sampleSize);
    }
  }
小小的总结一下:
- 首先通过ByteBufferDecoder提取Gif的头部信息
- 根据Gif的头部信息获取其背景颜色,好设置Bitmap的Config选项
- 依然还是根据头信息计算出采样率
- 获取GIF的解码器StandardGifDecoder用于构建GIF帧输出为Bitmap供外界使用
- 构建GifDrawable(用于播放Gif动画)
- 构建GifDrawableResource(用于管理GifDrawable)
2)其次看Gif图像帧获取以及如何将图像帧注入到Bitmap中
下面来看看Gif图像帧是如何被解码到Bitmap中的,请看StandardGifDecoder
public class StandardGifDecoder implements GifDecoder {
  private static final String TAG = StandardGifDecoder.class.getSimpleName();
  //...

  // 由ByteBufferGifDecoder的decode方法可知,通过StandardGifDecoder获取Gif的下一帧数据,用于转换为Bitmap.
  @Nullable
  @Override
  public synchronized Bitmap getNextFrame() {
    //...

    // 根据Gif的头信息获取GIF当前帧的帧数据
    GifFrame currentFrame = header.frames.get(framePointer);
    GifFrame previousFrame = null;
    int previousIndex = framePointer - 1;
    if (previousIndex >= 0) {
      previousFrame = header.frames.get(previousIndex);
    }

    // Set the appropriate color table.
    // 设置色表:用于设置像素透明度 lct == local color table ; gct == global color table;这里告诉我们的就是先局部后全局
    act = currentFrame.lct != null ? currentFrame.lct : header.gct;
    if (act == null) {
      if (Log.isLoggable(TAG, Log.DEBUG)) {
        Log.d(TAG, "No valid color table found for frame #" + framePointer);
      }
      // No color table defined.
      status = STATUS_FORMAT_ERROR;
      return null;
    }

    // Reset the transparent pixel in the color table
    // 重置色表中的像素的透明度
    if (currentFrame.transparency) {
      // Prepare local copy of color table ("pct = act"), see #1068
      System.arraycopy(act, 0, pct, 0, act.length);
      // Forget about act reference from shared header object, use copied version
      act = pct;
      // Set transparent color if specified.
      // 这里默认为黑色透明度
      act[currentFrame.transIndex] = COLOR_TRANSPARENT_BLACK;
    }

    // Transfer pixel data to image.
    // 将像素数据转换为图像
    return setPixels(currentFrame, previousFrame);
  }
  //...


  private Bitmap setPixels(GifFrame currentFrame, GifFrame previousFrame) {
    // Final location of blended pixels.
    // 存储上一帧的Bitmap像素数据
    final int[] dest = mainScratch;

    // clear all pixels when meet first frame and drop prev image from last loop
    if (previousFrame == null) {
      if (previousImage != null) {
       // 回收上一帧的Bitmap
        bitmapProvider.release(previousImage);
      }
      previousImage = null;
      // 并且将Bitmap的像素填充黑色
      Arrays.fill(dest, COLOR_TRANSPARENT_BLACK);
    }
    if (previousFrame != null && previousFrame.dispose == DISPOSAL_PREVIOUS
            && previousImage == null) {
     //上一帧数据为被废弃了,清空
      Arrays.fill(dest, COLOR_TRANSPARENT_BLACK);
    }

    // fill in starting image contents based on last image's dispose code
    //1. 将上一帧的 数据注入到dest数组中
    if (previousFrame != null && previousFrame.dispose > DISPOSAL_UNSPECIFIED) {
      if (previousFrame.dispose == DISPOSAL_BACKGROUND) {
        // Start with a canvas filled with the background color
        @ColorInt int c = COLOR_TRANSPARENT_BLACK;
        if (!currentFrame.transparency) {
          c = header.bgColor;
          if (currentFrame.lct != null && header.bgIndex == currentFrame.transIndex) {
            c = COLOR_TRANSPARENT_BLACK;
          }
        } else if (framePointer == 0) {
          isFirstFrameTransparent = true;
        }
        // The area used by the graphic must be restored to the background color.
        int downsampledIH = previousFrame.ih / sampleSize;
        int downsampledIY = previousFrame.iy / sampleSize;
        int downsampledIW = previousFrame.iw / sampleSize;
        int downsampledIX = previousFrame.ix / sampleSize;
        int topLeft = downsampledIY * downsampledWidth + downsampledIX;
        int bottomLeft = topLeft + downsampledIH * downsampledWidth;
        for (int left = topLeft; left < bottomLeft; left += downsampledWidth) {
          int right = left + downsampledIW;
          for (int pointer = left; pointer < right; pointer++) {
            dest[pointer] = c;
          }
        }
      } else if (previousFrame.dispose == DISPOSAL_PREVIOUS && previousImage != null) {
        // Start with the previous frame
        // 获取上一帧的Bitmap中的数据,并且将数据更新到dest中.
        previousImage.getPixels(dest, 0, downsampledWidth, 0, 0, downsampledWidth,
            downsampledHeight);
      }
    }

    // Decode pixels for this frame into the global pixels[] scratch.
    // 2. 解析当前帧的数据到dest中
    decodeBitmapData(currentFrame);

    if (currentFrame.interlace || sampleSize != 1) {
      copyCopyIntoScratchRobust(currentFrame);
    } else {
      copyIntoScratchFast(currentFrame);
    }

    // Copy pixels into previous image
    //3.获取当前帧的数据dest,并且将数据存储到上一帧的image(Bitmap)中存储.
    if (savePrevious && (currentFrame.dispose == DISPOSAL_UNSPECIFIED
        || currentFrame.dispose == DISPOSAL_NONE)) {
      if (previousImage == null) {
        previousImage = getNextBitmap();
      }
      previousImage.setPixels(dest, 0, downsampledWidth, 0, 0, downsampledWidth,
          downsampledHeight);
    }

    // Set pixels for current image.
    // 4.获取新的Bitmap,将dest中的数据拷贝到Bitmap,提供给GifDrawable使用.
    Bitmap result = getNextBitmap();
    result.setPixels(dest, 0, downsampledWidth, 0, 0, downsampledWidth, downsampledHeight);
    return result;
  }

}
看了上述代码流程,不够直观,下面画一张图,对比一下方便分析:
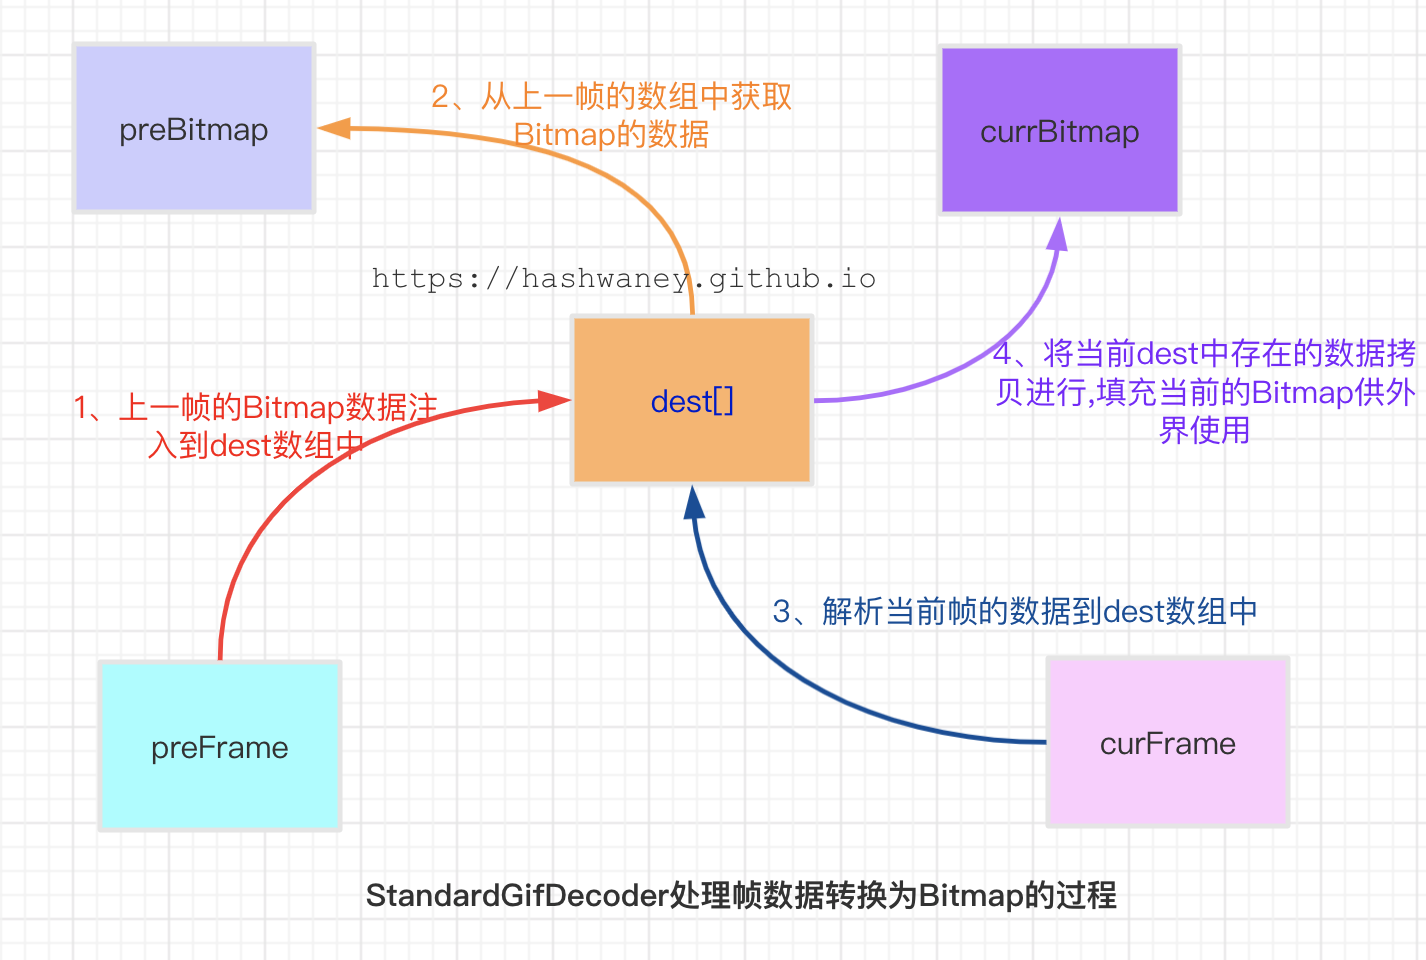
由上述图可知:
- 从上一帧的Bitmap中获取帧数据然后填充到dest数组
- 然后从这个数组获取帧数数据,填充到Bitmap中(第一次将Gif帧数据转换为preBitmap)
- 解析当前帧的数据到dest数组中,并且在将该数据保存在preBitmap中
- 从BitmapProvider(提供Bitmap的复用)中获取新的Bitmap,并且将当前帧解析的dest数组拷贝到Bitmap中,供外界使用
3)Glide借助GifDrawable来播放GIF动画
public class GifDrawable extends Drawable implements GifFrameLoader.FrameCallback,
    Animatable, Animatable2Compat {

  @Override
  public void start() {
    isStarted = true;
    resetLoopCount();
    if (isVisible) {
      startRunning();
    }
  }

  private void startRunning() {
    ......
    if (state.frameLoader.getFrameCount() == 1) {
      invalidateSelf();
    } else if (!isRunning) {
      isRunning = true;
      // 1. 调用了 GifFrameLoader 的 subscribe 方法
      state.frameLoader.subscribe(this);
      invalidateSelf();
    }
  }


  @Override
  public void onFrameReady() {
    ......
    // 2. 执行绘制
    invalidateSelf();
    ......
  }

}
从GifDrawable实现的接口可以看出,其是一个Animatable的Drawable,因此GifDrawable可以支持播放GIF动画,还有一个重要的类就是GifFrameLoader,用来帮助GifDrawable实现GIF动画播放的调度.
GifDrawable的start方法是动画开始的入口,在该方法中将GifDrawable作为一个观察者注册到GifFrameLoader中,一旦GifFrameLoader触发了绘制,就会调用onFrameReady方法,然后通过调用invalidateSelf执行此次绘制.
来具体看看GifFrameLoader是如何执行动画的调度
class GifFrameLoader {
  //..
  public interface FrameCallback {
    void onFrameReady();
  }

  //..

  void subscribe(FrameCallback frameCallback) {
    if (isCleared) {
      throw new IllegalStateException("Cannot subscribe to a cleared frame loader");
    }

    if (callbacks.contains(frameCallback)) {
      throw new IllegalStateException("Cannot subscribe twice in a row");
    }
    //判断观察者队列是否为空
    boolean start = callbacks.isEmpty();
    // 添加观察者
    callbacks.add(frameCallback);
    // 不为空,执行GIF的绘制
    if (start) {
      start();
    }
  }

  private void start(){
   if(isRunning){
    return;
   }
   isRunning =true;
   isCleared=false;
   loadNextFrame();
  }

  void unsubscribe(FrameCallback frameCallback) {
    callbacks.remove(frameCallback);
    if (callbacks.isEmpty()) {
      stop();
    }
  }

  private void loadNextFrame() {

  //..
   // 当前有没有被绘制的帧数据
    if (pendingTarget != null) {
      DelayTarget temp = pendingTarget;
      pendingTarget = null;
      //直接调用onFrameReady 通知观察者绘制当前帧.
      onFrameReady(temp);
      return;
    }
    isLoadPending = true;
    //获取下一帧需要绘制的间隔时长
    int delay = gifDecoder.getNextDelay();
    long targetTime = SystemClock.uptimeMillis() + delay;
    // 将下一帧放置在最前,方便进行绘制.(位置)
    gifDecoder.advance();
    //通过DelayTarget中的Handler创建一个延迟消息.
    next = new DelayTarget(handler, gifDecoder.getCurrentFrameIndex(), targetTime);
    // Glide的加载流程 ....with().load().into(); 在targetTime时,获取数据帧然后进行绘制.
    requestBuilder.apply(signatureOf(getFrameSignature())).load(gifDecoder).into(next);
  }

  @VisibleForTesting
  void onFrameReady(DelayTarget delayTarget) {
    //....
    if (delayTarget.getResource() != null) {
      recycleFirstFrame();
      DelayTarget previous = current;
      current = delayTarget;
    // 1. 回调给观察者,执行当前帧的绘制
      for (int i = callbacks.size() - 1; i >= 0; i--) {
        FrameCallback cb = callbacks.get(i);
        cb.onFrameReady();
      }
      if (previous != null) {
        handler.obtainMessage(FrameLoaderCallback.MSG_CLEAR, previous).sendToTarget();
      }
    }
    //2. 继续加载GIF的下一帧
    loadNextFrame();
  }

  private class FrameLoaderCallback implements Handler.Callback {
  //..

    @Override
    public boolean handleMessage(Message msg) {
      if (msg.what == MSG_DELAY) {
        GifFrameLoader.DelayTarget target = (DelayTarget) msg.obj;
        onFrameReady(target);
        return true;
      } else if (msg.what == MSG_CLEAR) {
        GifFrameLoader.DelayTarget target = (DelayTarget) msg.obj;
        requestManager.clear(target);
      }
      return false;
    }
  }

  @VisibleForTesting
  static class DelayTarget extends SimpleTarget<Bitmap> {
    //...

    @Override
    public void onResourceReady(@NonNull Bitmap resource,
        @Nullable Transition<? super Bitmap> transition) {
      this.resource = resource;
      Message msg = handler.obtainMessage(FrameLoaderCallback.MSG_DELAY, this);
      //通过Handler发送延迟消息,将下一帧的绘制工作消息发送出去.
      handler.sendMessageAtTime(msg, targetTime);
    }
  }
}
可以看到在onResourceReady方法中,通过Handler将FrameLoaderCallback.MSG_DELAY消息在延迟了targetTime时候,投递到主线程的消息队列中执行.
class GifFrameLoader{

private class FrameLoaderCallback implements Handler.Callback {
    static final int MSG_DELAY = 1;
    static final int MSG_CLEAR = 2;

    @Synthetic
    FrameLoaderCallback() { }

    @Override
    public boolean handleMessage(Message msg) {
      if (msg.what == MSG_DELAY) {
        // 回调了 onFrameReady 通知 GifDrawable 绘制
        GifFrameLoader.DelayTarget target = (DelayTarget) msg.obj;
        onFrameReady(target);
        return true;
      } else if (msg.what == MSG_CLEAR) {
        ......
      }
      return false;
    }
  }

  @VisibleForTesting
  void onFrameReady(DelayTarget delayTarget){
   //....
  if (delayTarget.getResource() != null) {
      recycleFirstFrame();
      DelayTarget previous = current;
      current = delayTarget;
      // 1. 回调观察者集合(GifDrawable), 执行 GIF 当前帧的绘制
      for (int i = callbacks.size() - 1; i >= 0; i--) {
        FrameCallback cb = callbacks.get(i);
        cb.onFrameReady();
      }
      if (previous != null) {
        handler.obtainMessage(FrameLoaderCallback.MSG_CLEAR, previous).sendToTarget();
      }
    }
    // 2. 继续加载 GIF 的下一帧
    loadNextFrame();
  }
}
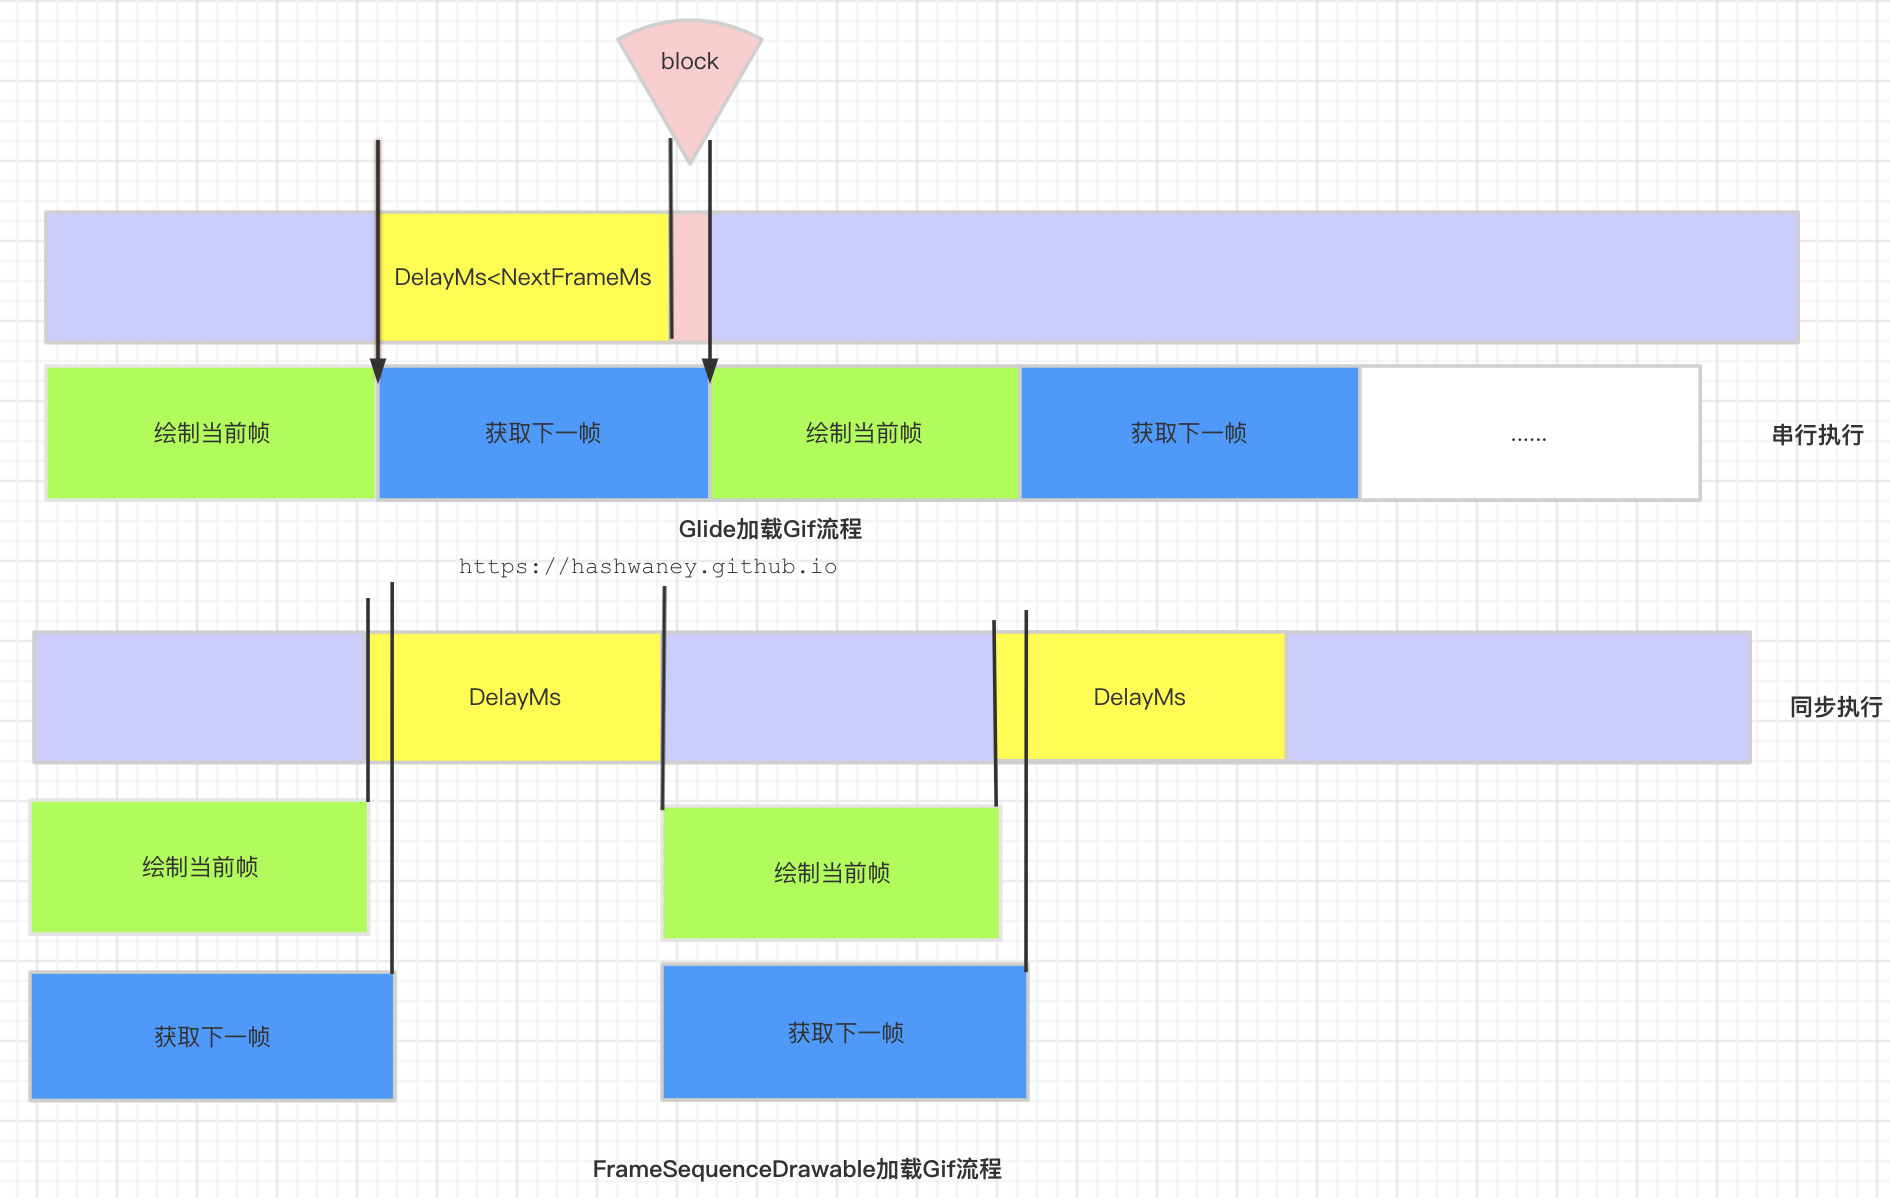
上述的消息处理给出一个线索:绘制当前帧和加载下一帧是串行的,也就说其中任何一个环节时间把控不准都会影响Gif加载的卡顿问题.
Glide加载Gif卡顿的优化
通过引入GIFLIB在native层解码GIF,这样一来内存消耗以及CPU的使用率都可以得到明显的降低和提升.其次通过FrameSequenceDrawable的双缓冲机制进行绘制GIF动画,这样就不需要在Java层的BitmapPool中创建多个Bitmap了.
具体看看FrameSequenceDrawable的双缓冲机制吧:
public class FrameSequenceDrawable extends Drawable implements Animatable,Runnable{

 //....

 public FrameSequenceDrawable(FrameSequence frameSequence,BitmapProvider bitmapProvider){
  //...
  final int width = frameSequence.getWidth();
  final int height = frameSequence.getHeight();
  //绘制前一帧的Bitmap
  frontBitmap = acquireAndValidateBitmap(bitmapProvider,width,height);
  //绘制下一帧的Bitmap
  backBitmap = acquireAndValidateBitmap(bitmapProvider,
   width,height);

  //.. 启动解码线程,用于处理后台解码Gif的人物
  initializeDecodingThread();
 }
}
从上述构造不难发现通过BitmapProvider创建了两个Bitmap;
1.GIF动画的绘制调度
public class FrameSequenceDrawable extends Drawable implements Animatable,Runnable{

 @Override
 public void start(){
  if(!isRunning){
   synchronized(mLock){
    //..
    if(mState == STATE_SCHEDULED){
     return;
    }
    //.执行一次解码操作
    scheduleDecodeLocked();
   }
  }
 }

 private void scheduleDecodeLocked(){
  mState = STATE_SCHEDULED;
  sDecodingThreadHandler.post(mDecodeRunnable);
 }

 private final Runnable mDecodeRunnable = new Runnable(){

  @Override
  public void run(){
   //...
   try{
    //1.解码下一帧
    invalidateTimeMs = mDecoder.getFrame(nextFrame,bitmap,lastFrame);
   }catch(Exception e){
    //..
   }

   if (invalidateTimeMs < MIN_DELAY_MS) {
    invalidateTimeMs = DEFAULT_DELAY_MS;
   }
   boolean schedule = false;
   Bitmap bitmapToRelease = null;

   //加锁
   synchronized(mLock){
    if(mDestroyed){
     bitmapToRelease = mBackBitmap;
     mBackBitmap =null;
    }else if (mNextFrameToDecode >=0 && mState ==STATE_DECODING){
     // 当前是解码状态,并且下一帧要被解码的数据为0 说明下一帧解码完成.等待绘制
     schedule = true;
     // 间隔的绘制时间
     mNextSwap = exceptionDuringDecode ? Long.MAX_VALUE:invalidateTimeMs+mLastSwap;
     mState= STATE_WAITING_TO_SWAP;
    }
   }

   if (schedule) {
   // 2. 在mNextSwap的时候,进行绘制调度
    scheduleSelf(FrameSequenceDrawable.this,mNextSwap);

   }
  }

  @Override
  public void run(){
   boolean invalidate = false;
   synchronized(mLock){
    if (mNextFrameToDecode > 0  && mState == STATE_WAITING_TO_SWAP) {
     invalidate =true
     ;
    }
   }
   if (invalidate) {
    //3. 绘制解码的数据
    invalidateSelf();
   }
  }
 }
}
从上述代码中可以看到start方法会触发一次解码操作,解码完成之后,通过调用scheduleSelf在指定的时间内执行绘制,Glide加载Gif也是差不多这样的.
2.GIF绘制以及双缓冲作用
public class FrameSequenceDrawable extends Drawable implements Animatable , Runnable{

 @Override
 public void draw(@NonNull Canvas canvas){
  synchronized(mLock){
   checkDestroyLocked();
   if (mState == STATE_WAITING_TO_SWAP) {
    if (mNextSwap - SystemClock.uptimeMillis()<=0) {
     mState = STATE_READY_TO_SWAP;
    }

   }
   if (isRunning() && mState == STATE_READY_TO_SWAP) {
    //1.将解码线程获取的下一帧的Bitmap(mBackBitmap)赋值为上一帧的Bitmap(mFrontBitmap)
    Bitmap temp = mBackBitmap;
    mBackBitmap = mFrontBitmap;
    mFrontBitmap = temp;

    //2. 完成上述步骤后,通知解码线程继续下一次解码操作
    if (continueLooping) {
     scheduleDecodeLocked();
    }else{
     scheduleSelf(mFinishedCallbackRunnable,0);
    }
   }
  }

  if (mCircleMaskEnabled) {
   //...
  }else{
   //3.绘制当前帧
   mPaint.setShader(null);
   canvas.drawBitmap(mFrontBitmap,mSrcRect,getBounds(),mPaint);
  }

 }
}
在FrameSequenceDrawable的draw方法中通过mFrontBitmap 和 mBackBitmap完成替换,然后立即通知解码线程解码下一帧数据,这样保证了获取下一帧和绘制当前当前帧近似同时进行.
总结
通过了解和分析上述操作流程,我们可以得出以下结论:
1、使用GIFLIB+双缓冲的实现,只会创建两个Bitmap,并且内存消耗非常之稳定
2、相比Glide的原生加载,当加载过大的GIF图时,超过了BitmapPool的可用大小,还是会直接创建Bitmap的.
3、使用GIFLIB是直接在native层对GIF数据进行解码的,这一点对Glide来说,效率和内存消耗情况都比较占优.
4、Glide构建当前帧数据和下一帧数据是串行的,而FrameSequenceDrawable则是利用了双缓冲以及解码子线程来实现近似同步的完成上一帧和下一帧数据的无缝衔接的.
本文使用 mdnice 排版
