

Vue3 已经发布beta版本了,笔者在新项目中尝试体验了下Vue3 + TypeScript全家桶,通过本文记录下项目搭建的过程。
用Vue Cli初始化项目
笔者已经安装了最新版本的Vue Cli,如果你的机器上尚未安装最新版本的Vue Cli,可以先去官网安装一下。
npm install -g @vue/cli
然后使用Vue Cli初始化一个基本的Vue项目
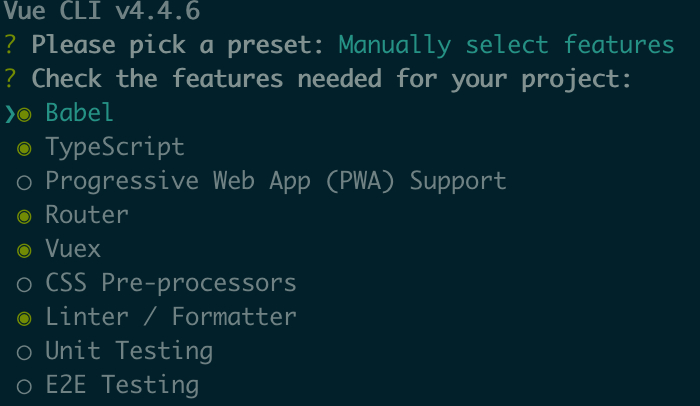
vue create vue3-project
因为需要使用TypeScript、Vue Router等选项,所以我们这里选择自定义初始化的特性,所以建议把这些选项都勾选上:
升级到Vue 3.x 项目
这里需要使用 Vue 官方提供的vue-cli-plugin-vue-next插件,这个插件帮助我们将一般的Vue Cli 创建的项目升级到 Vue 3.x beta版本。
vue add vue-next
安装好后,我们的项目并不能直接跑起来,需要我们手动做一些修改。由于我们项目中的组件是基于Vue 2.x 的语法写的,我们首先做一些减法,把项目中的组件删掉,再用使用Vue 3.x 的语法的组件进行替换。
修改router模块
这一步很简单,因为最新版本的Vue-Router替换为了createRouter的形式来创建router实例,我们按照Vue-Router最新版本的文档操作即可。
// router/index.ts
import { createRouter, createWebHistory } from 'vue-router';

const routes = [
  {
    path: '/',
    name: 'Home',
    component: () => import('@/views/Home.vue'),
  },
  {
    path: '/about',
    name: 'About',
    component: () => import('@/views/About.vue'),
  },
];

// 使用createRouter来创建Router实例
const router = createRouter({
  history: createWebHistory(process.env.BASE_URL),
  routes,
});

export default router;
修改store模块
为了对参数类型进行校验,Vuex也改为使用工厂函数来创建 Vuex 实例,笔者这里写了一个最简单 store 模块:
import { nextTick } from 'vue';
import { createLogger, createStore, ActionContext } from 'vuex';

interface State {
  title: string;
}

export default createStore({
  state(): State {
    return {
      title: '',
    };
  },
  mutations: {
    setTitle(state: State, title: string) {
      state.title = title;
    },
  },
  actions: {
    async nextTickSetTitle({ commit }: ActionContext<State, State>, title: string) {
      await nextTick();
      commit('setTitle', title);
    },
  },
  plugins: process.env.NODE_ENV === 'development' ? [createLogger()] : [],
});
一个最简单的示例组件
开始使用Compoisition API来写一个最简单的示例组件,在组件中使用 Vuex 的方式改为了useStore API,如下示例所示,注意 script 需要声明lang="ts":
<template>
    <div class="home">
      <div>{{ title }}</div>
      <button @click="setTitle('setTitle')">setTitle</button>
      <button @click="nextTickSetTitle('nextTickSetTitle')">nextTickSetTitle</button>
    </div>
</template>

<script lang="ts">
import {
  defineComponent, computed, onMounted, onUpdated, onUnmounted,
} from 'vue';
import { useStore } from 'vuex';

export default defineComponent({
  name: 'hello world',
  props: {},
  setup() {
    const store = useStore();
    const title = computed(() => store.state.title);

    const setTitle = (nextTitle: string): void => {
      store.commit('setTitle', nextTitle);
    };
    const nextTickSetTitle = async (nextTitle: string): Promise<void> => {
      await store.dispatch('nextTickSetTitle', nextTitle);
    };

    onMounted(() => {
      console.log('onMounted');
    });
    onUpdated(() => {
      console.log('onUpdated');
    });
    onUnmounted(() => {
      console.log('onUnmounted');
    });

    return {
      setTitle,
      nextTickSetTitle,
      title,
    };
  },
});
</script>
小结
本文很简单,只是笔者搭建 Vue 3.x 项目的简单小结,关于 Vue 3.x 的原理,笔者也写了一些相关的文章,感兴趣的读者可以查阅,一起学习。
