

本文主要介绍如何编译Redis项目并在JetBrains CLion(以下简称CLion)中运行/调试。
0. 开始之前
JSON Compilation Database
CLion默认支持CMake构建的项目,但Redis项目是基于Make构建的。对于使用Make构建的项目,CLion仍然可以通过Compilation Database来导入项目,而不用将其修改为CMake项目。同时也能通过Compilation Database实现代码的分析、跳转等功能,这对于我们进行代码调试很有帮助。
有关于Compilation Database的介绍可以参考这几篇文章:
Clang官方的Compilation Database介绍页面:JSON Compilation Database Format Specification — Clang 11 documentation- 这篇文章介绍了在不同场景下生成
Compilation database的各种工具:Compilation database — Sarcasm notebook CLion的帮助页面简要介绍了Compilation Database,以及在CLion的使用:Compilation Database - Help | CLion
对于基于Make构建的Redis项目来说,有一些工具可以生成Compilation Database,比如下面几个:
通常默认生成的Compilation Database是一个compile_commands.json文件。
1. 下载Redis源码
git clone git@github.com:redis-io/redis.git
cd redis
# 可以切换至指定版本对应分支
git checkout 5.0
2. 编译构建Redis
Redis基于Make构建,执行make命令即可完成构建。Redis 默认使用-O2级别优化,可以使用make noopt来编译以关闭优化,获得更多的调试信息。
我们需要使用工具来生成Compilation Database,以便于导入CLion。在不同系统上各个工具安装情况可能略有不同,下面分别介绍Ubuntu 16.04和MacOS 10.15上编译Redis并生成Compilation Database的方法。
Ubuntu 16.04
使用Bear工具
# 下载Bear工具
sudo apt-get install bear
# 编译构建,并使用Bear工具生成 Compilation Database
bear make noopt
使用compiledb工具
# 安装pip
sudo apt-get install python-pip
# pip安装 compiledb
pip install compiledb
# 编译构建,并使用compiledb工具生成 Compilation Database
compiledb make noopt
MacOS 10.15
使用Bear工具
在MacOS上使用Bear工具需要关闭SIP,关闭方法是进入恢复模式执行csrutil disable命令,然后重启,详细操作方法请自行搜索。
我们需要用到Homebrew来安装Bear,如果没有安装Homebrew需要先安装Homebrew,安装方法:
/bin/bash -c "$(curl -fsSL https://raw.githubusercontent.com/Homebrew/install/master/install.sh)"
开始编译Redis:
# 下载Bear工具
brew install bear
# 编译构建,并使用Bear工具生成 Compilation Database
bear make noopt
如果遇到adlist.c:32:10: fatal error: 'stdlib.h' file not found报错,可以先执行以下命令后重试:
sudo mount -uw /
sudo cp -R /Library/Developer/CommandLineTools/SDKs/MacOSX.sdk/usr/include /usr
使用compiledb工具
我们需要使用pip来安装compiledb,如果没有安装pip需要先安装pip,安装方法:
curl https://bootstrap.pypa.io/get-pip.py -o get-pip.py
python get-pip.py
# 安装pip之后可能还需要设置环境变量
开始编译Redis:
# pip安装 compiledb
pip install compiledb
# 编译构建,并使用compiledb工具生成 Compilation Database
compiledb make noopt
编译完成之后可以检验以下是否成功:
$ ./src/redis-server --version
Redis server v=5.0.8 sha=1f7d08b7:1 malloc=libc bits=64 build=3530fd9b48a55c7f
同时根目录下应该会有一个不为空的compile_commands.json文件。
导入CLion并调试
对于如何在CLion中管理基于Make构建的项目,CLion的官方帮助文档中有详细的介绍:
Managing Makefile Projects。参考上述文档,本小节简要介绍了如何在CLion中导入Redis项目并运行/调试的方法。
-
下载安装
CLion,并安装Makefile Support插件。建议使用最新版本,较老的版本是不支持Make构建的项目的。 -
导入项目。打开
CLion,选择Open Or Import,选择项目目录中的compile_commands.json文件,弹出框选择Open as Project,等待文件索引完成。
-
创建自定义
Build Target。点击File菜单栏,Settings | Build, Execution, Deployment | Custom Build Targets,点击+新建一个Target。Name:Target的名字,之后在创建Run/Debug配置的时候会看到这个名字- 点击
Build或者Clean右边的三点,弹出框中点击+新建两个External Tool配置如下: 第一个配置如下,用来指定构建指令,Program 和 Arguments 共同构成了所要执行的命令 "make noopt"Name: make Program: make Arguments: noopt Working directory: $ProjectFileDir$Name: make clean Program: make Arguments: clean Working directory: $ProjectFileDir$ ToolChain选择Default;Build选择make(上面创建的第一个External Tool);Clean选择make clean(上面创建的第二个External Tool)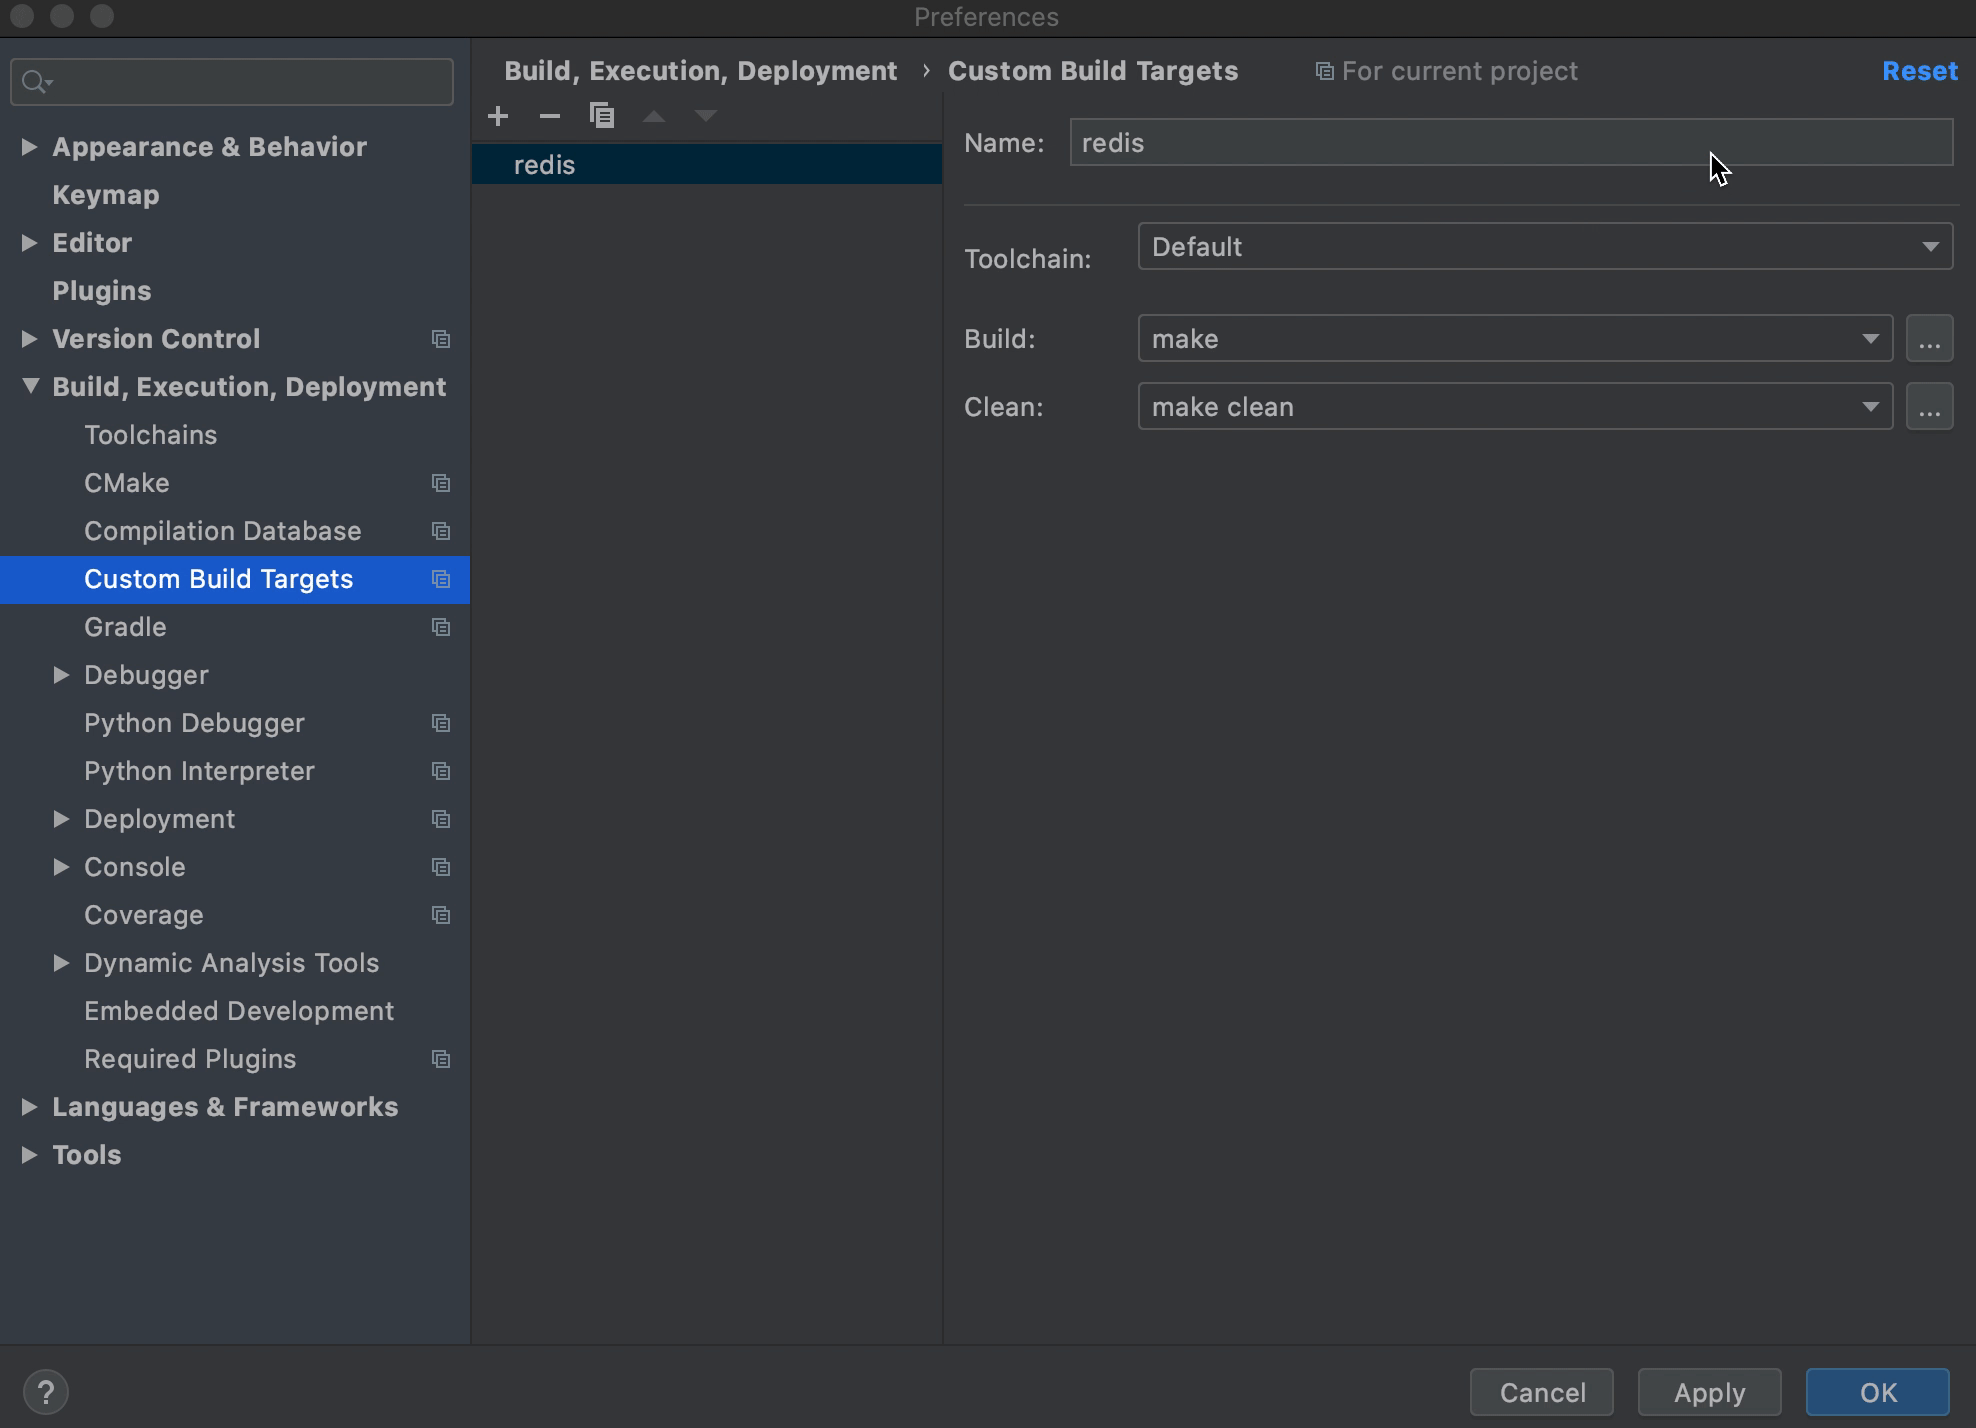
-
创建自定义的
Run/Debug configuration。点击Run菜单栏,Edit Configurations, 点击+,选择Custom Build Application,配置如下:# Name:Configure 的名称 Name: redis # Target:选择上一步创建的 “Custom Build Target” Target: redis # Executable:程序执行入口,也就是需要调试的程序 Executable: 这里我们调试Redis Server,选择`{source_root}/src/redis-server`。 # Program arguments: 与 “Executable” 配合使用,指定其参数 Program arguments: 这里我们选择"$ProjectFileDir$/redis.conf"作为配置文件启动Redis服务器Executable和Program arguments可以根据需要调试的信息自行设置。如果不想每次运行/调试前都执行
Build操作(在这里就是Make构建过程),可以在编辑页下方Before launch框中删除Build条目。
-
点击
Run/Debug开始运行/调试。
