

当需要对底层DOM元素进行操作时,你可以选择使用自定义指令来达到一些特殊的目的。
钩子函数
注册指令,就是注册监听一些事件回调 —— 钩子函数。
bind:只调用一次,指令第一次绑定到元素时调用。初始化操作。inserted:被绑定元素插入父节点时调用 (仅保证父节点存在,但不一定已被插入文档中)。update:元素所在组件的 VNode 更新时调用,但指令绑定值不一定发生改变。componentUpdated:指令所在组件的 VNode 及其子 VNode 全部更新后调用。unbind:只调用一次,指令与元素解绑时调用。
钩子函数参数
钩子函数接受参数:
el:指令所绑定的元素,可以用来直接操作 DOM。binding:包含的元素信息,如下:name:指令名,不包括 v- 前缀。value:指令的绑定值,例如:v-my-directive="1 + 1"中,绑定值为2。oldValue:指令绑定的前一个值,仅在 update 和 componentUpdated 钩子中可用。无论值是否改变都可用。expression:字符串形式的指令表达式。例如v-my-directive="1 + 1"中,表达式为"1 + 1"。arg:传给指令的参数,可选。例如 v-my-directive:foo 中,参数为 "foo"。modifiers:一个包含修饰符的对象。例如:v-my-directive.foo.bar中,修饰符对象为{ foo: true, bar: true }。
vnode:Vue 编译生成的虚拟节点。移步 VNode API 来了解更多详情。oldVnode:上一个虚拟节点,仅在update和componentUpdated钩子中可用。
注册指令的两种方法
- 全局注册
Vue.directive('myDir', {
  bind (el) {
    console.log('myDir bind')
  },
  inserted () {
    console.log('myDir inserted')
  },
  update () {
    console.log('myDir update')
  },
  componentUpdated () {
    console.log('myDir componentUpdated')
  },
  unbind () {
    console.log('myDir unbind')
  }
})
- 局部注册
组件支持directives选项用于注册本组件指令
new Vue({
  directives: {
    myDir: function (el) {
      console.log('myDir bind or update')
    }
  }
})
从源码看指令注册流程
- 全局注册
全局有一个directive的方法,这个方法如何实现的呢?
首先得找到initAssetRegisters方法,该函数注册全局的一些方法,包括:
// shared/constants
export const ASSET_TYPES = [
  'component', // 组件
  'directive', // 指令
  'filter' // 过滤器
]
若注册指令,传入的是一个函数,则该函数默认为bind和update的钩子函数。之后将指令挂载在Vue.options.directives上。同理全局组件与过滤器相应都挂载在Vue.options.components与Vue.options.filters上。
// core/global-api/assets.js
import { ASSET_TYPES } from 'shared/constants'
import { isPlainObject, validateComponentName } from '../util/index'

export function initAssetRegisters (Vue: GlobalAPI) {
  /**
   * Create asset registration methods.
   */
  ASSET_TYPES.forEach(type => {
    Vue[type] = function (
      id: string,
      definition: Function | Object
    ): Function | Object | void {
      if (!definition) {
        return this.options[type + 's'][id]
      } else {
        /* istanbul ignore if */
        if (process.env.NODE_ENV !== 'production' && type === 'component') {
          validateComponentName(id)
        }
        if (type === 'component' && isPlainObject(definition)) {
          definition.name = definition.name || id
          definition = this.options._base.extend(definition)
        }
        /* --------- 这里的directive ---------- */
        if (type === 'directive' && typeof definition === 'function') {
          definition = { bind: definition, update: definition }
        }
        this.options[type + 's'][id] = definition
        return definition
      }
    }
  })
}
- 局部注册以及合并全局选项
在组件实例生成时,将会对组件进行选项操作。我们调用new Vue(options),其实调用的是Vue.prototype._init(options)。
//core/instance/init.js
// ... 部分代码已省略
import { extend, mergeOptions, formatComponentName } from '../util/index'

...
export function initMixin (Vue: Class<Component>) {
  Vue.prototype._init = function (options?: Object) {
    const vm: Component = this
    // ...
    // merge options
    if (options && options._isComponent) {
      // optimize internal component instantiation
      // since dynamic options merging is pretty slow, and none of the
      // internal component options needs special treatment.
      initInternalComponent(vm, options)
    } else {
      // 该方法将合并选项的同时,规则化组件选项,包括normalizeDirectives
      vm.$options = mergeOptions(
        // 此处vm为Vue的实例,其constructor指向Vue
        resolveConstructorOptions(vm.constructor),
        options || {},
        vm
      )
    }
    // ...
  }
}

// ...

export function resolveConstructorOptions (Ctor: Class<Component>) {
  // 该options即全局注册时注入的全局对象,将合并入组件中
  // 即包括我们之前提到的全局注册的directives
  let options = Ctor.options
  if (Ctor.super) {
    const superOptions = resolveConstructorOptions(Ctor.super)
    const cachedSuperOptions = Ctor.superOptions
    if (superOptions !== cachedSuperOptions) {
      // super option changed,
      // need to resolve new options.
      Ctor.superOptions = superOptions
      // check if there are any late-modified/attached options (#4976)
      const modifiedOptions = resolveModifiedOptions(Ctor)
      // update base extend options
      if (modifiedOptions) {
        extend(Ctor.extendOptions, modifiedOptions)
      }
      options = Ctor.options = mergeOptions(superOptions, Ctor.extendOptions)
      if (options.name) {
        options.components[options.name] = Ctor
      }
    }
  }
  return options
}
// ...
从源码的角度看指令的执行周期
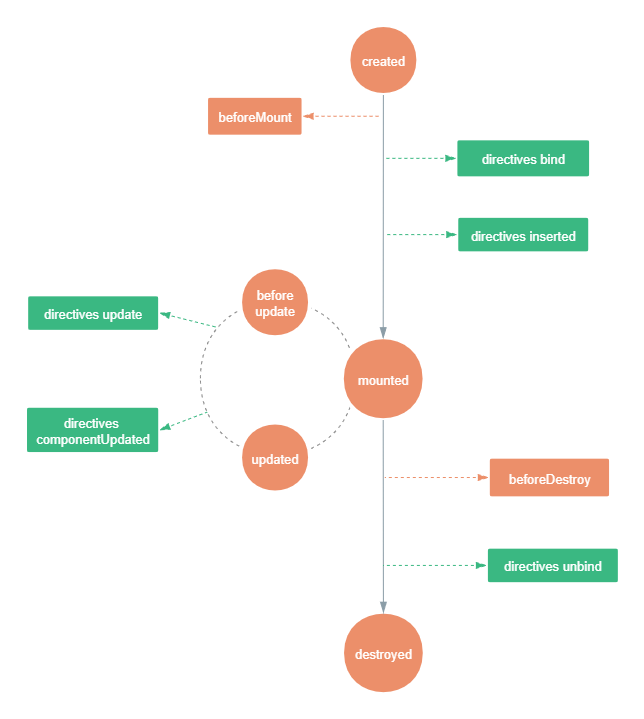
在开始介绍钩子函数时,我们其实已经可以发现钩子函数的执行过程和组件的生命周期其实是密不可分的。
// core/vdom/modules/directives

export default {
  create: updateDirectives,
  update: updateDirectives,
  destroy: function unbindDirectives (vnode: VNodeWithData) {
    updateDirectives(vnode, emptyNode)
  }
}
该文件导出三个生命周期对应的回调监听函数,注入组件的生命周期中,在组件执行相应周期时,将会执行对应函数。
// core/vdom/modules/directives
function updateDirectives (oldVnode: VNodeWithData, vnode: VNodeWithData) {
  if (oldVnode.data.directives || vnode.data.directives) {
    _update(oldVnode, vnode)
  }
}

function _update (oldVnode, vnode) {
  const isCreate = oldVnode === emptyNode // 是否是新建的节点
  const isDestroy = vnode === emptyNode // 是否已经销毁
  const oldDirs = normalizeDirectives(oldVnode.data.directives, oldVnode.context)
  const newDirs = normalizeDirectives(vnode.data.directives, vnode.context)

  const dirsWithInsert = [] // 此次收集的inserted的钩子函数
  const dirsWithPostpatch = [] // 此次收集的componentUpdated的钩子函数

  let key, oldDir, dir
  for (key in newDirs) {
    oldDir = oldDirs[key]
    dir = newDirs[key]
    if (!oldDir) {
      // new directive, bind
      callHook(dir, 'bind', vnode, oldVnode)
      if (dir.def && dir.def.inserted) {
        // bind之后,收集inserted
        dirsWithInsert.push(dir)
      }
    } else {
      // existing directive, update
      dir.oldValue = oldDir.value
      dir.oldArg = oldDir.arg
      callHook(dir, 'update', vnode, oldVnode)
      // update后收集componentUpdated
      if (dir.def && dir.def.componentUpdated) {
        dirsWithPostpatch.push(dir)
      }
    }
  }

  if (dirsWithInsert.length) {
    const callInsert = () => {
      for (let i = 0; i < dirsWithInsert.length; i++) {
        callHook(dirsWithInsert[i], 'inserted', vnode, oldVnode)
      }
    }
    // inserted注入生命周期内待执行
    if (isCreate) {
      mergeVNodeHook(vnode, 'insert', callInsert)
    } else {
      callInsert()
    }
  }

  // componentUpdated注入生命周期内待执行
  if (dirsWithPostpatch.length) {
    mergeVNodeHook(vnode, 'postpatch', () => {
      for (let i = 0; i < dirsWithPostpatch.length; i++) {
        callHook(dirsWithPostpatch[i], 'componentUpdated', vnode, oldVnode)
      }
    })
  }

  // unbind触发条件
  if (!isCreate) {
    for (key in oldDirs) {
      if (!newDirs[key]) {
        // no longer present, unbind
        callHook(oldDirs[key], 'unbind', oldVnode, oldVnode, isDestroy)
      }
    }
  }
}
最后用一个示例来看看
父组件控制子组件加载卸载
const Parent = new Vue({
  components: { Counter },
  data: {
    show: false
  },
  methods: {
    handleControl () {
      this.show = !this.show
    }
  },
  template: `
    <div>
      <counter v-if="show"></counter>
      <button @click="handleControl">{{ show ? '卸载' : '加载' }}</button>
    </div>
  `
})
子组件控制更新
const Counter = new Vue({
  data: {
    count: 1
  },
  created() {
    console.log("组件 created");
  },
  beforeMount() {
    console.log("组件 beforeMount");
  },
  mounted() {
    console.log("组件 mounted");
  },
  beforeUpdate() {
    console.log("组件 beforeUpdate");
  },
  updated() {
    console.log("组件 updated");
  },
  methods: {
    handleUpdate() {
      this.count++;
    }
  },
  directives: {
    demo: {
      bind(el, binding) {
        console.log("demo bind", binding);
      },
      inserted(el) {
        console.log("demo inserted");
      },
      update(el, binding) {
        console.log("demo update", binding.value);
      },
      componentUpdated(el, binding) {
        console.log("demo componentUpdated", binding.value);
      },
      unbind(el) {
        console.log("demo unbind");
      }
    }
  },
  template: `
    <div>
      <span v-demo:a.modifer="count" data-name="demo">{{count}}</span>
      <button @click="handleUpdate">更新</button>
    </div>
  `
})
运行看看实际的效果:
我们根据输出看binding的值:
// binding
{
  name: "demo", // 指令名
  rawName: "v-demo:a.modifer", // 使用时的原始字符串
  value: 1, // 值
  expression: "count", // 字符串
  arg: "a",
  modifiers: {
    modifer: true
  },
  modifer: true
}
我们具体看子组件加载->更新->卸载时的过程:
以上。
