

本文适合对Vuex有过中度使用--至少在一个项目使用vuex以及相关辅助函数的朋友阅读.
-
关于Vuex
Vuex 是一个专为 Vue.js 应用程序开发的状态管理模式。它采用集中式存储管理应用的所有组件的状态,并以相应的规则保证状态以一种可预测的方式发生变化。以上就是官网的解释,简单来说,就是简化为了高阶组件传参,统一管理各个组件都需要共享的一个数据状态,如果组件间不是父子组件,那么传参起来可能就很麻烦,当然通过其他手段也能实现,但目前来说都比较繁琐,这时候,就需要用到我们的数据状态管理了。
-
数据更改流程
我就直接放官网一张图说明好了:
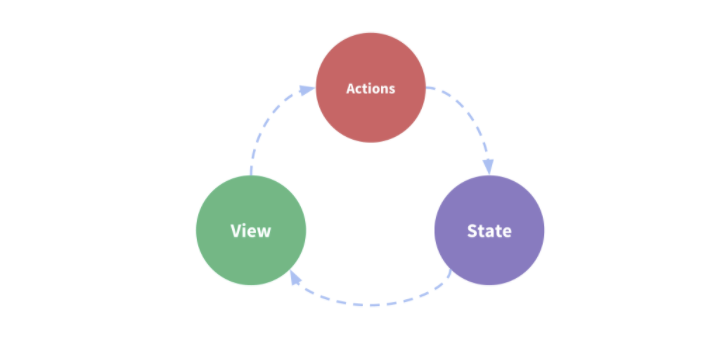
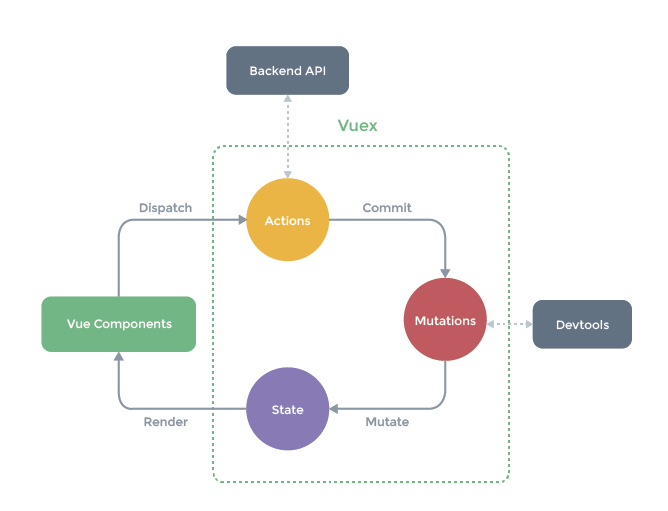
意思就是我们把需要管理的数据放在 state 中,从 state 中取出数据渲染到页面中,然后用户在页面层发起更改数据,数据更改要通过mutation 去改,异步操作还需要用 actions 去触发 mutation,整个过程如下图:
说到这里,差不多就介绍完概念了,下面我们看它的使用新姿势。
因为是给已经有 vuex 使用经验的小伙伴分享,我就直接上代码了。
最基本的打开方式是这样的
const store = new Vuex.Store({
  state: {
    count: 0
  },
  mutations: {
    increment (state) {
      state.count++
    }
  },
  actions: {
    increment (context) {
      context.commit('increment')
    }
  }
})
用辅助函数更改数据是这样的
import { mapMutations } from 'vuex'
export default {
  methods: {
    ...mapMutations([
      'increment', // 将 `this.increment()` 映射为 `this.$store.commit('increment')`

      // `mapMutations` 也支持载荷:
      'incrementBy' // 将 `this.incrementBy(amount)` 映射为 `this.$store.commit('incrementBy', amount)`
    ]),
    ...mapMutations({
      add: 'increment' // 将 `this.add()` 映射为 `this.$store.commit('increment')`
    })
  }
}
以上不论哪种方式,他们需要这样——写一堆 mutation
export const mutations = {
  changeIsPhone(state, isPhone) {
    state.isPhone = isPhone;
  },
  changeMenuIndex(state, menuIndex) {
    state.menuIndex = menuIndex;
  },
  changeTabbarShow(state, show) {
    state.tabbarShow = show;
  },
  changTopbarShow(state, show) {
    state.topbarShow = show;
  },
  setPaintingInfo(state, paintingInfo) {
    state.paintingInfo = paintingInfo;
  },
  setArticleCategory(state, category) {
    state.articleCategory = category;
  },
  changeUser(state, user) {
    state.user = user;
  },
  changeIsLogin(state, isLogin) {
    state.isLogin = isLogin;
  },
  changeLoginDialogShow(state, show) {
    state.loginDialogShow = show;
  },
  changeLoginDialogType(state, type) {
    state.loginDialogType = type;
  }
};
经过经验累积可发现,我们的 mutation大多数都只是做简单的数据更新,如果其中有复杂的逻辑变化,一般都是交给 actions 去做了,我们可以在 actions 里面做异步请求,数据处理,最后将处理好的数据通过 mutation 更改,那既然 mutation 形为这么一致,我们为什么不把他封装起来了呢?
说做就做。
我们先给他封装 store 对象封装一个魔法方法,主要看__s这个魔法方法。
export type MagicMethod = {
  // 触发 mutation
  __s?: (type: string, msg: string) => any;
  // 触发 actions
  __d?: (type: string, msg: string) => any;
  // 触发 getter
  __g?: (type: string, msg: string) => any;
  commit: Commit;
  dispatch: Dispatch;
  getters: any;
}

const store: Store<any> & MagicMethod= = new Vuex.Store({
  strict: true,
  state,
  mutations,
  actions,
  getters,
  modules,
  plugins: [
    // 持久化插件
    VuexPersistedState({
      paths: ['app.language']
    })
  ]
})

// 这是重点!重点!重点!
@param type - 需要更改的数据名,模块名以.分隔,如 user 模块下的info 属性,type 应为 user.info
store.__s = (type, msg) => {
  let _state = store.state
  if (!type) return store.state
  // 判断是根 state 还是 module 下的
  if (type.indexOf('.') === -1) {
    if (msg !== undefined) {
      store.commit({
        type: '__set',
        key: type,
        val: msg,
        root: true
      })
      return _state
    } else {
      return _state[type]
    }
  }
  const _path = type.split('.')
  for (let i = 0; i < _path.length; i++) {
    if (_state[_path[i]] !== undefined) {
      _state = _state[_path[i]]
    } else {
      _state = undefined
    }
  }
  if (msg !== undefined && _path.length === 2) {
    store.commit({
      type: _path[0] + '/__set',
      key: _path[1],
      val: msg
    })
  }
  return _state
}
我们的 mutation 文件,一个方法就够了,通过 key 和 value 去更改 数据,mutation.js内容如下。
export default {
  __set(state, msg) {
    state[msg.key] = msg.val
  }
}
然后在任何一个页面,我们都不用引入 mapMutaion,mapActions 这些辅助函数,更改state 直接使用如下方式
 confirm() {
      // 更改根 state 下的 coinType属性
      this.$store.__s('coinType', this.d_selectType)
       // 更改根 state 下的 coinInfo属性
      this.$store.__s('coinInfo', coinbook[coinName])
      if (Reflect.has(coinbook[coinName].bip, '49')) {
       // 更改根 state 下的 coinProtocol属性
        this.$store.__s('coinProtocol', 49)
      } else {
       // 更改根 state 下的 coinProtocol属性
        this.$store.__s('coinProtocol', 44)
      }
       // 更改dialog 模块下的 chooseType属性
      this.$store.__s('dialog.chooseType', false)
       // 更改usb 模块下的 xpub 属性
      this.$store.__s('usb.xpub', '')
}
读取的话还是和原来一样,使用 compute读取
computed: {
  addressType:(vm) => vm.$store.__s('addressType'),
  coinProtocol: (vm) => vm.$store.__s('coinProtocol')
}
当然如果你嫌弃这样麻烦,还是可以和原来的辅助函数共存的,没有一点侵入性。 如果你也觉得这个方法有用,赶快学起来吧。 经实验证明,有大量 mutation 的情况下,真的能节约不少时间呢。
